


最近在项目中遇到的问题,一种是放在drawable下的资源文件,一种为下载后复制到data/data目录下的文件,同样的分辨率,放入相同layout配置的ImageView中,显示的大小却不一样。查看代码后,逻辑并无不同的地方,唯一的区别是:读取图片文件资源的时候,读drawable下用的decodeResource方法,读data/data下用的decodeFile方法。用分辨率320px*569px的手机执行的效果是,decodeResource方法读出的图片比decodeFile大一点,debug出的为放大了1.5倍。就现象而言,decodeResource方法自己似乎做了scale处理。
于是翻看源码,得到执行两种方法时的调用次序:
decodeFile(String pathName) ->decodeFile(pathName, null) -> decodeStream(stream, null, opts)
decodeResource(res, id) -> decodeResource(res, id, null) -> decodeResourceStream(res, value, is, null, opts) -> decodeStream(is, pad, opts)
对比各自处理,不同点发生在decodeResource会调用的decodeResourceStream方法中
- /**
- * Decode a new Bitmap from an InputStream. This InputStream was obtained from
- * resources, which we pass to be able to scale the bitmap accordingly.
- */
- public static Bitmap decodeResourceStream(Resources res, TypedValue value,
- InputStream is, Rect pad, Options opts) {
- if (opts == null) {
- opts = new Options();
- }
- if (opts.inDensity == 0 && value != null) {
- final int density = value.density;
- if (density == TypedValue.DENSITY_DEFAULT) {
- opts.inDensity = DisplayMetrics.DENSITY_DEFAULT;
- } else if (density != TypedValue.DENSITY_NONE) {
- opts.inDensity = density;
- }
- }
- if (opts.inTargetDensity == 0 && res != null) {
- opts.inTargetDensity = res.getDisplayMetrics().densityDpi;
- }
- return decodeStream(is, pad, opts);
- }
这段逻辑,比decodeFile方法多了个Options属性值的设置,自己手头手机的实验结果来看,
opts.inDensity设成了DisplayMetrics.DENSITY_DEFAULT 为160
opts.inTargetDensity设成res.getDisplayMetrics().densityDpi 为240
就字面意思,inTargetDensity正好是inDensity的1.5倍,查了SDK如下
opts.inDensity的解释
- The pixel density to use for the bitmap. This will always result in the returned bitmap having a density set for it (see Bitmap.setDensity(int)).
- In addition, if inScaled is set (which it is by default} and this density does not match inTargetDensity, then the bitmap will be scaled to the target
- density before being returned.
opts.inTargetDensity的解释
- The pixel density of the destination this bitmap will be drawn to. This is used in conjunction with inDensity and inScaled to determine if and how to
- scale the bitmap before returning it.
总之
inDensity——用于位图的像素压缩比
inTargetDensity——用于目标位图的像素压缩比(要生成的位图)
inScaled——设置为true时进行图片压缩,从inDensity到inTargetDensity。
由上可知,decodeResourceStream方法根据手机屏幕的密度有一个缩放图片的过程,而decodeFile不会自动处理。为了避开这种差异性,将decodeFile方法的调用替换掉,先得到图片文件的InputStream,再直接调用decodeResourceStream,模拟decodeResource的操作。
其实,decodeResource中对图片文件的缩放可以理解成图片像素px与屏幕dip显示的转换,可为什么decodeFile没有做这一步?暂时不知道原因,可能是decodeResource多用于drawable下本app资源的读取,涉及到不同屏幕密度的区分吧。
另外关于DisplayMetrics的屏幕密度Density,官方的解释:
The logical density of the display. This is a scaling factor for the Density Independent Pixel unit, where one DIP is one pixel on an approximately 160 dpi screen (for example a 240x320, 1.5"x2" screen), providing the baseline of the system's display. Thus on a 160dpi screen this density value will be 1; on a 120 dpi screen it would be .75; etc.
This value does not exactly follow the real screen size (as given by xdpi andydpi, but rather is used to scale the size of the overall UI in steps based on gross changes in the display dpi. For example, a 240x320 screen will have a density of 1 even if its width is 1.8", 1.3", etc. However, if the screen resolution is increased to 320x480 but the screen size remained 1.5"x2" then the density would be increased (probably to 1.5).
上面一段不是太明白,自己的理解:屏幕密度与手机硬件有关,而这个Density是一个倍率值,相同的分辨率屏幕尺寸越小,密度就越大,dip与密度有关系,官方解释也说了“在160dip的屏幕上,1dip=1px”。它常用于程序中dip,px之间的转换
- public static int px2dip(Context context, float pxValue){
- final float scale = context.getResources().getDisplayMetrics().density;
- return (int)(pxValue / scale + 0.5f);
- }
- public static int dip2px(Context context, float dipValue){
- final float scale = context.getResources().getDisplayMetrics().density;
- return (int)(dipValue * scale + 0.5f);
- }
关于dip,px,屏幕密度的理解,可结合下面的内容理解(注:以下内容均转载自 http://blog.csdn.net/cgaanns/article/details/6180618)
- px(pixels)——像素:不同的设备显示效果相同,一般我们HVGA代表320x480像素,这个用的比较多。
- dip(device independent pixels)——设备独立像素:这个和设备硬件有关,一般哦我们为了支持WCGA、HVGA和QVGA推荐使用这个,不依赖于像素。等同于dp。
- sp(scaled pixels—best for text size)——带比例的像素。
- pt(points)——磅:1pt = 1/72英寸
- in(inches)——英寸
- mm(millimeters)——毫米
- sp由于是放大像素,主要是用于字体显示,由此根据google的建议,TextView的字体大小最好用sp做单位,而且查看TextView的源码可知Android默认使用水平作为字号单位。
- 在Android中最常用到的还是px和dip。但是这两个之间到底有什么区别呢?
- 在HVGA屏density=160;QVGA屏density=120;WVGA屏density=240;WQVGA屏density=120 density值表示每英寸有多少个显示点,与分辨率是两个概念。
- 不同density下屏幕分辨率信息,以480dip*800dip的 WVGA(density=240)为例。
- density=120时 屏幕实际分辨率为240px*400px (两个点对应一个分辨率)
- 状态栏和标题栏高各19px或者25dip
- 横屏是屏幕宽度400px 或者800dip,工作区域高度211px或者480dip
- 竖屏时屏幕宽度240px或者480dip,工作区域高度381px或者775dip
- density=160时 屏幕实际分辨率为320px*533px (3个点对应两个分辨率)
- 状态栏和标题栏高个25px或者25dip
- 横屏是屏幕宽度533px 或者800dip,工作区域高度295px或者480dip
- 竖屏时屏幕宽度320px或者480dip,工作区域高度508px或者775dip
- density=240时 屏幕实际分辨率为480px*800px (一个点对于一个分辨率)
- 状态栏和标题栏高个38px或者25dip
- 横屏是屏幕宽度800px 或者800dip,工作区域高度442px或者480dip
- 竖屏时屏幕宽度480px或者480dip,工作区域高度762px或者775dip
- apk的资源包中,当屏幕density=240时使用hdpi 标签的资源
- 当屏幕density=160时,使用mdpi标签的资源
- 当屏幕density=120时,使用ldpi标签的资源。
- 不加任何标签的资源是各种分辨率情况下共用的。
下面我们回到我们的主题上来:怎样获取图片的大小?
思路很简单:
首先我们把这个图片转成Bitmap,然后再利用Bitmap的getWidth()和getHeight()方法就可以取到图片的宽高了。
新问题又来了,在通过BitmapFactory.decodeFile(Stringpath)方法将突破转成Bitmap时,遇到大一些的图片,我们经常会遇到OOM(Out Of Memory)的问题。怎么避免它呢?
这就用到了我们上面提到的BitmapFactory.Options这个类。
BitmapFactory.Options这个类,有一个字段叫做 inJustDecodeBounds 。SDK中对这个成员的说明是这样的:
If set to true, the decoder will return null (no bitmap), but the out…
也就是说,如果我们把它设为true,那么BitmapFactory.decodeFile(Stringpath, Options opt)并不会真的返回一个Bitmap给你,它仅仅会把它的宽,高取回来给你,这样就不会占用太多的内存,也就不会那么频繁的发生OOM了。
示例代码如下:
BitmapFactory.Options options = newBitmapFactory.Options();
options.inJustDecodeBounds = true;
Bitmap bmp = BitmapFactory.decodeFile(path,options);
/* 这里返回的bmp是null */
复制代码
这段代码之后,options.outWidth和options.outHeight就是我们想要的宽和高了。
有了宽,高的信息,我们怎样在图片不变形的情况下获取到图片指定大小的缩略图呢?
比如我们需要在图片不变形的前提下得到宽度为200的缩略图。
那么我们需要先计算一下缩放之后,图片的高度是多少
/* 计算得到图片的高度 */
/* 这里需要主意,如果你需要更高的精度来保证图片不变形的话,需要自己进行一下数学运算 */
int height = options.outHeight * 200 /options.outWidth;
options.outWidth = 200;
options.outHeight = height;
/* 这样才能真正的返回一个Bitmap给你 */
options.inJustDecodeBounds = false;
Bitmap bmp = BitmapFactory.decodeFile(path,options);
image.setImageBitmap(bmp);
复制代码
这样虽然我们可以得到我们期望大小的ImageView
但是在执行BitmapFactory.decodeFile(path,options);时,并没有节约内存。要想节约内存,还需要用到BitmapFactory.Options这个类里的 inSampleSize 这个成员变量。
我们可以根据图片实际的宽高和我们期望的宽高来计算得到这个值。
inSampleSize = options.outWidth / 200;
另外,为了节约内存我们还可以使用下面的几个字段:
options.inPreferredConfig =Bitmap.Config.ARGB_4444; // 默认是Bitmap.Config.ARGB_8888
/* 下面两个字段需要组合使用 */
options.inPurgeable = true;
options.inInputShareable = true;
正在做一个软件其中涉及到一些关于缩略图的知识。还有就是大图片的溢出问题,也可以通过缩略图的方式避免。
主要是通过BitmapFactory.Options 来实现。
Options中有个属性inJustDecodeBounds。我们可以充分利用它,来避免大图片的溢出问题。他是什么原理呢?
API这样说:如果该 值设为true那么将不返回实际的bitmap,也不给其分配内存空间这样就避免内存溢出了。但是允许我们查询图片的信息这其中就包括图片大小信息(
options.outHeight (图片原始高度)和option.outWidth(图片原始宽度))。
Options中有个属性inSampleSize。我们可以充分利用它,实现缩放。
如果被设置为一个值> 1,要求解码器解码出原始图像的一个子样本,返回一个较小的bitmap,以节省存储空间。
例如,inSampleSize = = 2,则取出的缩略图的宽和高都是原始图片的1/2,图片大小就为原始大小的1/4。
对于任何值< = 1的同样处置为1。
那么相应的方法也就出来了,通过设置 inJustDecodeBounds为true,获取到outHeight(图片原始高度)和 outWidth(图片的原始宽度),然后计算一个inSampleSize(缩放值),
然后就可以取图片了,这里要注意的是,inSampleSize 可能小于0,必须做判断。
实现步骤:
第一步:BitmapFactory.Option
设置 inJustDecodeBounds为true
第二步:BitmapFactory.decodeFile(path,option)方法
解码图片路径为一个位图。如果指定的文件名是空的,或者不能解码到一个位图,函数将返回null[空值]。
获取到outHeight(图片原始高度)和 outWidth(图片的原始宽度)
第三步:计算缩放比例,也可以不计算,直接给它设定一个值。
options.inSampleSize = "你的缩放倍数";
如果是2就是高度和宽度都是原始的一半。
第四步:设置options.inJustDecodeBounds = false;
重新读出图片
bitmap = BitmapFactory.decodeFile(path, options);
具体实现:
- package xiaosi.compress;
- import android.app.Activity;
- import android.graphics.Bitmap;
- import android.graphics.BitmapFactory;
- import android.os.Bundle;
- import android.widget.ImageView;
- public class Compress extends Activity
- {
- /** Called when the activity is first created. */
- private ImageView image = null;
- @Override
- public void onCreate(Bundle savedInstanceState)
- {
- super.onCreate(savedInstanceState);
- setContentView(R.layout.main);
- image = (ImageView) findViewById(R.id.image);
- image.setImageBitmap(decodeBitmap());
- }
- public Bitmap decodeBitmap()
- {
- BitmapFactory.Options options = new BitmapFactory.Options();
- options.inJustDecodeBounds = true;
- // 通过这个bitmap获取图片的宽和高
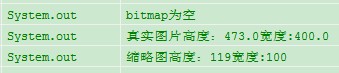
- Bitmap bitmap = BitmapFactory.decodeFile("/sdcard/MTXX/3.jpg", options);
- if (bitmap == null)
- {
- System.out.println("bitmap为空");
- }
- float realWidth = options.outWidth;
- float realHeight = options.outHeight;
- System.out.println("真实图片高度:" + realHeight + "宽度:" + realWidth);
- // 计算缩放比
- int scale = (int) ((realHeight > realWidth ? realHeight : realWidth) / 100);
- if (scale <= 0)
- {
- scale = 1;
- }
- options.inSampleSize = scale;
- options.inJustDecodeBounds = false;
- // 注意这次要把options.inJustDecodeBounds 设为 false,这次图片是要读取出来的。
- bitmap = BitmapFactory.decodeFile("/sdcard/MTXX/3.jpg", options);
- int w = bitmap.getWidth();
- int h = bitmap.getHeight();
- System.out.println("缩略图高度:" + h + "宽度:" + w);
- return bitmap;
- }
- }
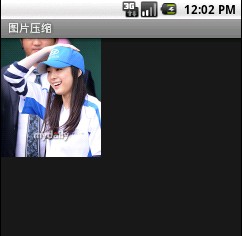
效果图:


 2万+
2万+

 被折叠的 条评论
为什么被折叠?
被折叠的 条评论
为什么被折叠?
 到【灌水乐园】发言


