iOS UITableView 快速滚动(索引方式实现)

参考:http://my.oschina.net/joanfen/blog/204503

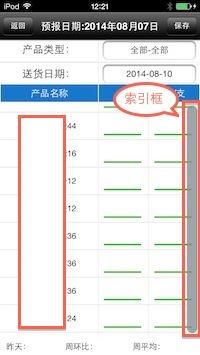
思路:UITableView一次性加载数据过多时,需要滑动多次触底。想通过索引实现快速滑动,索引中加载20个空点。用户在最右端滑动时,索引框显示,当触及索引点时指向其想对应的UITableView的RowIndex来实现快速滚动。这方法有缺陷:普通滑动时滚动条被遮盖了。

主要代码:

//获取数据
-(void)getTableData{
    
    dispatch_async(dispatch_get_global_queue(DISPATCH_QUEUE_PRIORITY_DEFAULT, 0), ^{
        dispatch_async(dispatch_get_main_queue(), ^{
            // 获取数据库数据
            self.listArray = [[ReportLogic sharedInstance] getProductByCategory];
            if ([self.listArray count] == 0) {
                [GlobalApplication Alert:@"提示" :@"暂无数据"];
            }else{
                // 索引目录,20个空点
                NSMutableArray *stArray =  [[NSMutableArray alloc] init];
                self.sectionTitles = stArray;
                [stArray release];
                for (int i=0;i<20;i++)
                {
                    NSString *index = @"";
                    [self.sectionTitles insertObject:index atIndex:i];
                }
            }
            // 数据刷新
            [self.fmTableView reloadData];
        });
    });
}

#pragma mark index
// 分区数
-(NSInteger)numberOfSectionsInTableView:(UITableView *)tableView{  
    return 1;
}

// 索引目录
-(NSArray *)sectionIndexTitlesForTableView:(UITableView *)tableView{

    return self.sectionTitles;
}

// 滑动时点击目录
-(NSInteger)tableView:(UITableView *)tableView sectionForSectionIndexTitle:(NSString *)title atIndex:(NSInteger)index{
    
     // 修正索引焦点为UITableView的RowIndex,头尾和中间值
    if (index == 0) {
        index = 1;
    }else if(index == self.sectionTitles.count - 1){
        index = self.listArray.count -1;
    }else
         index = round(index*self.listArray.count/20);
    [self.fmTableView scrollToRowAtIndexPath:[NSIndexPath indexPathForRow:index inSection:0] atScrollPosition:UITableViewScrollPositionBottom animated:YES];
    return index;
}
 

效果:


  • 0
    点赞
  • 0
    收藏
    觉得还不错? 一键收藏
  • 0
    评论
UITableView循环滚动可以通过以下步骤实现: 1. 首先,创建一个UITableView并设置其数据源和代理。 2. 然后,创建一个数组来存储要显示的数据。 3. 实现UITableViewDataSource协议中的方法tableView(_:numberOfRowsInSection:),返回一个比实际数据量多的数值,例如10倍于实际数据量。 4. 实现tableView(_:cellForRowAt:)方法,在该方法中设置cell的内容,需要根据cell的indexPath.row来获取数据,应该将indexPath.row对实际数据量取模,以保证循环滚动。 5. 实现tableView(_:willDisplay:forRowAt:)方法,在该方法中判断当前cell是否为最后一行,如果是,则将tableView的contentOffset设置到第一行的位置,以实现循环滚动。 下面是一个简单的实现代码: ```swift class ViewController: UIViewController, UITableViewDataSource, UITableViewDelegate { @IBOutlet weak var tableView: UITableView! var data = ["A", "B", "C", "D", "E"] override func viewDidLoad() { super.viewDidLoad() tableView.dataSource = self tableView.delegate = self tableView.register(UITableViewCell.self, forCellReuseIdentifier: "cell") } func tableView(_ tableView: UITableView, numberOfRowsInSection section: Int) -> Int { return data.count * 10 } func tableView(_ tableView: UITableView, cellForRowAt indexPath: IndexPath) -> UITableViewCell { let cell = tableView.dequeueReusableCell(withIdentifier: "cell", for: indexPath) cell.textLabel?.text = data[indexPath.row % data.count] return cell } func tableView(_ tableView: UITableView, willDisplay cell: UITableViewCell, forRowAt indexPath: IndexPath) { let lastRowIndex = tableView.numberOfRows(inSection: 0) - 1 if indexPath.row == lastRowIndex { let firstIndexPath = IndexPath(row: 0, section: 0) tableView.scrollToRow(at: firstIndexPath, at: .top, animated: false) } } } ``` 在这个例子中,我们将数据循环滚动10次,即实际数据量为5个,但是显示了50个cell,可以通过手动滑动tableView来验证循环滚动效果。
评论
添加红包

请填写红包祝福语或标题

红包个数最小为10个

红包金额最低5元

当前余额3.43前往充值 >
需支付:10.00
成就一亿技术人!
领取后你会自动成为博主和红包主的粉丝 规则
hope_wisdom
发出的红包
实付
使用余额支付
点击重新获取
扫码支付
钱包余额 0

抵扣说明:

1.余额是钱包充值的虚拟货币,按照1:1的比例进行支付金额的抵扣。
2.余额无法直接购买下载,可以购买VIP、付费专栏及课程。

余额充值