


1.基本概念:
View(视图):可视界面元素,所有的UI控件都是view派生而来。
ViewGroup(视图组):包含多个子视图,是View类的扩展,主要用来管理子视图的布局或者是构建原子的可重用组件。
Layout(布局):用来控制子控件在UI中的位置,布局可嵌套。三者关系如下:

.xml布局文件的根节点必须是包含android的命名空间,空间固定为:xmlns:android="http://schemas.android.com/apk/res/android"
android:gravity--当前组件内的对齐方式
android:layout_gravity--当前组件在父布局中的对齐方式
2.常用布局:
LinearLayout(线性布局)、RelativeLayout(相对布局)、FrameworkLayout(框架布局)、TableLayout(表格布局)、GridLayout(网格布局)
3.线性布局
wrap_content 组件大小完整显示组件内内容
fill_parent 组件大小填充满父组件
match_parent 从2.2之后可以启用match_parent代替fill_parent
android:layout_weight:组件权重,默认为0,如果赋值大于0,则将父视图的可用空间分割,分割大小取决于layout_weight,所以layout_weight的“优先级”大于layout_width/height,示例如下:
<Button
        android:layout_width="wrap_content"
        android:layout_height="wrap_content"
        android:text="hello" />
    <Button
        android:layout_width="wrap_content"
        android:layout_height="wrap_content"
        android:layout_weight="1"
        android:text="hello" />
    <Button
        android:layout_width="wrap_content"
        android:layout_height="wrap_content"
        android:layout_weight="2"
        android:text="world" />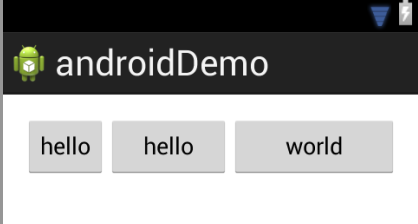
4.框架布局:
默认的位置是左上角,可以用layout_gravity属性改变其位置,所有添加到这个布局中的视图均以层叠方式显示,后放入的视图会覆盖先入的视图。
<FrameLayout xmlns:android="http://schemas.android.com/apk/res/android"
    xmlns:tools="http://schemas.android.com/tools"
    android:layout_width="match_parent"
    android:layout_height="match_parent"
    android:orientation="horizontal"
    tools:context=".MainActivity" >
    <Button
        android:layout_width="wrap_content"
        android:layout_height="wrap_content"
        android:layout_gravity="right"
        android:text="hi" />
    <Button
        android:layout_width="wrap_content"
        android:layout_height="wrap_content"
        android:text="hello" />
    <Button
        android:layout_width="wrap_content"
        android:layout_height="wrap_content"
        android:text="world" />
</FrameLayout>
开发中,如果想要实现层叠效果,可以使用框架布局。
5.相对布局:
熟悉相对位置属性的使用, layout_alignXX, layout_toXXof, layout_xxx等
<!-- Button A 位于父窗口居中位置 ,B与A上边界对齐 ,B位于A的左侧。。。-->
<RelativeLayout xmlns:android="http://schemas.android.com/apk/res/android"
    xmlns:tools="http://schemas.android.com/tools"
    android:layout_width="match_parent"
    android:layout_height="match_parent"
    android:orientation="horizontal"
    tools:context=".MainActivity" >
    <Button
        android:id="@+id/btn1"
        android:layout_width="wrap_content"
        android:layout_height="wrap_content"
        android:layout_centerInParent="true"
        android:text="A" />
    <Button
        android:layout_width="wrap_content"
        android:layout_height="wrap_content"
        android:layout_alignTop="@id/btn1"
        android:layout_toLeftOf="@id/btn1"
        android:text="B" />
    <Button
        android:layout_width="wrap_content"
        android:layout_height="wrap_content"
        android:layout_alignBottom="@id/btn1"
        android:layout_toRightOf="@id/btn1"
        android:text="C" />
    <Button
        android:layout_width="wrap_content"
        android:layout_height="wrap_content"
        android:layout_above="@id/btn1"
        android:layout_alignLeft="@id/btn1"
        android:text="D" />
    <Button
        android:layout_width="wrap_content"
        android:layout_height="wrap_content"
        android:layout_below="@id/btn1"
        android:layout_alignRight="@id/btn1"
        android:text="E" />
</RelativeLayout>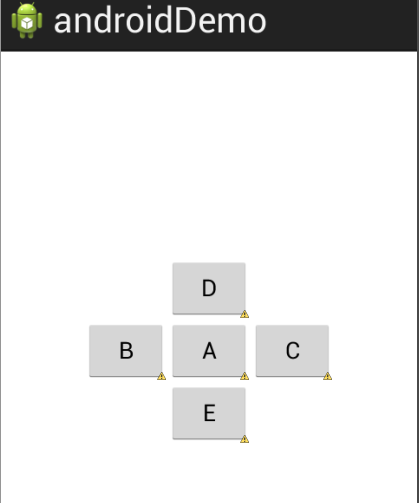
6.表格布局:
表格布局中可以通过添加TableRow或其他组件来控制行列数,TableRow同时也是个容器,允许添加组件。TableLayout继承自LinearLayout,所以LinearLayout的属性仍适用于TableLayout。
对于TableLayout,有几个针对列的属性值得注意:
shrinkColumns: The zero-based index of the columns to shrink
stretchColumns: The zero-based index of the columns to stretch.
例如:
android:shrinkColumns="0"   <!-- 第0列的控件允许收缩,以适应父窗口变化-->
android:stretchColumns="1"  <!-- 第1列的控件允许扩张,以适应父窗口变化-->
7.网格布局:
GridLayout是在Android4.0(API 12)中引入的,是最为灵活的一种布局,可用来替代复杂的嵌套布局。以“计算器界面“的UI设计为例,对于跨多行或多列的单元格,其他布局常用布局嵌套+设置weight的方式实现,既设计复杂,又影响渲染速度。
使用GridLayout时,不需要对每个组件高度和宽度属性进行设置,其默认为wrap_content方式。
使用属性columnCount和rawCount设置行列数,orientation设置排列方向,子组件填充顺序是按从左到右,从上到下。
若想扩展单元格使其占有多行或多列大小(类似合并单元格),可以通过属性layout_rawSpan和layout_columnSpan来设置跨越行列数,然后通过layout_gravity属性完成填充。
demo如下:
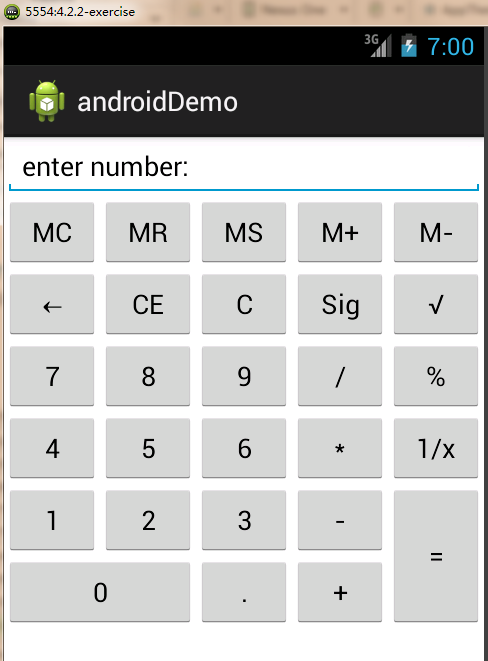
布局代码:
<GridLayout xmlns:android="http://schemas.android.com/apk/res/android"
    xmlns:tools="http://schemas.android.com/tools"
    android:layout_width="wrap_content"
    android:layout_height="wrap_content"
    android:columnCount="5"
    android:orientation="horizontal"
    android:rowCount="8" >
    <EditText
        android:id="@+id/edittext"
        android:layout_rowSpan="2"
        android:layout_columnSpan="5"
        android:layout_gravity="fill"
        android:text="enter number:"/>
    <Button
        android:id="@+id/mc"
        android:text="MC" />
    <Button
        android:id="@+id/mr"
        android:text="MR" />
    <Button
        android:id="@+id/ms"
        android:text="MS" />
    <Button
        android:id="@+id/mplus"
        android:text="M+" />
    <Button
        android:id="@+id/msub"
        android:text="M-" />
    <Button
        android:id="@+id/delete"
        android:text="←" />
    <Button
        android:id="@+id/ce"
        android:text="CE" />
    <Button
        android:id="@+id/c"
        android:text="C" />
    <Button
        android:id="@+id/sign"
        android:text="Sig" />
    <Button
        android:id="@+id/sqrt"
        android:text="√" />
    <Button
        android:id="@+id/seven"
        android:text="7" />
    <Button
        android:id="@+id/eight"
        android:text="8" />
    <Button
        android:id="@+id/nine"
        android:text="9" />
    <Button
        android:id="@+id/division"
        android:text="/" />
    <Button
        android:id="@+id/mod"
        android:text="%" />
    <Button
        android:id="@+id/four"
        android:text="4" />
    <Button
        android:id="@+id/five"
        android:text="5" />
    <Button
        android:id="@+id/six"
        android:text="6" />
    <Button
        android:id="@+id/multiple"
        android:text="*" />
    <Button
        android:id="@+id/inverse"
        android:text="1/x" />
    <Button
        android:id="@+id/one"
        android:text="1" />
    <Button
        android:id="@+id/two"
        android:text="2" />
    <Button
        android:id="@+id/three"
        android:text="3" />
    <Button
        android:id="@+id/subtract"
        android:text="-" />
    <Button
        android:id="@+id/equal"
        android:layout_gravity="fill_vertical"
        android:layout_rowSpan="2"
        android:text="=" />
    <Button
        android:id="@+id/zero"
        android:layout_columnSpan="2"
        android:layout_gravity="fill_horizontal"
        android:text="0" />
    <Button
        android:id="@+id/comma"
        android:text="." />
    <Button
        android:id="@+id/add"
        android:text="+" />
</GridLayout>
仍存在一个问题,就是EditText中我设置单元格为2行5列,结果只体现出了5列的效果,后来尝试修改orientation值,或layout_gravity、rowspan与columnSpan顺序,仍然只体现出5列的效果,难道rowSpan与columnSpan只能存在一个,两者都存在时只保留columnSpan属性的作用?


 被折叠的 条评论
为什么被折叠?
被折叠的 条评论
为什么被折叠?
 到【灌水乐园】发言


