


maven私服的搭建最主要的原因就是避免组内每个人员都在maven库中直接下载依赖包,同时如果公司办公电脑不能连接外网的时候可采用此方式。在可连接外网的机器上部署nexus私服,其他机器连接私服即可。
文中部分图可能来自网上其他地方,可能跟实际稍微有点儿偏差。
1:下载Nexus,注意下载war包,我下载的是2.7.2版本。
http://www.sonatype.org/nexus/archived
直接下载:http://www.sonatype.org/downloads/nexus-2.7.2.war
2:直接将下载的war包丢到tomcat目录中webapp下即可。
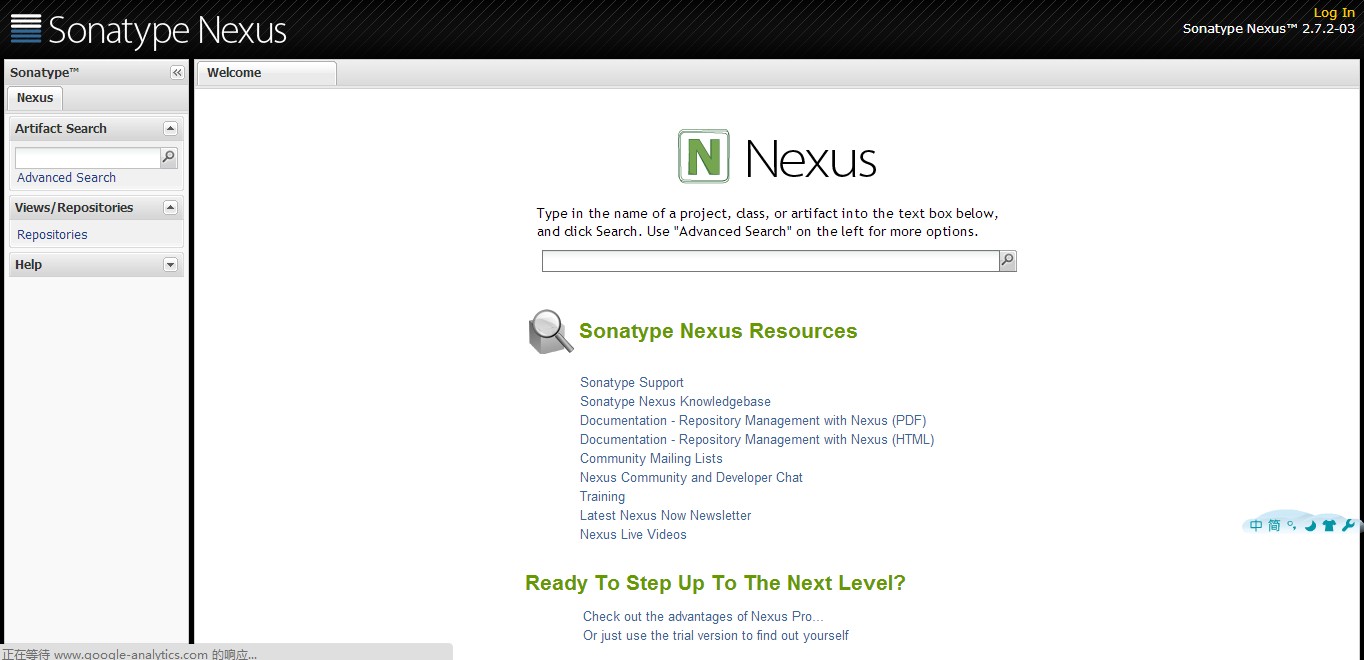
3:启动tomcat,浏览器访问:http://127.0.0.1:8080/nexus-2.7.2,则会看到如下图界面。
4:点击右上角用admin登陆,默认密码admin123,进入后配置nuxus,安装如下图步骤配置。
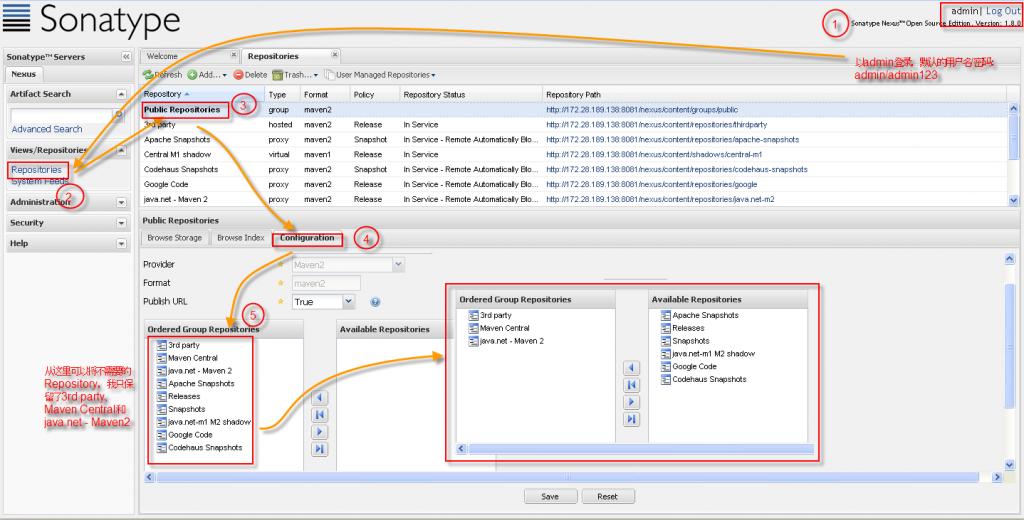
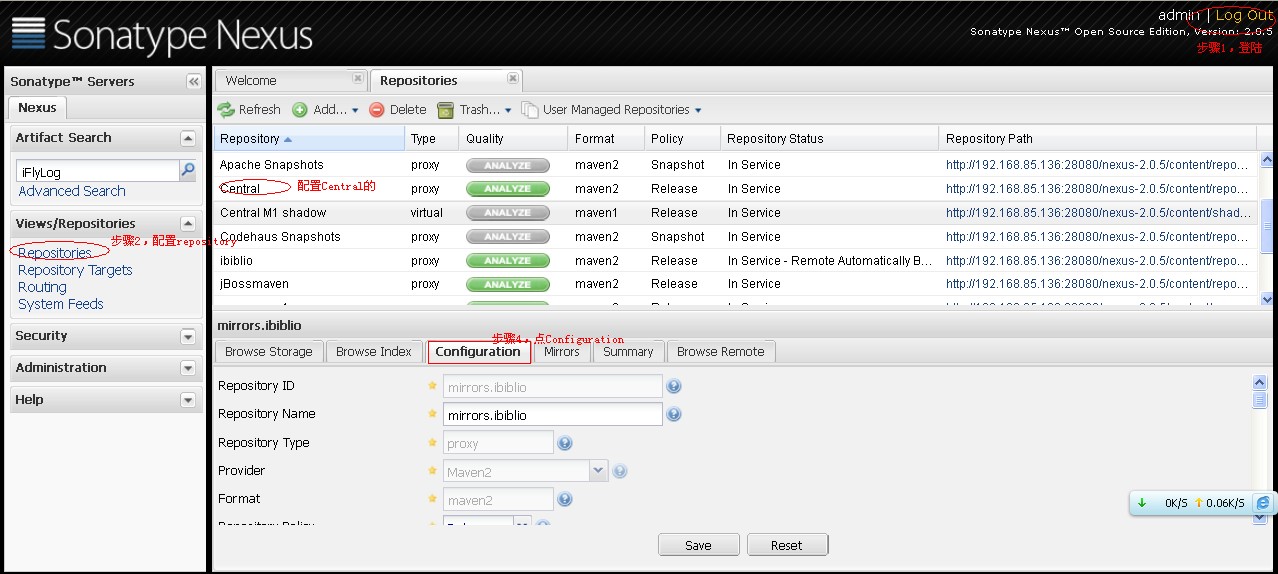
配置Central的Repository,这个是一个proxy类型的Repository,用来代理别的如官方的Repository,能帮你自动下载,我们也可以再添加别的proxy类型的Repository。 需要注意,可以改下URL(如http://repo1.maven.org/maven2/),同时修改Download Remote Indexes改为true,然后右键repair index,一定要这样做。然后可看到如下结果:

5:项目中使用私服。
A)修改setting.xml文件
<span style="font-size:12px;"><?xml version="1.0" encoding="UTF-8"?>

<settings xmlns="http://maven.apache.org/SETTINGS/1.0.0"
          xmlns:xsi="http://www.w3.org/2001/XMLSchema-instance"
          xsi:schemaLocation="http://maven.apache.org/SETTINGS/1.0.0 http://maven.apache.org/xsd/settings-1.0.0.xsd">
  <localRepository>D:/maven_repo</localRepository>

  <pluginGroups>

  </pluginGroups>

  <proxies>
    <!-- proxy
     | Specification for one proxy, to be used in connecting to the network.
     |
	<proxy>
      <id>normal</id>
      <active>true</active>
      <protocol>http</protocol>
      <username>admin</username>
      <password>admin123</password>
      <host>172.28.10.139</host>
      <port>8080</port>
      <nonProxyHosts>172.28.10.139:8080/nexus</nonProxyHosts>
    </proxy>
	-->
  </proxies>

  <!-- servers
   | This is a list of authentication profiles, keyed by the server-id used within the system.
   | Authentication profiles can be used whenever maven must make a connection to a remote server.
   |-->
  <servers>
	<server>
		<id>nexus-releases</id>
		<username>admin</username>
		<password>admin123</password>
	</server>
	<server>
		<id>nexus-snapshots</id>
		<username>admin</username>
		<password>admin123</password>
	</server>

  </servers>

  <mirrors>
  </mirrors>

  <profiles>
	<profile>
		<id>jdk-1.6</id>
		<activation>
			<activeByDefault>true</activeByDefault>
			<jdk>1.6</jdk>
		</activation>
	</profile>
	<profile>
		<id>nexus</id>
		<repositories>
			<repository>
				<id>nexus</id>
				<name>Nexus</name>
				<url>http://172.28.10.139:8080/nexus/content/groups/public/</url>
				<release>
					<enabled>true</enabled>
				</release>
				<snapshots>
					<enabled>true></enabled>
				</snapshots>
			</repository>
		</repositories>
		<pluginRepositories>
			<pluginRepository>
				<id>nexus</id>
				<name>Nexus</name>
				<url>http://172.28.10.139:8080/nexus/content/groups/public/</url>
				<release>
					<enabled>true</enabled>
				</release>
				<snapshots>
					<enabled>true></enabled>
				</snapshots>
			</pluginRepository>
		</pluginRepositories>
	</profile>

  </profiles>
  <activeProfiles>
	<activeProfile>nexus</activeProfile>
  </activeProfiles>
</settings></span>
<span style="font-size:12px;"><project xmlns="http://maven.apache.org/POM/4.0.0" xmlns:xsi="http://www.w3.org/2001/XMLSchema-instance"
  xsi:schemaLocation="http://maven.apache.org/POM/4.0.0 http://maven.apache.org/xsd/maven-4.0.0.xsd">
  <modelVersion>4.0.0</modelVersion>

  <groupId>org.maven.demo</groupId>
  <artifactId>MavenDemo</artifactId>
  <version>0.0.1-SNAPSHOT</version>
  <packaging>jar</packaging>

  <name>MavenDemo</name>
  <url>http://maven.apache.org</url>

    <repositories>
        <repository>
            <snapshots>
                <enabled>true</enabled>
            </snapshots>
            <id>public</id>
            <name>Public Repositories</name>
            <url>http://172.28.189.138:8081/nexus/content/groups/public/</url>
        </repository>
    </repositories>
    <pluginRepositories>
        <pluginRepository>
            <id>public</id>
            <name>Public Repositories</name>
            <url>http://172.28.189.138:8081/nexus/content/groups/public/</url>
        </pluginRepository>
    </pluginRepositories>
    <dependencies>
        <dependency>
            <groupId>junit</groupId>
            <artifactId>junit</artifactId>
            <version>4.8.1</version>
            <type>jar</type>
            <scope>compile</scope>
        </dependency>
    </dependencies>
    <properties>
    <project.build.sourceEncoding>UTF-8</project.build.sourceEncoding>
  </properties>
</project> </span>
6:将jar包上传到nexus私服上面
两种方式,手动上传,简单就不介绍了,但是要自己填写版本之类的东西 重点介绍下使用maven上传
A)首先,修改maven的配置文件setting.xml
<span style="font-size:12px;"><settings>
...
<servers>
  <server>
    <id>nexus-releases</id>
    <username>admin</username>
    <password>admin123</password>
  </server>
  <server>
    <id>nexus-snapshots</id>
    <username>admin</username>
    <password>admin123</password>
  </server>
</servers>
...
</settings></span><span style="font-size:12px;"><project>
...
<distributionManagement>
<repository>
<id>nexus-releases</id>
<name>Nexus Release Repository</name>
<url>http://127.0.0.1:8080/nexus/content/repositories/releases/</url>
</repository>
<snapshotRepository>
<id>nexus-snapshots</id>
<name>Nexus Snapshot Repository</name>
<url>http://127.0.0.1:8080/nexus/content/repositories/snapshots/</url>
</snapshotRepository>
</distributionManagement>
...
</project></span>最后,在命令行运行 mvn deploy即可,注意要把项目生成release,不是snapshot的。
注:如果想将源码也发布到nexus中,则需要在pom.xml中添加如下插件即可。
        <plugin>
            <groupId>org.apache.maven.plugins</groupId>
            <artifactId>maven-source-plugin</artifactId>
            <executions>
                <execution>
                    <id>attach-sources</id>
                    <goals>
                        <goal>jar</goal>
                    </goals>
                </execution>
            </executions>
        </plugin>
参考资料:
http://ajita.iteye.com/blog/1564967
http://blog.csdn.net/mydeman/article/details/5905424
http://my.oschina.net/shootercn/blog/12269
http://blog.linguofeng.com/archive/2012/08/10/maven-nexus-install.html


 1602
1602


 被折叠的 条评论
为什么被折叠?
被折叠的 条评论
为什么被折叠?
 到【灌水乐园】发言


