


1.MyBatis是什么?
MyBatis是一款有序的持久层框架,能更简单的完成程序和数据库交互的工具,也就是更简单的的操作和读取数据库的工具。
2.为什么要学习MyBatis?
我们原来操作数据库的时候,是使用JDBC的代码,但是它是非常麻烦的。每次都要建立数据库连接池,通过DataSource获取数据库连接Connection,然后执行语句,最后还要释放资源等等,这是相当繁琐的步骤。学习使用MyBatis就能更加简单的操作数据库了。
3.怎么学习MyBatis?
MyBatis学习分为两个部分:
- 配置MyBatis开发环境
- 使用MyBatis模式和语法操作数据库。
4第一个MyBatis查询操作
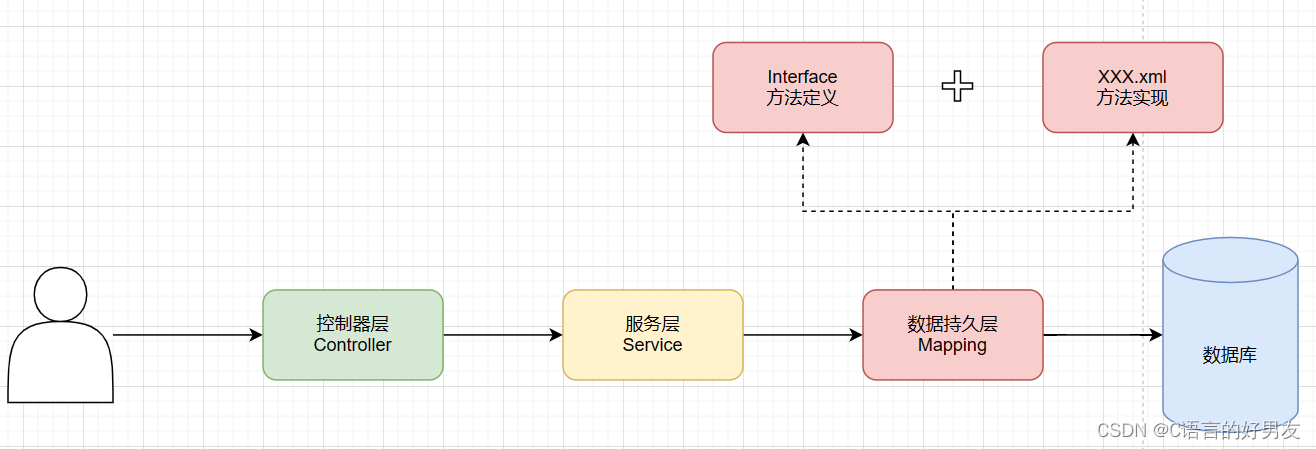
开始搭建MyBatis之前,我们先看一下MyBatis在整个框架中的定位,框架交互流程图:

4.1创建数据和表
下面我们添加用户表和文章表:
-- 创建数据库
drop database if exists mycnblog;
create database mycnblog DEFAULT CHARACTER SET utf8mb4;

-- 使⽤数据数据
use mycnblog;

-- 创建表[⽤户表]
drop table if exists userinfo;
create table userinfo(
 id int primary key auto_increment,
 username varchar(100) not null,
 password varchar(32) not null,
 photo varchar(500) default '',
 createtime datetime default now(),
 updatetime datetime default now(),
 `state` int default 1
) default charset 'utf8mb4';

-- 创建⽂章表
drop table if exists articleinfo;
create table articleinfo(
 id int primary key auto_increment,
 title varchar(100) not null,
 content text not null,
 createtime datetime default now(),
 updatetime datetime default now(),
 uid int not null,
 rcount int not null default 1,
 `state` int default 1
)default charset 'utf8mb4';

-- 添加⼀个⽤户信息
INSERT INTO `mycnblog`.`userinfo` (`id`, `username`, `password`, `photo`,
`createtime`, `updatetime`, `state`) VALUES
(1, 'admin', 'admin', '', '2021-12-06 17:10:48', '2021-12-06 17:10:48', 1);

-- ⽂章添加测试数据
insert into articleinfo(title,content,uid)
 values('Java','Java正⽂',1);
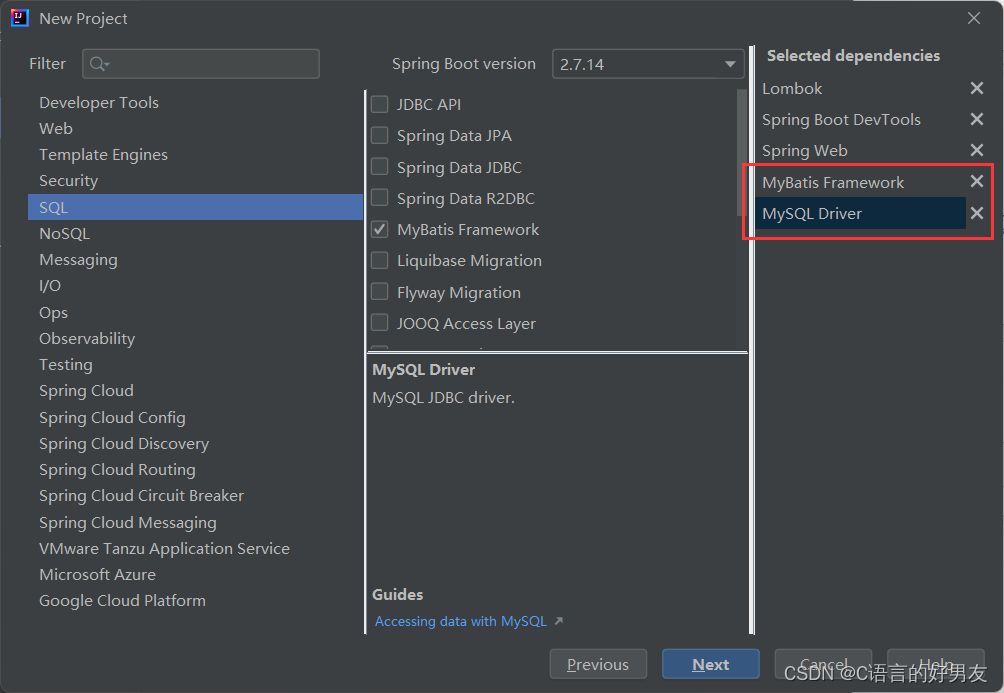
4.2添加MyBatis框架支持
4.3配置连接字符串和MyBatis
4.3.1配置连接字符串
下面是application.yml的文件的相关配置:
Spring:
  datasource:
    url: jdbc:mysql://localhost:3306/mycnblog?characterEncoding=utf8&userSSL=fasle
    username: root
    password: 1020118096
    dirver-class-name: com.mysql.jdbc.Driver
4.3.2配置MyBatis中XML路径
# 配置 mybatis xml的文件路径名,在resources/mapper创建所有表的xml文件
mybatis:
  mapper-locations: classpath:mapper/**Mapper.xml
4.4添加业务代码
下面是后端开发的工程思路,也就是下面的流程来实现MyBatis查询所有的用户功能:
4.4.1添加实体类
先添加用户的实体类:
import lombok.Data;
import java.util.Date;
/**
 * Describe:
 * User:lenovo
 * Date:2023-07-28
 * Time:9:14
 */
@Data
public class User {
    private Integer id;
    private String username;
    private String password;
    private String photo;
    private Date createTime;
    private Date updateTime;

}
4.4.2添加mapper接口
数据持久层的接口定义:
@Mapper
public interface UserMapper {

    public List<User> getAll();
}
4.4.3添加UserMapper.xml
数据持久层的实现,mybatis的固定xml格式:
<?xml version="1.0" encoding="utf-8" ?>
<!DOCTYPE mapper PUBLIC "-//mybatis.org//DTD Mapper 3.0//EN" "http://mybatis.org/dtd/mybatis-3-mapper.dtd">
<mapper namespace="com.example.demo.dao.UserMapper">

</mapper>
UserMapper.xml查询所有用户的具体实现SQL:
<?xml version="1.0" encoding="utf-8" ?>
<!DOCTYPE mapper PUBLIC "-//mybatis.org//DTD Mapper 3.0//EN" "http://mybatis.org/dtd/mybatis-3-mapper.dtd">
<mapper namespace="com.example.demo.dao.UserMapper">
    <select id="getAll" resultType="com.example.demo.model.User">
        select * from userinfo
    </select>
</mapper>
以下是对标签的说明:
- <mapper>标签:需要指定namespace属性,表示命名空间,值为mapper接口的全限定名
- <select>查询标签:是用来执行数据库的查询操作:
- id:是和Interface(接口)中定义的方法名称一样的,表明对接口的具体实现方法。
- resultType:是返回的数据类型。
4.4.4添加测试代码
测试代码实现如下:
@SpringBootTest //不能省略,告诉当前程序项目是在Spring Boot框架中运行的。
class UserMapperTest {

    @Autowired
    private UserMapper userMapper;
    @Test
    void getAll() {
        List<User> list = userMapper.getAll();
        System.out.println(list);
    }
}
5.增、删、改操作
接下来,我们将实现用户的增加、删除、修改的操作,对应使用MyBatis的标签如下:
- <insert>标签:插入语句;
- <update>标签:修改语句;
- <delete>标签:删除标签.
5.1增加用户操作
mapper interface:
@Mapper
public interface UserMapper {

    //查询所有用户操作
    public List<User> getAll();

    //添加用户操作
    Integer add(User user);
}
mapper.xml:
    <insert id="add">
        insert into userinfo(user, password,photo,state)
        values(#{username}, #{password}, #{photo}, 1)
    </insert>
Test:
@Test
void add() {
User user = new User();
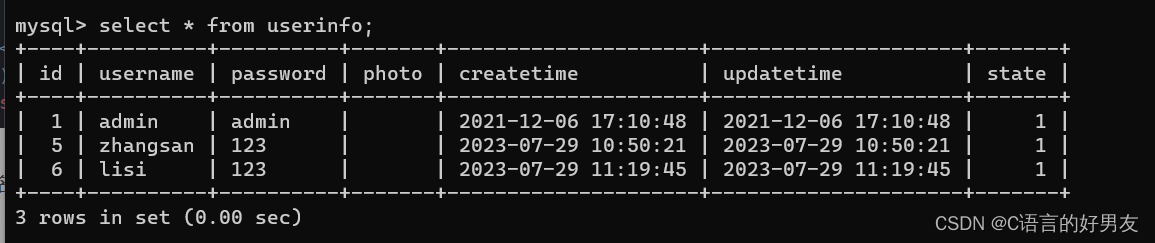
user.setUsername("zhangsan");
user.setPassword("123");
user.setPhoto("cat.png");
System.out.println(userMapper.add(user));
}

默认情况下,这个方法返回值为受影响结构的行数
5.2修改用户操作
mapper interface:
//更新用户操作
    Integer update(User user);
mapper.xml:
    <update id="update">
        update userinfo set username = #{username} where id = #{id}
    </update>
test:
 @Test
    void update() {
        User user = new User();
        user.setUsername("lisi");
        user.setId(2);
        System.out.println(userMapper.update(user));
    }
5.3删除用户操作
mapper interface:
//删除用户操作
    Integer delById(User user);
mapper.xml:
    <delete id="delById">
        delete from userinfo where id = #{id}
    </delete>
test:
@Test
    void delById() {
        User user = new User();
        user.setId(2);
        System.out.println(userMapper.delById(user));
    }
5.4 #{} VS ${}
不同点:
- #{}和${}都能实现传递参数的目的,但是#{}采取预编译的形式,而${}采取直接替换的模式。
- #{}由于采取预编译的模式,更加的安全,${}采用直接替换的模式,只能导致SQL注入的问题。所以在正常情况下,我们都是用#{}。
- 同时我们如果传递的参数是字符串,如果使用${}符(不考虑SQL注入的问题),会直接进行替换,但是在SQL语句中字符串是需要加引号的,这就导致了SQL语句需要我们手动添加引号,但是使用#{}会自动为字符串添加引号。
- 我们如果进行模糊查询,我们必须使用${}符,#{}会自动的加上引号,导致错误。例如:select * from userinfo where username like '%${}%'。同样的我们可以换一种写法:select * from userinfo where user name like concat('%', #{}, '%')
6.查询操作
6.1返回字典映射:ResultMap
resultMap使用场景:
- 字段名称和程序中的属性名称不同的时候,我们可以使用resultMap配置映射
- 一对一和一对多关系可以使用映射并查询数据
字段名和属性名不同的情况
创建User1类:
@Data
public class User1 {
    private Integer id;
    private String username;
    private String pwd;
    private String photo;
    private Date createTime;
    private Date updateTime;
}
创建User1Mapper类:
@Mapper
public interface User1Mapper {

    //查询操作
    List<User1> getUserById(Integer id);
}
创建User1Mapper.xml文件:
<resultMap id="BaseMap" type="com.example.demo.model.User1">
        <id column="id" property="id"></id>
        <result column="username" property="username"></result>
        <result column="password" property="pwd"></result>
    </resultMap>

    <select id="getUserById" resultMap="com.example.demo.dao.User1Mapper.BaseMap">
        select * from userinfo where id = #{id}
    </select>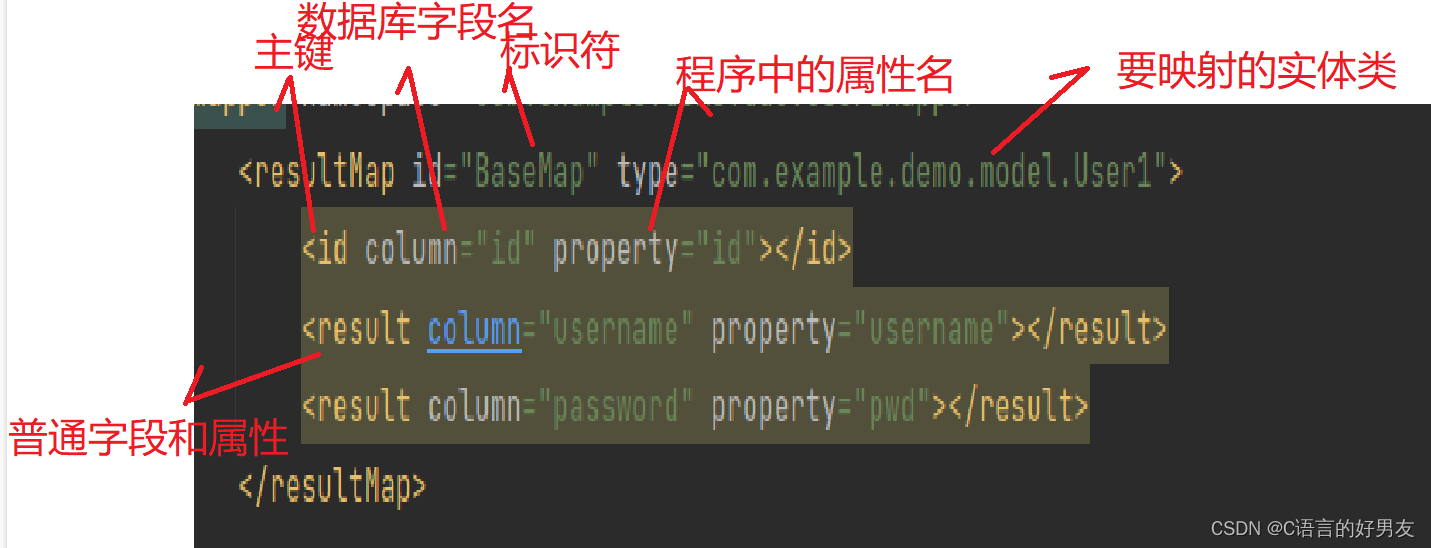
test方法:
@SpringBootTest
class User1MapperTest {

    @Autowired
    private User1Mapper user1Mapper;

    @Test
    void getUserById() {
        System.out.println(user1Mapper.getUserById(1));
    }
}
6.2多表查询
在进行多表查询的时候,如果我们使用resultType标签,在一个类中包含了另一个对象是查询不出来所包含的对象的,比如以下代码:
@Data
public class ArticleInfo {
    private Integer id;
    private String title;
    private String content;
    private LocalDateTime createtime;
    private LocalDateTime updatetime;
    private Integer rcount;
    //包含了另一个对象
    private User user;
}
这个时候,由于我们查询文章的时候,又需要查询作者的信息,导致对象中包含了对象,我们使用MyBatis是无法进行响应的user对象中字段匹配的。
ArticleInfoMapper.java 类:
@Mapper
public interface ArticleInfoMapper {

    //查询文章以及对应的作者名字
    List<ArticleInfo> getAll();
}
ArticleInfoMapper.xml文件:
<?xml version="1.0" encoding="utf-8" ?>
<!DOCTYPE mapper PUBLIC "-//mybatis.org//DTD Mapper 3.0//EN" "http://mybatis.org/dtd/mybatis-3-mapper.dtd">
<mapper namespace="com.example.demo.dao.ArticleInfoMapper">
    <select id="getAll" resultType="com.example.demo.model.ArticleInfo">
        select a.*, u.username u_username from articleinfo a left join userinfo u on a.uid=u.id
    </select>
</mapper>
Test类:
@SpringBootTest
class ArticleInfoMapperTest {
    @Autowired
    private ArticleInfoMapper articleInfoMapper;

    @Test
    void getAll() {
        List<ArticleInfo> list = articleInfoMapper.getAll();
        System.out.println(list);
    }
}
修改如下:
<?xml version="1.0" encoding="utf-8" ?>
<!DOCTYPE mapper PUBLIC "-//mybatis.org//DTD Mapper 3.0//EN" "http://mybatis.org/dtd/mybatis-3-mapper.dtd">
<mapper namespace="com.example.demo.dao.ArticleInfoMapper">
    <resultMap id="BaseMap" type="com.example.demo.model.ArticleInfo">
        <id column="id" property="id"></id>
        <result column="title" property="title"></result>
        <result column="content" property="content"></result>
        <association property="user"
                     resultMap="com.example.demo.dao.UserMapper.UserBaseMap"
                     columnPrefix="u_">
        </association>
    </resultMap>
    <select id="getAll" resultMap="com.example.demo.dao.ArticleInfoMapper.BaseMap">
        select a.*, u.username u_username from articleinfo a left join userinfo u on a.uid=u.id
    </select>

</mapper>
以上使用association>标签,表示一对一结果映射:
- property属性:指定Article中对应的属性,即用户
- resultMap属性:指定关联的结果集映射,将基于该映射配置来组织用户数据。
- columnPrefix属性:这个属性不能省略,如果省略并且还需要作者的id时,关联表中有两个id,,这会跟文章的id混淆,导致匹配错误的问题。
6.3一对多,一个用户多篇文章案例
一对多,我们需要使用<collection>标签,用法和<association>相同,如下所示:
<resultMap id="BaseMap" type="com.example.demo.model.User2">
    <id column="id" property="id"></id>
    <result column="username" property="username"></result>
    <result column="password" property="password"></result>
    <result column="photo" property="photo"></photo>
    <collection property="alist" resultMap=com.exam.demo.mappper.ArticleInfoMapper.baseMap"
        columnPrefix="a_">
    </collection>
</resultMap>
<select id="getUserById resultMap="BaseMap">
    select u.*, a.title a_title from userinfo u left join articleinfo a on u.id=a.uid where u.id=#{id}
7.复杂情况:动态SQL使用
在我们填写一些信息的时候,可能会遇到这问题,比如在注册的时候只有账号,密码,和确认密码是必填项,真实姓名、性别、年龄等是选填,这个时候我们应当如何构造SQL语句呢?
7.1<if>标签
假设注册场景:名字、密码必填,头像图片选填。
UserMapper.java文件:
//添加用户
    Integer add1(User user);
UserMapper.xml文件:
<insert id="add1">
        insert into userinfo(
        username,
        <if test="photo != null">
            photo,
        </if>
        password
        ) values(
        #{username},
        <if test="photo != null">
            #{photo},
        </if>
        #{password})
</insert>
我们现在只插入姓名和密码的结果为:

7.2<trim>标签
之前插入用户的时候,我们只有一个photo是可选字段,但是如果姓名,密码,照片都为可选字段我们要怎么做呢?
<trim>标签中有以下属性:
- prefix:整个语句块,以prefix的值为前缀
- suffix:整个语句快,以suffix的值为后缀
- prefixOverrides:表示整个语句块要去除掉的前缀
- suffixOverrides:表示整个语句块要去除掉的后缀
调整UserMapper.xml的插入语句:
    <insert id="add2">
        insert into userinfo(
        <trim suffixOverrides=",">
            <if test="username != null">
                username,
            </if>
            <if test="password != null">
                password,
            </if>
            <if test="photo != null">
                photo
            </if>
        </trim>
        ) values(
        <trim  suffixOverrides=",">
            <if test="username != null">
                #{username},
            </if>
            <if test="password != null">
                #{password},
            </if>
            <if test="photo != null">
                #{photo},
            </if>
        </trim>
        )
    </insert>
我们只添加名字和密码:
7.3<where>标签
传入的用户对象,根据属性做where条件查询,用户对象中属性不为null的,都可以作为查询条件。
UserMapper.java:
List<User> selectByCondition(User user);UserMapper.xml:
<select id="selectByCondition" resultType="com.example.demo.model.User">
        select * from userinfo
        <where>
            <if test="id != null">
                and id = #{id}
            </if>
            <if test="username != null">
                and username = #{username}
            </if>
            <if test="photo != null">
                and photo = #{photo}
            </if>
            <if test="createTime">
                and createtime = #{createTime}
            </if>
            <if test="updateTime">
                and updatetime = #{updateTime}
            </if>
        </where>
    </select>
<where>标签也可以使用<trim prifix="where" prefixOverrides="and">代替
7.4<set>标签
根据川渝的用户对象属性来更新数据。
UserMapper接口中修改用户,根据传入的用户ID,修改其他非空属性。
 //<set>标签的使用
    int updateById(User user);
UserMapper.xml:
<update id="updateById">
        update userinfo
        <set>
            <if test="username != null">
                username = #{username},
            </if>
            <if test="password != null">
                password = #{password},
            </if>
            <if test="photo != photo">
                photo != #{photo}
            </if>
        </set>
        where id = #{id}
    </update>
<set>标签可以使用<trim prefix="set" suffixOverrides=",">代替
7.5<foreach>标签
对集合进行遍历时可以使用该标签。<foreach>标签有如下属性:
- collection:绑定方法参数中的集合
- item:遍历时的每一个对象
- open:语句块开头的字符串
- close:语句块结束的字符串
- separator:每次遍历之间间隔的字符串
根据多个文章id查询文章数据:
//根据Id查询文章,<foreach>的使用
    List<ArticleInfo> selectByIds(List<Integer> list);
.xml:
<select id="selectByIds" resultType="com.example.demo.model.ArticleInfo">
        select * from articleinfo where id in
        <foreach collection="list" item="item" open="(" close=")" separator=",">
            #{item}
        </foreach>
    </select>


 179
179


 被折叠的 条评论
为什么被折叠?
被折叠的 条评论
为什么被折叠?
 到【灌水乐园】发言


