


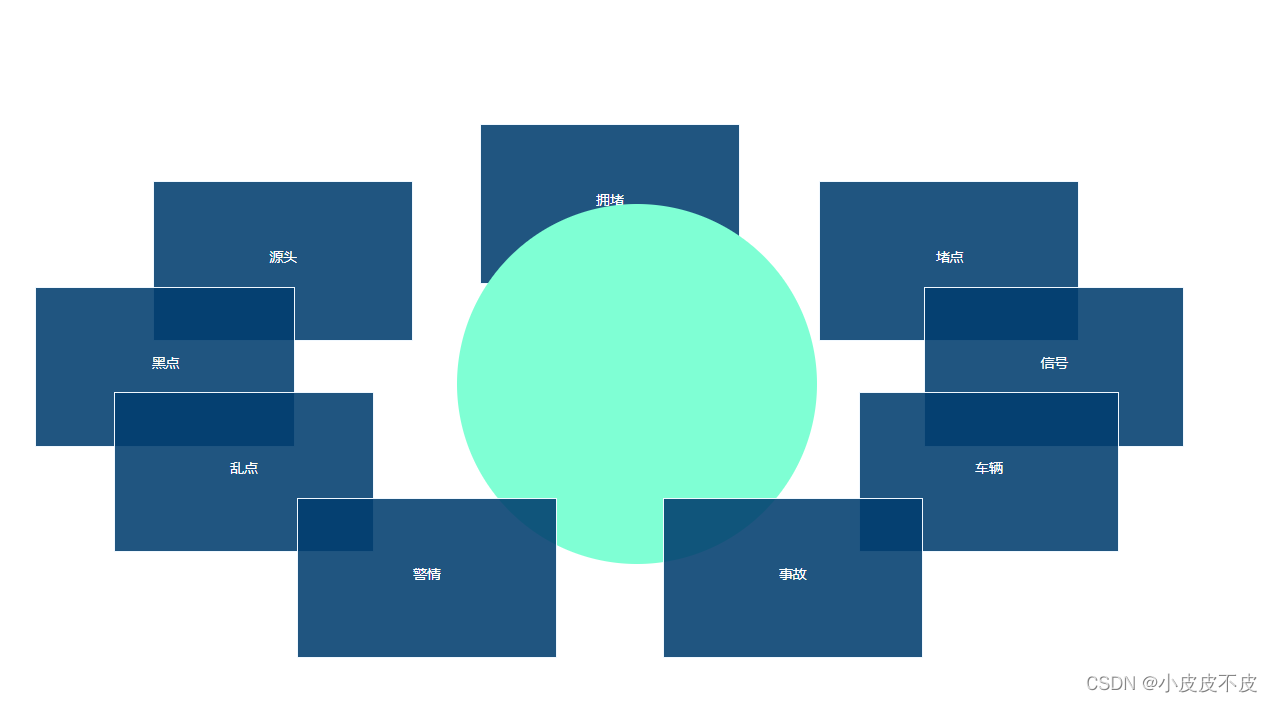
方法一:
这个方法有一个弊端就是固定的个数,通过样式先排列好位置在进行动画
实际使用过程中有点击事件加 .stop 阻止冒泡
<template>
  <ul>
    <li
      v-for="(item, index) in list"
      :key="index"
      :style="
        'top:' + item.top + ';left: ' + item.left + ';z-index: ' + item.zIndex
      "
      :class="{ active: item.active }"
      @click="item.active = !item.active"
      @mouseleave="autoData()"
      @mouseenter="clearIntervalFn()"
    >
      {{ item.label }}
    </li>
  </ul>
</template>

<script>
export default {
  data() {
    return {
      listIndex: 0,
      transfrom: [
        {
          top: " 64%",
          left: "24%",
          zIndex: 9,
        },
        {
          top: "51%",
          left: "10%",
          zIndex: 8,
        },
        {
          top: "38%",
          left: "4%",
          zIndex: 7,
        },
        {
          top: "25%",
          left: "13%",
          zIndex: 6,
        },
        {
          top: "18%",
          left: "38%",
          zIndex: 5,
        },
        {
          top: "25%",
          left: "64%",
          zIndex: 6,
        },
        {
          top: "38%",
          left: "72%",
          zIndex: 7,
        },
        {
          top: "51%",
          left: "67%",
          zIndex: 8,
        },
        {
          top: "64%",
          left: "52%",
          zIndex: 9,
        },
      ],
      list: [
        {
          label: "乱点",
          active: false,
        },
        {
          label: "黑点",
          active: false,
        },
        {
          label: "源头",
          active: false,
        },
        {
          label: "拥堵",
          active: false,
        },
        {
          label: "堵点",
          active: false,
        },
        {
          label: "信号",
          active: false,
        },
        {
          label: "车辆",
          active: false,
        },
        {
          label: "事故",
          active: false,
        },
        {
          label: "警情",
          active: false,
        },
      ],
      time: null,
    };
  },
  mounted() {
    this.listIndex = this.list.length;
    this.autoData();
    document.addEventListener("visibilitychange", () => {
      if (document.hidden === true) {
        // 页面被挂起
        this.clearIntervalFn();
      } else {
        // 页面由挂起被激活
        this.autoData();
      }
    });
  },
  methods: {
    clearIntervalFn() {
      clearInterval(this.time);
    },
    autoData() {
      this.clearIntervalFn();
      this.time = setInterval(() => {
        this.listIndex--;
        if (this.listIndex == 0) {
          this.listIndex = this.list.length;
        }
        this.transfrom.push(this.transfrom[0]); // 将数组的第一个元素添加到数组的
        this.transfrom.shift(); //删除数组的第一个元素
        this.autoList();
      }, 2000);
    },
    autoList() {
      this.transfrom.forEach((val, index) => {
        let arr = Object.keys(val);
        arr.forEach((item) => {
          this.list[index][item] = val[item];
        });
      });
      this.list = Object.assign([], this.list);
    },
  },
};
</script>

<style scoped>
ul {
  width: 100%;
  height: 100%;
  position: relative;
  transition: 2s all ease;
}
ul::before {
  content: "";
  width: 360px;
  height: 360px;
  background-color: aquamarine;
  position: absolute;
  top: 50%;
  left: 50%;
  transform: translate(-50%, -50%);
  border-radius: 50%;
  z-index: 6;
}

ul > li {
  list-style: none;
  width: 260px;
  height: 160px;
  box-sizing: border-box;
  border: 1px solid aliceblue;
  background-color: #013d6ee0;
  position: absolute;
  top: 0;
  left: 0;
  transition: 2s all ease;
  font-size: 0.2rem;
  text-align: center;
  line-height: 150px;
  color: #fff;
  cursor: pointer;
}
ul > li:hover {
  background-color: rgba(0, 255, 255, 0.678);
}
ul > li > img {
  width: 100%;
  height: 100%;
  display: block;
}

ul:hover li > img {
  opacity: 0.5;
}
ul > li:hover img {
  opacity: 1;
}

ul > li:nth-child(1),
ul > li:nth-child(9) {
  top: 64%;
  left: 24%;
  z-index: 9;
}
ul > li:nth-child(9) {
  left: 52%;
}
ul > li:nth-child(2),
ul > li:nth-child(8) {
  top: 51%;
  left: 10%;
  z-index: 8;
}
ul > li:nth-child(8) {
  left: 67%;
}
ul > li:nth-child(3),
ul > li:nth-child(7) {
  top: 38%;
  left: 4%;
  z-index: 7;
}
ul > li:nth-child(7) {
  left: 72%;
}

ul > li:nth-child(4),
ul > li:nth-child(6) {
  top: 25%;
  left: 13%;
}
ul > li:nth-child(6) {
  left: 64%;
}
ul > li:nth-child(5) {
  top: 18%;
  left: 38%;
}

ul > li.active {
  background-color: aqua;
}
</style>
方法二:
这个方法实现了可以动态添加个数,但是个数太少的时候没有围成一个圆在动画执行的时候没办法圆形旋转,而且如果是自适应页面,需要变化会重新执行来调整大小和位置,所以动画会重新执行,没办法像上面方法一样还是继续执行动画不受页面变化的影响
这里我只是放了一个案例具体的一些配置可以根据实际使用来设置,比如少于4个动画不是一个圆形来旋转就设置小于4不执行动画等等
<template>
  <div class="assemblyDemo">
        <ul class="items" ref="items" id="items">
          <li class="item" :style="`background:${item.bgColor};left:${item.rotLeft};top:${item.rotTop}`" v-for="item in list" :key="item.id" @mouseleave="autoData()" @mouseenter="clearIntervalFn()">{{item.itemname}}</li>
        </ul>
  </div>
</template>

<script>
export default {
  data() {
    return {
      list: [
        { itemname: "乱点", id: 1, bgColor: "red" },
        { itemname: "黑点", id: 2, bgColor: "green" },
        { itemname: "源头", id: 3, bgColor: "blue" },
        { itemname: "拥堵", id: 4, bgColor: "yellow" },
        { itemname: "堵点", id: 5, bgColor: "pink" },
        { itemname: "信号", id: 6, bgColor: "yellowgreen" },
        { itemname: "车辆", id: 7, bgColor: "white" },
        { itemname: "事故", id: 8, bgColor: "#537ba6" },
        { itemname: "警情", id: 9, bgColor: "#6b24e6" },
      ],
      listIndex: 0,
      time: null,
    }
  },
  mounted() {
    this.autoMove();
    window.addEventListener('resize', () => {
      let time = null;
      clearTimeout(time);
      time = setTimeout(() => {
        this.autoMove();
      }, 800)
    })
    // 防止浏览器长时间不用,点开后计时器发生错乱
    document.addEventListener("visibilitychange", () => {
      if (document.hidden === true) {
        // 页面被挂起
        this.clearIntervalFn();
      } else {
        // 页面由挂起被激活
        this.autoMove();
      }
    });
  },
  methods: {
    autoMove() {
      let angle = 360 / this.list.length
      let radian = angle * Math.PI / 180;
      // console.log(this.$refs)
      // 微调 topNum,leftNum
      let topNum = 1.6;
      let leftNum = 1.2;
      let itemsWidth = this.$refs.items.offsetWidth / leftNum;
      let itemsHeight = this.$refs.items.offsetHeight / topNum;
      // console.log(this.$refs)
      let body = document.getElementById('items');
      let liWidth = body.getElementsByClassName('item')[0].offsetWidth;
      let liHeight = body.getElementsByClassName('item')[0].offsetHeight;
      // console.log(liWidth, liHeight)
      this.list.forEach((item, index) => {
        this.$set(item, "rotLeft", (Math.sin((radian * index)) * itemsWidth + (itemsWidth - liWidth * topNum)).toFixed(0) + "px");
        this.$set(item, "rotTop", (Math.cos((radian * index)) * itemsHeight + (itemsHeight - liHeight * 1.1)).toFixed(0) + "px");
      })
      this.list = Object.assign([], this.list)
      this.listIndex = this.list.length;
      this.autoData();


    },
    clearIntervalFn() {
      clearInterval(this.time);
    },
    autoData() {
      this.clearIntervalFn();
      let arr = JSON.parse(JSON.stringify(this.list))
      this.time = setInterval(() => {
        this.listIndex--;
        if (this.listIndex == 0) {
          this.listIndex = arr.length;
        }
        arr.push(arr[0]); // 将数组的第一个元素添加到数组的
        arr.shift(); //删除数组的第一个元素
        arr.forEach((item, index) => {
          this.list[index].rotLeft = item.rotLeft
          this.list[index].rotTop = item.rotTop
        })

      }, 2000);
    },
  }
}
</script>

<style lang='css' scoped>
.items {
  background-color: cadetblue;
  height: 4rem;
  width: 4rem;
  margin: 1rem auto;
  border-radius: 50%;
  position: relative;
}

.items .item {
  width: 1.2rem;
  height: 0.8rem;
  line-height: 0.8rem;
  text-align: center;
  position: absolute;
  list-style: none;
  transition: 1s all;
}
</style>


 649
649


 被折叠的 条评论
为什么被折叠?
被折叠的 条评论
为什么被折叠?
 到【灌水乐园】发言


