


css篇
height与lineheight
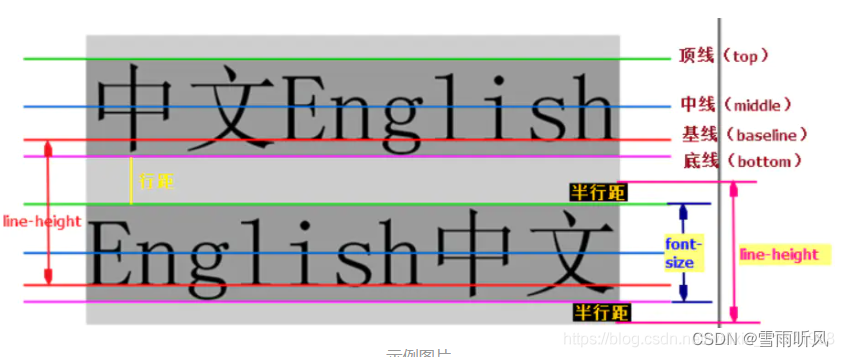
顶线:文字顶部对齐的线
中线:文字中部的画线
基线:英文字母下端沿线
底线: 文字底部对齐的线
从图片上看,很容易看出fontsize就是文字的高度,是顶线到底线之间的距离
line-height行高=fontsize+行距
接下来是比较重要的
也就是height与line-height之间的关系
height:就是盒子的高度
line-height:是行高,文字会处于行高的中间
当height=line-height时,文字处于div的垂直正中间
vue篇
v-bind
绑定样式
<div v-bind:style="{ color: activeColor, fontSize: fontSize + 'px' }"></div>
color: activeColor中,activeColor是在data中定义的,可以直接使用
:style="`color:${item.color}`"
item.color 是一个变量,所以需要使用模板字符串
prevent
.prevent的作用是用来阻止浏览器的默认事件的。
浏览器的事件包括以下三种:
1.超链接的自动跳转:
比如下方这个超链接,你点击了就会到百度页面。
2.form标签中的submit按钮点击导致的页面刷新。
3.网页中右键单机,会弹出一个菜单
v-if
v-if 是“真正”的条件渲染,因为它会确保在切换过程中条件块内的事件监听器和子组件适当地被销毁和重建。
v-if 也是惰性的:如果在初始渲染时条件为假,则什么也不做——直到条件第一次变为真时,才会开始渲染条件块。
插槽
编译作用域
<navigation-link url="/profile">
  Clicking here will send you to: {{ url }}
  <!--
  这里的 `url` 会是 undefined,因为其 (指该插槽的) 内容是
  _传递给_ <navigation-link> 的而不是
  在 <navigation-link> 组件*内部*定义的。
  -->
</navigation-link>
父级模板里的所有内容都是在父级作用域中编译的;子模板里的所有内容都是在子作用域中编译的。
具名插槽
具名插槽的缩写:(v-slot:) 替换为字符 #。例如 v-slot:header 可以被重写为 #header
<header>
    <slot name="header"></slot>			//格式:slot标签 name=“XXX”
  </header>
  <main>
    <slot></slot>
  </main>
  <footer>
    <slot name="footer"></slot>
  </footer>


在向具名插槽提供内容的时候,我们可以在一个 <template> 元素上使用 **v-slot 指令**,并以 v-slot 的参数的形式提供其名称:
<base-layout>
  <template v-slot:header>
    <h1>Here might be a page title</h1>			//格式:**v-slot:name**
  </template>

  <p>A paragraph for the main content.</p>
  <p>And another one.</p>

  <template v-slot:footer>
    <p>Here's some contact info</p>
  </template>
</base-layout>
作用域插槽 !!!
https://v2.cn.vuejs.org/v2/guide/components-slots.html#%E4%BD%9C%E7%94%A8%E5%9F%9F%E6%8F%92%E6%A7%BD
让插槽内容(父组件中)能够访问子组件中才有的数据是很有用的
<span>
	<slot>{{ user.firstName}}</slot>
</span>
==>>
<current-user>
  {{ user.firstName }}
</current-user>
错误,父组件获取不到子组件中的user
只有 组件可以访问到 user,而我们提供的内容是在父级渲染的。
为了让 user 在父级的插槽内容中可用,我们可以将 user 作为 元素的一个 attribute 绑定上去:
子组件中:
<span>
	<slot v-bind:user="user">{{ user.firstName}}</slot>
</span>
绑定在 元素上的 attribute 被称为插槽 prop。现在在父级作用域中,我们可以使用带值的 v-slot 来定义我们提供的插槽 prop 的名字:
<current-user>
  <template v-slot:default="slotProps">		//	slotProps 是我们自定义的插槽prop的名字 通过这个名字可以获取到子组件插槽暴露出来的attribute
    {{ slotProps.user.firstName }}
  </template>
</current-user>					【解构前】
作用域插槽总结:父组件想要渲染子组件中的值,但是不能直接写子组件中的变量,此时需要子组件使用v-bind:/ v-bind= 去将子组件中的值暴露给父组件。父组件需要使用slot-scope 或者 v-slot 去定义插槽prop name 并在父组件中使用。
解构插槽 Prop
【解构后】
<current-user v-slot="{ user }">
  {{ user.firstName }}
</current-user>
【解构且重命名】
<current-user v-slot="{ user: person }">
  {{ person.firstName }}
</current-user>
【解构且设定默认值】
<current-user v-slot="{ user = { firstName: 'Guest' } }">
  {{ user.firstName }}
</current-user>
父组件独占默认插槽的缩写语法
父组件中:(v-slot 一定是在父组件中,代表占用某插槽,v-slot 只能添加在 上 )
<current-user v-slot:default="slotProps">
  {{ slotProps.user.firstName }}
</current-user>
<current-user v-slot="slotProps">
  {{ slotProps.user.firstName }}
</current-user>
默认插槽不能和其他具名插槽共同使用,如果同时出现默认插槽和其他具名插槽,应该使用完整语法
废弃的slot语法
带有 slot attribute 的具名插槽(旧)【slot为attribute 】vs 具名插槽(新)【v-slot】
相同点:(用在父组件中,将内容从父级传给具名插槽)
旧
//slot使用在  【template】 中  【slot作为 attribute 被使用】
 <template slot="header">
    <h1>Here might be a page title</h1>
  </template>
  slot使用在  【 普通元素 】 中  【slot作为 attribute 被使用】
   <h1 slot="header">Here might be a page title</h1>
新
<template v-slot:header>
    <h1>Here might be a page title</h1>
  </template>
带有 slot-scope attribute 的作用域插槽(旧) vs 作用域插槽(新)
在 <template> 或者 普通元素 上使用特殊的 slot-scope attribute,可以接收传递给插槽的 prop 【slot-scope 是使用在template和普通元素上(与新版不同),且作为attribute 使用】
使用带值的 v-slot 来定义我们提供的插槽 prop 的名字
不同点:在父组件中template 或者普通元素 中使用slot-scope定义prop是旧版,在子组件中template或者任意标签中使用slot作为attribute的是旧版。
在父组件中template中使用v-slot是新版,在子组件中使用slot标签(元素)是新版
相同点:子组件传值都是使用v-bind
新版具名插槽(父级,占用)和作用域插槽(父级,占用,获取子组件prop)都是使用v-slot ,具名:v-slot:name 作用域:v-slot:name=propname
<slot-example>
  <template slot="default" slot-scope="slotProps">
    {{ slotProps.msg }}
  </template>
</slot-example>
//作用域插槽,用于父级【 slot="default" slot-scope="slotProps"==v-slot:default=slotProp】
示例:
<el-table-column
      fixed="right"
      label="操作"
      width="100">
      <template slot-scope="scope">
        <el-button @click="handleClick(scope.row)" type="text" size="small">查看</el-button>
        <el-button type="text" size="small">编辑</el-button>
      </template>
    </el-table-column>
element ui table中的操作列。组件占用了插槽(template、slot-scope)scope可以获取到element底层封装好的子组件传递的prop。代码中, slot-scope="scope"获取到了传递过来的值,子组件可能有默认内容,但是是插槽,就会被当前插槽所替代,并执行当前逻辑。
javascript篇
&&
当且仅当一组操作数的所有操作数都为真时,一组操作数的逻辑 AND () 运算符(逻辑连词)为真。它通常与布尔(逻辑)值一起使用。如果是,则返回布尔值。但是,该运算符实际上返回指定操作数之一的值,因此,如果将此运算符与非布尔值一起使用,它将返回非布尔值。
可以转换为 false 的表达式示例包括:
null;
NaN;
0;
空字符串 ( 或 或""‘’``);
undefined.
true || false && false      // returns true, **because && is executed first**
(true || false) && false    // returns false, because operator precedence cannot apply
a5 = 'Cat' && 'Dog'      // t && t returns "Dog"
a6 = false && 'Cat'      // f && t returns false
a7 = 'Cat' && false      // t && f returns false
a8 = ''    && false      // f && f returns ""
a9 = false && ''         // f && f returns false
vueRouter篇
核心思想:用 Vue + Vue Router 创建单页应用非常简单:通过 Vue.js,我们已经用组件组成了我们的应用。当加入 Vue Router 时,我们需要做的就是将我们的组件映射到路由上,让 Vue Router 知道在哪里渲染它们。
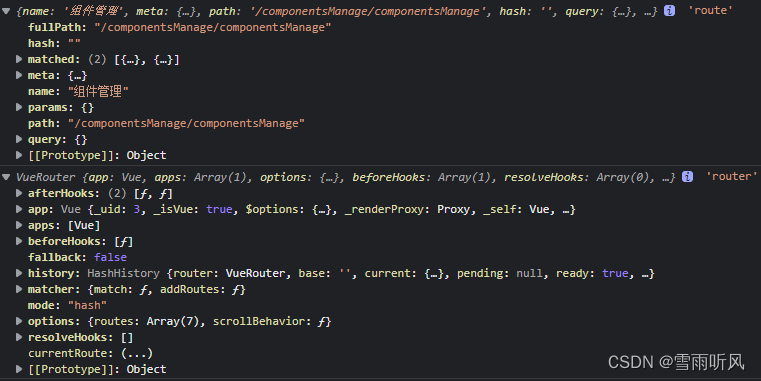
通过调用 app.use(router),我们可以在任意组件中以 this.$router 的形式访问它,并且以 this.$route 的形式访问当前路由.
this.$router 与直接使用通过 createRouter 创建的 router 实例完全相同。我们使用 this.$router 的原因是,我们不想在每个需要操作路由的组件中都导入路由。
动态路由
将给定匹配模式的路由映射到同一个组件。例如,我们可能有一个 User 组件,它应该对所有用户进行渲染,但用户 ID 不同。在 Vue Router 中,我们可以在路径中使用一个动态字段来实现,我们称之为 路径参数 (组件相同,id不同)
const routes = [
  // 动态字段以冒号开始
  { path: '/users/:id', component: User },
]
现在像 /users/johnny 和 /users/jolyne 这样的 URL 都会映射到同一个路由。
路径参数 用冒号 : 表示。当一个路由被匹配时,它的 params 的值将在每个组件中以 this.$route.params 的形式暴露出来。(是$route,不是$router) 暴露出后就可以通过params去获取并使用
/users/:username	               /users/eduardo	          { username: 'eduardo' }
/users/:username/posts/:postId	   /users/eduardo/posts/123	  { username: 'eduardo', postId: '123' }
params暴露出的是一个对象
响应路由参数的变化
从 /users/johnny 导航到 /users/jolyne 时,相同的组件实例将被重复使用。因为两个路由都渲染同个组件,比起销毁再创建,复用则显得更加高效。不过,这也意味着组件的生命周期钩子不会被调用.要对同一个组件中参数的变化做出响应的话,你可以简单地 watch $route 对象上的任意属性


 153
153


 被折叠的 条评论
为什么被折叠?
被折叠的 条评论
为什么被折叠?
 到【灌水乐园】发言


