目录:
应项目需求,需要做一个日历控件,效果图如下:
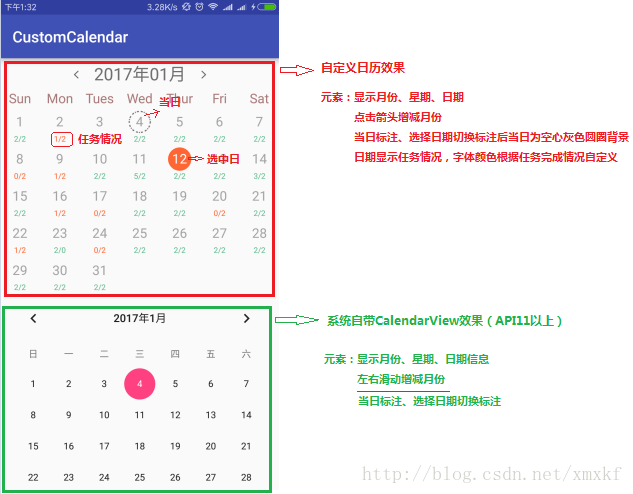
接到需求后,没有立即查找是否有相关开源日历控件可用、系统日历控件是否能满足 ,第一反应就是这个控件该怎么画?谁叫咱自定义控件技术牛逼呢O(∩_∩)O哈哈~(开个玩笑,不要这样子严肃→广告时间:要想达到哥的高度,请认真学习自定义控件系列博客喔)。言归正传,如图,上部分是自定义日历的效果图,下面是系统自带CalendarView的效果,这两个控件的相关功能需求元素图上都有标注。系统自带的日历控件能够左右滑动切换月份,效果还是挺酷的(这是我在自定义控件完毕之后才发现的),结果就后悔了,这么酷干嘛还要自定义啊?
自定义当然不是为了装逼呐,请认真看需求,我们需要在日期下面显示任务完成情况,当日被切换之后需要标注为灰色圆圈背景,这些都是自带日历控件不可达到的,当然,我们也可以继承系统CalendarView然后试着修改;那为什么不选择开源的日历控件呢?如果我们不会自定义控件或者时间很紧,开源的当然是首选,谁叫我闲的慌,开源的控件也会有些问题,有的可能不够完善很多bug,比较完善的可能内容太多,如果要抽取有用的内容还是需要花一定时间,如果整个库工程都弄过来会造成大量的代码冗余。另外一点很重要,任务情况需要从服务器上获取,当切换日期之后,日历控件下方要显示那天的任务详情(可能需要请求数据),这么多问题如果去修改开源库工程工作量不一定比自定义小。综上,还是自定义更适合我,整个日历控件500多行代码就搞定(包括注释、接口、各种变量),后面如果项目需求有变动,改动起来也是so easy! 当然,日常开发中,自带控件能搞定的尽量就用系统自带的。下面我们一起看看这个控件是怎样实现的。
1、分析
怎样自定义这个日历控件呢?可能我们第一反应是GridView+组合控件的方式,GridView用来展示下面日期部分,这种方式实现起来相对比较容易,但是核心的内容(获取某月的天数、具体展示在什么位置)还是得自己做,这种方式代码量也不少,另外这样做也会加大系统性能开销,GridView中同时显示30来个item,item里面还嵌套子控件,之前我们讲控件填充、测量时讲过尽量减少布局的嵌套,这样会造成过多的遍历,一不小心又装逼了,现在的手机那么牛逼,这么点工作量跟我谈什么性能?
第二种就是通过自定义View完全绘制出来,只需要一个类搞定。其实绘制很简单,拿到一个画笔(Paint),我们就能画天画地画美女,爱画什么画什么,不需要有品位、不需要艺术功底,比起拿2B铅笔作画简单多了。
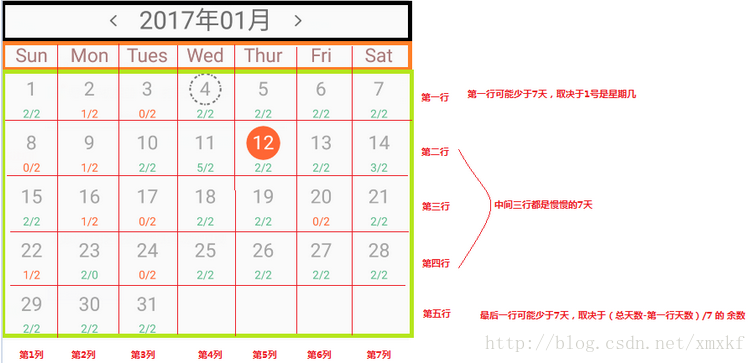
如果要绘制出这个控件,我们首先要得到某个月的所有天数(从1号开始….)、1号是星期几(从什么位置开始展示),有了这两个数据,我们就能得到第一行从哪里开始绘制,能绘制多少天,最后一行能绘制多少天,其他中间的都是绘制7天;接下来需要绘制当前日期和被选中日期的背景,其实就是在绘制日期时先判断下日期是不是当前日期,如果是就给他先画一个背景,被选择的也是一样。我们先看看获取日期的算法:
/**设置月份*/
private void setMonth(String Month){
month = str2Date(Month);
Calendar calendar = Calendar.getInstance();
calendar.setTime(new Date());
currentDay = calendar.get(Calendar.DAY_OF_MONTH);
Date cM = str2Date(getMonthStr(new Date()));
if(cM.getTime() == month.getTime()){
isCurrentMonth = true;
selectDay = currentDay;
}else{
isCurrentMonth = false;
selectDay = 0;
}
Log.d(TAG, "设置月份:"+month+" 今天"+currentDay+"号, 是否为当前月:"+isCurrentMonth);
calendar.setTime(month);
dayOfMonth = calendar.getActualMaximum(Calendar.DAY_OF_MONTH);
firstIndex = calendar.get(Calendar.DAY_OF_WEEK)-1;
lineNum = 1;
firstLineNum = 7-firstIndex;
lastLineNum = 0;
int shengyu = dayOfMonth - firstLineNum;
while (shengyu>7){
lineNum ++;
shengyu-=7;
}
if(shengyu>0){
lineNum ++;
lastLineNum = shengyu;
}
Log.i(TAG, getMonthStr(month)+"一共有"+dayOfMonth+"天,第一天的索引是:"+firstIndex+" 有"+lineNum+
"行,第一行"+firstLineNum+"个,最后一行"+lastLineNum+"个");
}
- 1
- 2
- 3
- 4
- 5
- 6
- 7
- 8
- 9
- 10
- 11
- 12
- 13
- 14
- 15
- 16
- 17
- 18
- 19
- 20
- 21
- 22
- 23
- 24
- 25
- 26
- 27
- 28
- 29
- 30
- 31
- 32
- 33
- 34
- 35
- 36
- 37
- 38
- 39
- 40
- 1
- 2
- 3
- 4
- 5
- 6
- 7
- 8
- 9
- 10
- 11
- 12
- 13
- 14
- 15
- 16
- 17
- 18
- 19
- 20
- 21
- 22
- 23
- 24
- 25
- 26
- 27
- 28
- 29
- 30
- 31
- 32
- 33
- 34
- 35
- 36
- 37
- 38
- 39
- 40
2、自定义属性
自定义属性相关的知识请参考Android自定义View(二、深入解析自定义属性),这里就不多说了,我们看看本控件都定义了那些属性:
<?xml version="1.0" encoding="utf-8"?>
<resources>
<declare-styleable name="CustomCalendar">
<attr name="mBgMonth" format="color" />
<attr name="mBgWeek" format="color" />
<attr name="mBgDay" format="color" />
<attr name="mBgPre" format="color" />
<attr name="mTextColorMonth" format="color" />
<attr name="mTextColorWeek" format="color" />
<attr name="mTextColorDay" format="color" />
<attr name="mTextColorPreFinish" format="color" />
<attr name="mTextColorPreUnFinish" format="color" />
<attr name="mSelectTextColor" format="color" />
<attr name="mSelectBg" format="color" />
<attr name="mCurrentBg" format="color" />
<attr name="mCurrentBgStrokeWidth" format="dimension" />
<attr name="mCurrentBgDashPath" format="reference" />
<attr name="mTextSizeMonth" format="dimension" />
<attr name="mTextSizeWeek" format="dimension" />
<attr name="mTextSizeDay" format="dimension" />
<attr name="mTextSizePre" format="dimension" />
<attr name="mMonthRowL" format="reference" />
<attr name="mMonthRowR" format="reference" />
<attr name="mMonthRowSpac" format="dimension" />
<attr name="mSelectRadius" format="dimension" />
<attr name="mMonthSpac" format="dimension" />
<attr name="mLineSpac" format="dimension" />
<attr name="mTextSpac" format="dimension" />
</declare-styleable>
</resources>
- 1
- 2
- 3
- 4
- 5
- 6
- 7
- 8
- 9
- 10
- 11
- 12
- 13
- 14
- 15
- 16
- 17
- 18
- 19
- 20
- 21
- 22
- 23
- 24
- 25
- 26
- 27
- 28
- 29
- 30
- 31
- 32
- 33
- 34
- 35
- 1
- 2
- 3
- 4
- 5
- 6
- 7
- 8
- 9
- 10
- 11
- 12
- 13
- 14
- 15
- 16
- 17
- 18
- 19
- 20
- 21
- 22
- 23
- 24
- 25
- 26
- 27
- 28
- 29
- 30
- 31
- 32
- 33
- 34
- 35
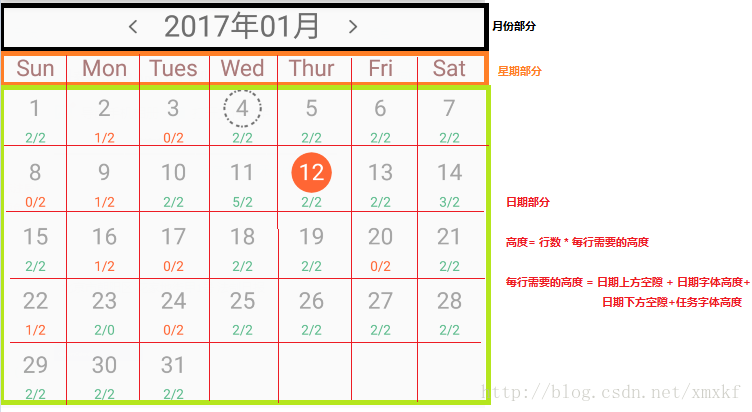
3、onMeasure()
得到需要绘制的数据之后,接下来就是重写onMeasure()方法了,这个控件需要多宽多高?宽度直接填充父窗体即可,总高度=月份高度+星期高度+日期高度,相应的数据在上面的算法中都得到了,请看下面分析图:
代码:
/**计算相关常量,构造方法中调用*/
private void initCompute(){
mPaint = new Paint();
bgPaint = new Paint();
mPaint.setAntiAlias(true);
bgPaint.setAntiAlias(true);
map = new HashMap<>();
mPaint.setTextSize(mTextSizeMonth);
titleHeight = FontUtil.getFontHeight(mPaint) + 2 * mMonthSpac;
mPaint.setTextSize(mTextSizeWeek);
weekHeight = FontUtil.getFontHeight(mPaint);
mPaint.setTextSize(mTextSizeDay);
dayHeight = FontUtil.getFontHeight(mPaint);
mPaint.setTextSize(mTextSizePre);
preHeight = FontUtil.getFontHeight(mPaint);
oneHeight = mLineSpac + dayHeight + mTextSpac + preHeight;
String cDateStr = getMonthStr(new Date());
setMonth(cDateStr);
}
@Override
protected void onMeasure(int widthMeasureSpec, int heightMeasureSpec) {
int widthSize = MeasureSpec.getSize(widthMeasureSpec);
columnWidth = widthSize / 7;
float height = titleHeight + weekHeight + (lineNum * oneHeight);
Log.v(TAG, "标题高度:"+titleHeight+" 星期高度:"+weekHeight+" 每行高度:"+oneHeight+
" 行数:"+ lineNum + " \n控件高度:"+height);
setMeasuredDimension(getDefaultSize(getSuggestedMinimumWidth(), widthMeasureSpec),
(int)height);
}
- 1
- 2
- 3
- 4
- 5
- 6
- 7
- 8
- 9
- 10
- 11
- 12
- 13
- 14
- 15
- 16
- 17
- 18
- 19
- 20
- 21
- 22
- 23
- 24
- 25
- 26
- 27
- 28
- 29
- 30
- 31
- 32
- 33
- 34
- 35
- 36
- 37
- 38
- 39
- 40
- 41
- 42
- 43
- 1
- 2
- 3
- 4
- 5
- 6
- 7
- 8
- 9
- 10
- 11
- 12
- 13
- 14
- 15
- 16
- 17
- 18
- 19
- 20
- 21
- 22
- 23
- 24
- 25
- 26
- 27
- 28
- 29
- 30
- 31
- 32
- 33
- 34
- 35
- 36
- 37
- 38
- 39
- 40
- 41
- 42
- 43
4、onDraw()
@Override
protected void onDraw(Canvas canvas) {
    drawMonth(canvas);
    drawWeek(canvas);
    drawDayAndPre(canvas);
}
①、绘制月份
private void drawMonth(Canvas canvas){
bgPaint.setColor(mBgMonth);
RectF rect = new RectF(0, 0, getWidth(), titleHeight);
canvas.drawRect(rect, bgPaint);
mPaint.setTextSize(mTextSizeMonth);
mPaint.setColor(mTextColorMonth);
float textLen = FontUtil.getFontlength(mPaint, getMonthStr(month));
float textStart = (getWidth() - textLen)/ 2;
canvas.drawText(getMonthStr(month), textStart,
mMonthSpac+FontUtil.getFontLeading(mPaint), mPaint);
Bitmap bitmap = BitmapFactory.decodeResource(getResources(), mMonthRowL);
int h = bitmap.getHeight();
rowWidth = bitmap.getWidth();
rowLStart = (int)(textStart-2*mMonthRowSpac-rowWidth);
canvas.drawBitmap(bitmap, rowLStart+mMonthRowSpac , (titleHeight - h)/2, new Paint());
bitmap = BitmapFactory.decodeResource(getResources(), mMonthRowR);
rowRStart = (int)(textStart+textLen);
canvas.drawBitmap(bitmap, rowRStart+mMonthRowSpac, (titleHeight - h)/2, new Paint());
}
- 1
- 2
- 3
- 4
- 5
- 6
- 7
- 8
- 9
- 10
- 11
- 12
- 13
- 14
- 15
- 16
- 17
- 18
- 19
- 20
- 21
- 22
- 23
- 1
- 2
- 3
- 4
- 5
- 6
- 7
- 8
- 9
- 10
- 11
- 12
- 13
- 14
- 15
- 16
- 17
- 18
- 19
- 20
- 21
- 22
- 23
②、绘制星期
private String[] WEEK_STR = new String[]{"Sun", "Mon", "Tues", "Wed", "Thur", "Fri", "Sat", };
private void drawWeek(Canvas canvas){
bgPaint.setColor(mBgWeek);
RectF rect = new RectF(0, titleHeight, getWidth(), titleHeight + weekHeight);
canvas.drawRect(rect, bgPaint);
mPaint.setTextSize(mTextSizeWeek);
mPaint.setColor(mTextColorWeek);
for(int i = 0; i < WEEK_STR.length; i++){
int len = (int)FontUtil.getFontlength(mPaint, WEEK_STR[i]);
int x = i * columnWidth + (columnWidth - len)/2;
canvas.drawText(WEEK_STR[i], x, titleHeight + FontUtil.getFontLeading(mPaint), mPaint);
}
}
③、绘制日期及任务
private void drawDayAndPre(Canvas canvas){
float top = titleHeight+weekHeight;
for(int line = 0; line < lineNum; line++){
if(line == 0){
drawDayAndPre(canvas, top, firstLineNum, 0, firstIndex);
}else if(line == lineNum-1){
top += oneHeight;
drawDayAndPre(canvas, top, lastLineNum, firstLineNum+(line-1)*7, 0);
}else{
top += oneHeight;
drawDayAndPre(canvas, top, 7, firstLineNum+(line-1)*7, 0);
}
}
}
/**
* 绘制某一行的日期
* @param canvas
* @param top 顶部坐标
* @param count 此行需要绘制的日期数量(不一定都是7天)
* @param overDay 已经绘制过的日期,从overDay+1开始绘制
* @param startIndex 此行第一个日期的星期索引
*/
private void drawDayAndPre(Canvas canvas, float top,
int count, int overDay, int startIndex){
float topPre = top + mLineSpac + dayHeight;
bgPaint.setColor(mBgDay);
RectF rect = new RectF(0, top, getWidth(), topPre);
canvas.drawRect(rect, bgPaint);
bgPaint.setColor(mBgPre);
rect = new RectF(0, topPre, getWidth(), topPre + mTextSpac + dayHeight);
canvas.drawRect(rect, bgPaint);
mPaint.setTextSize(mTextSizeDay);
float dayTextLeading = FontUtil.getFontLeading(mPaint);
mPaint.setTextSize(mTextSizePre);
float preTextLeading = FontUtil.getFontLeading(mPaint);
for(int i = 0; i<count; i++){
int left = (startIndex + i)*columnWidth;
int day = (overDay+i+1);
mPaint.setTextSize(mTextSizeDay);
if(isCurrentMonth && currentDay == day){
mPaint.setColor(mTextColorDay);
bgPaint.setColor(mCurrentBg);
bgPaint.setStyle(Paint.Style.STROKE);
PathEffect effect = new DashPathEffect(mCurrentBgDashPath, 1);
bgPaint.setPathEffect(effect);
bgPaint.setStrokeWidth(mCurrentBgStrokeWidth);
canvas.drawCircle(left+columnWidth/2, top + mLineSpac +dayHeight/2,
mSelectRadius-mCurrentBgStrokeWidth, bgPaint);
}
bgPaint.setPathEffect(null);
bgPaint.setStrokeWidth(0);
bgPaint.setStyle(Paint.Style.FILL);
if(selectDay == day){
mPaint.setColor(mSelectTextColor);
bgPaint.setColor(mSelectBg);
canvas.drawCircle(left+columnWidth/2, top + mLineSpac +dayHeight/2, mSelectRadius, bgPaint);
}else{
mPaint.setColor(mTextColorDay);
}
int len = (int)FontUtil.getFontlength(mPaint, day+"");
int x = left + (columnWidth - len)/2;
canvas.drawText(day+"", x, top + mLineSpac + dayTextLeading, mPaint);
mPaint.setTextSize(mTextSizePre);
MainActivity.DayFinish finish = map.get(day);
String preStr = "0/0";
if(finish!=null){
if(finish.finish >= finish.all) {
mPaint.setColor(mTextColorPreFinish);
}else{
mPaint.setColor(mTextColorPreUnFinish);
}
preStr = finish.finish+"/"+finish.all;
}else{
mPaint.setColor(mTextColorPreUnFinish);
}
len = (int)FontUtil.getFontlength(mPaint, preStr);
x = left + (columnWidth - len)/2;
canvas.drawText(preStr, x, topPre + mTextSpac + preTextLeading, mPaint);
}
}
- 1
- 2
- 3
- 4
- 5
- 6
- 7
- 8
- 9
- 10
- 11
- 12
- 13
- 14
- 15
- 16
- 17
- 18
- 19
- 20
- 21
- 22
- 23
- 24
- 25
- 26
- 27
- 28
- 29
- 30
- 31
- 32
- 33
- 34
- 35
- 36
- 37
- 38
- 39
- 40
- 41
- 42
- 43
- 44
- 45
- 46
- 47
- 48
- 49
- 50
- 51
- 52
- 53
- 54
- 55
- 56
- 57
- 58
- 59
- 60
- 61
- 62
- 63
- 64
- 65
- 66
- 67
- 68
- 69
- 70
- 71
- 72
- 73
- 74
- 75
- 76
- 77
- 78
- 79
- 80
- 81
- 82
- 83
- 84
- 85
- 86
- 87
- 88
- 89
- 90
- 91
- 92
- 93
- 94
- 95
- 96
- 97
- 98
- 99
- 100
- 101
- 102
- 103
- 104
- 105
这部分完成之后,我们自定义日历的绘制工作就over了,下面我们看看效果图:

5、事件处理
事件相关知识点也是自定义控件比较重要的内容,后面有空会详细介绍。下面我们看看这个控件需要处理那些事件。当点击箭头时需要增减月份,点击日期时需要置为选中。控件接受到事件之后,我要怎样知道点击的是箭头还是日期还是其他部位?只能通过事件的坐标计算了,如果在某个范围之内即可,在上面的分析图中,将控件划分成了很多小网格,这些小网格的坐标范围都是确定的(根据宽高等数据),事件发生后,只需要判断事件点坐标是否落入相应区域即可,然后边测试边修改一些细节问题,下面是事件处理先关的代码:
private PointF focusPoint = new PointF();
@Override
public boolean onTouchEvent(MotionEvent event) {
int action = event.getAction() & MotionEvent.ACTION_MASK;
switch (action) {
case MotionEvent.ACTION_DOWN:
focusPoint.set(event.getX(), event.getY());
touchFocusMove(focusPoint, false);
break;
case MotionEvent.ACTION_MOVE:
focusPoint.set(event.getX(), event.getY());
touchFocusMove(focusPoint, false);
break;
case MotionEvent.ACTION_OUTSIDE:
case MotionEvent.ACTION_CANCEL:
case MotionEvent.ACTION_UP:
focusPoint.set(event.getX(), event.getY());
touchFocusMove(focusPoint, true);
break;
}
return true;
}
/**焦点滑动*/
public void touchFocusMove(final PointF point, boolean eventEnd) {
Log.e(TAG, "点击坐标:("+point.x+" ,"+point.y+"),事件是否结束:"+eventEnd);
/**标题和星期只有在事件结束后才响应*/
if(point.y<=titleHeight){
if(eventEnd && listener!=null){
if(point.x>=rowLStart && point.x<(rowLStart+2*mMonthRowSpac+rowWidth)){
Log.w(TAG, "点击左箭头");
listener.onLeftRowClick();
}else if(point.x>rowRStart && point.x<(rowRStart + 2*mMonthRowSpac+rowWidth)){
Log.w(TAG, "点击右箭头");
listener.onRightRowClick();
}else if(point.x>rowLStart && point.x <rowRStart){
listener.onTitleClick(getMonthStr(month), month);
}
}
}else if(point.y<=(titleHeight+weekHeight)){
if(eventEnd && listener!=null){
int xIndex = (int)point.x / columnWidth;
Log.e(TAG, "列宽:"+columnWidth+" x坐标余数:"+(point.x / columnWidth));
if((point.x / columnWidth-xIndex)>0){
xIndex += 1;
}
if(listener!=null){
listener.onWeekClick(xIndex-1, WEEK_STR[xIndex-1]);
}
}
}else{
/**日期部分按下和滑动时重绘,只有在事件结束后才响应*/
touchDay(point, eventEnd);
}
}
private boolean responseWhenEnd = false;
/**事件点在 日期区域 范围内*/
private void touchDay(final PointF point, boolean eventEnd){
boolean availability = false;
float top = titleHeight+weekHeight+oneHeight;
int foucsLine = 1;
while(foucsLine<=lineNum){
if(top>=point.y){
availability = true;
break;
}
top += oneHeight;
foucsLine ++;
}
if(availability){
int xIndex = (int)point.x / columnWidth;
if((point.x / columnWidth-xIndex)>0){
xIndex += 1;
}
if(xIndex<=0)
xIndex = 1;
if(xIndex>7)
xIndex = 7;
if(foucsLine == 1){
if(xIndex<=firstIndex){
Log.e(TAG, "点到开始空位了");
setSelectedDay(selectDay, true);
}else{
setSelectedDay(xIndex-firstIndex, eventEnd);
}
}else if(foucsLine == lineNum){
if(xIndex>lastLineNum){
Log.e(TAG, "点到结尾空位了");
setSelectedDay(selectDay, true);
}else{
setSelectedDay(firstLineNum + (foucsLine-2)*7+ xIndex, eventEnd);
}
}else{
setSelectedDay(firstLineNum + (foucsLine-2)*7+ xIndex, eventEnd);
}
}else{
setSelectedDay(selectDay, true);
}
}
/**设置选中的日期*/
private void setSelectedDay(int day, boolean eventEnd){
Log.w(TAG, "选中:"+day+" 事件是否结束"+eventEnd);
selectDay = day;
invalidate();
if(listener!=null && eventEnd && responseWhenEnd && lastSelectDay!=selectDay) {
lastSelectDay = selectDay;
listener.onDayClick(selectDay, getMonthStr(month) + selectDay + "日", map.get(selectDay));
}
responseWhenEnd = !eventEnd;
}
- 1
- 2
- 3
- 4
- 5
- 6
- 7
- 8
- 9
- 10
- 11
- 12
- 13
- 14
- 15
- 16
- 17
- 18
- 19
- 20
- 21
- 22
- 23
- 24
- 25
- 26
- 27
- 28
- 29
- 30
- 31
- 32
- 33
- 34
- 35
- 36
- 37
- 38
- 39
- 40
- 41
- 42
- 43
- 44
- 45
- 46
- 47
- 48
- 49
- 50
- 51
- 52
- 53
- 54
- 55
- 56
- 57
- 58
- 59
- 60
- 61
- 62
- 63
- 64
- 65
- 66
- 67
- 68
- 69
- 70
- 71
- 72
- 73
- 74
- 75
- 76
- 77
- 78
- 79
- 80
- 81
- 82
- 83
- 84
- 85
- 86
- 87
- 88
- 89
- 90
- 91
- 92
- 93
- 94
- 95
- 96
- 97
- 98
- 99
- 100
- 101
- 102
- 103
- 104
- 105
- 106
- 107
- 108
- 109
- 110
- 111
- 112
- 113
- 114
- 115
- 116
- 117
- 118
- 119
- 120
- 121
- 122
- 123
- 124
最终效果如下:
本篇博客讲解没有特别细致,但是关键的思路已经很清晰了,其实自定义控件也就那么会事儿,在之前自定义控件系列博客及案例中已经讲解的非常详细了;如果后面我再更新自定义系列文章也将侧重讲解思路,知识点不熟悉的还请移步自定义控件基础。
源码下载:
注:没有积分的童鞋 请点赞留言索要代码
http://download.csdn.net/detail/u010163442/9728781
转载出处:
http://blog.csdn.net/xmxkf/article/details/54020386
本文出自:【openXu的博客】


 7万+
7万+

 被折叠的 条评论
为什么被折叠?
被折叠的 条评论
为什么被折叠?
 到【灌水乐园】发言


