


一、 利用系统光盘镜像,构建yum源


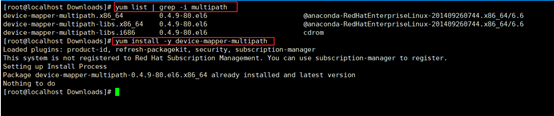
二、 安装device-mapper-multipath包
yum install -y device-mapper-multipath
三、 修改配置文件,并启动服务;
rpm -ql device-mapper-multipath

ls -l /etc/multipath.conf

cat /etc/multipath.conf|sed '/^#/d' |sed '/^s/d'
defaults {
        user_friendly_names yes
}
devices {
        device {
        vendor "HITACHI"
        product "OPEN-.*"
        path_grouping_policy multibus
        path_selector "service-time 0"
        path_checker tur
        features "0"
        hardware_handler "0"
        prio const
        rr_weight uniform
        no_path_retry 6
        rr_min_io 1000
        rr_min_io_rq 1
        }
}

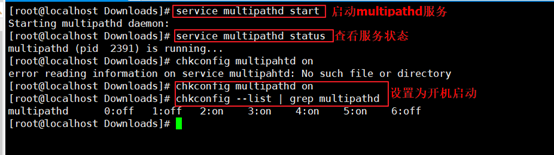
service multipathd start

service multipathd status

chkconfig multipathd on

chkconfig --list|grep multipathd
以下是从存储划分到该主机的LUN:

使用multipath扫盘:


四、 后续所有对LUN的操作路径,都使用/dev/mapper/mpath*


 6282
6282


 被折叠的 条评论
为什么被折叠?
被折叠的 条评论
为什么被折叠?
 到【灌水乐园】发言


