


 这篇博客详细介绍了如何使用Java实现文件和图片的上传及删除操作。首先,通过封装ImageVO对象来处理上传业务,利用SpringMVC的MultipartFile API简化文件处理。接着,提供了将文件保存到本地磁盘的完整代码,包括controller和service层的实现。最后,展示了文件删除的代码,通过编辑FileController和FileService实现浏览器上的删除操作。

文件/图片上传业务接口文档

业务说明:
当用户选择多张图片上传时——文件图片的上传,假如有三张图片,并不是三张同时上传,而是一张一张来进行上传的
只能用post类型传,因为get类型url只最多支持2k

具体实现
1、根据接口文档封装所需要返回的ImageVO对象


package com.jt.vo;

import lombok.AllArgsConstructor;
import lombok.Data;
import lombok.NoArgsConstructor;
import lombok.experimental.Accessors;

@Data
@Accessors(chain = true)
@NoArgsConstructor
@AllArgsConstructor
public class ImageVO {
    private String virtualPath; //动态变化的路径
    private String urlPath;  //网络地址
    private String fileName; //图片名称
//String virtualPath = datePath + fileName;//虚拟路径/动态变化的 全 路径=虚拟路径/动态变化的路径 + 文件名
//String urlPath =  rootURl + virtualPath;//图片服务器网址 +  virtualPath/虚拟路径/动态变化的 全 路径

}
文件上传入门案例(新的高级API MultipartFile)
- SpringMVC针对与IO操作开发了MultipartFile
- 底层实现就是常规IO流,简化了用户的操作过程.无需手动关流
- SpringMVC中默认支持最大1M的文件
步骤:
1.获取 文件名称
2.准备 文件路径
3.准备文件上传的全路径(文件路径+文件名称 1和2步)
4.实现文件上传操作
package com.jt.controller;

import com.jt.vo.SysResult;
import org.springframework.web.bind.annotation.CrossOrigin;
import org.springframework.web.bind.annotation.PostMapping;
import org.springframework.web.bind.annotation.RequestMapping;
import org.springframework.web.bind.annotation.RestController;
import org.springframework.web.multipart.MultipartFile;

import java.io.File;
import java.io.IOException;
import java.io.InputStream;

@RestController
@CrossOrigin
@RequestMapping("/file")
public class FileController {

    /**
     * URL: /file/upload
     * 类型: post
     * 参数: file=字节信息
     * 返回值: SysResult(ImageVO)
     * 知识点:
     *   SpringMVC针对与IO操作开发了MultipartFile
     *   底层实现就是常规IO流,简化了用户的操作过程.无需手动关流
     *   SpringMVC中默认支持最大1M
     * 步骤:
     *      1.获取文件名称
     *      2.准备文件路径
     *      3.准备文件上传的全路径
     *      4.实现文件上传操作
     */
    @PostMapping("/upload")
    public SysResult upload(MultipartFile file) throws IOException {
        //1.获取文件名称  a.jpg
        String fileName = file.getOriginalFilename();
        //2.准备文件目录
        String dir = "D:/project3/images";
        File dirFile = new File(dir);//把这个字符串路径转换成一个对象,接下来我们才能用对象的方式去操作它
        if(!dirFile.exists()){//判断目录是否存在
            dirFile.mkdirs(); //创建多级目录
        }

        //3、准备文件上传的全路径
        String path = dir + "/" + fileName;
        //实现文件上传
        file.transferTo(new File(path));
        return SysResult.success();
    }
}
2、文件/图片上传完整代码——把文件/图片存到自己电脑磁盘
1)先构建File层级代码(controller层+service层 无mapper层)
2)编辑FileController
@RestController
@CrossOrigin
@RequestMapping("/file")

     * URL: /file/upload
     * 类型: post
     * 参数: file=字节信息
     * 返回值: SysResult(ImageVO)
public class FileController {

    @Autowired
    private FileService fileService;

    @PostMapping("/upload")
    public SysResult fileUpload(MultipartFile file){

        ImageVO imageVO = fileService.upload(file);
        if(imageVO == null ){
            return SysResult.fail();
        }
        return SysResult.success(imageVO);
    }
   }
3)编辑FileService
ImageVO upload(MultipartFile file);package com.jt.service;
import com.jt.vo.ImageVO;
import org.springframework.stereotype.Service;
import org.springframework.web.multipart.MultipartFile;
import javax.imageio.ImageIO;
import java.awt.image.BufferedImage;
import java.io.IOException;
@Service
public class FileServiceImpl implements FileService{
/**
* 思路:
* 1.校验文件是否为图片(正则表达式) 校验图片类型
* 2.防止文件为恶意程序 木马.exe.jpg
* 3.分目录存储 按照时间维度划分——D:\project3\images\2022\01\02 2022年01月02日
* 4.防止文件重名 UUID
*/
@Override
public ImageVO upload(MultipartFile file) {
//1.获取图片名称,并全部转化为小写——因为Java区分大小写,windows不区分大小写
String fileName = file.getOriginalFilename().toLowerCase();
if(!fileName.matches("^.+\\.(jpg|png|gif)$")){ //判断是不是jpg/png/gif图片格式
return null;//如果不满足,返回null
//返回空 不能告诉用户输入正确,所以要在controller层判断imageVO是否为空
}
//2.通过校验宽度和高度判断是否为图片 bufferedImage是图片包装对象
try {
BufferedImage bufferedImage = ImageIO.read(file.getInputStream());
int width = bufferedImage.getWidth();
int height = bufferedImage.getHeight();
if(width == 0 || height == 0){
return null;
}
} catch (IOException e) {
//一般条件下为了不影响代码结构,将检查异常,转化为运行时异常
e.printStackTrace();
throw new RuntimeException(e);
}
return null;
}
}
package com.jt.service;

import com.jt.vo.ImageVO;
import org.springframework.stereotype.Service;
import org.springframework.web.multipart.MultipartFile;

import javax.imageio.ImageIO;
import java.awt.image.BufferedImage;
import java.io.File;
import java.io.IOException;
import java.text.SimpleDateFormat;
import java.util.Date;
import java.util.UUID;

@Service
public class FileServiceImpl implements FileService{

    //定义文件的根目录/固定路径
    private String rootDir = "D:/project3/images";
    //定义图片服务器网址
    private String rootURl = "http://image.jt.com";

    /**
     * 思路:
     *  1.校验文件是否为图片  校验图片类型
     *  2.防止文件为恶意程序  木马.exe.jpg
     *  3.分目录存储         按照时间维度划分
     *  4.防止文件重名       UUID
     */
    @Override
    public ImageVO upload(MultipartFile file) {
        //1.获取图片名称,全部转化为小写  abc.jpg
        String fileName = file.getOriginalFilename().toLowerCase();
        if(!fileName.matches("^.+\\.(jpg|png|gif)$")){
            return null;
        }

        //2.通过校验宽度和高度判断是否为图片 bufferedImage图片包装对象
        try {
            BufferedImage bufferedImage = ImageIO.read(file.getInputStream());
            int width = bufferedImage.getWidth();
            int height = bufferedImage.getHeight();
            if(width == 0 || height == 0){
                return null;
            }

            //3.实现分目录的存储——需要先 定义文件的根目录/固定路径  如上;然后拼接下面生成的 虚拟路径/动态变化的路径
            String datePath = new SimpleDateFormat("/yyyy/MM/dd/").format(new Date());//SimpleDateFormat 时间转换API 可以把时间转换为字符串
//括号里面的表达式:我们要把时间转化为什么样的格式   SimpleDateFormat("/yyyy年/MM月/dd日/HH小时/mm分钟/ss秒")
            //D:/project3/images/2025/11/11/
            String fileDir = rootDir + datePath; //文件的根目录/固定路径 + 虚拟路径/动态变化的路径
            File dirFile = new File(fileDir);
            if(!dirFile.exists()){ //判断当前目录是否存在,不存在创建一个
                dirFile.mkdirs();
            }

            //4.动态生成UUID——防止文件重名       UUID
            String UUID = java.util.UUID.randomUUID().toString();
            int index = fileName.lastIndexOf(".");获取图片名称的后缀  截取字符串
            String fileType = fileName.substring(index);//获取图片名称的后缀  截取字符串
            fileName = UUID+fileType;//生成的新UUID的不重复的文件名

            //5.实现文件上传  准备文件的全路径
            String path = fileDir + fileName;
            file.transferTo(new File(path));

            //6.准备ImageVO数据返回 /2021/11/11/uuid.jpg
            //封装VO对象对象——ImageVO需要三个参数virtualPath urlPath fileName/上面已经生成了
            String virtualPath = datePath + fileName;//虚拟路径/动态变化的 全 路径=虚拟路径/动态变化的路径 + 文件名
            //String urlPath = "https://img14.360buyimg.com/n0/jfs/t1/172855/37/23003/136174/61b053d3Eb780b286/448d26aa148e6ea7.jpg";
            //按照要求封装图片网络地址
            //http://image.jt.com/2021/11/11/uuid.jpg
            String urlPath =  rootURl + virtualPath;//图片服务器网址 +  virtualPath/虚拟路径/动态变化的 全 路径
            System.out.println(urlPath);
            ImageVO imageVO = new ImageVO(virtualPath,urlPath, fileName);
            return imageVO;
        } catch (IOException e) {
            //一般条件下为了不影响代码结构,将检查异常,转化为运行时异常
            e.printStackTrace();
            throw new RuntimeException(e);
        }
    }
}
3、文件删除完整代码——在浏览器删除操作就会把文件/图片从自己电脑磁盘删除
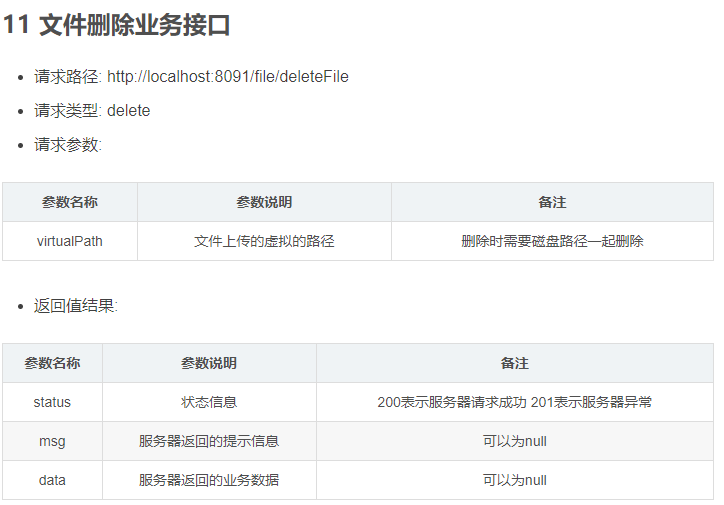
1)编辑FileController
 /**
     * 完成图片的删除操作
     * URL: http://localhost:8091/file/deleteFile
     * 参数: virtualPath
     * 返回值: SysResult对象
     */
    @DeleteMapping("/deleteFile")
    public SysResult deleteFile(String virtualPath){

        fileService.deleteFile(virtualPath);
        return SysResult.success();
    }
2)编辑FileService
void deleteFile(String virtualPath); //删除文件 需要文件全路径——文件的根目录/固定路径+虚拟路径/动态变化的 全 路径
@Override
public void deleteFile(String virtualPath) {
String localPath = rootDir + virtualPath;
File file = new File(localPath);
if(file.exists()){ //如果文件存在,则删除
file.delete();
}
}


 957
957

 被折叠的 条评论
为什么被折叠?
被折叠的 条评论
为什么被折叠?
 到【灌水乐园】发言


