


需求
在这里还是使用mybatis学习时使用的案例,以案例为驱动进行学习
功能需求:商品列表查询
运行环境的配置
在开始之前要确定数据库版本、jdk版本、IDE版本、tomcat版本等
数据库:MySQL 5.1.38
jdk : 1.8.0_60
IDE : intelliJ idea 2017 1.4
tomcat : 8.5.11
spring : 4.3.9
1、导入jar包
SpringMVC版本:使用Spring4.3.9版本
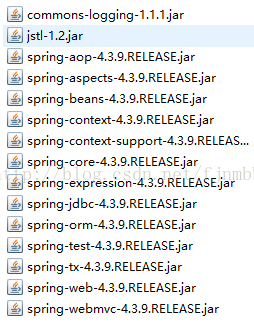
需要导入Spring4.3.9所有jar包(一定包括spring-webmvc-4.3.9.RELEASE.jar)
以及扩展包(数据库驱动,JSTL,Junit等)
所需jar包(不包括扩展包):
一个小程序测试是否正常运行
1、配置前端控制器
在web.xml中配置前端控制器,插入如下代码:
    <!-- SrpingMVC前端控制器 -->
    <servlet>
        <servlet-name>springmvc</servlet-name>
        <servlet-class>org.springframework.web.servlet.DispatcherServlet</servlet-class>
        <!--
        contextConfigLocation配置springmvc加载的配置文件(需要配置处理器映射器、适配器等)
        如果不配置contextConfigLocation , 摸人家在的是/WEB-INFO/servlet名称-servlet。xml(springmvc-servlet.xml)
         -->
        <init-param>
            <param-name>contextConfigLocation</param-name>
            <param-value>classpath:springmvc.xml</param-value>
        </init-param>
    </servlet>
    <servlet-mapping>
        <servlet-name>springmvc</servlet-name>
        <!--
        第一种配置方式: *.action 访问以 .action结尾的 由DispatcherServlet进行解析
        第二种配置方式:/ , 所有访问的地址 都由DispatcherServlet进行解析,若有图片或者其他的静态文件的解析,需要配置不让DispatcherServlet进行解析
        使用这种方式可以实现RESTful风格的url
        第三种配置模式: /* , 这样配置不对,使用该配置,最终要转发到一个JSP页面时,仍然会由dispaerServlet解析JSP,不能根据jsp页面找到handler,会报错的
        -->
        <url-pattern>*.action</url-pattern>
    </servlet-mapping>
2、配置springmvc.xml
在classpath下创建springmvc.xml,
在首部插入如下代码:
<beans xmlns="http://www.springframework.org/schema/beans"
       xmlns:xsi="http://www.w3.org/2001/XMLSchema-instance" xmlns:mvc="http://www.springframework.org/schema/mvc"
       xmlns:context="http://www.springframework.org/schema/context"
       xmlns:aop="http://www.springframework.org/schema/aop" xmlns:tx="http://www.springframework.org/schema/tx"
       xsi:schemaLocation="http://www.springframework.org/schema/beans
		http://www.springframework.org/schema/beans/spring-beans-4.3.xsd
		http://www.springframework.org/schema/mvc
		http://www.springframework.org/schema/mvc/spring-mvc-4.3.xsd
		http://www.springframework.org/schema/context
		http://www.springframework.org/schema/context/spring-context-4.3.xsd
		http://www.springframework.org/schema/aop
		http://www.springframework.org/schema/aop/spring-aop-4.3.xsd
		http://www.springframework.org/schema/tx
		http://www.springframework.org/schema/tx/spring-tx-4.3.xsd ">

    <!-- 处理器映射器 -->

    <!-- 处理器适配器 -->

    <!-- 视图解析器 -->

</beans>
3、配置处理器适配器
在classpath下的springmvc.xml配置处理器:
    <!--
    处理器适配器
    所有的处理器适配器都实现HandlerAdapter接口
    -->
    <bean class="org.springframework.web.servlet.mvc.SimpleControllerHandlerAdapter" />

得知适配器能执行实现Controller的接口Handler

4、编写handler
需要实现Controller接口,才能由springmvc里配置的适配器SimpleControllerhandleradapter执行public class ItemsController implements Controller {
@Override
public ModelAndView handleRequest(HttpServletRequest request, HttpServletResponse response) throws Exception {
//调用service查询数据库,查询商品列表,这里使用静态数据模拟
List<Items> list = new ArrayList<Items>();
//向List中填充静态数据
Items items1 = new Items();
items1.setName("苹果笔记本");
items1.setPrice(6000.0);
items1.setDetail("iMac");
Items items2 = new Items();
items2.setName("小米手机");
items2.setPrice(2499.0);
items2.setDetail("小米 mix");
list.add(items1);
list.add(items2);
//返回modelandview
ModelAndView modelAndView = new ModelAndView();
//相当于request中的setAttribute方法,在jsp页面中通过items取到书库
modelAndView.addObject("items",list);
//指定视图
modelAndView.setViewName("/WEB-INFO/jsp/items/itemsList.jsp");
return modelAndView;
}
}5、视图的编写
在WEB-INF/jsp/items目录下创建itemsList.jsp页面:
<%@ page language="java" contentType="text/html; charset=UTF-8"
    pageEncoding="UTF-8"%>
<%@ taglib uri="http://java.sun.com/jsp/jstl/core" prefix="c" %>
<%@ taglib uri="http://java.sun.com/jsp/jstl/fmt"  prefix="fmt"%>
<!DOCTYPE html PUBLIC "-//W3C//DTD HTML 4.01 Transitional//EN" "http://www.w3.org/TR/html4/loose.dtd">
<html>
<head>
<meta http-equiv="Content-Type" content="text/html; charset=UTF-8">
<title>查询商品列表</title>
</head>
<body>
<form action="${pageContext.request.contextPath }/item/queryItem.action" method="post">
查询条件:
<table width="100%" border=1>
<tr>
<td><input type="submit" value="查询"/></td>
</tr>
</table>
商品列表:
<table width="100%" border=1>
<tr>
	<td>商品名称</td>
	<td>商品价格</td>
	<td>商品描述</td>
	<td>操作</td>
</tr>
<c:forEach items="${items }" var="item">
<tr>
	<td>${item.name }</td>
	<td>${item.price }</td>
	<td>${item.detail }</td>

	<td><a href="${pageContext.request.contextPath }/item/editItem.action?id=${item.id}">修改</a></td>

</tr>
</c:forEach>

</table>
</form>
</body>

</html>
6、配置Handler
将上面编写的Handler处理器在spring容器中加载
在classpath下的springmvc.xml文件中配置:
    <!--
    处理器映射器
    将bean的name作为url作为url进行查找,需要在配置Handler时指定beanname(url)
    -->
    <bean class="org.springframework.web.servlet.handler.BeanNameUrlHandlerMapping" />
7、配置处理器映射器
在classpath下的springmvc.xml文件中配置处理器映射器:
    <!--
    处理器映射器
    将bean的name作为url作为url进行查找,需要在配置Handler时指定beanname(url)
    -->
    <bean class="org.springframework.web.servlet.handler.BeanNameUrlHandlerMapping" />
8、配置视图解析器
需要配置解析modelAndView的视图解析器
在classpath下的springmvc.xml文件中配置视图解析器:
    <!--
    视图解析器
    解析jsp视图,默认使用jstl,classpath要有jstl的包
    -->
    <bean class="org.springframework.web.servlet.view.InternalResourceViewResolver" />
9、调试程序
启动服务器,访问地址:http://localhost:8080/queryItems.action出现如下页面,即代表配置成功


 298
298

 被折叠的 条评论
为什么被折叠?
被折叠的 条评论
为什么被折叠?
 到【灌水乐园】发言


