


在以前的web应用中,开发树形控件是相当麻烦的工作。而使用ExtJS库中的TreePannel控件,可以大大方便树形控件的开发,好了,闲话少说,进入正题:
1.用*.json文件模拟后台输出,其中树结点的cls属性表示节点前的图标,在layerList.css中定义;
layerList.json
[{
text: ' 我的地图 ' ,
children:
[{
id: ' layer1 ' ,
text: ' map_A ' ,
leaf: true ,
cls: ' editable '
},{
id: ' layer2 ' ,
text: ' map_B ' ,
leaf: true ,
cls: ' selectable '
},{
id: ' layer3 ' ,
text: ' map_C ' ,
leaf: true ,
cls: ' visible '
},{
id: ' layer4 ' ,
text: ' map_D ' ,
leaf: true ,
cls: ' hidden '
}]}]
layerList.css
.editable .x-tree-node-icon
{
background-image : url(../images/3.gif) ;
}
.selectable .x-tree-node-icon {
background-image : url(../images/2.gif) ;
}
.visible .x-tree-node-icon {
background-image : url(../images/1.gif) ;
}
.hidden .x-tree-node-icon {
background-image : url(../images/0.gif) ;
}
background-image : url(../images/3.gif) ;
}
.selectable .x-tree-node-icon {
background-image : url(../images/2.gif) ;
}
.visible .x-tree-node-icon {
background-image : url(../images/1.gif) ;
}
.hidden .x-tree-node-icon {
background-image : url(../images/0.gif) ;
}
2.在layerList.js编写树形控件,现在树节点的单击事件与右键菜单事件还未添加,该树控件提供了expand()与refresh()
var
net
=
new
Object();
net.LayerList = function (divId,listId){
var divId = divId || '' ;
var title = ' 图层列表 ' ;
var dataUrl = ' ../data/layerList.json ' ;
var setEditable = function (){};
var showCtx = function (){};
var tree = new Ext.tree.TreePanel({
root: new Ext.tree.AsyncTreeNode({
expanded: true ,
text: ' tree '
}),
renderTo:divId,
id:listId,
animate: true ,
enableDD: true ,
autoScroll: false ,
rootVisible: false ,
title:title,
loader: new Ext.tree.TreeLoader({
dataUrl:dataUrl
}),
listeners:{
click:setEditable,
contextmenu:showCtx
}
});
return {
expand: function (){
tree.root.expand( true , true );
},
refresh: function (){
tree.body.mask( " 加载图层中... " , " x-mask-loading " );
tree.root.reload();
tree.root.collapse( true , false );
setTimeout( function (){
tree.body.unmask();
tree.root.expand( true , true );
}, 1000 );
}
};
}
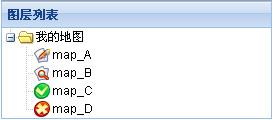
3.编写layerList.html页面,先预览下这个简单的树
<!
DOCTYPE HTML PUBLIC "-//W3C//DTD HTML 4.01//EN" "http://www.w3.org/TR/html4/strict.dtd"
>
< html >
< head >
< meta http-equiv ="Content-Type" content ="text/html; charset=utf-8" />
< title > ExtJS树,以及节点示例 </ title >
< link rel ='stylesheet' type ='text/css' href ='lib/ext/resources/css/ext-all.css' />
< script type ='text/javascript' src ='lib/ext/adapter/ext/ext-base.js' ></ script >
< script type ='text/javascript' src ='lib/ext/ext-all.js' ></ script >
< script type ='text/javascript' src ='iLib/layerList.js' ></ script >
< link rel ='stylesheet' type ='text/css' href ='iCss/layerList.css' ></ link >
< script type ='text/javascript' >
Ext.onReady( function (){
Ext.BLANK_IMAGE_URL = ' lib/ext/resources/images/default/s.gif ' ;
Ext.QuickTips.init();
var layerList = net.LayerList( ' tree ' , ' list1 ' );
layerList.expand();
})
</ script >
</ head >
< body >
< div id ='tree' ></ div >
</ body >
</ html >
树节点的图标已被自定义
4.添加树节点的右键菜单事件,在layerList.js中修改showCtx函数,并添加selectedNode变量与ctx变量
var
selectedNode;
var ctx;
var setEditable = function (){};
var showCtx = function (node,event){
node.select();
selectedNode = node;
createContextMenu();
ctx.showAt(event.getXY());
};
var createContextMenu = function (){
if (ctx)
return ;
ctx = new Ext.menu.Menu({
id: ' layerCtx ' ,
items:[{
text: ' 隐藏 ' ,
scope: this ,
iconCls: ' hidden_m ' ,
handler:Ext.emptyFn
}, ' - ' ,{
text: ' 可见 ' ,
scope: this ,
iconCls: ' visible_m ' ,
handler:Ext.emptyFn
}, ' - ' ,{
text: ' 可查询 ' ,
scope: this ,
iconCls: ' selectable_m ' ,
handler:Ext.emptyFn
}, ' - ' ,{
text: ' 可编辑 ' ,
scope: this ,
iconCls: ' editable_m ' ,
handler:Ext.emptyFn
}]
});
};
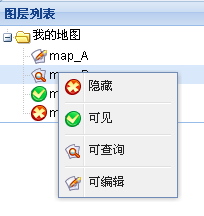
好了,至于右键菜单中的事件,就可以自由发挥了。


 1227
1227

 被折叠的 条评论
为什么被折叠?
被折叠的 条评论
为什么被折叠?
 到【灌水乐园】发言


