


最近有个工作中有个需求就是展示的图片必须圆角、正方形,当时一想这太尼玛简单了,无非就是设置一个图片参数的大小,然后在设置一个centerCrop的属性,在自定义一个类去继承BitmapTransformation重画一下。
结果写的时候发现,在glide4.0上面 centerCrop和圆角图片有冲突只能显示一个,结果就度娘问了一边,大部分都是下面这行代码,发现这个在glide4.0上面直接报错 无法使用,最后没办法了只能自己撸一遍源码看看了。
transform(new CenterCrop(getActivity()),new GlideRoundImage(getActivity()))点开centerCrop的源码
  /**
   * Applies {@link CenterCrop} to all default types and
   * throws an exception if asked to transform an unknown type.
   *
   * <p>this will override previous calls to {@link #dontTransform()} ()}.
   *
   * @see #transform(Class, Transformation)
   * @see #optionalCenterCrop()
   */
  public RequestOptions centerCrop() {
    return transform(DownsampleStrategy.CENTER_OUTSIDE, new CenterCrop());
  }
/**
 * Scale the image so that either the width of the image matches the given width and the height of
 * the image is greater than the given height or vice versa, and then crop the larger dimension to
 * match the given dimension.
 *
 * Does not maintain the image's aspect ratio
 */
public class CenterCrop extends BitmapTransformation {
  private static final String ID = "com.bumptech.glide.load.resource.bitmap.CenterCrop";
  private static final byte[] ID_BYTES = ID.getBytes(CHARSET);

  public CenterCrop() {
    // Intentionally empty.
  }

  @Deprecated
  public CenterCrop(@SuppressWarnings("unused") Context context) {
    this();
  }

  @Deprecated
  public CenterCrop(@SuppressWarnings("unused") BitmapPool bitmapPool) {
    this();
  }

  // Bitmap doesn't implement equals, so == and .equals are equivalent here.
  @SuppressWarnings("PMD.CompareObjectsWithEquals")
  @Override
  protected Bitmap transform(
      @NonNull BitmapPool pool, @NonNull Bitmap toTransform, int outWidth, int outHeight) {
    return TransformationUtils.centerCrop(pool, toTransform, outWidth, outHeight);
  }

  @Override
  public boolean equals(Object o) {
    return o instanceof CenterCrop;
  }

  @Override
  public int hashCode() {
    return ID.hashCode();
  }

  @Override
  public void updateDiskCacheKey(MessageDigest messageDigest) {
    messageDigest.update(ID_BYTES);
  }
}
不出所料 这里面也是继承了 BitmapTransformation这个类然后重画了一边,后面我们自己有调用了transform()这个方法等于把系统的Centercrop这个方法给覆盖了,所以说这两个属性谁在后面就用哪种效果,但是现在的问题是我想两个都要用咋整,那么问题来了,这下只能在自己自定义的BitmapTransformation将两个效果一起画出来了;
先是我的布局文件:很简单就一个线性布局+3个ImageView
<?xml version="1.0" encoding="utf-8"?>
<LinearLayout xmlns:android="http://schemas.android.com/apk/res/android"
    xmlns:app="http://schemas.android.com/apk/res-auto"
    xmlns:tools="http://schemas.android.com/tools"
    android:layout_width="match_parent"
    android:layout_height="match_parent"
    android:orientation="vertical"
    tools:context="com.flyinbed.myapplication.MainActivity">

    <ImageView
        android:id="@+id/icon1"
        android:layout_width="150dp"
        android:layout_height="150dp" />

    <ImageView
        android:id="@+id/icon2"
        android:layout_marginTop="10dp"
        android:layout_width="150dp"
        android:layout_height="150dp"  />

    <ImageView
        android:id="@+id/icon3"
        android:layout_marginTop="10dp"
        android:layout_width="150dp"
        android:layout_height="150dp"  />

</LinearLayout>
Activity代码:3个Imageview加载3张本地图片
public class MainActivity extends AppCompatActivity {
    private ImageView icon1,icon2,icon3;

    @Override
    protected void onCreate(Bundle savedInstanceState) {
        super.onCreate(savedInstanceState);
        setContentView(R.layout.activity_main);
        icon1 = (ImageView) findViewById(R.id.icon1);
        icon2 = (ImageView) findViewById(R.id.icon2);
        icon3 = (ImageView) findViewById(R.id.icon3);


        Glide.with(this).load(R.drawable.item1).into(icon1);
        Glide.with(this).load(R.drawable.image2).into(icon2);
        Glide.with(this).load(R.drawable.image3).into(icon3);
    }
}
先设置一下Centercrop的属性:
题外话:glide4.0想设置图片的属性现在都是通过RequestOptions()这个类来实现的,然后在glide加载的时候通过
.apply()把那个类给赛进去就好了;
@Override
    protected void onCreate(Bundle savedInstanceState) {
        super.onCreate(savedInstanceState);
        setContentView(R.layout.activity_main);
        icon1 = (ImageView) findViewById(R.id.icon1);
        icon2 = (ImageView) findViewById(R.id.icon2);
        icon3 = (ImageView) findViewById(R.id.icon3);

        RequestOptions myOptions = new RequestOptions()
                .centerCrop();

        Glide.with(this)
                .load(R.drawable.item1)
                .apply(myOptions)
                .into(icon1);
        Glide.with(this)
                .load(R.drawable.image2)
                .apply(myOptions)
                .into(icon2);
        Glide.with(this)
                .load(R.drawable.image3)
                .apply(myOptions)
                .into(icon3);
    }
现在设置transform圆角属性
protected void onCreate(Bundle savedInstanceState) {
        super.onCreate(savedInstanceState);
        setContentView(R.layout.activity_main);
        icon1 = (ImageView) findViewById(R.id.icon1);
        icon2 = (ImageView) findViewById(R.id.icon2);
        icon3 = (ImageView) findViewById(R.id.icon3);

        RequestOptions myOptions = new RequestOptions()
                .centerCrop()
                .transform(new GlideRoundTransform(this,30));

        Glide.with(this)
                .load(R.drawable.item1)
                .apply(myOptions)
                .into(icon1);
        Glide.with(this)
                .load(R.drawable.image2)
                .apply(myOptions)
                .into(icon2);
        Glide.with(this)
                .load(R.drawable.image3)
                .apply(myOptions)
                .into(icon3);
    }

很明显把Centercrop的属性给覆盖了;
下面是我自定义类GlideRoundTransform()的代码:
public class GlideRoundTransform extends BitmapTransformation {

    private static float radius = 0f;

    public GlideRoundTransform(Context context) {
        this(context, 4);
    }

    public GlideRoundTransform(Context context, int dp) {
        super(context);
        this.radius = Resources.getSystem().getDisplayMetrics().density * dp;
    }

    @Override
    protected Bitmap transform(BitmapPool pool, Bitmap toTransform, int outWidth, int outHeight) {
        return roundCrop(pool, toTransform);
    }

    private static Bitmap roundCrop(BitmapPool pool, Bitmap source) {
        if (source == null) return null;

        Bitmap result = pool.get(source.getWidth(), source.getHeight(), Bitmap.Config.ARGB_8888);
        if (result == null) {
            result = Bitmap.createBitmap(source.getWidth(), source.getHeight(), Bitmap.Config.ARGB_8888);
        }

        Canvas canvas = new Canvas(result);
        Paint paint = new Paint();
        paint.setShader(new BitmapShader(source, BitmapShader.TileMode.CLAMP, BitmapShader.TileMode.CLAMP));
        paint.setAntiAlias(true);
        RectF rectF = new RectF(0f, 0f, source.getWidth(), source.getHeight());
        canvas.drawRoundRect(rectF, radius, radius, paint);
        return result;
    }

    public String getId() {
        return getClass().getName() + Math.round(radius);
    }

    @Override
    public void updateDiskCacheKey(MessageDigest messageDigest) {

    }

}
接下来就开始解决这个问题了,在这个自定义类当中,我们要先获取到Centercrop()这个属性后得到到图片,然后在根据这个图片在进行圆角加工然后在返回。
其实屡清楚了思路很简单 也就是一样代码的事,下面是我更改以后的代码:
public class GlideRoundTransform extends BitmapTransformation {
private static float radius = 0f;
public GlideRoundTransform(Context context) {
this(context, 4);
}
public GlideRoundTransform(Context context, int dp) {
super(context);
this.radius = Resources.getSystem().getDisplayMetrics().density * dp;
}
@Override
protected Bitmap transform(BitmapPool pool, Bitmap toTransform, int outWidth, int outHeight) {
Bitmap bitmap = TransformationUtils.centerCrop(pool, toTransform, outWidth, outHeight);
return roundCrop(pool, bitmap);
}
private static Bitmap roundCrop(BitmapPool pool, Bitmap source) {
if (source == null) return null;
Bitmap result = pool.get(source.getWidth(), source.getHeight(), Bitmap.Config.ARGB_8888);
if (result == null) {
result = Bitmap.createBitmap(source.getWidth(), source.getHeight(), Bitmap.Config.ARGB_8888);
}
Canvas canvas = new Canvas(result);
Paint paint = new Paint();
paint.setShader(new BitmapShader(source, BitmapShader.TileMode.CLAMP, BitmapShader.TileMode.CLAMP));
paint.setAntiAlias(true);
RectF rectF = new RectF(0f, 0f, source.getWidth(), source.getHeight());
canvas.drawRoundRect(rectF, radius, radius, paint);
return result;
}
public String getId() {
return getClass().getName() + Math.round(radius);
}
@Override
public void updateDiskCacheKey(MessageDigest messageDigest) {
}
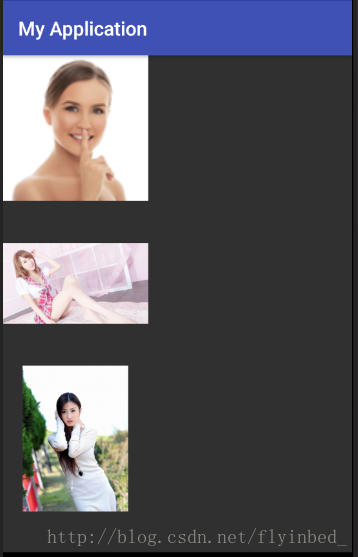
}在看看效果:

很完美,搞定收工,接下来是Activity的完整代码:
public class MainActivity extends AppCompatActivity {
    private ImageView icon1,icon2,icon3;

    @Override
    protected void onCreate(Bundle savedInstanceState) {
        super.onCreate(savedInstanceState);
        setContentView(R.layout.activity_main);
        icon1 = (ImageView) findViewById(R.id.icon1);
        icon2 = (ImageView) findViewById(R.id.icon2);
        icon3 = (ImageView) findViewById(R.id.icon3);

        //第一个是上下文,第二个是圆角的弧度
        RequestOptions myOptions = new RequestOptions()
                .transform(new GlideRoundTransform(this,30));

        Glide.with(this)
                .load(R.drawable.item1)
                .apply(myOptions)
                .into(icon1);
        Glide.with(this)
                .load(R.drawable.image2)
                .apply(myOptions)
                .into(icon2);
        Glide.with(this)
                .load(R.drawable.image3)
                .apply(myOptions)
                .into(icon3);
    }
}
要是设置的效果没用就清除下缓存,要是还不行就卸载重装好了!!!!!


 796
796


 被折叠的 条评论
为什么被折叠?
被折叠的 条评论
为什么被折叠?
 到【灌水乐园】发言


