


创建一个RDLC报表的目的主要是呈现和打印,可将Barcode 也呈现在报表上,做Label的打印。先从一个简单的Demo项目开始。
1. 创建一个WPF Project
2. 添加引用
Microsoft.ReportViewer.common
Microsoft.ReportViewer.Winforms
WindowFormsIntegration.


添加Ok后,在项目的引用中可以看到相关的组件:

3. 创建一个模型类型
public class Student
{
public int Id { get; set; }
public string Name { get; set; }
public int Age { get; set; }
}
4. Rebuild Solution
5. 添加Report 项,命名为 TestReport.rdlc
public class Student
{
public int Id { get; set; }
public string Name { get; set; }
public int Age { get; set; }
}
在TestReport上插入一个Table,可以直接在工具栏上将Table拖放放到报表上

选择数据源类型时,本例选择对象,因为从模型的实例对象取值。


可以在创建后修改数据源,这个数据源可以直接来自数据库。本例选择Student对象。

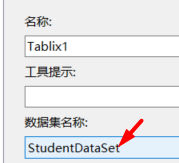
6. 在Table上单击右键,选择Tablix 属性,选择StudentDataSet

7. 可输入Header,在绑定到对应属性

8. 增加一个ViewModel类型
using System;
using System.Collections.Generic;
using System.Linq;
using System.Text;
using System.Threading.Tasks;
using System.IO;
using Microsoft.Reporting.WinForms;
using System.Windows;
namespace WpfApp_Demo
{
public class ViewModel
{
private MainWindow _window;
//private LocalReport _Report;
private ReportViewer _reportviewer;
public ViewModel(MainWindow window)
{
_window = window;
this._reportviewer = window._reportviewer;
Initialize();
}
private IEnumerable<Student> students = new List<Student>()
{
new Student { Name = "Jack", Id = 46, Age =12} ,
new Student { Name = "John", Id = 1, Age =23},
new Student { Name = "Francis", Id = 2, Age =12},
new Student { Name = "Ndu", Id = 3, Age =32},
new Student { Name = "Murphy", Id = 4, Age =22},
new Student { Name = "Charles", Id = 5, Age =52}
};
private void Initialize()
{
_reportviewer.LocalReport.DataSources.Clear();
var rpds_model = new ReportDataSource() { Name = "StudentDataSet", Value = students };
_reportviewer.LocalReport.DataSources.Add(rpds_model);
_reportviewer.LocalReport.EnableExternalImages = true;
string _path =
System.IO.Path.GetDirectoryName(System.IO.Path.GetDirectoryName(System.IO.Path.GetDirectoryName(System.IO.Directory.GetCurrentDirectory())));
string ContentStart = _path + @"\WpfApp_Demo\TestReport.rdlc";
_reportviewer.LocalReport.ReportPath = ContentStart;
_reportviewer.SetDisplayMode(DisplayMode.PrintLayout);
_reportviewer.Refresh();
_reportviewer.RefreshReport();
}
}
}
这个类初始化Report Viewer,设置 演示数据,制定rdlc文件的路径。
9. 在MainWindow.Xaml中添加Reporting.WinForms的引用
前台添加引用和Windows
xmlns:rdlcReport="clr-namespace:Microsoft.Reporting.WinForms;assembly=Microsoft.ReportViewer.WinForms"
<WindowsFormsHost Name="windowsFormsHost1" >
<rdlcReport:ReportViewer x:Name="_reportviewer" />
</WindowsFormsHost>
后台代码,创建数据绑定
public MainWindow()
{
InitializeComponent();
DataContext = new ViewModel(this);
}
测试运行:

能预期将数据显在RDLC报表上,可以做位置的调整和打印。
源码位置:https://download.csdn.net/download/flysh05/21867091?spm=1001.2014.3001.5501


 2900
2900


 被折叠的 条评论
为什么被折叠?
被折叠的 条评论
为什么被折叠?
 到【灌水乐园】发言


