


viewControl 是ios 开发的重中之重,基本上80%的工作都需要和viewControl相关,因此,了解它是每个ios开发者的必备功课。网上的viewcontrol 资料非常多,而最权威的资料还是官方文档。 下面就是我看官方文档的笔记和总结。
https://developer.apple.com/library/ios/featuredarticles/ViewControllerPGforiPhoneOS/DefiningYourSubclass.html
1.我们使用UIVIewController的子控件来显示app内容,常用的是UITableViewController, UICollectionViewController, UIVIewController.
2.Use the storyboard editor to do the following:
- Add, arrange, and configure the views for a view controller.
- Connect outlets and actions; seeHandling User Interactions.
- Create relationships and segues between your view controllers; seeUsing Segues.
- Customize your layout and views for different size classes; seeBuilding an Adaptive Interface.
- Add gesture recognizers to handle user interactions with views; seeEvent Handling Guide for iOS
- View controllers define action methods for handling higher-level events.Action methods respond to:
- Specific actions. Controls and some views call an action method to report specific interactions.
- Gesture recognizers. Gesture recognizers call an action method to report the current status of a gesture. Use your view controller to process status changes or respond to the completed gesture.
- View controllers observe notifications sent by the system or other objects. Notifications report changes and are a way for the view controller to update its state.
- View controllers act as a data source or delegate for another object. View controllers are often used to manage the data for tables, and collection views. You can also use them as a delegate for an object such as a CLLocationManager object, which sends updated location values to its delegate.
- Instantiates views using the information in your storyboard file.
- Connects all outlets and actions.
- Assigns the root view to the view controller’s view property.
- Calls the view controller’s awakeFromNib method.
When this method is called, the view controller’s trait collection is empty and views may not be in their final positions. - Calls the view controller’s viewDidLoad method.
Use this method to add or remove views, modify layout constraints, and load data for your views.
- Use Auto Layout. The constraints you create using Auto Layout are a flexible and easy way to position your content on different screen sizes.
- Take advantage of the top and bottom layout guides. Laying out content to these guides ensures that your content is always visible. The position of the top layout guide factors in the height of the status bar and navigation bar. Similarly, the position of the bottom layout guide factors in the height of a tab bar or toolbar.
- Remember to update constraints when adding or removing views. If you add or remove views dynamically, remember to update the corresponding constraints.
- Remove constraints temporarily while animating your view controller’s views. When animating views using UIKit Core Animation, remove your constraints for the duration of the animations and add them back when the animations finish. Remember to update your constraints if the position or size of your views changed during the animation.
| Task | Methods | Discussion |
| Allocate critical data structures required by your view controller. | Initialization methods | Your custom initialization method (whether it is named init or something else) is always responsible for putting your view controller object into a known good state. Use these methods to allocate whatever data structures are needed to ensure proper operation. |
| Allocate or load data to be displayed in your view. | Use the viewDidLoad method to load any data objects you intend to display. By the time this method is called, your view objects are guaranteed to exist and to be in a known good state. | |
| Respond to low-memory notifications. | Use this method to deallocate all noncritical objects associated with your view controller. Deallocate as much memory as you can. | |
| Release critical data structures required by your view controller. | Override this method only to perform any last-minute cleanup of your view controller class. The system automatically releases objects stored in instance variables and properties of your class, so you do not need to release those explicitly. |
- What is the role of the container and what role do its children play?
- How many children are displayed simultaneously?
- What is the relationship (if any) between sibling view controllers?
- How are child view controllers added to or removed from the container?
- Can the size or position of the children change? Under what conditions do those changes occur?
- Does the container provide any decorative or navigation-related views of its own?
- What kind of communication is required between the container and its children? Does the container need to report specific events to its children other than the standard ones defined by theUIViewController class?
- Can the appearance of the container be configured in different ways? If so, how?
Presenting a View Controller Defined in a Different Storyboard
Although you can create segues between view controllers in the same storyboard, you cannot create segues between storyboards. When you want to display a view controller stored in a different storyboard, you must instantiate that view controller explicitly before presenting it, as shown in Listing 8-2. The example presents the view controller modally but you could push it onto a navigation controller or display it in other ways.
在同一个storyboard的senece 可以用segue来跳转,但是不同的storyboard 见的viewControl跳转,首先必须要将VIewController实例化,见下面案例。
- UIStoryboard* sb = [UIStoryboard storyboardWithName:@"SecondStoryboard" bundle:nil];
- MyViewController* myVC = [sb instantiateViewControllerWithIdentifier:@"MyViewController"];
- // Configure the view controller.
- // Display the view controller
- [self presentViewController:myVC animated:YES completion:nil];
There is no requirement that you create multiple storyboards in your app. Here, though, are a few cases where multiple storyboards might be useful:
- You have a large programming team, with different portions of the user interface assigned to different parts of the team. Each team owns its portion of the user interface in a different storyboard file to minimize contention.
- You purchased or created a library that predefines a collection of view controller types; the contents of those view controllers are defined in a storyboard provided by the library.
- You have content that needs to be displayed on an external screen. In this case, you might keep all of the view controllers associated with the alternate screen inside a separate storyboard. An alternative pattern for the same scenario is to write a custom segue.
| Segue type | Behavior |
| Show (Push) | This segue displays the new content using the showViewController:sender: method of the target view controller. For most view controllers, this segue presents the new content modally over the source view controller. Some view controllers specifically override the method and use it to implement different behaviors. For example, a navigation controller pushes the new view controller onto its navigation stack. UIKit uses the targetViewControllerForAction:sender: method to locate the source view controller. |
| Show Detail (Replace) | This segue displays the new content using the showDetailViewController:sender: method of the target view controller. This segue is relevant only for view controllers embedded inside a UISplitViewController object. With this segue, a split view controller replaces its second child view controller (the detail controller) with the new content. Most other view controllers present the new content modally. UIKit uses the targetViewControllerForAction:sender: method to locate the source view controller. |
| Present Modally | This segue displays the view controller modally using the specified presentation and transition styles. The view controller that defines the appropriate presentation context handles the actual presentation. |
| Present as Popover | In a horizontally regular environment, the view controller appears in a popover. In a horizontally compact environment, the view controller is displayed using a full-screen modal presentation. |
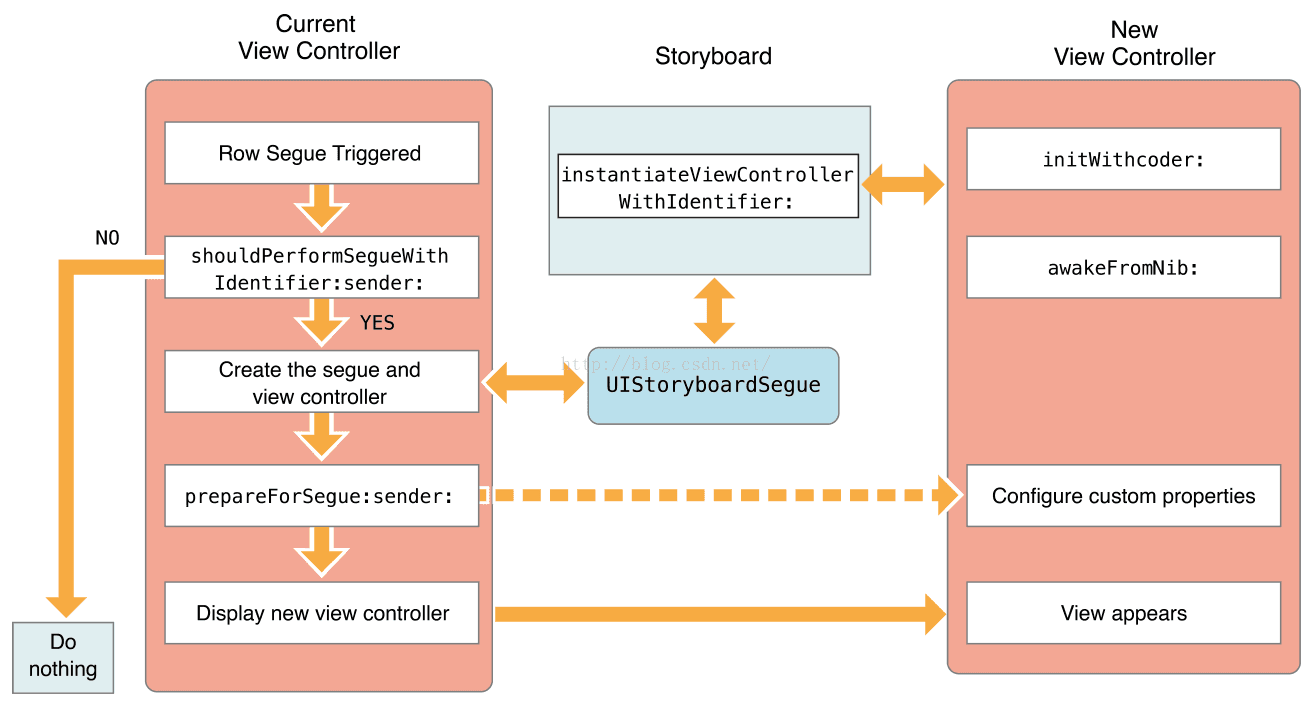
After creating a segue, select the segue object and assign an identifier to it using the attributes inspector. During a segue, you can use the identifier to determine which segue was triggered, which is especially useful if your view controller supports multiple segues. The identifier is included in the UIStoryboardSegue object delivered to your view controller when the segue is performed.
Figure 9-4Displaying a view controller using a segue (这个图非常重要,直观的现实了两个ViewContoller 之间的跳转)
To create an unwind segue
- Choose the view controller that should appear onscreen at the end of an unwind segue.
- Define an unwind action method on the view controller you chose.
The Swift syntax for this method is as follows:- @IBAction func myUnwindAction(unwindSegue: UIStoryboardSegue
The Objective-C syntax for this method is as follows: - (IBAction)myUnwindAction:(UIStoryboardSegue*)unwindSegue
- Navigate to the view controller that initiates the unwind action.
- Control-click the button (or other object) that should initiate the unwind segue. This element should be in the view controller you want to dismiss.
- Drag to the Exit object at the top of the view controller scene.
- Select your unwind action method from the relationship panel.
You must define an unwind action method in one of your view controllers before trying to create the corresponding unwind segue in Interface Builder. The presence of that method is required and tells Interface Builder that there is a valid target for the unwind segue.
Use the implementation of your unwind action method to perform any tasks that are specific to your app. You do not need to dismiss any view controllers involved in the segue yourself; UIKit does that for you. Instead, use the segue object to fetch the view controller being dismissed so that you can retrieve data from it. You can also use the unwind action to update the current view controller before the unwind segue finishes.
10.跳转后的设置。比如看点击视频后,自动横屏设置。下面有写好的代码。
Initiating a Segue Programmatically
Segues are usually triggered because of the connections you create in your storyboard file. However, there may be times when you cannot create segues in your storyboard, perhaps because the destination view controller is not yet known. For example, a game app might transition to different screens depending on the outcome of the game. In those situations, you can trigger segues programmatically from your code using the performSegueWithIdentifier:sender: method of the current view controller.
Listing 9-1 illustrates a segue that presents a specific view controller when rotating from portrait to landscape. Because the notification object in this case provides no useful information for performing the segue command, the view controller designates itself as the sender of the segue.
Listing 9-1Triggering a segue programmatically
- - (void)orientationChanged:(NSNotification *)notification {
- UIDeviceOrientation deviceOrientation = [UIDevice currentDevice].orientation;
- if (UIDeviceOrientationIsLandscape(deviceOrientation) &&
- !isShowingLandscapeView) {
- [self performSegueWithIdentifier:@"DisplayAlternateView" sender:self];
- isShowingLandscapeView = YES;
- }
- // Remainder of example omitted.
- }
Listing 9-2A custom segue
- - (void)perform {
- // Add your own animation code here.
- [[self sourceViewController] presentViewController:[self destinationViewController] animated:NO completion:nil];
- }
Size classes for devices with different screen sizes.
| Device | Portrait | Landscape |
| iPad (all) iPad Mini | Vertical size class: Regular Horizontal size class: Regular | Vertical size class: Regular Horizontal size class: Regular |
| iPhone 6 Plus | Vertical size class: Regular Horizontal size class: Compact | Vertical size class: Compact Horizontal size class: Regular |
| iPhone 6 | Vertical size class: Regular Horizontal size class: Compact | Vertical size class: Compact Horizontal size class: Compact |
| iPhone 5s iPhone 5c iPhone 5 | Vertical size class: Regular Horizontal size class: Compact | Vertical size class: Compact Horizontal size class: Compact |
| iPhone 4s | Vertical size class: Regular Horizontal size class: Compact | Vertical size class: Compact Horizontal size class: Compact |


 234
234


 被折叠的 条评论
为什么被折叠?
被折叠的 条评论
为什么被折叠?
 到【灌水乐园】发言


