八、
liferay4.2.2
下的
jBPM
开发
liferay4.2.2
中对
jBPM3.1.2
进行了集成,并且多
jpdl
语言做了扩展,主要表现在对表单数据类型的支持。表现形式为在原有变量表示的基础上为每个变量名加上前缀。下面我们通过一个稍微复杂的例子来具体讲解。
(这里
liferay
在
eclipse
下的工程名为
portal
,扩展工程名为
ext
)
1.
数据库的迁移
数据库的生成这里不再赘述,请参考前面章节建立数据库。数据库建立之后,修改
portal/jbpm-web/docroot/WEB-INF/classes/hibernate.cfg.xml
文件,此文件为
liferay
下的
jbpm
数据库配置文件,注释掉
<!-- Hypersonic -->
下的属性,根据数据库配置
<!-- SQL Server -->
下属性,我的配置如下:
<
property
name
=
"hibernate.dialect"
>
org.hibernate.dialect.SQLServerDialect
</
property
>
<
property
name
=
"hibernate.connection.driver_class"
>
net.sourceforge.jtds.jdbc.Driver
</
property
>
<
property
name
=
"hibernate.connection.url"
>
jdbc:jtds:sqlserver://127.0.0.1:1433;DatabaseName=lportal
</
property
>
<
property
name
=
"hibernate.connection.username"
>
liferay
</
property
>
<
property
name
=
"hibernate.connection.password"
>
831214
</
property
>
完成后保存文件。
2.
流程定义
在
portal/jbpm-web/docroot/WEB-INF/definitions
下右键新建一个流程,命名为
MessageSend
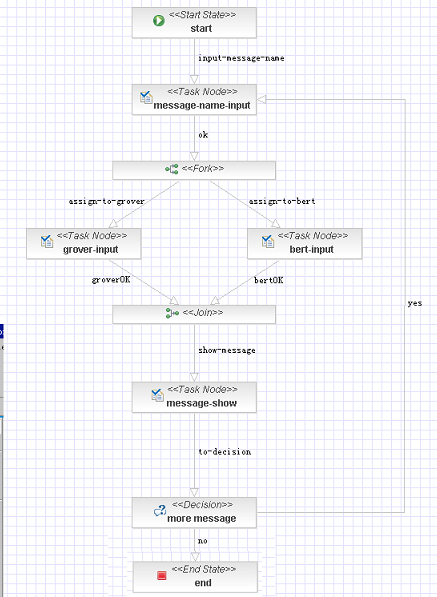
。按照下图所示建立基本流程,具体过程参照前面。
3.
定义泳道
定义一个名为
user
的泳道:

4.
定义任务
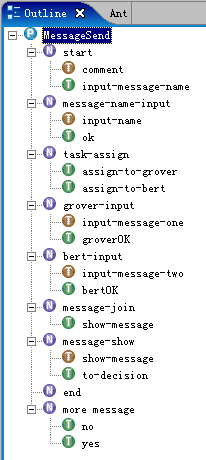
对照下图为各个节点创建任务,并将所有任务赋予泳道
user
。
5.
定义任务变量
下面分别介绍各个任务中的变量:
任务
comment
:

任务
input-name
:

任务
input-message-one
:

任务
input-message-two
:

任务
show-message
:

这里说明一下:
liferay
的
workflow portlet
对
jbpm
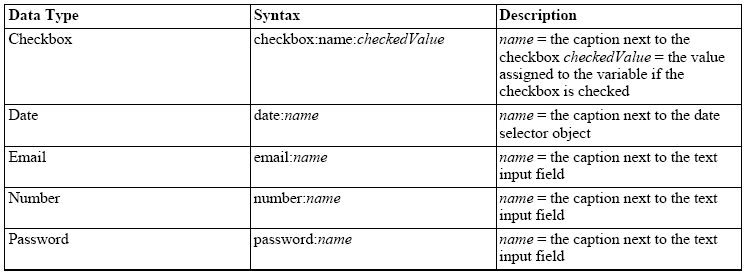
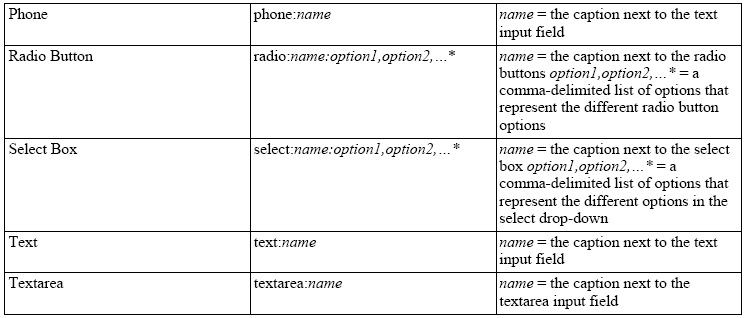
的变量定义经行了扩展,可以看到每个变量的名字都由多部分组成其中用冒号分隔,
workflow portlet
会根据变量的前缀自动为该变量生成
html
中的表单。
值得注意的是
jbpm
并不会区分前缀与变量名,而是将这个字符串作为该变量的名字。如:上图中
text:message name
,变量名就为“
text:message name
”。在程序中对该变量的引用也应使用“
text:message name
”。
具体每种数据类型的表示方法如下表:
6.
定义
Handler
及
Action
在流程中我们有一个
decision
节点,这里需要自定义一个类来对
decision
逻辑进行处理。首先,我们切换到
source
视图,找到
decision
标签,在标签中添加一个
handler
标签,该标签用来指定处理逻辑的类,具体内容如下:
<
decision
name
=
"more message"
>
<
handler
class
=
"com.liferay.jbpm.handler.MessageSendDecision"
></
handler
>
<
transition
name
=
"no"
to
=
"end"
></
transition
>
<
transition
name
=
"yes"
to
=
"message-name-input"
></
transition
>
</
decision
>
从上面可以看出定义的类为:
MessageSendDecision
,
此类的主要任务是通过判断用户的选项来决定将令牌具体传递给哪一个
transition
,下面我们实现这个类。
我们在
portal
工程中新建一个
java
文件
portal/jbpm-web/docroot/WEB-INF/src/com/liferay/jbpm/handler/MessageSendDecision.java
,内容如下:
package com.liferay.jbpm.handler;
import org.jbpm.context.exe.ContextInstance;
import org.jbpm.graph.exe.ExecutionContext;
import org.jbpm.graph.node.DecisionHandler;
public class MessageSendDecision implements DecisionHandler {
public String decide(ExecutionContext executionContext) throws Exception {
//
获取当前令牌所处的上下文
ContextInstance instance = executionContext.getContextInstance();
String decision = null;
//
获取该上下文中的变量
radio:more info:yes,no
String response = (String) instance.getVariable("radio:more info:yes,no");
//
对该变量进行判断
if (response.equalsIgnoreCase("yes") || response.equalsIgnoreCase("no"))
decision = response;
else
decision = "no";
System.out.println(decision);
//
返回
decision
//
返回的
decision
必须与定义的
transition
名相对应,否则执行默认
transition
return decision;
}
}
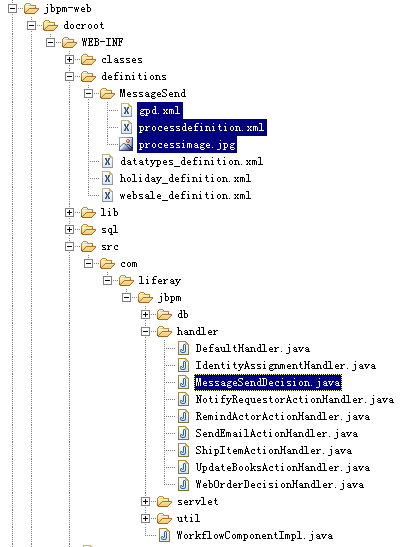
保存该文件,至此该流程的定义结束,我们可以看到
jbpm-web
目录下多了
4
个文件:
7.
部署流程
Jboss
提供的
IDE
没有支持在
liferay
下自动部署流程,因此通过
jbpm-web
下的
ant
命令进行部署。
将
jbpm-web
下的
build.xml
文件拖入
ant
窗口,依次执行命令
compile
编译我们定义的
java
类。之后执行
deploy
命令,将类和流程的定义部署到
web
应用中。打开
tomcat
下的
webapp/jbpm-web
,就可以找到新添加的相应文件。
启动
tomcat
,登录
liferay
,添加
workflow portlet
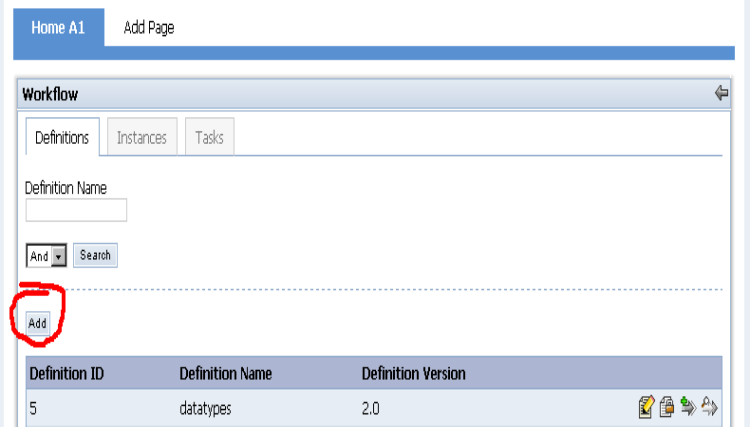
,点击
definition
选项,点击
add
:
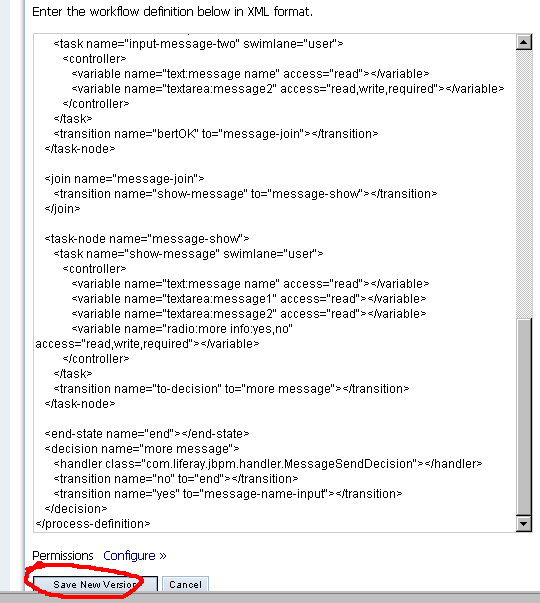
将刚才定义的流程的
processdenfinition.xml
中的内容全部拷贝到文本框中,点击
save new version
,如下:
提交成功后,可以看到列表中多了一项:

点击
add instance
,为该流程添加一个新实例,对该流程进行验证。


 2万+
2万+

 被折叠的 条评论
为什么被折叠?


