


前言
- 最近学校安排计算机操作系统实验, 在学习过程中整理了一些代码和内容, 再次记录和分享一下, 希望能帮到各位. 若有问题欢迎交流
- 代码运行环境是 vscode 配置的 C/C++ 环境和 DEV C++
实验一: 创建进程
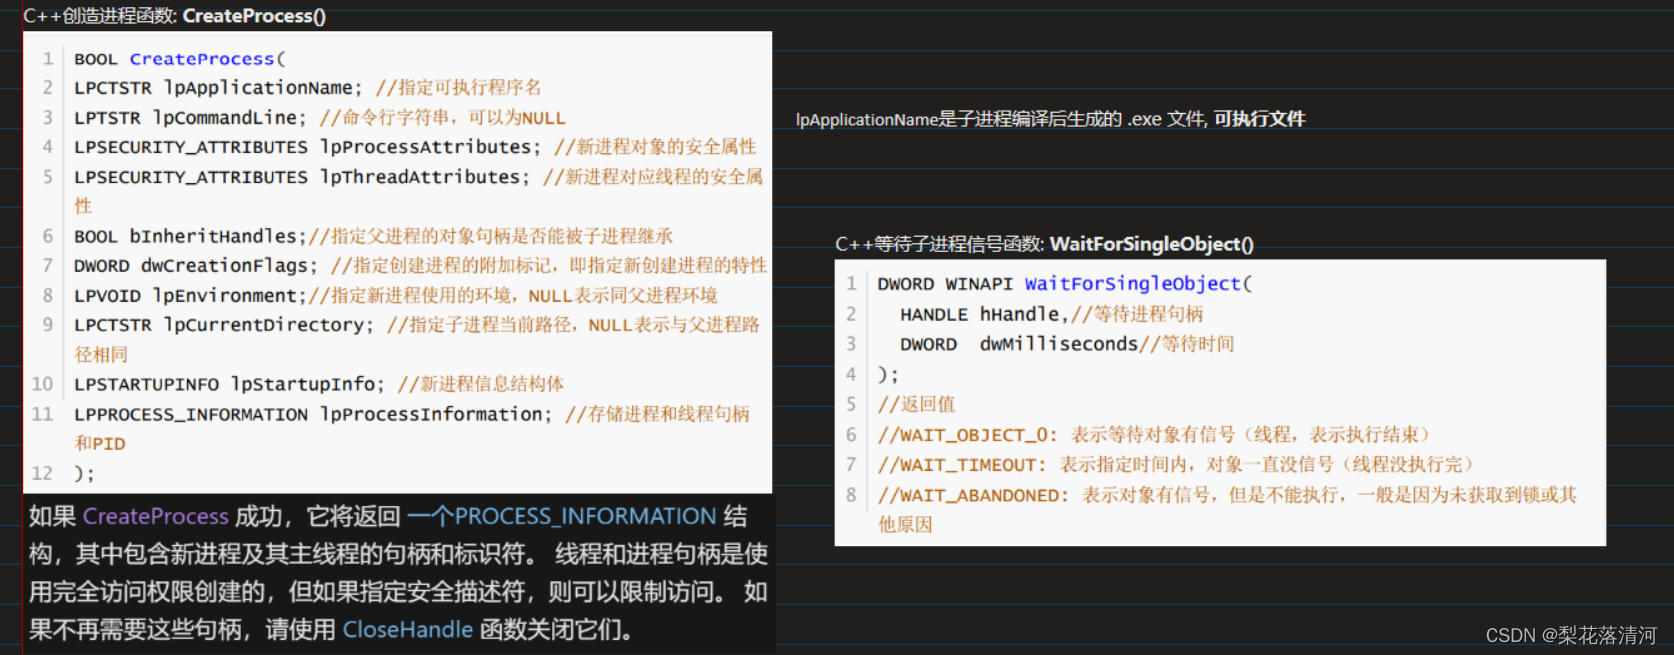
所涉及函数
PS: win平台相关的函数都可以在微软官网查到具体内容和案例 ( 虽然有的跑不起来 )
子进程程序
在这里要注意, 先使用 DEV C++ 把子进程编译成可执行文件 ( .exe ), 父进程才能基于该文件创建子进程, 结合CreateProcess()函数中参数的定义即可知道.
#include<stdio.h>
#include<windows.h>
int main()
{
	printf("子进程开始运行...\n\n");
	const char *something = "这是一句话。";
	FILE *fp;
	if(fp = fopen("D:\\test.txt","w+"))              //以可读写方式打开文件
	{
		printf("文件打开成功!\n\n");
		fwrite(something,strlen(something),1,fp);    //将something写入文件中
		fwrite("\n这是另一句话。",strlen("\n这是另一句话。"),1,fp);    //将另一句话写入文件中
		printf("写入数据成功!\n\n");
		fclose(fp);//关闭文件
 		fp = fopen("D:\\test.txt","r");               //以只读方式打开文件
 		printf("当前文件中的内容如下:\n");
		char ch=fgetc(fp);                       //取第一个字符
		while(ch!=EOF)                        //当该字符不为文件结束标志时
		{
			putchar(ch);                       //输出该字符
			ch=fgetc(fp);                      //继续从文件中获取字符
		}
		fclose(fp);                            //关闭文件
	}
	else
		printf("创建文件失败!\n");
	printf("\n\n");
	system("pause");
	return 0;
}
父进程程序
#include<stdio.h>
#include<windows.h>
int main()
{
	STARTUPINFO sui;               //启动信息结构体
	PROCESS_INFORMATION pi;      //在创建进程时相关的数据结构之一,该结构返回有关新进程及其主线程的信息。
	ZeroMemory(&sui,sizeof(sui));
	sui.cb = sizeof(STARTUPINFO);  //将cb成员设置为信息结构体的大小
	int sum = 0;
	char content[100] = "";          //初始化content字符数组用来存放文件内容
	if(CreateProcess("E:\\Coding\\CandC++\\child.exe",NULL,NULL,NULL,FALSE,CREATE_NEW_CONSOLE,NULL,NULL,&sui,&pi))//创建进程
	{
		printf("已创建一个子进程\n");
		for(int i = 1; i <= 100; i++)
		{
			sum = sum + i;       //求1-100之和
			Sleep(5);            //延迟时间5ms
			printf("Now, sum = %d\n",sum);
		}
		WaitForSingleObject(pi.hProcess,INFINITE);  //一直等下去直到进程结束
		FILE *fp = fopen("D:\\test.txt","r");
		fread(content,sizeof(char),100,fp);           //设置读取文件内容的相关参数
		printf("子进程创建的文件内容如下:\n\n%s\n\n",content);
		fclose(fp);
	}
	else
		printf("创建子进程失败\n");
	printf("实验结束!");
	return 0;
}
实验二: 线程共享进程数据

所涉及函数
来自微软的代码
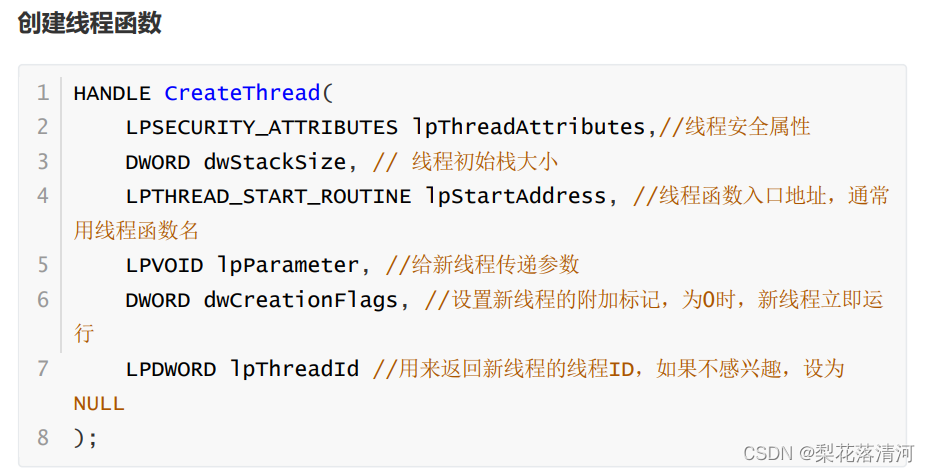
通过这个代码也能理解如何使用CreateThread()函数, 也能展示线程中间数据共享, 但确实内容太多了
#include <windows.h>
#include <tchar.h>
#include <strsafe.h>

#define MAX_THREADS 3
#define BUF_SIZE 255

DWORD WINAPI MyThreadFunction( LPVOID lpParam );
void ErrorHandler(LPCTSTR lpszFunction);

// Sample custom data structure for threads to use.
// This is passed by void pointer so it can be any data type
// that can be passed using a single void pointer (LPVOID).
typedef struct MyData {
    int val1;
    int val2;
} MYDATA, *PMYDATA;

static int key = 1;

int _tmain()
{
    PMYDATA pDataArray[MAX_THREADS];
    DWORD   dwThreadIdArray[MAX_THREADS];
    HANDLE  hThreadArray[MAX_THREADS];

    // Create MAX_THREADS worker threads.
	printf("main0:%d\n",key);
    for( int i=0; i<MAX_THREADS; i++ )
    {
        // Allocate memory for thread data.

        pDataArray[i] = (PMYDATA) HeapAlloc(GetProcessHeap(), HEAP_ZERO_MEMORY,
                sizeof(MYDATA));

        if( pDataArray[i] == NULL )
        {
           // If the array allocation fails, the system is out of memory
           // so there is no point in trying to print an error message.
           // Just terminate execution.
            ExitProcess(2);
        }

        // Generate unique data for each thread to work with.

        pDataArray[i]->val1 = i;
        pDataArray[i]->val2 = i+100;

        // Create the thread to begin execution on its own.

        hThreadArray[i] = CreateThread(
            NULL,                   // default security attributes
            0,                      // use default stack size
            MyThreadFunction,       // thread function name
            pDataArray[i],          // argument to thread function
            0,                      // use default creation flags
            &dwThreadIdArray[i]);   // returns the thread identifier


        // Check the return value for success.
        // If CreateThread fails, terminate execution.
        // This will automatically clean up threads and memory.

        if (hThreadArray[i] == NULL)
        {
           ErrorHandler(TEXT("CreateThread"));
           ExitProcess(3);
        }
    } // End of main thread creation loop.

    // Wait until all threads have terminated.

    WaitForMultipleObjects(MAX_THREADS, hThreadArray, TRUE, INFINITE);

    // Close all thread handles and free memory allocations.

    for(int i=0; i<MAX_THREADS; i++)
    {
        CloseHandle(hThreadArray[i]);
        if(pDataArray[i] != NULL)
        {
            HeapFree(GetProcessHeap(), 0, pDataArray[i]);
            pDataArray[i] = NULL;    // Ensure address is not reused.
        }
    }
	printf("main1:%d", key);
    return 0;
}


DWORD WINAPI MyThreadFunction( LPVOID lpParam )
{
    HANDLE hStdout;
    PMYDATA pDataArray;

    TCHAR msgBuf[BUF_SIZE];
    size_t cchStringSize;
    DWORD dwChars;

    // Make sure there is a console to receive output results.

    hStdout = GetStdHandle(STD_OUTPUT_HANDLE);
    if( hStdout == INVALID_HANDLE_VALUE )
        return 1;

    // Cast the parameter to the correct data type.
    // The pointer is known to be valid because
    // it was checked for NULL before the thread was created.

    pDataArray = (PMYDATA)lpParam;

	key += 1;
	printf("thread:%d\n",key);
    // Print the parameter values using thread-safe functions.

    StringCchPrintf(msgBuf, BUF_SIZE, TEXT("Parameters = %d, %d\n"),
        pDataArray->val1, pDataArray->val2);
    StringCchLength(msgBuf, BUF_SIZE, &cchStringSize);
    WriteConsole(hStdout, msgBuf, (DWORD)cchStringSize, &dwChars, NULL);

    return 0;
}


void ErrorHandler(LPCTSTR lpszFunction)
{
    // Retrieve the system error message for the last-error code.

    LPVOID lpMsgBuf;
    LPVOID lpDisplayBuf;
    DWORD dw = GetLastError();

    FormatMessage(
        FORMAT_MESSAGE_ALLOCATE_BUFFER |
        FORMAT_MESSAGE_FROM_SYSTEM |
        FORMAT_MESSAGE_IGNORE_INSERTS,
        NULL,
        dw,
        MAKELANGID(LANG_NEUTRAL, SUBLANG_DEFAULT),
        (LPTSTR) &lpMsgBuf,
        0, NULL );

    // Display the error message.

    lpDisplayBuf = (LPVOID)LocalAlloc(LMEM_ZEROINIT,
        (lstrlen((LPCTSTR) lpMsgBuf) + lstrlen((LPCTSTR) lpszFunction) + 40) * sizeof(TCHAR));
    StringCchPrintf((LPTSTR)lpDisplayBuf,
        LocalSize(lpDisplayBuf) / sizeof(TCHAR),
        TEXT("%s failed with error %d: %s"),
        lpszFunction, dw, lpMsgBuf);
    MessageBox(NULL, (LPCTSTR) lpDisplayBuf, TEXT("Error"), MB_OK);

    // Free error-handling buffer allocations.

    LocalFree(lpMsgBuf);
    LocalFree(lpDisplayBuf);
}
课上给出的代码
自己确实没写出来, 也懒得拆解微软代码了
#include <windows.h>
#include <cstdio>
static int count; // 定义全局共享数据
// 定义线程功能函数
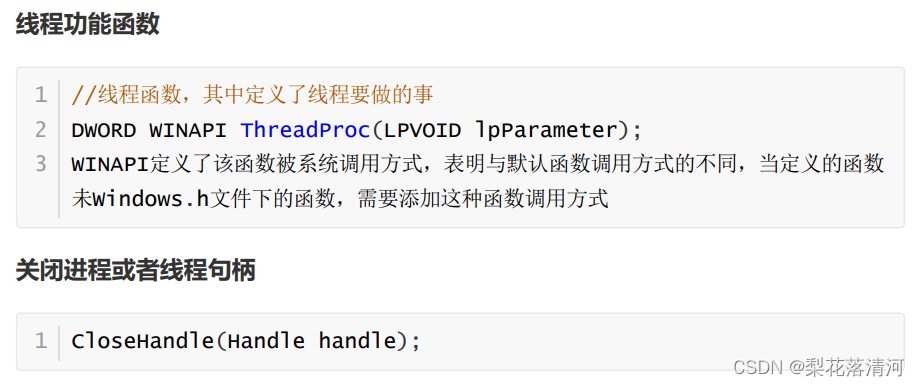
DWORD WINAPI ThreadProc(LPVOID lpParameter)
{
printf("线程运行!\n");
// 修改进程中的变量
for (count = 1; count <= 10; count += 2)
{
printf("线程:count=%d\n", count);
}
printf("等待线程3秒\n");
Sleep(3000);
return 0;
}
int main()
{
count = 20;
printf("进程:count=%d\n", count);
HANDLE hEvent = CreateThread(NULL, 0, ThreadProc, NULL, 0,
NULL); // 创建线程
WaitForSingleObject(hEvent, INFINITE);
// 等待线程运行结束
CloseHandle(hEvent);
// 关闭线程句柄
printf("线程结束!\n");
printf("进程结束!\n");
printf("进程:count=%d\n", count);
return 0;
}
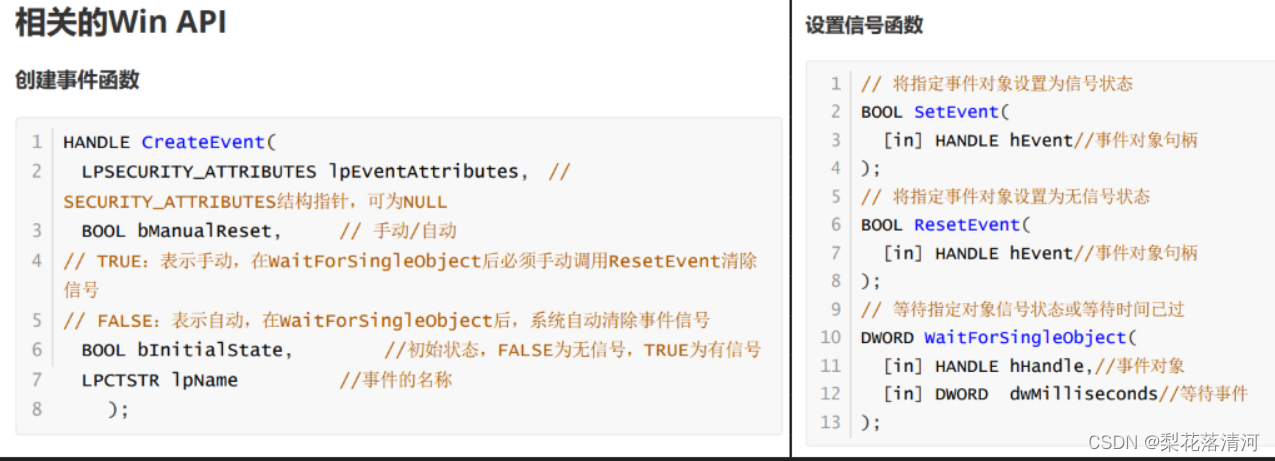
实验三: 信号通信

所涉及函数
子进程代码
在这里要注意, 先使用 DEV C++ 把子进程编译成可执行文件 ( .exe ), 父进程才能基于该文件创建子进程, 结合CreateProcess()函数中参数的定义即可知道.
#include <iostream>
#include <windows.h>
using namespace std;
int main()
{
	HANDLE hEvent = OpenEvent(EVENT_ALL_ACCESS, TRUE, (LPCTSTR)"myEvent"); // 打开命名事件
	// 休眠1s
	Sleep(1000);
	char ch;
	cout << "Signal the event to Parent[y/n]" << endl;
	cin >> ch;
	if (ch == 'y') // 发送信号
	SetEvent(hEvent);
	// 休眠1s
	Sleep(1000);
	system("pause");
	return 0;

	return 0;
}
父进程代码
#include <iostream>
#include <windows.h>
using namespace std;
int main()
{
	STARTUPINFO sui;
	PROCESS_INFORMATION pi;
	ZeroMemory(&sui, sizeof(sui));
	sui.cb = sizeof(STARTUPINFO);

	if (!CreateProcess((LPCTSTR)"E:\\Coding\\CandC++\\test3\\child.exe", NULL, NULL, NULL,
	FALSE, CREATE_NEW_CONSOLE, NULL, NULL, &sui, &pi))
		cout << "进程创建失败" << endl;

	cout << "这是一个子进程" << endl;
	// 创建一个有名事件
	HANDLE hEvent = CreateEvent(NULL, FALSE, TRUE, (LPCTSTR) "myEvent");
	ResetEvent(hEvent); // 清除事件信号
	// 等待子进程信号5s
	int time = 5000;
	DWORD flag = WaitForSingleObject(hEvent, time);
	if (WAIT_FAILED == flag) // 等待信号函数失败
		cout << "等待事件信号失败" << endl;
	else if (WAIT_OBJECT_0 == flag) // 等到事件信号
		cout << "获得事件信号" << endl;
	else if (WAIT_TIMEOUT == flag) // 子进程超时
		cout << "等待子进程信号超时" << endl;
	return 0;
}
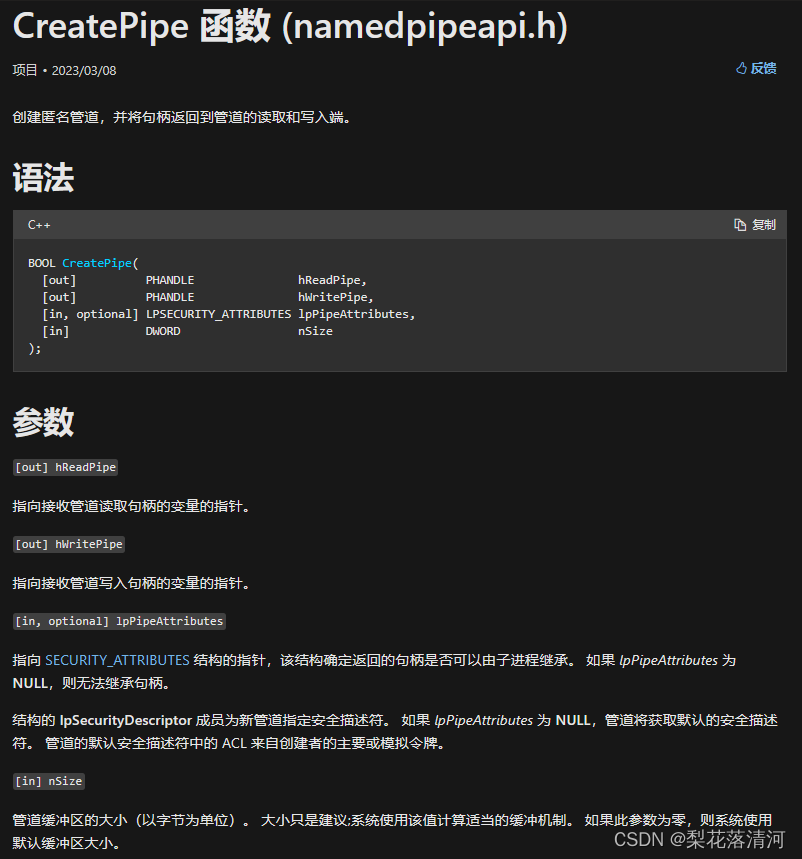
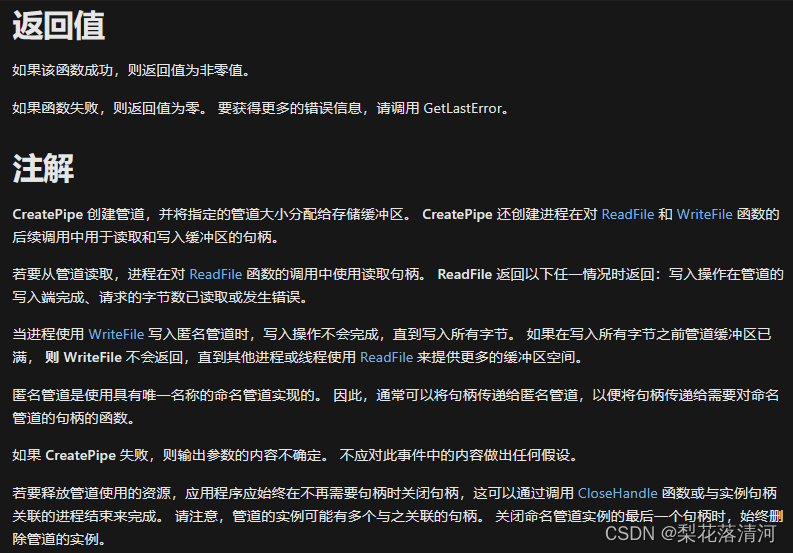
实验四: 匿名管道通信

所涉及函数
微软官网对函数的分析匿名管道通信
子进程代码
- 在这里要注意, 先使用 DEV C++ 把子进程编译成可执行文件 ( .exe ), 父进程才能基于该文件创建子进程, 结合
CreateProcess()函数中参数的定义即可知道. - 代码的参考了一下这位老哥的博客内容Windows进程间的通信, 大家可以去看看. 老哥使用的是 VS 写的, 是改了一下, 能用 DEV C++ 和 VSCode 跑.
- 代码注释的地方是我当初想着看能不能反向传输, 但确实不得, 因为这函数的关系是父子进程继承, 不能反过来
// 子进程.cpp : Defines the entry point for the console application.
//

#include <stdio.h>
#include <Windows.h>
#include <iostream>
using namespace std;

int main()
{
    const int nBufferLen = 256;
    HANDLE hRead  = NULL;
    HANDLE hWrite = NULL;

    BOOL bRet = FALSE;

    //1. 获得匿名管道输入输出句柄
    hRead  = GetStdHandle(STD_INPUT_HANDLE);
    hWrite = GetStdHandle(STD_OUTPUT_HANDLE);

    char  szSendBuffer[] = "子进程写入管道成功!";
    // char  szSendBuffer[] = "1111";
    DWORD dwWriteLen = 0;

    //2. 写入数据
    bRet = WriteFile(hWrite, szSendBuffer, (DWORD)strlen(szSendBuffer), &dwWriteLen, NULL);
    if (!bRet)
    {
        system("pause");
        return -1;
    }

    Sleep(500);

    // //3. 读取数据
    // Sleep(4000);
    // char  szBuffer[nBufferLen] = { 0 };
    // DWORD dwReadLen = 0;
    // bRet = ReadFile(hRead, szBuffer, nBufferLen, &dwReadLen, NULL);
    // if ( !bRet)
    // {
    //     cout << "读取数据失败!" << endl;
    //     system("pause");
    //     return -1;
    // }
    // cout << "从父进程接收到到数据: " << szBuffer << endl;

    system("pause");
    return 0;
}
父进程代码
// 父进程.cpp : Defines the entry point for the console application.
//

#include <stdio.h>
#include <Windows.h>
#include <iostream>
using namespace std;

int main()
{
    const int nBufferLen = 256;
    //管道缓冲区的大小(以字节为单位)

    SECURITY_ATTRIBUTES sa;
    sa.bInheritHandle = TRUE;
    sa.lpSecurityDescriptor = NULL;
    sa.nLength = sizeof(SECURITY_ATTRIBUTES);
    /**
     * @brief 结构包含对象的安全描述符,并指定通过指定此结构检索的句柄是否可继承
     * 指向控制对对象的访问 的SECURITY_DESCRIPTOR 结构的指针。
     * 指向控制对对象的访问 的SECURITY_DESCRIPTOR 结构的指针。
     * 此结构的大小(以字节为单位)。 将此值设置为 SECURITY_ATTRIBUTES 结构的大小。
     */
    HANDLE hRead = NULL;
    // 指向接收管道读取句柄的变量的指针。
    HANDLE hWrite = NULL;
    // 指向接收管道写入句柄的变量的指针。

    BOOL bRet = FALSE;

    //1. 创建匿名管道
    bRet = CreatePipe(&hRead, &hWrite, &sa, 0);
    if (!bRet)
    {
        cout << "创建匿名管道失败!" << endl;
        system("pause");
        return -1;
    }

    //2. 创建子进程,并对子进程相关数据进行初始化(用匿名管道的读取写入句柄赋予子进程的输入输出句柄)
    STARTUPINFO sui;
    PROCESS_INFORMATION pi;
    ZeroMemory(&sui, sizeof(STARTUPINFO));
    sui.cb = sizeof(STARTUPINFO);
    sui.dwFlags = STARTF_USESTDHANDLES;
    // 设置 STARTUPINFO 结构的成员。
    // 此结构指定用于重定向的 STDIN 和 STDOUT 句柄。
    sui.hStdInput  = hRead;
    sui.hStdOutput = hWrite;
    sui.hStdError = GetStdHandle(STD_ERROR_HANDLE);
    bRet = CreateProcess("E:\\Coding\\CandC++\\test4\\child2.exe", NULL, NULL, NULL, TRUE, CREATE_NEW_CONSOLE, NULL, NULL, &sui, &pi);
    if ( !bRet)
    {
        cout << "创建子进程失败!" << endl;
        system("pause");
        return -1;
    }

    // 3. 关闭子进程相关句柄(进行句柄,进程主线程句柄)
    CloseHandle(pi.hProcess);
    CloseHandle(pi.hThread);

    Sleep(2000);
    //4. 读取数据
    char  szBuffer[nBufferLen] = { 0 };
    DWORD dwReadLen = 0;

    bRet = ReadFile(hRead, szBuffer, nBufferLen, &dwReadLen, NULL);
    if ( !bRet)
    {
        cout << "读取数据失败!" << endl;
        system("pause");
        return -1;
    }

    cout << "从子进程接收到到数据: " << szBuffer << endl;
    Sleep(2000);

    // //5. 写入数据
    // char szSendBuffer[] = "父进程写入管道成功!";
    // DWORD dwWriteLen = 0;
    // bRet = WriteFile(hWrite, szSendBuffer, (DWORD)strlen(szSendBuffer), &dwWriteLen, NULL);
    // if (!bRet)
    // {
    //     system("pause");
    //     return -1;
    // }

    printf("???");
    system("pause");
    return 0;
}
实验五: 命名管道通信

涉及函数
- CreateNamedPipe, 微软还有相关的示例代码, 但我没跑起来, 一直报错
- 也是参考了一下其他大哥的博客内容进程间通信之------- 命名管道, 大家都可以去看一看学习学习
子进程代码
在这里要注意, 先使用 DEV C++ 把子进程编译成可执行文件 ( .exe ), 父进程才能基于该文件创建子进程, 结合CreateProcess()函数中参数的定义即可知道.
#include <windows.h>
#include <stdio.h>
#include <conio.h>
#include <tchar.h>
#include <iostream>

#define BUFSIZE 512
using namespace std;

int main(){
   //等待连接命名管道
   HANDLE hNamedPipe;
   const char * pStr = "data from server";
   const char * pPipeName;
   if( !WaitNamedPipe("\\\\.\\pipe\\testspipe", NMPWAIT_WAIT_FOREVER) )
   {
      cout<<"命名管道实例不存在 ..."<< endl<< endl;
      return 0;
   }
   cout << "成功连接到服务器" << endl;
   //打开命名管道
   hNamedPipe = CreateFile("\\\\.\\pipe\\testspipe", GENERIC_READ|GENERIC_WRITE,0,NULL,OPEN_EXISTING,FILE_ATTRIBUTE_NORMAL,NULL);
   if( INVALID_HANDLE_VALUE == hNamedPipe )
   {
      cout << "打开命名管道失败!!!" << endl << endl;
      return 0;
   }
   printf("Open!\n");

   DWORD dwWrite;
   //向命名管道中写入数据
   if( !WriteFile(hNamedPipe, pStr, strlen(pStr), &dwWrite, NULL) )
   {
      cout<<"写入数据失败 ..." << endl << endl;
      return 0;
   }
   cout<< "写入数据成功:: "<< pStr << endl << endl;

   Sleep(5000);

   char * pReadBuf;
   DWORD  dwRead;
   pReadBuf = new char[strlen(pStr) + 1];
   memset(pReadBuf, 0, strlen(pStr) + 1);
   //从命名管道中读取数据
   if( !ReadFile(hNamedPipe, pReadBuf, strlen(pStr), &dwRead, NULL) )
   {
         delete []pReadBuf;
         cout << "读取数据失败 ..."<< endl << endl;
         return 0;
   }
   cout<<"读取数据成功:: "<< pReadBuf << endl << endl;

   system("pause");
   return 0;
}
父进程代码
#include <stdio.h>
#include <Windows.h>
#include <iostream>
using namespace std;

int main(){
      HANDLE  hNamedPipe;
      OVERLAPPED ovlpd;

      BYTE sd[SECURITY_DESCRIPTOR_MIN_LENGTH];
      SECURITY_ATTRIBUTES sa;

      sa.nLength = sizeof(SECURITY_ATTRIBUTES);
      sa.bInheritHandle = TRUE;
      sa.lpSecurityDescriptor = &sd;

      InitializeSecurityDescriptor(&sd, SECURITY_DESCRIPTOR_REVISION);
      SetSecurityDescriptorDacl(&sd, TRUE, (PACL) 0, FALSE);
      //创建命名管道
      //这里创建的是双向模式且使用重叠模式(异步操作)的命名管道
      hNamedPipe = CreateNamedPipe("\\\\.\\pipe\\testspipe",PIPE_ACCESS_DUPLEX | FILE_FLAG_OVERLAPPED,0, 1, 1024, 1024, 0, &sa);
      if( INVALID_HANDLE_VALUE == hNamedPipe )
      {
            cout << GetLastError() << endl;
            hNamedPipe = NULL;
            cout << "创建命名管道失败!!!" << endl << endl;
            return 0;
      }
      printf("1\n");

      STARTUPINFO sui;               //启动信息结构体
      PROCESS_INFORMATION pi;      //在创建进程时相关的数据结构之一,该结构返回有关新进程及其主线程的信息。
      ZeroMemory(&sui,sizeof(sui));
      sui.cb = sizeof(STARTUPINFO);  //将cb成员设置为信息结构体的大小
      int sum = 0;
      char content[100] = "";          //初始化content字符数组用来存放文件内容
      if(!CreateProcess("E:\\Coding\\CandC++\\test5\\child1.exe",NULL,NULL,NULL,FALSE,CREATE_NEW_CONSOLE,NULL,NULL,&sui,&pi))//创建进程
      {
            cout << "进程创建失败" << endl;
      }
      printf("3\n");
      printf("子进程创建\n");

      Sleep(5000);


      // cout << "等待客户端的连接" << endl;
      BOOL   fConnected = FALSE;
      ConnectNamedPipe(hNamedPipe, NULL) ? TRUE : (GetLastError() == ERROR_PIPE_CONNECTED);
      // printf("???\n");

      const char *pStr;
      char *            pReadBuf;
      DWORD            dwRead;
      pReadBuf = new char[strlen(pStr) + 1];
      memset(pReadBuf, 0, strlen(pStr) + 1);
      //从命名管道中读取数据
      if( !ReadFile(hNamedPipe, pReadBuf, strlen(pStr), &dwRead, NULL) )
      {
            delete []pReadBuf;
            cout<<"读取数据失败 ..."<< endl<< endl;
            return 0;
      }
      cout << "读取数据成功::"<< pReadBuf << endl<< endl;

      pStr = "data from client";
      const char *pPipeName;
      pPipeName = "\\\\.\\pipe\\testPipe";

      DWORD dwWrite;
      //向命名管道中写入数据
      if( !WriteFile(hNamedPipe, pStr, strlen(pStr), &dwWrite, NULL) )
      {
            cout << "写入数据失败 ..." << endl<< endl;
            return 0;
      }
      cout << "写入数据成功:: "<< pStr<< endl<< endl;

      CloseHandle(hNamedPipe);

      system("pause");

      return 0;
}
未完待续
- 还有几个实验, 但是没急着补上, 等之后学到对应内容再把实验做一下
- 个人感觉还是在 Linux 系统上做这些实验比较好


 4万+
4万+


 被折叠的 条评论
为什么被折叠?
被折叠的 条评论
为什么被折叠?
 到【灌水乐园】发言


