Zend Framework 快速开始

Zendframework  快速开始
目录
1、  Zend Framework & MVC  介绍
2、   创建你的项目
3、   创建布局(Layout
4、   创建模型和数据表
5、   创建表单
6、   恭喜
 
Zend Framework & MVC 介绍
 
Zend Framework
Zend Framework 是一个为PHP5开发的开源、面向对象的web应用程序框架。Zend Framework 经常被称为“组件库”,因为它有许多松散链接的、几乎独立使用的组件。但是Zend Framework 也提供高级的“模型-试图-控制器(MVC)”组件(implementation),它能够为你的应用程序建立一个基本结构。带有简短描述的Zend Framework完整组件列表可以在» components overview中找到。这个快速教程将向你介绍一些Zend Framework的最常用的组件,包括Zend_Controller,Zend_Layout, Zend_Config, Zend_Db, Zend_Db_Table, Zend_Registry,,还包括一些制图助手。
       使用这些组件,我们将在几分钟内建立一个简单的数据库驱动的留言板(guestbook)应用程序。程序的完整源代码可以从下面的压缩文件中得到:
·          » zip
·          » tar.gz

 
Model-View-Controller
 
这就是每个人谈论的MVC模式。为什么应该关心?MVC不仅仅是听起来时髦,随时可以读出的由三个首字母组成的缩略语,它几乎已经成为web应用程序的设计标准。有充分的理由相信,大多数的web应用程序代码属于下面三个类别中的一个:展示、业务逻辑和数据存取。MVC模式模型分开关注这三个方面(The MVC pattern models this separation of concerns well)。最终,展示代码将成为带有业务逻辑和数据存储代码的应用程序的一部分。许多开发者已经发现这种为了组织代码而定义明确的分离,特别是当不止一个开发者工作于同一个应用程序时。
注:更多信息
我们来打破这种模式,来看看各个单件:


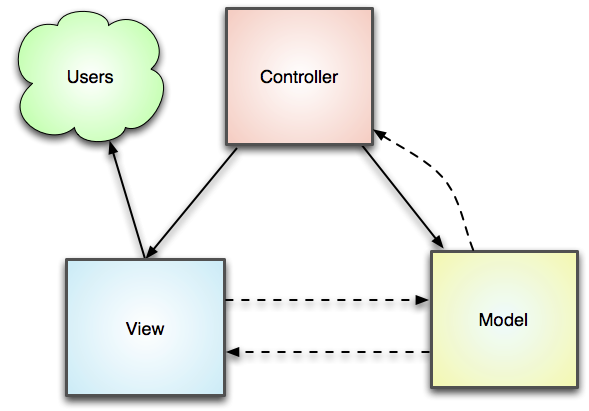
  • 模型(Model)-这是你的应用程序的一部分,其在一系列抽象概念后定义了基本功能。数据访问例程和一些业务逻辑将在这个模型中定义。
  • 视图(View)-视图精确定义什么将展现给用户,通常控制器传递数据给每个视图按某种格式渲染。视图也经常从用户收集代码。这里是在你的MVC应用程序中很可能发现HTML标记的地方
  • 控制器(Controller)-控制器将整个模式绑定在一起。他们基于用户的请求和其他因素操纵模型,决定哪个视图去显示,传递每个视图都需要的数据,或者完全的将控制权交给另一个控制器。多数 MVC专家建议:»尽可能小的保持控制器(keeping controllers as skinny as possible.
当然关于这个关键性的模式有»有更多的话要说,但是应该给你足够的背景去明白这个我们要建立的留言板(guestbook)应用程序

 
创建你的项目
 
为了创建你的项目,你必须首先下载和提取ZendFramework。

 
安装ZendFramework
 
得到带有完整PHP堆栈的ZendFramework的最容易的方法是安装Zend Server。Zend Server已经有为Mac OSX、Windows、Fedora Core 和Ubuntu的本地安装版本,也有一个兼容大多数Linux发布版本的通用安装包。
在安装ZendServer之后,在Mac OSX和Linux中,框架文件存储在/usr/local/zend/share/ZendFramework,在windows上,存储在C:/Program Files/Zend/ZendServer/share/ZendFramework。Include_path已经被配置包含Zend Framework。
另外,你也可以下载最新版本的Zend Framework并提取内容( » Download the latest version of Zend Framework ),记下来你在哪里做的( make a note of where you have done so)。
可选的,你可以将档案( archive library/ 子目录路径加入到到你的 php.ini include_path 设置中。( Optionally, you can add the path to the library/ subdirectory of the archive to your php.ini's  include_path setting.
就这么简单! Zend Framework 已经被安装并可以使用了

 
创建你的项目
 
zf 命令行工具
Make a note of the absolute path to this script. 
Wherever you see references to the command zf, please substitute the absolute path to the script. On Unix-like systems, you may want to use your shell's alias functionality: aliaszf.sh=path/to/ZendFramework/bin/zf.sh

If you have problems setting up the zf command-line tool, please refer to 
the manual .
在你的Zend Framework安装目录中有个bin/子目录,里面含有分别为Unix用户和Window用户准备的zf.sh和zf.bat脚本。记下这个脚本的绝对路径。
无论在哪里看到zf命令的参考(references),请替代为脚本的绝对路径。在类Unix系统中,你可能想使用shell的别名函数:alish
zf.sh=path/to/ZendFramework/bin/zf.sh.
如果你再安装zf命令行工具是有任何问题,请参考手册。
打开终端(windows:开始->运行,然后使用cmd命令)。到你准备开始新项目的目录。然后使用相应的脚本路径并且执行下面当中的一个:
  1. % zf create project quickstart
运行这个命令将创建你的基本网站结构,包括你的初始控制器和视图。目录树看起来像下面这样:
  1. quickstart
  2. |-- application
  3. |   |-- Bootstrap.php
  4. |   |-- configs
  5. |   |   `-- application.ini
  6. |   |-- controllers
  7. |   |   |-- ErrorController.php
  8. |   |   `-- IndexController.php
  9. |   |-- models
  10. |   `-- views
  11. |       |-- helpers
  12. |       `-- scripts
  13. |           |-- error
  14. |           |   `-- error.phtml
  15. |           `-- index
  16. |               `-- index.phtml
  17. |-- library
  18. |-- public
  19. |   |-- .htaccess
  20. |   `-- index.php
  21. `-- tests
  22.     |-- application
  23.     |   `-- bootstrap.php
  24.     |-- library
  25.     |   `-- bootstrap.php
  26.     `-- phpunit.xml
这个时候,如果你还没有将Zend Framework加入到你的include_path,我们推荐或者拷贝或者链接它到你的library/目录,无论哪种情况,你将想或者递归的拷贝或者链接Zend Framework 安装目录的library/Zend/子目录到你的项目的library/目录。在类unix系统中,它将象下面这样:
  1. # Symlink:
  2. % cd library; ln -s path/to/ZendFramework/library/Zend .
  3.  
  4. # Copy:
  5. % cd library; cp -r path/to/ZendFramework/library/Zend .
在windows系统中,在资源管理其中可以很容易的做这个事情。
既然项目已经创建了,开始要弄懂的主要的工作就是引导程序(bootstrap),配置(configuration),动作控制器(action controllers)和视图(views)。

引导程序(Bootstrap)
引导类定义哪些资源和组件要去初始化。默认情况下,Zend Framework 的前端控制器是被初始化的,并且使用application/controllers/ 作为寻找动作控制器的默认的目录(稍后更多)。这个类看起来像这样:
  1. // application/Bootstrap.php
  2.  
  3. class Bootstrap extends Zend_Application_Bootstrap_Bootstrap
  4. {
  5. }
就想你看到的,要开始的内容没有多少

配置
Zend Framework 自身是没有配置的,你经常需要配置你的应用程序。默认的配置位于application/configs/application.ini,它包含一些设置你的PHP环境的基本指令(比如,打开或关闭错误报告),指示你的引导类(bootstrap class)路径(以及它的类名),还有你的动作控制器路径,它看起来像下面这样:
  1. ; application/configs/application.ini
  2.  
  3. [production]
  4. phpSettings.display_startup_errors = 0
  5. phpSettings.display_errors = 0
  6. includePaths.library = APPLICATION_PATH "/../library"
  7. bootstrap.path = APPLICATION_PATH "/Bootstrap.php"
  8. bootstrap.class "Bootstrap"
  9. appnamespace "Application"
  10. resources.frontController.controllerDirectory = APPLICATION_PATH"/controllers"
  11. resources.frontController.params.displayExceptions = 0
  12.  
  13. [staging : production]
  14.  
  15. [testing : production]
  16. phpSettings.display_startup_errors = 1
  17. phpSettings.display_errors = 1
  18.  
  19. [development : production]
  20. phpSettings.display_startup_errors = 1
  21. phpSettings.display_errors = 1
这个文件的许多东西应该注意,首先,当使用INI类型的配置,你应该直接提到常量并且扩展它们;APPLICATION_PATH 实际上是一个常量。另外注意有许多定义的部分:production,staging,testing和development。后面三个继承“production”环境的设置。这是一个有用的组织配置方法去确信适当的配置在应用程序开发的每个阶段都是可用的。

动作控制器
应用程序的动作控制器包含应用程序工作流,并且做映射请求到适当模型和视图的工作。
     一个动作控制器应该有一个或多个以“Action”结尾的方法;这些方法可能后面通过web被请求。默认的,Zend Framework URLs按照“/controller/action” 模式,这里“controller”映射动作控制器名(减去“Controller”后缀),“action”映射一个动作方法(减去“Action”后缀 )。
典型的,你总是需要一个IndexController,这是一个后备控制器(fallback controller),而且它也是站点的主页。还需要一个ErrorController,它为了指示诸如HTTP 404错误(没有发现控制器或者动作)和HTTP 500错误的发生(应用程序错误)。
默认的 IndexController 像下面这样:
  1. // application/controllers/IndexController.php
  2.  
  3. class IndexController extends Zend_Controller_Action
  4. {
  5.  
  6.     public function init()
  7.     {
  8.         /* Initialize action controller here */
  9.     }
  10.  
  11.     public function indexAction()
  12.     {
  13.         // action body
  14.     }
  15. }
默认的 ErrorController像下面这样:
  1. // application/controllers/ErrorController.php
  2.  
  3. class ErrorController extends Zend_Controller_Action
  4. {
  5.  
  6.     public function errorAction()
  7.     {
  8.         $errors = $this->_getParam('error_handler');
  9.  
  10.         switch ($errors->type{
  11.             caseZend_Controller_Plugin_ErrorHandler::EXCEPTION_NO_ROUTE:
  12.             caseZend_Controller_Plugin_ErrorHandler::EXCEPTION_NO_CONTROLLER:
  13.             caseZend_Controller_Plugin_ErrorHandler::EXCEPTION_NO_ACTION:
  14.  
  15.                 // 404 error -- controller or action not found
  16.                 $this->getResponse()->setHttpResponseCode(404);
  17.                 $this->view->message = 'Page not found';
  18.                 break;
  19.             default:
  20.                 // application error
  21.                 $this->getResponse()->setHttpResponseCode(500);
  22.                 $this->view->message = 'Application error';
  23.                 break;
  24.         }
  25.  
  26.         $this->view->exception = $errors->exception;
  27.         $this->view->request   = $errors->request;
  28.     }
  29. }
你会注意到:(1)IndexController没有包含真是代码;(2)ErrorController提到视图属性。这导致我们很好的进入到下一个主题

视图
Zend Framework 中的视图是用普通的PHP代码写的。视图脚本放置在application/views/scripts/中,这里脚本被使用控制器名称进一步的分类。在我们的示例中,我们已经有了一个IndexController和一个ErrorController,因此在视图脚本目录有相应的index/ 和 error/ 子目录。在这些子目录中,随后你将发现和创建对应每个暴露的(exposed)控制器动作的视图脚本。在默认情况下,我们会有视图脚本index/index.phtml 和error/error.phtml.
视图脚本可以包含任何你想要的标记,并且使用<?php 开始标记和?>结束标记区插入PHP指令。
下面的代码是默认安装下index/index.phtml视图脚本:
  1. <!-- application/views/scripts/index/index.phtml -->
  2. <style>
  3.  
  4.     a:link,
  5.     a:visited
  6.     {
  7.         color: #0398CA;
  8.     }
  9.  
  10.     span#zf-name
  11.     {
  12.         color: #91BE3F;
  13.     }
  14.  
  15.     div#welcome
  16.     {
  17.         color: #FFFFFF;
  18.         background-image: url(http://framework.zend.com/images/bkg_header.jpg);
  19.         width:  600px;
  20.         height: 400px;
  21.         border: 2px solid #444444;
  22.         overflow: hidden;
  23.         text-align: center;
  24.     }
  25.  
  26.     div#more-information
  27.     {
  28.         background-image: url(http://framework.zend.com/images/bkg_body-bottom.gif);
  29.         height: 100%;
  30.     }
  31.  
  32. </style>
  33. <div id="welcome">
  34.     <h1>Welcome to the <span id="zf-name">Zend Framework!</span><h1 />
  35.     <h3>This is your project's main page<h3 />
  36.     <div id="more-information">
  37.         <p>
  38.             <img src="http://framework.zend.com/images/PoweredBy_ZF_4LightBG.png" />
  39.         </p>
  40.  
  41.         <p>
  42.             Helpful Links: <br />
  43.             <a href="http://framework.zend.com/">Zend Framework Website</a> |
  44.             <a href="http://framework.zend.com/manual/en/">Zend Framework
  45.                 Manual</a>
  46.         </p>
  47.     </div>
  48. </div>
  49.  
Error/error.phtml 视图脚本有点更加有趣,因为它使用一些PHP的条件语句。
  1. <!-- application/views/scripts/error/error.phtml -->
  2. <!DOCTYPE html PUBLIC "-//W3C//DTD XHTML 1.0 Strict//EN";
  3.     "http://www.w3.org/TR/xhtml1/DTD/xhtml1-strict.dtd>
  4. <html xmlns="http://www.w3.org/1999/xhtml">
  5. <head>
  6.   <meta http-equiv="Content-Type" content="text/html; charset=utf-8" />
  7.   <title>Zend Framework Default Application</title>
  8. </head>
  9. <body>
  10.   <h1>An error occurred</h1>
  11.   <h2><?php echo $this->message ?></h2>
  12.  
  13.   <?php if ('development' == $this->env): ?>
  14.  
  15.   <h3>Exception information:</h3>
  16.   <p>
  17.       <b>Message:</b> <?php echo $this->exception->getMessage() ?>
  18.   </p>
  19.  
  20.   <h3>Stack trace:</h3>
  21.   <pre><?php echo $this->exception->getTraceAsString(?>
  22.   </pre>
  23.  
  24.   <h3>Request Parameters:</h3>
  25.   <pre><?php echo var_export($this->request->getParams(), 1) ?>
  26.   </pre>
  27.   <?php endif ?>
  28.  
  29. </body>
  30. </html>
创建一个虚拟主机
为了这个快速开始的目的,我们将假设你在使用Apache web服务器。Zend Framework完美的工作在其他的web服务器——包括Microsoft IIS,lighttppd,ngix等等——但是多数的开发者最低程度的应该熟悉Apache。并且它提供一个容易的Zend Framework 的目录结构和重写能力的简单介绍。
为了创建你的vhost,你应该知道httpd.conf文件的位置,还有一些需要知道的其他的配置文件的位置(and potentially where other configuration files are located)。一些常见的地点:
  • /etc/httpd/httpd.conf (Fedora, RHEL, and others)
  • /etc/apache2/httpd.conf (Debian, Ubuntu, and others)
  • /usr/local/zend/etc/httpd.conf (Zend Server on *nix machines)
  • C:/Program Files/Zend/Apache2/conf (Zend Server on Windows machines)
在你的httpd.conf中(或者在一些系统的 httpd-vhosts.conf中),你需要去做两件事情。首先,确信NameVirtualHost被定义,典型的,你将把它设为“*:80”。其次,定义一个虚拟主机:
  1. <VirtualHost *:80>
  2.     ServerName quickstart.local
  3.     DocumentRoot /path/to/quickstart/public
  4.  
  5.     SetEnv APPLICATION_ENV "development"
  6.  
  7.     <Directory /path/to/quickstart/public>
  8.         DirectoryIndex index.php
  9.         AllowOverride All
  10.         Order allow,deny
  11.         Allow from all
  12.     </Directory>
  13. </VirtualHost>
有几件事情要注意。首先,注意我们的项目中的DocumentRoot 设置要明确指定public子目录;这意味着只有在那个目录中的文件在任何时候能够被服务器直接服务。其次,注意“AllowOverride”的Order和Allow指令;我们在项目中可以使用htacess文件,在开发过程中,这是一个好的办法,因为它可以防止当你改变你的站点指令的时候不断重新启动web服务器。实际上,在产品中,你应该可能将你的htaccess文件的内容放到你的服务器设置中并且禁用htaccess。第三,注意SetEnv命令,它要做的是为你的虚拟主机设置环境变量,这个变量将在index.php中为我们的Zend Framework应用程序设置APPLICATION_ENV常量。在产品中,你能够省略这个指令(在这种情况下,将使用默认值“产品”)或者明确的设定它为“产品”。
最后,你需要在你的hosts文件中增加一个条目,对应于在ServerName指令中设定的值,在类Unix系统中,这个文件通常位于/etc/hosts;在windows中,你通常会在c:/windows/system32/drivers/etc中找到它。无论什么系统,这个条目看起来会是这样:
  1. 127.0.0.1 quickstart.local
开始你的webserver(或者重新启动它),你就可以准备开始了。

检查
到目前为止,你应该能够启动你的初步Zend Framework应用。在浏览器中键入在前面的章节中配置的服务器名,你应该可以看到一个欢迎页面
 
创建布局
你可能已经注意到在前面章节中的视图脚本是HTML片段而非完整的页面代码。这是被设计成这样的。我们想让返回内容的动作只与动作本身相关,而不是与作为一个整体的应用程序相关。
现在我们必须组合产生的内容到完整的HTML页面。我们还希望应用程序有一个一致的外观和感觉。我们将使用一个全局的站点布局去完成这两个任务。
Zend Framework有两种设计模式去实施布局: » 两步视图法 和  » 组合视图法.两步视图法经常与 »变换视图 模式联合使用。基本思想是你的应用程序视图创建内容(representation),然后把它注入到主视图以便最后的转换。组合视图模式处理一个或多个原子视图、应用程序视图。
在Zend Framework中,Zend Layout 结合这些模式的思想。不是每个动作视图脚本需要包括全站内容(artifacts),替代的是他们只要关注他们自己的责任。
偶然的,你可能在你的全站视图脚本中需要特定应用信息。幸运的是,Zend Framework提供了许多视图占位符以便在你的动作视图脚本中提供那些信息
要开始使用Zend_Layout,首先我们需要通知引导程序(bootstrap)去使用布局资源。这个可以使用“zf enable layout”命令:
  1. % zf enable layout
  2. Layouts have been enabled, and a default layout created at
  3. application/layouts/scripts/layout.phtml
  4. A layout entry has been added to the application config file.
正如命令所指出的那样,application/configs/application.ini 被更新了,现在在“production”节中包含如下内容
  1. ; application/configs/application.ini
  2.  
  3. ; Add to [production] section:
  4. resources.layout.layoutPath = APPLICATION_PATH "/layouts/scripts"
最终的INI文件看起来像下面这样:
  1. ; application/configs/application.ini
  2.  
  3. [production]
  4. ; PHP settings we want to initialize
  5. phpSettings.display_startup_errors = 0
  6. phpSettings.display_errors = 0
  7. includePaths.library = APPLICATION_PATH "/../library"
  8. bootstrap.path = APPLICATION_PATH "/Bootstrap.php"
  9. bootstrap.class "Bootstrap"
  10. appnamespace "Application"
  11. resources.frontController.controllerDirectory = APPLICATION_PATH"/controllers"
  12. resources.frontController.params.displayExceptions = 0
  13. resources.layout.layoutPath = APPLICATION_PATH "/layouts/scripts"
  14.  
  15. [staging : production]
  16.  
  17. [testing : production]
  18. phpSettings.display_startup_errors = 1
  19. phpSettings.display_errors = 1
  20.  
  21. [development : production]
  22. phpSettings.display_startup_errors = 1
  23. phpSettings.display_errors = 1
这个指令告诉你的应用程序在application/layouts/scripts去寻找布局视图脚本。如果你检查你的目录树,你会看到这个目录已经为你创建了layout.phtml文件。
我们也想确信我们的应用程序有一个XHTML文档类型(doctype)声明。为了确信这点,我们需要增加一个资源到我们的引导程序(bootstrap)中。
在引导程序(bootstrap)中增加资源的最简单方法是仅仅创建一个以_init短语开始的protected方法。在这种情况下,我们想去初始化文档类型(doctype),所以我们再初始(bootstrap)类中将创建一个_initDoctype()方法:
  1. // application/Bootstrap.php
  2.  
  3. class Bootstrap extends Zend_Application_Bootstrap_Bootstrap
  4. {
  5.     protected function _initDoctype()
  6.     {
  7.     }
  8. }
在这个方法里,我们需要提示视图使用恰当的文档类型(doctype)。但是视图对象从哪里来呢?简单的解决办法是去初始化视图资源。一旦我们有了,我们能够从引导程序(bootstrap)中取出(pull)视图对象并使用它。 为了初始化视图资源,在你的application/configs/application.ini 文件中“production”部分增加下面的行:
  1. ; application/configs/application.ini
  2.  
  3. ; Add to [production] section:
  4. resources.view[] =
这个告诉我们去初始化没有选项的视图(‘[]’说明视图键是一个数组,并且我们没有传递任何数据给它)。
既然我们有一个视图,让我们充实我们的_initDoctype()方法。在这个方法里面,我们将首先确信视图资源已经运行,提取视图对象,然后配置它
  1. // application/Bootstrap.php
  2.  
  3. class Bootstrap extends Zend_Application_Bootstrap_Bootstrap
  4. {
  5.     protected function _initDoctype()
  6.     {
  7.         $this->bootstrap('view');
  8.         $view = $this->getResource('view');
  9.         $view->doctype('XHTML1_STRICT');
  10.     }
  11. }
现在我们已经初始化Zend_Layout并且已经设置了文档类型(Doctype),让我们来创建我们全站的布局
  1. <!-- application/layouts/scripts/layout.phtml -->
  2. <?php echo $this->doctype() ?>
  3. <html xmlns="http://www.w3.org/1999/xhtml">
  4. <head>
  5.   <meta http-equiv="Content-Type" content="text/html; charset=utf-8" />
  6.   <title>Zend Framework Quickstart Application</title>
  7.   <?php echo $this->headLink()->appendStylesheet('/css/global.css') ?>
  8. </head>
  9. <body>
  10. <div id="header" style="background-color: #EEEEEE; height: 30px;">
  11.     <div id="header-logo" style="float: left">
  12.         <b>ZF Quickstart Application</b>
  13.     </div>
  14.     <div id="header-navigation" style="float: right">
  15.         <a href="<?php echo $this->url(
  16.             array('controller'=>'guestbook'),
  17.             'default',
  18.             true) ?>">Guestbook</a>
  19.     </div>
  20. </div>
  21.  
  22. <?php echo $this->layout()->content ?>
  23.  
  24. </body>
  25. </html>
我们使用layout()视图助手获得我们的应用程序内容,并访问“content”键。如果你想,你可以渲染其他的响应片段,但是大多是情况下,必须做的就是这么多。
还要注意使用headLink()占位符。这是产生HTML<link>元素的简单方法,以及在你整个应用程序中跟踪它们。如果你需要增加另外的css表以支持一个动作,你可以这么做,并确保它将出现在最后被渲染的页面
注:检查点
现在到http://localhost,并检查源代码。你应该可以看到你XHTML的header、head、title和body部分。

创建模型和数据表
在我们开始之前,让我们来思考几点:这些类将放在什么地方,我们如何找到它们?我们创建的默认的项目实例化一个自动加载(autoloader)。我们可以给它附加其他的自动加载(autoloader),所以它知道在哪里可以找到不同的类。典型的,我们想让我们各种各样的MVC类归入同一个目录树——在这个例子中是application/ ——并且大多数经常使用共同的前缀(common prefix)。
Zend_Controller_Front  有一个“模块(modules)”概念,它是一个单独的小应用程序。模块模拟在application/目录下用zf工具建立的目录结构,且里面所有的类假定有相同的前缀——模块名。“Application/”本身就是一个模块——“default”或者“application”模块。因此,我们将去设置在此目录下资源的自动导入。
Zend_Application_Module_Autoloader 提供将模块下各种资源映射到相应目录的功能,并且也提供一个标准的命名机制。在引导对象(bootstrap object)初始化时,这个类的实例被默认创建。你的应用程序引导程序(bootstrap)将默认的使用“Application”作为模块前缀。这样,我们的模型、表单和数据表类将以“Applicatin_”为前缀。
Now, let's consider what makes up a guestbook. Typically, they are simply a list of entries with a commenttimestamp, and, often, email address. Assuming we store them in a database, we may also want a unique identifier for each entry. We'll likely want to be able to save an entry, fetch individual entries, and retrieve all entries. As such, a simple guestbook model API might look something like this:
现在,我们来看看是什么组成了留言簿,典型的,他们简单的由评论(comment),戳(timestamp),经常还包括邮件地址的条目列表。假若将他们存储在数据库中,还要为每一个条目建立一个唯一的标识符。我们想要保存条目、查询单个条目,检索所有条目。因此,一个简单的留言薄模型API可能看起来像这样:
  1. // application/models/Guestbook.php
  2.  
  3. class Application_Model_Guestbook
  4. {
  5.     protected $_comment;
  6.     protected $_created;
  7.     protected $_email;
  8.     protected $_id;
  9.  
  10.     public function __set($name, $value);
  11.     public function __get($name);
  12.  
  13.     public function setComment($text);
  14.     public function getComment();
  15.  
  16.     public function setEmail($email);
  17.     public function getEmail();
  18.  
  19.     public function setCreated($ts);
  20.     public function getCreated();
  21.  
  22.     public function setId($id);
  23.     public function getId();
  24. }
  25.  
  26. class Application_Model_GuestbookMapper
  27. {
  28.     public function save(Application_Model_Guestbook $guestbook);
  29.     public function find($id);
  30.     public function fetchAll();
  31. }
__get() 和__set()将提供一个提供了一个便捷的机制去访问单个条目属性,代理其他的getter和setter方法(proxy to the other getters and setters),他们也帮助确保对象中只有白名单属性才是可用的
Find() 和fetchAll()提供获取单个条目和能力,而save()负责将条目存储到数据库。
从现在开始,我们能够开始建立我们的数据库
首先我们需要初始化我们的数据源。就像布局和视图资源那样,可以为数据源提供配置。我们可以使用“zf configure db-adapter”命令:
  1. % zf configure db-adapter /
  2. > 'adapter=PDO_SQLITE&dbname=APPLICATION_PATH "/../data/db/guestbook.db"' /
  3. > production
  4. A db configuration for the production has been written to the application config file.
  5.  
  6. % zf configure db-adapter /
  7. > 'adapter=PDO_SQLITE&dbname=APPLICATION_PATH "/../data/db/guestbook-testing.db"' /
  8. > testing
  9. A db configuration for the production has been written to the application config file.
  10.  
  11. % zf configure db-adapter /
  12. > 'adapter=PDO_SQLITE&dbname=APPLICATION_PATH "/../data/db/guestbook-dev.db"' /
  13. > development
  14. A db configuration for the production has been written to the application config file.
现在编辑你的application/configs/application.ini file文件,在相应的部分你将会看到下面的行被加进去。
  1. ; application/configs/application.ini
  2.  
  3. [production]
  4. ; ...
  5. resources.db.adapter "PDO_SQLITE"
  6. resources.db.params.dbname = APPLICATION_PATH"/../data/db/guestbook.db"
  7.  
  8. [testing : production]
  9. ; ...
  10. resources.db.adapter "PDO_SQLITE"
  11. resources.db.params.dbname = APPLICATION_PATH"/../data/db/guestbook-testing.db"
  12.  
  13. [development : production]
  14. ; ...
  15. resources.db.adapter "PDO_SQLITE"
  16. resources.db.params.dbname = APPLICATION_PATH"/../data/db/guestbook-dev.db"
最后的配置文件看起来像这样:
  1. ; application/configs/application.ini
  2.  
  3. [production]
  4. phpSettings.display_startup_errors = 0
  5. phpSettings.display_errors = 0
  6. bootstrap.path = APPLICATION_PATH "/Bootstrap.php"
  7. bootstrap.class "Bootstrap"
  8. appnamespace "Application"
  9. resources.frontController.controllerDirectory = APPLICATION_PATH"/controllers"
  10. resources.frontController.params.displayExceptions = 0
  11. resources.layout.layoutPath = APPLICATION_PATH "/layouts/scripts"
  12. resources.view[] =
  13. resources.db.adapter "PDO_SQLITE"
  14. resources.db.params.dbname = APPLICATION_PATH"/../data/db/guestbook.db"
  15.  
  16. [staging : production]
  17.  
  18. [testing : production]
  19. phpSettings.display_startup_errors = 1
  20. phpSettings.display_errors = 1
  21. resources.db.adapter "PDO_SQLITE"
  22. resources.db.params.dbname = APPLICATION_PATH"/../data/db/guestbook-testing.db"
  23.  
  24. [development : production]
  25. phpSettings.display_startup_errors = 1
  26. phpSettings.display_errors = 1
  27. resources.db.adapter "PDO_SQLITE"
  28. resources.db.params.dbname = APPLICATION_PATH"/../data/db/guestbook-dev.db"
注意数据库将被存储在“data/db/”目录下。创建这些目录并且使它们是可写的。在类unix系统中,你可以像下面这么做:
  1. % mkdir -p data/db; chmod -R a+rwX data
在wendows系统中,你需要在资源管理器中创建目录并设置对任何人的写权限。
这里我们有一个到数据库的连接,它连接到位于application/data/目录下的sqlite数据库。我们来设计一个简单的数据表用于存储我们的留言板条目。
  1. -- scripts/schema.sqlite.sql
  2. --
  3. -- You will need load your database schema with this SQL.
  4.  
  5. CREATE TABLE guestbook (
  6.     id INTEGER NOT NULL PRIMARY KEY AUTOINCREMENT,
  7.     email VARCHAR(32) NOT NULL DEFAULT 'noemail@test.com',
  8.     comment TEXT NULL,
  9.     created DATETIME NOT NULL
  10. );
  11.  
  12. CREATE INDEX "id" ON "guestbook" ("id");
为使我们的工作有创意的(so that we can have some working data out of the box),我们来创建一些数据行使我们的应用程序更加有趣
  1. -- scripts/data.sqlite.sql
  2. --
  3. -- You can begin populating the database with the following SQL statements.
  4.  
  5. INSERT INTO guestbook (email, comment, created) VALUES
  6.     ('ralph.schindler@zend.com',
  7.     'Hello! Hope you enjoy this sample zf application!',
  8.     DATETIME('NOW'));
  9. INSERT INTO guestbook (email, comment, created) VALUES
  10.     ('foo@bar.com',
  11.     'Baz baz baz, baz baz Baz baz baz - baz baz baz.',
  12.     DATETIME('NOW'));
现在我们已经定义了数据表和数据。让我们一起来得到一个脚本,去建立这个数据库。当然,这个在产品中是不需要的,但是这个脚本将帮助开发者建立局部的数据库需求,以便有一个完整的应用程序。创建带有以下内容的“scripts/load.sqlite.php”脚本
  1. // scripts/load.sqlite.php
  2.  
  3. /**
  4. * Script for creating and loading database
  5. */
  6.  
  7. // Initialize the application path and autoloading
  8. defined('APPLICATION_PATH')
  9.     || define('APPLICATION_PATH', realpath(dirname(__FILE__) .'/../application'));
  10. set_include_path(implode(PATH_SEPARATOR, array(
  11.     APPLICATION_PATH . '/../library',
  12.     get_include_path(),
  13. )));
  14. require_once 'Zend/Loader/Autoloader.php';
  15. Zend_Loader_Autoloader::getInstance();
  16.  
  17. // Define some CLI options
  18. $getopt = new Zend_Console_Getopt(array(
  19.     'withdata|w' => 'Load database with sample data',
  20.     'env|e-s'    => 'Application environment for which to create database (defaults to development)',
  21.     'help|h'     => 'Help -- usage message',
  22. ));
  23. try {
  24.     $getopt->parse();
  25. } catch (Zend_Console_Getopt_Exception $e{
  26.     // Bad options passed: report usage
  27.     echo $e->getUsageMessage();
  28.     return false;
  29. }
  30.  
  31. // If help requested, report usage message
  32. if ($getopt->getOption('h'){
  33.     echo $getopt->getUsageMessage();
  34.     return true;
  35. }
  36.  
  37. // Initialize values based on presence or absence of CLI options
  38. $withData = $getopt->getOption('w');
  39. $env      = $getopt->getOption('e');
  40. defined('APPLICATION_ENV')
  41.     || define('APPLICATION_ENV', (null === $env) ? 'development'$env);
  42.  
  43. // Initialize Zend_Application
  44. $application = new Zend_Application(
  45.     APPLICATION_ENV,
  46.     APPLICATION_PATH . '/configs/application.ini'
  47. );
  48.  
  49. // Initialize and retrieve DB resource
  50. $bootstrap = $application->getBootstrap();
  51. $bootstrap->bootstrap('db');
  52. $dbAdapter = $bootstrap->getResource('db');
  53.  
  54. // let the user know whats going on (we are actually creating a
  55. // database here)
  56. if ('testing' != APPLICATION_ENV) {
  57.     echo 'Writing Database Guestbook in (control-c to cancel): '. PHP_EOL;
  58.     for ($x = 5; $x > 0$x--) {
  59.         echo $x . "/r"sleep(1);
  60.     }
  61. }
  62.  
  63. // Check to see if we have a database file already
  64. $options = $bootstrap->getOption('resources');
  65. $dbFile  = $options['db']['params']['dbname'];
  66. if (file_exists($dbFile){
  67.     unlink($dbFile);
  68. }
  69.  
  70. // this block executes the actual statements that were loaded from
  71. // the schema file.
  72. try {
  73.     $schemaSql = file_get_contents(dirname(__FILE__) .'/schema.sqlite.sql');
  74.     // use the connection directly to load sql in batches
  75.     $dbAdapter->getConnection()->exec($schemaSql);
  76.     chmod($dbFile, 0666);
  77.  
  78.     if ('testing' != APPLICATION_ENV) {
  79.         echo PHP_EOL;
  80.         echo 'Database Created';
  81.         echo PHP_EOL;
  82.     }
  83.  
  84.     if ($withData) {
  85.         $dataSql = file_get_contents(dirname(__FILE__) .'/data.sqlite.sql');
  86.         // use the connection directly to load sql in batches
  87.         $dbAdapter->getConnection()->exec($dataSql);
  88.         if ('testing' != APPLICATION_ENV) {
  89.             echo 'Data Loaded.';
  90.             echo PHP_EOL;
  91.         }
  92.     }
  93.  
  94. } catch (Exception $e) {
  95.     echo 'AN ERROR HAS OCCURED:' . PHP_EOL;
  96.     echo $e->getMessage() . PHP_EOL;
  97.     return false;
  98. }
  99.  
  100. // generally speaking, this script will be run from the command line
  101. return true;
现在,我们来执行这个脚本,从一个终端或者DOS命令行做如下工作:
  1. % php scripts/load.sqlite.php --withdata
你应该会看到像下面一样的输出:
  1. path/to/ZendFrameworkQuickstart/scripts$ php load.sqlite.php --withdata
  2. Writing Database Guestbook in (control-c to cancel):
  3. 1
  4. Database Created
  5. Data Loaded.
现在,我们的留言板有了一个完整的工作数据库和表。我们下面几步准备去建立我们的应用程序代码。这包括建立一个数据源(我们的例子里,我们将使用Zend_Db_Table)和一个数据映射(data mapper)去连接数据源和数据模型(model)。最后,我们将建立与这个模型相互作用控制器去显示已经存在的和要发布的条目。
我们将使用 » 表数据网关(Table Data Gateway)去连接我们的数据源;Zend_Db_Table提供这个功能。为了开始,我们创建一个基于Zend_Db_Table的表类,就像我们已经为布局和数据适配器做的那样,我们能够使用zf工具的“create db-table”命令,它需要至少两个参数,一个是你想要引用类的名称,另一个是要映射的数据表
  1. % zf create db-table Guestbook guestbook
  2. Creating a DbTable at application/models/DbTable/Guestbook.php
  3. Updating project profile 'zfproject.xml'
看一下你的目录树,你会看到一个新的目录:application/models/DbTable/被创建,里面还有一个名为Guestbook.php的文件,若你打开这个文件,你会看到下面的内容:
  1. // application/models/DbTable/Guestbook.php
  2.  
  3. /**
  4. * This is the DbTable class for the guestbook table.
  5. */
  6. class Application_Model_DbTable_Guestbook extendsZend_Db_Table_Abstract
  7. {
  8.     /** Table name */
  9.     protected $_name    = 'guestbook';
  10. }
注意这个类的前缀:Application_Model_DbTable。我们模块名的类前缀“Application”是第一个部分,第二部分是“Model_DbTable”。后者是映射模块的目录“models/DbTable”。
扩展的Zend_Db_Table提供一个表名和可选的主键(如果它不是“id”),这都是有必要的。
现在我们来创建 » 数据映射(Data Mapper)。Data Mapper映射域对象到数据库。在我们这个例子中,它将映射我们的模型(model)Application_Model_Guestbook到数据源Application_Model_DbTable_Guestbook. Data mapper典型的API像下面这样:
 
  1. // application/models/GuestbookMapper.php
  2.  
  3. class Application_Model_GuestbookMapper
  4. {
  5.     public function save($model);
  6.     public function find($id, $model);
  7.     public function fetchAll();
  8. }
除了这些方法之外,我们将增加设置和检索表数据网关(Table Data Gateway)的方法。使用“zf CLI”工具来创建初始的类:
  1. % zf create model GuestbookMapper
  2. Creating a model at application/models/GuestbookMapper.php
  3. Updating project profile '.zfproject.xml'
现在,像下面这样编辑application/models/GuestbookMapper.php 中的Application_Model_GuestbookMapper类:
  1. // application/models/GuestbookMapper.php
  2.  
  3. class Application_Model_GuestbookMapper
  4. {
  5.     protected $_dbTable;
  6.  
  7.     public function setDbTable($dbTable)
  8.     {
  9.         if (is_string($dbTable){
  10.             $dbTable = new $dbTable();
  11.         }
  12.         if (!$dbTable instanceof Zend_Db_Table_Abstract) {
  13.             throw new Exception('Invalid table data gateway provided');
  14.         }
  15.         $this->_dbTable = $dbTable;
  16.         return $this;
  17.     }
  18.  
  19.     public function getDbTable()
  20.     {
  21.         if (null === $this->_dbTable) {
  22.             $this->setDbTable('Application_Model_DbTable_Guestbook');
  23.         }
  24.         return $this->_dbTable;
  25.     }
  26.  
  27.     public function save(Application_Model_Guestbook $guestbook)
  28.     {
  29.         $data = array(
  30.             'email'   => $guestbook->getEmail(),
  31.             'comment' => $guestbook->getComment(),
  32.             'created' => date('Y-m-d H:i:s'),
  33.         );
  34.  
  35.         if (null === ($id = $guestbook->getId())) {
  36.             unset($data['id']);
  37.             $this->getDbTable()->insert($data);
  38.         } else {
  39.             $this->getDbTable()->update($dataarray('id = ?' =>$id));
  40.         }
  41.     }
  42.  
  43.     public function find($id, Application_Model_Guestbook$guestbook)
  44.     {
  45.         $result = $this->getDbTable()->find($id);
  46.         if (0 == count($result)) {
  47.             return;
  48.         }
  49.         $row = $result->current();
  50.         $guestbook->setId($row->id)
  51.                   ->setEmail($row->email)
  52.                   ->setComment($row->comment)
  53.                   ->setCreated($row->created);
  54.     }
  55.  
  56.     public function fetchAll()
  57.     {
  58.         $resultSet = $this->getDbTable()->fetchAll();
  59.         $entries   = array();
  60.         foreach ($resultSet as $row) {
  61.             $entry = new Application_Model_Guestbook();
  62.             $entry->setId($row->id)
  63.                   ->setEmail($row->email)
  64.                   ->setComment($row->comment)
  65.                   ->setCreated($row->created);
  66.             $entries[] = $entry;
  67.         }
  68.         return $entries;
  69.     }
  70. }
现在是时候创建我们模型类的时候了。我们将又一次使用“zf create model”命令来做这个事情:
  1. % zf create model Guestbook
  2. Creating a model at application/models/Guestbook.php
  3. Updating project profile '.zfproject.xml'
我们将修改这个空的PHP类,通过传递一个数据数组到构造函数(constructor)或者setOptions()方法使它容易去填充模型:
  1. // application/models/Guestbook.php
  2.  
  3. class Application_Model_Guestbook
  4. {
  5.     protected $_comment;
  6.     protected $_created;
  7.     protected $_email;
  8.     protected $_id;
  9.  
  10.     public function __construct(array $options = null)
  11.     {
  12.         if (is_array($options){
  13.             $this->setOptions($options);
  14.         }
  15.     }
  16.  
  17.     public function __set($name, $value)
  18.     {
  19.         $method = 'set' . $name;
  20.         if (('mapper' == $name) || !method_exists($this,$method)) {
  21.             throw new Exception('Invalid guestbook property');
  22.         }
  23.         $this->$method($value);
  24.     }
  25.  
  26.     public function __get($name)
  27.     {
  28.         $method = 'get' . $name;
  29.         if (('mapper' == $name) || !method_exists($this,$method)) {
  30.             throw new Exception('Invalid guestbook property');
  31.         }
  32.         return $this->$method();
  33.     }
  34.  
  35.     public function setOptions(array $options)
  36.     {
  37.         $methods = get_class_methods($this);
  38.         foreach ($options as $key => $value) {
  39.             $method = 'set' . ucfirst($key);
  40.             if (in_array($method$methods)) {
  41.                 $this->$method($value);
  42.             }
  43.         }
  44.         return $this;
  45.     }
  46.  
  47.     public function setComment($text)
  48.     {
  49.         $this->_comment = (string) $text;
  50.         return $this;
  51.     }
  52.  
  53.     public function getComment()
  54.     {
  55.         return $this->_comment;
  56.     }
  57.  
  58.     public function setEmail($email)
  59.     {
  60.         $this->_email = (string) $email;
  61.         return $this;
  62.     }
  63.  
  64.     public function getEmail()
  65.     {
  66.         return $this->_email;
  67.     }
  68.  
  69.     public function setCreated($ts)
  70.     {
  71.         $this->_created = $ts;
  72.         return $this;
  73.     }
  74.  
  75.     public function getCreated()
  76.     {
  77.         return $this->_created;
  78.     }
  79.  
  80.     public function setId($id)
  81.     {
  82.         $this->_id = (int) $id;
  83.         return $this;
  84.     }
  85.  
  86.     public function getId()
  87.     {
  88.         return $this->_id;
  89.     }
  90. }
最后,为了将所有这些部分连接在一起,我们来创建留言簿控制器(a guestbook controller),它将列出目前在数据库中已有的条目。
为了创建新的控制器,使用“zf create controller”命令:
  1. % zf create controller Guestbook
  2. Creating a controller at
  3.     application/controllers/GuestbookController.php
  4. Creating an index action method in controller Guestbook
  5. Creating a view script for the index action method at
  6.     application/views/scripts/guestbook/index.phtml
  7. Creating a controller test file at
  8.     tests/application/controllers/GuestbookControllerTest.php
  9. Updating project profile '.zfproject.xml'
这将创建一个新的控制器,位于application/controllers/GuestbookController.php里的GuestbookController,它带有唯一的动作方法:indexAction。也会为这个控制器创建一个视图脚本目录,application/views/scripts/guestbook/,里面会有一个为index action创建的视图脚本
我们将使用“index”动作作为目标页面(landing page)去查看所有的留言簿条目
现在我们来使基本应用程序逻辑丰满起来,当进入indexAction(),我们将显示所有的留言簿条目,看起来像下面这样:
  1. // application/controllers/GuestbookController.php
  2.  
  3. class GuestbookController extends Zend_Controller_Action
  4. {
  5.     public function indexAction()
  6.     {
  7.         $guestbook = new Application_Model_GuestbookMapper();
  8.         $this->view->entries = $guestbook->fetchAll();
  9.     }
  10. }
当然,我们需要一个试图脚本和它一起运行。像下面这样编辑application/views/scripts/guestbook/index.phtml :
  1. <!-- application/views/scripts/guestbook/index.phtml -->
  2.  
  3. <p><a href="<?php echo $this->url(
  4.     array(
  5.         'controller' => 'guestbook',
  6.         'action'     => 'sign'
  7.     ),
  8.     'default',
  9.     true) ?>">Sign Our Guestbook</a></p>
  10.  
  11. Guestbook Entries: <br />
  12. <dl>
  13.     <?php foreach ($this->entries as $entry)?>
  14.     <dt><?php echo $this->escape($entry->email) ?></dt>
  15.     <dd><?php echo $this->escape($entry->comment) ?></dd>
  16.     <?php endforeach ?>
  17. </dl>
Note Checkpoint
Now browse to "http://localhost/guestbook". You should see the following in your browser:
注:检查点
现在浏览http://localhost/guestbook。你将看到下面的样子:


使用数据导入脚本
在本节中介绍的数据导入脚本(scripts/load.sqlite.php)能够被用作创建你所定义的每个环境下的数据库,以及导入简单的样本数据。在内部,它使用Zend_Console_Getopt,它提供了许多命令行开关。如果你提供 “-h”或者“--help”开关,它将给你可用的选择:
1.   Usage: load.sqlite.php  [  options  ]
2.   --withdata|-w         Load database with sample data
3.   --env|-e  [    ]          Application environment  for  which to create database
4.                          ( defaults to development )
5.   --help|-h             Help -- usage message )] ]
  “-e”开关允许你指定常量“APPLICATION_EVN”的值——它依次允许你去创建为每个环境定义的SQLLite数据库。确信当部署的时候为你的应用程序选择的环境运行脚本
创建表单
为了使留言簿有用,我们需要提交新条目的表单。
我们首先要做的是去创建实际的表单类。为创建空的表单类,执行:
  1. % zf create form Guestbook
  2. Creating a form at application/forms/Guestbook.php
  3. Updating project profile '.zfproject.xml'
这将创建带有类文件Guestbook.php的application/forms/目录。打开Guestbook.php文件并更新它,你将会看到:
  1. // application/forms/Guestbook.php
  2.  
  3. class Application_Form_Guestbook extends Zend_Form
  4. {
  5.     public function init()
  6.     {
  7.         // Set the method for the display form to POST
  8.         $this->setMethod('post');
  9.  
  10.         // Add an email element
  11.         $this->addElement('text''email'array(
  12.             'label'      => 'Your email address:',
  13.             'required'   => true,
  14.             'filters'    => array('StringTrim'),
  15.             'validators' => array(
  16.                 'EmailAddress',
  17.             )
  18.         ));
  19.  
  20.         // Add the comment element
  21.         $this->addElement('textarea''comment'array(
  22.             'label'      => 'Please Comment:',
  23.             'required'   => true,
  24.             'validators' => array(
  25.                 array('validator' => 'StringLength''options' =>array(0, 20))
  26.                 )
  27.         ));
  28.  
  29.         // Add a captcha
  30.         $this->addElement('captcha''captcha'array(
  31.             'label'      => 'Please enter the 5 letters displayed below:',
  32.             'required'   => true,
  33.             'captcha'    => array(
  34.                 'captcha' => 'Figlet',
  35.                 'wordLen' => 5,
  36.                 'timeout' => 300
  37.             )
  38.         ));
  39.  
  40.         // Add the submit button
  41.         $this->addElement('submit''submit'array(
  42.             'ignore'   => true,
  43.             'label'    => 'Sign Guestbook',
  44.         ));
  45.  
  46.         // And finally add some CSRF protection
  47.         $this->addElement('hash''csrf'array(
  48.             'ignore' => true,
  49.         ));
  50.     }
  51. }
上面的表单定义了五个元素:email address字段,评论字段,防止垃圾提交信息的CAPTCHA字段,提交按钮,和CSRF保护令牌(protection token)。
下一步,我们将增加signAction()到我们的GuestbookController,它将处理提交后的表单。为了创建动作和相关视图脚本,执行下面内容:
  1. % zf create action sign Guestbook
  2. Creating an action named sign inside controller
  3.     at application/controllers/GuestbookController.php
  4. Updating project profile '.zfproject.xml'
  5. Creating a view script for the sign action method
  6.     at application/views/scripts/guestbook/sign.phtml
  7. Updating project profile '.zfproject.xml'
就像你从输出中看到的,这将控制器中创建一个signAction()方法,以及相关的视图脚本。
我们来加入一些逻辑到我们的留言簿控制器提交动作(sign action)。我们需要首先检查是否得到的是POST还是用GET请求;如果是后者,我们将简单的将表单显示出来。然而,如果我们得到一个POST请求,我们将要去验证表单提交的数据。如果通过认证,则创建一个新的条目并存储它。这个逻辑看起来会像下面这样:
  1. // application/controllers/GuestbookController.php
  2.  
  3. class GuestbookController extends Zend_Controller_Action
  4. {
  5.     // snipping indexAction()...
  6.  
  7.     public function signAction()
  8.     {
  9.         $request = $this->getRequest();
  10.         $form    = new Application_Form_Guestbook();
  11.  
  12.         if ($this->getRequest()->isPost()) {
  13.             if ($form->isValid($request->getPost()){
  14.                 $comment = new Application_Model_Guestbook($form->getValues());
  15.                 $mapper  = newApplication_Model_GuestbookMapper();
  16.                 $mapper->save($comment);
  17.                 return $this->_helper->redirector('index');
  18.             }
  19.         }
  20.  
  21.         $this->view->form = $form;
  22.     }
  23. }
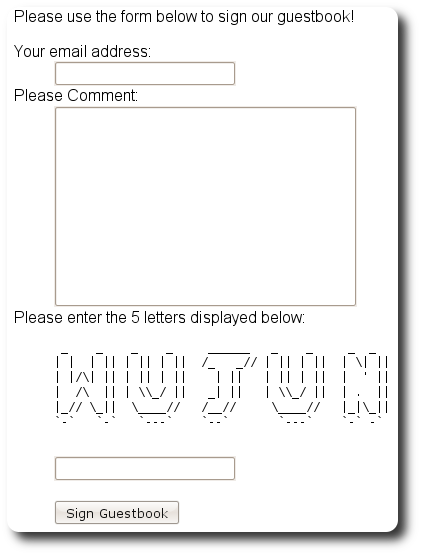
当然,我们也需要编辑视图脚本,编辑application/views/scripts/guestbook/sign.phtml
  1. <!-- application/views/scripts/guestbook/sign.phtml -->
  2.  
  3. Please use the form below to sign our guestbook!
  4.  
  5. <?php
  6. $this->form->setAction($this->url());
  7. echo $this->form;
使表单看起来更美观
任何时候,没有人会对于这个表单的美观说好,无论如何,表单的外观是完全可定制的,具体请看在参考指南的装饰一节。
注:检查点:
Now browse to "http://localhost/guestbook/sign". You should see the following in your browser:
现在,将浏览器定位到http://localhost/guestbook/sign,你将会看到下面的样子:


恭喜!
 
你现在已经使用最常用的Zend Framework组件建立一个非常简单的应用程序。Zend Framework给你提供许多可用的组件,它们在web应用中提供最常见的需求,除了包括web服务,搜索,PDF读写,认证,授权外还有许多组件。这个参考指南是一个去发现你已经使用的组件以及其他组件好地方。我们希望你发现Zend Framework是有用并接—更重要的—愉快的!
  • 0
    点赞
  • 0
    收藏
    觉得还不错? 一键收藏
  • 0
    评论
1. Introduction to Zend Framework 1.1. 概述 1.2. 安装 2. Zend_Acl 2.1. 简介 2.1.1. 关于资源(Resource) 2.1.2. 关于角色(Role) 2.1.3. 创建访问控制列表(ACL) 2.1.4. 注册角色(Role) 2.1.5. 定义访问控制 2.1.6. 查询 ACL 2.2. 精细的访问控制 2.2.1. 精细的访问控制 2.2.2. 除去访问控制 2.3. 高级用法 2.3.1. 保存 ACL 数据确保持久性 2.3.2. 使用声明(Assert)来编写条件性的 ACL 规则 3. Zend_Auth 3.1. 简介 3.1.1. 适配器 3.1.2. 结果 3.1.3. 身份的持久(Persistence) 3.1.3.1. 在PHP Session 中的缺省持久(Persistence) 3.1.3.2. 实现订制存储 3.1.4. 使用Zend_Auth 3.2. 数据库表认证 3.2.1. 简介 3.2.2. 高级使用:持久一个 DbTable 结果对象 3.2.3. 高级用法示例 3.3. 摘要式认证 3.3.1. 简介 3.3.2. 规范(Specifics) 3.3.3. 身份(Identity) 3.4. HTTP 认证适配器 3.4.1. 简介 3.4.2. 设计回顾 3.4.3. 配置选项 3.4.4. Resolvers 3.4.4.1. 文件 Resolver 3.4.5. 基本用法 4. Zend_Cache 4.1. 简介 4.2. 缓存原理 4.2.1. Zend_Cache 工厂方法 4.2.2. 标记纪录 4.2.3. 缓存清理 4.3. Zend_Cache前端 4.3.1. Zend_Cache_Core 4.3.1.1. 简介 4.3.1.2. 可用选项 4.3.1.3. 例子 4.3.2. Zend_Cache_Frontend_Output 4.3.2.1. 简介 4.3.2.2. 可用的选项 4.3.2.3. 例子 4.3.3. Zend_Cache_Frontend_Function 4.3.3.1. Introduction 4.3.3.2. A可用的选项 4.3.3.3. 例子 4.3.4. Zend_Cache_Frontend_Class 4.3.4.1. Introduction 4.3.4.2. Available options 4.3.4.3. Examples 4.3.5. Zend_Cache_Frontend_File 4.3.5.1. Introduction 4.3.5.2. Available options 4.3.5.3. Examples 4.3.6. Zend_Cache_Frontend_Page 4.3.6.1. Introduction 4.3.6.2. Available options (for this frontend in Zend_Cache factory) 4.3.6.3. Examples 4.4. Zend_Cache后端 4.4.1. Zend_Cache_Backend_File 4.4.2. Zend_Cache_Backend_Sqlite 4.4.3. Zend_Cache_Backend_Memcached 4.4.4. Zend_Cache_Backend_Apc 4.4.5. Zend_Cache_Backend_ZendPlatform 5. Zend_Config 5.1. 简介 5.2. 操作理论 5.3. Zend_Config_Ini 5.4. Zend_Config_Xml 6. Zend_Console_Getopt 6.1. Getopt 简介 6.2. 声明 Getopt 规则 6.2.1. 用短语法声明选项 6.2.2. 用长语法声明选项 6.3. 读取(Fetching)选项和参数 6.3.1. 操作 Getopt 异常 6.3.2. 通过名字读取 (Fetching)选项 6.3.3. 报告选项 6.3.4. 读取非选项参数 6.4. 配置 Zend_Console_Getopt 6.4.1. 添加选项规则 6.4.2. 添加帮助信息 6.4.3. 添加选项别名 6.4.4. 添加参数列表 6.4.5. 添加配置 7. Zend_Controller 7.1. Zend_Controller 快速入门 7.1.1. 简介 7.1.2. 入门 7.1.2.1. 文件系统的组织结构 7.1.2.2. 设置文件根目录 7.1.2.3. 创建URL重写规则 7.1.2.4. 创建你的bootstrap文件 7.1.2.5. 创建默认的控制器(Action Controller) 7.1.2.6. 创建你的视图脚本 7.1.2.7. 创建你自己的错误控制器 7.1.2.8. 访问站点! 7.2. Zend_Controller 基础 7.3. 前端控制器 7.3.1. 概述 7.3.2. 主要方法 7.3.2.1. getInstance() 7.3.2.2. setControllerDirectory() 和 addControllerDirectory() 7.3.2.3. dispatch() 7.3.2.4. run() 7.3.3. 环境访问器方法 7.3.4. 前端控制器参数 7.3.5. 继承前端控制器 7.4. 请求对象 7.4.1. 介绍 7.4.2. HTTP 请求 7.4.2.1. 访问请求数据 7.4.2.2. 基地址和子目录 7.4.2.3. 决定请求方式 7.4.2.4. 删除 AJAX 请求 7.4.3. 子类化请求对象 7.5. 标准路由器:Zend_Controller_Router_Rewrite 7.5.1. 简介 7.5.2. 使用路由器 7.5.3. 基本的Rewrite路由器操作 7.5.4. 缺省路由 7.5.5. 基本 URL 和子目录 7.5.6. Route Types 7.5.6.1. Zend_Controller_Router_Route 7.5.6.1.1. 变量缺省 7.5.6.1.2. 变量请求 7.5.6.2. Zend_Controller_Router_Route_Static 7.5.6.3. Zend_Controller_Router_Route_Regex 7.5.7. 使用 Zend_Config with the RewriteRouter 7.5.8. Subclassing the Router 7.6. 分发器 7.6.1. 概述 7.6.2. 子类化分发器 7.7. 动作控制器 7.7.1. 简介 7.7.2. 对象初始化 7.7.3. 派遣前后的钩子 7.7.4. 访问器 7.7.5. 视图集成 7.7.5.1. 视图初始化 7.7.5.2. 解析(Rendering)视图 7.7.6. 实用方法 7.7.7. 继承(Subclassing)动作控制器 7.8. 动作助手 7.8.1. 介绍 7.8.2. 初始化助手 7.8.3. 助手经纪人 7.8.4. 内建的动作助手 7.8.4.1. 动作堆栈(助手) 7.8.4.2. AutoComplete 7.8.4.2.1. AutoCompletion with Dojo 7.8.4.2.2. AutoCompletion with Scriptaculous 7.8.4.3. ContextSwitch and AjaxContext 7.8.4.3.1. 缺省可用的上下文 7.8.4.3.2. 创建定制的上下文 7.8.4.3.3. 为每个动作设置上下文 7.8.4.3.4. 初始化上下文开关 7.8.4.3.5. 另外的功能 7.8.4.3.6. AjaxContext 函数 7.8.4.4. FlashMessenger 7.8.4.4.1. 简介 7.8.4.4.2. Basic Usage Example 7.8.4.5. JSON 7.8.4.6. 转向器(Redirector) 7.8.4.6.1. 介绍 7.8.4.6.2. 基础用例 7.8.4.7. ViewRenderer 7.8.4.7.1. 介绍 7.8.4.7.2. API 7.8.4.7.3. 基础用法示例 7.8.4.7.4. 高级用法示例 7.8.5. 编写自己的助手 7.9. 响应对象 7.9.1. 用法 7.9.2. 处理消息头 7.9.3. 命名片段 7.9.4. 在响应对象中测试异常 7.9.5. 子类化响应对象 7.10. 插件 7.10.1. 简介 7.10.2. 编写插件 7.10.3. 使用插件 7.10.4. 获取和控制插件 7.10.5. 包含在标准发行包中的插件 7.10.5.1. 动作堆栈 7.10.5.2. Zend_Controller_Plugin_ErrorHandler 7.10.5.2.1. 使用 ErrorHandler 作为一个 404 处理器(handler) 7.10.5.2.2. 处理以前呈现的(rendered)输出 7.10.5.2.3. 插件用法示例 7.10.5.2.4. 错误控制器示例 7.11. 使用传统的模块目录结构 7.11.1. 简介 7.11.2. 指定模块控制器目录 7.11.3. Routing to modules 7.11.4. 模块或全局缺省控制器 7.12. MVC 异常 7.12.1. 介绍 7.12.2. 如何处理异常? 7.12.3. 可能遭遇的MVC异常 7.13. 从以前的版本移植 7.13.1. 从 1.0.x 到 1.5.0 或更新的版本的移植 7.13.2. 从 0.9.3 到 1.0.0RC1 或更新的版本的移植 7.13.3. 从 0.9.2 移植到 0.9.3 或更新的版本 7.13.4. 从 0.6.0 移植到 0.8.0 或更新的版本 7.13.5. 从 0.2.0 或以前的版本移植到 0.6.0 8. Zend_Currency 8.1. Zend_Currency 简介 8.1.1. 为什么使用 Zend_Currency ? 8.2. 如何使用货币 8.2.1. 从货币创建输出 8.2.2. 修改货币格式 8.2.3. Zend_Currency 的信息方法 8.2.4. 设置新缺省值 8.2.5. 加速 Zend_Currency 8.3. 从前面的版本迁移 8.3.1. 从 1.0.2 到 1.0.3 或更新的迁移 9. Zend_Date 9.1. Introduction 9.1.1. Always Set a Default Timezone 9.1.2. Why Use Zend_Date? 9.2. 操作理论 9.2.1. 内部(Internals) 9.3. Basic Methods 9.3.1. The current date 9.3.2. Zend_Date by Example 9.3.2.1. Ouput a Date 9.3.2.2. Setting a Date 9.3.2.3. Adding and Subtracting Dates 9.3.2.4. Comparation of dates 9.4. Zend_Date API Overview 9.4.1. Zend_Date Options 9.4.1.1. Selecting the date format type 9.4.1.2. DST and Date Math 9.4.1.3. Month Calculations 9.4.1.4. Speed up date localization and normalization with Zend_Cache 9.4.1.5. Receiving syncronised timestamps with Zend_TimeSync 9.4.2. Working with Date Values 9.4.3. Basic Zend_Date Operations Common to Many Date Parts 9.4.3.1. List of Date Parts 9.4.3.2. List of Date Operations 9.4.4. Comparing Dates 9.4.5. Getting Dates and Date Parts 9.4.6. Working with Fractions of Seconds 9.4.7. Sunrise / Sunset 9.5. Creation of dates 9.5.1. Create the actual date 9.5.2. Create a date from database 9.5.3. Create dates from an array 9.6. Constants for General Date Functions 9.6.1. Using Constants 9.6.2. List of All Constants 9.6.3. Self-Defined OUTPUT Formats with ISO 9.6.4. Self-defined OUTPUT formats using PHP's date() format specifiers 9.7. Working examples 9.7.1. Checking dates 9.7.2. Sunrise and Sunset 9.7.3. Timezones 10. Zend_Db 10.1. Zend_Db_Adapter 10.1.1. 简介 10.1.2. 添加引号防止数据库攻击 10.1.3. 直接查询 10.1.4. 事务处理 10.1.5. 插入数据行 10.1.6. 更新数据行 10.1.7. 删除数据行 10.1.8. 取回查询结果 10.2. Zend_Db_Statement 10.2.1. Creating a Statement 10.2.2. Executing a Statement 10.2.3. Fetching Results from a SELECT Statement 10.2.3.1. Fetching a Single Row from a Result Set 10.2.3.2. Fetching a Complete Result Set 10.2.3.3. Changing the Fetch Mode 10.2.3.4. Fetching a Single Column from a Result Set 10.2.3.5. Fetching a Row as an Object 10.3. Zend_Db_Profiler 10.3.1. Introduction 10.3.2. Using the Profiler 10.3.3. Advanced Profiler Usage 10.3.3.1. Filter by query elapsed time 10.3.3.2. Filter by query type 10.3.3.3. Retrieve profiles by query type 10.4. Zend_Db_Select 10.4.1. 简介 10.4.2. 同一表中查询多列数据 10.4.3. 多表联合查询 10.4.4. WHERE条件 10.4.5. GROUP BY分句 10.4.6. HAVING 条件 10.4.7. ORDER BY 分句 10.4.8. 通过总数和偏移量进行LIMIT限制 10.4.9. 通过页数和总数进行LIMIT限制 10.5. Zend_Db_Table 10.5.1. 简介 10.5.2. 开始 10.5.3. 表名和主键 10.5.4. 插入数据 10.5.5. 更新数据 10.5.6. Deleting Rows 10.5.7. 根据主键查找数据 10.5.8. 取回一条记录 10.5.9. 取回多条记录 10.5.10. Adding Domain Logic 10.6. Zend_Db_Table_Row 10.6.1. 简介 10.6.2. 取回一条记录 10.6.3. 修改数据 10.7. Zend_Db_Table_Rowset 10.7.1. 简介 10.7.2. 取回结果集 10.7.3. 遍历结果集 10.8. Zend_Db_Table Relationships 10.8.1. Introduction 10.8.2. Defining Relationships 10.8.3. Fetching a Dependent Rowset 10.8.4. Fetching a Parent Row 10.8.5. Fetching a Rowset via a Many-to-many Relationship 10.8.6. Cascading Write Operations 10.8.6.1. Notes Regarding Cascading Operations 11. Zend_Debug 11.1. 输出变量的值 (Dumping Variables) 12. Zend_Exception 12.1. 使用“异常” 13. Zend_Feed 13.1. 介绍 13.2. 导入Feeds 13.2.1. 定制 feeds 13.2.1.1. 导入定制的数组 13.2.1.2. 导入定制的数据源 13.2.1.3. Dumping feed 内容 13.3. 从网页上获得Feed 13.4. RSS Feed的使用 13.5. Atom Feed的使用 13.6. 单个Atom条目的处理 13.7. 修改Feed和条目结构 13.8. 自定义Feed和条目类 14. Zend_Filter 14.1. 简介 14.1.1. 什么是过滤器(filter)? 14.1.2. 过滤器的基本用法 14.1.3. 使用静态 get() 方法 14.2. 标准过滤器类 14.2.1. Alnum 14.2.2. Alpha 14.2.3. BaseName 14.2.4. Digits 14.2.5. Dir 14.2.6. HtmlEntities 14.2.7. Int 14.2.8. RealPath 14.2.9. StringToLower 14.2.10. StringToUpper 14.2.11. StringTrim 14.2.12. StripTags 14.3. 过滤器链 14.4. 编写过滤器 14.5. Zend_Filter_Input 14.5.1. Declaring Filter and Validator Rules 14.5.2. Creating the Filter and Validator Processor 14.5.3. Retrieving Validated Fields and other Reports 14.5.3.1. Querying if the input is valid 14.5.3.2. Getting Invalid, Missing, or Unknown Fields 14.5.3.3. Getting Valid Fields 14.5.4. Using Metacommands to Control Filter or Validator Rules 14.5.4.1. The FIELDS metacommand 14.5.4.2. The PRESENCE metacommand 14.5.4.3. The DEFAULT_VALUE metacommand 14.5.4.4. The ALLOW_EMPTY metacommand 14.5.4.5. The BREAK_CHAIN metacommand 14.5.4.6. The MESSAGES metacommand 14.5.4.7. Using options to set metacommands for all rules 14.5.5. Adding Filter Class Namespaces 14.6. Zend_Filter_Inflector 14.6.1. Operation 14.6.2. Setting Paths To Alternate Filters 14.6.3. Setting the Inflector Target 14.6.4. Inflection Rules 14.6.4.1. Static Rules 14.6.4.2. Filter Inflector Rules 14.6.4.3. Setting Many Rules At Once 14.6.5. Utility Methods 14.6.6. Using Zend_Config with Zend_Filter_Inflector 15. Zend_Form 15.1. Zend_Form 15.2. Zend_Form 快速起步 15.2.1. 创建表单对象 15.2.2. 添加表单元素 15.2.3. 解析(Render)表单 15.2.4. 检查表单是否有效 15.2.5. 获得错误状态 15.2.6. 放到一起 15.2.7. 使用 Zend_Config 对象 15.2.8. 结论 15.3. 使用 Zend_Form_Element 生成表单元素 15.3.1. 插件加载器 15.3.2. 过滤器 15.3.3. 校验器 15.3.4. 装饰器 15.3.5. 元数据和属性 15.3.6. 标准元素 15.3.7. Zend_Form_Element 方法 15.3.8. 配置 15.3.9. 定制元素 15.4. 使用 Zend_Form 生成表单 15.4.1. 插件加载器 15.4.2. 元素(Elements) 15.4.2.1. 组装和读取数值 15.4.2.2. 全局操作 15.4.2.3. 和元素交互使用的方法 15.4.3. 显示组(Display Groups) 15.4.3.1. 全局操作 15.4.3.2. 使用定制的显示组类 15.4.3.3. 和显示组交互使用的方法 15.4.3.4. Zend_Form_DisplayGroup 方法 15.4.4. 子表单 15.4.4.1. 全局操作 15.4.4.2. 和子表单交互使用的方法 15.4.5. 元数据(Metadata)和属性(Attributes) 15.4.6. 装饰器 15.4.7. 校验 15.4.8. 方法 15.4.9. 配置 15.4.10. 定制表单 15.5. 使用 Zend_Form_Decorator 生成定制的表单标识(Markup) 15.5.1. 操作 15.5.2. 标准装饰器 15.5.3. 定制装饰器 15.6. Zend Framework 带有的标准表单元素 15.6.1. Zend_Form_Element_Button 15.6.2. Zend_Form_Element_Checkbox 15.6.3. Zend_Form_Element_Hidden 15.6.4. Zend_Form_Element_Hash 15.6.5. Zend_Form_Element_Image 15.6.6. Zend_Form_Element_MultiCheckbox 15.6.7. Zend_Form_Element_Multiselect 15.6.8. Zend_Form_Element_Password 15.6.9. Zend_Form_Element_Radio 15.6.10. Zend_Form_Element_Reset 15.6.11. Zend_Form_Element_Select 15.6.12. Zend_Form_Element_Submit 15.6.13. Zend_Form_Element_Text 15.6.14. Zend_Form_Element_Textarea 15.7. Zend Framework 带有的标准表单装饰器(Decorators) 15.7.1. Zend_Form_Decorator_Callback 15.7.2. Zend_Form_Decorator_Description 15.7.3. Zend_Form_Decorator_DtDdWrapper 15.7.4. Zend_Form_Decorator_Errors 15.7.5. Zend_Form_Decorator_Fieldset 15.7.6. Zend_Form_Decorator_Form 15.7.7. Zend_Form_Decorator_FormElements 15.7.8. Zend_Form_Decorator_HtmlTag 15.7.9. Zend_Form_Decorator_Image 15.7.10. Zend_Form_Decorator_Label 15.7.11. Zend_Form_Decorator_ViewHelper 15.7.12. Zend_Form_Decorator_ViewScript 15.8. Zend_Form 的国际化 15.8.1. 在表单中初始化 I18n 15.8.2. 标准 I18N 目标 15.9. Zend_Form 的高级用法 15.9.1. 数组符号(Notation) 15.9.2. 多页表单 16. Zend_Gdata 16.1. Introduction to Gdata 16.1.1. Structure of Zend_Gdata 16.1.2. Interacting with Google Services 16.1.3. Obtaining instances of Zend_Gdata classes 16.1.4. Google Data Client Authentication 16.1.5. Dependencies 16.1.6. Creating a new Gdata client 16.1.7. Common query parameters 16.1.8. Fetching a feed 16.1.9. Working with multi-page feeds 16.1.10. Working with data in feeds and entries 16.1.11. Updating entries 16.1.12. Posting entries to Google servers 16.1.13. Deleting entries on Google servers 16.2. Authenticating with AuthSub 16.2.1. Creating an AuthSub authenticated Http Client 16.2.2. Revoking AuthSub authentication 16.3. Authenticating with ClientLogin 16.3.1. Creating a ClientLogin authenticated Http Client 16.3.2. Terminating a ClientLogin authenticated Http Client 16.4. Using Google Calendar 16.4.1. Connecting To The Calendar Service 16.4.1.1. Authentication 16.4.1.2. Creating A Service Instance 16.4.2. Retrieving A Calendar List 16.4.3. Retrieving Events 16.4.3.1. Queries 16.4.3.2. Retrieving Events In Order Of Start Time 16.4.3.3. Retrieving Events In A Specified Date Range 16.4.3.4. Retrieving Events By Fulltext Query 16.4.3.5. Retrieving Individual Events 16.4.4. Creating Events 16.4.4.1. Creating Single-Occurrence Events 16.4.4.2. Event Schedules and Reminders 16.4.4.3. Creating Recurring Events 16.4.4.4. Using QuickAdd 16.4.5. Modifying Events 16.4.6. Deleting Events 16.4.7. Accessing Event Comments 16.5. Using Google Documents List Data API 16.5.1. Get a List of Documents 16.5.2. Upload a Document 16.5.3. Searching the documents feed 16.5.3.1. Get a List of Word Processing Documents 16.5.3.2. Get a List of Spreadsheets 16.5.3.3. Performing a text query 16.6. Using Google Spreadsheets 16.6.1. Create a Spreadsheet 16.6.2. Get a List of Spreadsheets 16.6.3. Get a List of Worksheets 16.6.4. Interacting With List-based Feeds 16.6.4.1. Get a List-based Feed 16.6.4.2. Reverse-sort Rows 16.6.4.3. Send a Structured Query 16.6.4.4. Add a Row 16.6.4.5. Edit a Row 16.6.4.6. Delete a Row 16.6.5. Interacting With Cell-based Feeds 16.6.5.1. Get a Cell-based Feed 16.6.5.2. Send a Cell Range Query 16.6.5.3. Change Contents of a Cell 16.7. Using Google Apps Provisioning 16.7.1. Setting the current domain 16.7.1.1. Setting the domain for the service class 16.7.1.2. Setting the domain for query classes 16.7.2. Interacting with users 16.7.2.1. Creating a user account 16.7.2.2. Retrieving a user account 16.7.2.3. Retrieving all users in a domain 16.7.2.4. Updating a user account 16.7.2.4.1. Resetting a user's password 16.7.2.4.2. Forcing a user to change their password 16.7.2.4.3. Suspending a user account 16.7.2.4.4. Granting administrative rights 16.7.2.5. Deleting user accounts 16.7.3. Interacting with nicknames 16.7.3.1. Creating a nickname 16.7.3.2. Retrieving a nickname 16.7.3.3. Retrieving all nicknames for a user 16.7.3.4. Retrieving all nicknames in a domain 16.7.3.5. Deleting a nickname 16.7.4. Interacting with email lists 16.7.4.1. Creating an email list 16.7.4.2. Retrieving all email lists to which a recipient is subscribed 16.7.4.3. Retrieving all email lists in a domain 16.7.4.4. Deleting an email list 16.7.5. Interacting with email list recipients 16.7.5.1. Adding a recipient to an email list 16.7.5.2. Retrieving the list of subscribers to an email list 16.7.5.3. Removing a recipient from an email list 16.7.6. Handling errors 16.8. Using Google Base 16.8.1. Connect To The Base Service 16.8.1.1. Authentication 16.8.1.2. Create A Service Instance 16.8.2. Retrieve Items 16.8.2.1. Send a Structured Query 16.8.2.1.1. Query Customer Items Feed 16.8.2.1.2. Query Snippets Feed 16.8.2.2. Iterate through the Items 16.8.3. Insert, Update, and Delete Customer Items 16.8.3.1. Insert an Item 16.8.3.2. Modify an Item 16.8.3.3. Delete an Item 16.9. Using the YouTube data API 16.9.1. Retrieving video feeds 16.9.1.1. Searching for videos by metadata 16.9.1.2. Searching for videos by categories and tags/keywords 16.9.1.3. Retrieving standard feeds 16.9.1.4. Retrieving videos uploaded by a user 16.9.1.5. Retrieving videos favorited by a user 16.9.1.6. Retrieving video responses for a video 16.9.2. Retrieving video comments 16.9.3. Retrieving playlist feeds 16.9.3.1. Retrieving the playlists of a user 16.9.3.2. Retrieving a specific playlist 16.9.4. Retrieving a list of a user's subscriptions 16.9.5. Retrieving a user's profile 16.10. Using Picasa Web Albums 16.10.1. Connecting To The Service 16.10.1.1. Authentication 16.10.1.2. Creating A Service Instance 16.10.2. Understanding and Constructing Queries 16.10.3. Retrieving Feeds And Entries 16.10.3.1. Retrieving A User 16.10.3.2. Retrieving An Album 16.10.3.3. Retrieving A Photo 16.10.3.4. Retrieving A Comment 16.10.3.5. Retrieving A Tag 16.10.4. Creating Entries 16.10.4.1. Creating An Album 16.10.4.2. Creating A Photo 16.10.4.3. Creating A Comment 16.10.4.4. Creating A Tag 16.10.5. Deleting Entries 16.10.5.1. Deleting An Album 16.10.5.2. Deleting A Photo 16.10.5.3. Deleting A Comment 16.10.5.4. Deleting A Tag 16.10.5.5. Optimistic Concurrency (Notes On Deletion) 16.11. Catching Gdata Exceptions 17. Zend_Http 17.1. Zend_Http_Client 17.1.1. 简介 17.1.2. 带有指定的HTTP头的基本 GET 请求 17.1.3. 发送请求到多个域名 17.1.4. 改变HTTP timeout时间 17.1.5. 动态指定HTTP Header 17.1.6. 构造 HTTP POST, PUT, 和 DELETE 请求 17.2. Zend_Http_Client - Advanced Usage 17.2.1. HTTP Redirections 17.2.2. Adding Cookies and Using Cookie Persistence 17.2.3. Setting Custom Request Headers 17.2.4. File Uploads 17.2.5. Sending Raw POST Data 17.2.6. HTTP Authentication 17.2.7. Sending Multiple Requests With the Same Client 17.3. Zend_Http_Client - Connection Adapters 17.3.1. Overview 17.3.2. The Socket Adapter 17.3.3. The Proxy Adapter 17.3.4. The Test Adapter 17.3.5. Creating your own connection adapters 17.4. Zend_Http_Cookie and Zend_Http_CookieJar 17.4.1. Introduction 17.4.2. Instantiating Zend_Http_Cookie Objects 17.4.3. Zend_Http_Cookie getter methods 17.4.4. Zend_Http_Cookie: Matching against a scenario 17.4.5. The Zend_Http_CookieJar Class: Instantiation 17.4.6. Adding Cookies to a Zend_Http_CookieJar object 17.4.7. Retrieving Cookies From a Zend_Http_CookieJar object 17.5. Zend_Http_Response 17.5.1. 简介 18. Zend_Json 18.1. 简介 18.2. 基本用法 18.3. JSON 对象 18.4. XML 到 JSON 转换 19. Zend_Layout 19.1. 简介 19.2. Zend_Layout 快速入门 19.2.1. 布局脚本 19.2.2. 和Zend Framework MVC一起使用 Zend_Layout 19.2.3. 使用Zend_Layout做为独立的组件 19.2.4. 尝试一下布局 19.3. Zend_Layout 配置选项 19.3.1. 范例 19.4. Zend_Layout 高级用法 19.4.1. 定制视图对象 19.4.2. 定制前端控制器插件 19.4.3. 定制动作助手 19.4.4. 定制布局脚本路径解析(Resolution):使用变形器(Inflector) 20. Zend_Loader 20.1. 动态加载文件和类 20.1.1. 加载文件 20.1.2. 加载类 20.1.3. 判定某个文件是否可读 20.1.4. 使用 Autoloader 20.2. 加载插件 20.2.1. 基本用例 20.2.2. 处理插件路径 20.2.3. 测试插件和获取类的名字 21. Zend_Locale 21.1. Introduction 21.1.1. What is Localization 21.1.2. What is a Locale? 21.1.3. How are Locales Represented? 21.1.4. Selecting the Right Locale 21.1.5. Usage of automatic Locales 21.1.6. Using a default Locale 21.1.7. ZF Locale-Aware Classes 21.1.8. Zend_Locale_Format::setOptions(array $options) 21.1.9. Speed up Zend_Locale and it's subclasses 21.2. Using Zend_Locale 21.2.1. Copying, Cloning, and Serializing Locale Objects 21.2.2. Equality 21.2.3. Default locales 21.2.4. Set a new locale 21.2.5. Getting the language and region 21.2.6. Obtaining localized strings 21.2.7. Obtaining translations for "yes" and "no" 21.2.8. Get a list of all known locales 21.3. Normalization and Localization 21.3.1. Number normalization: getNumber($input, Array $options) 21.3.1.1. Precision and Calculations 21.3.2. Number localization 21.3.3. Number testing 21.3.4. Float value normalization 21.3.5. Floating point value localization 21.3.6. Floating point value testing 21.3.7. Integer value normalization 21.3.8. Integer point value localization 21.3.9. Integer value testing 21.3.10. Numeral System Conversion 21.3.10.1. List of supported numeral systems 21.4. Working with Dates and Times 21.4.1. Normalizing Dates and Times 21.4.2. Testing Dates 21.4.3. Normalizing a Time 21.4.4. Testing Times 21.5. Supported Languages for Locales 21.6. Supported Regions for Locales 22. Zend_Log 22.1. 概述 22.1.1. 创建Log 22.1.2. 日志消息 22.1.3. 销毁Log 22.1.4. 使用内建的消息等级 22.1.5. 添加用户定义的日志等级 22.1.6. 理解日志事件 22.2. Writers 22.2.1. 写入到流(Streams) 22.2.2. 写入到数据库 22.2.3. 踩熄Writer 22.2.4. 测试 Mock 22.2.5. 组合Writers 22.3. Formatters 22.3.1. 简单格式化 22.3.2. 格式化到XML 22.4. 过滤器 22.4.1. 对所有Writer过滤 22.4.2. 过滤一个Writer实例 23. Zend_Mail 23.1. 简介 23.1.1. 起步 23.1.2. 配置缺省的 sendmail 传送器(transport) 23.2. 通过SMTP发送邮件 23.3. 通过一个SMTP连接发送多个邮 23.4. 使用不同的Transport对象 23.5. HTML邮件 23.6. 附件 23.7. 增加收件人 23.8. 控制MIME分界线 23.9. 外加邮件头信息 23.10. 字符集 23.11. 编码 23.12. SMTP 身份验证 23.13. Securing SMTP Transport 23.14. Reading Mail Messages 23.14.1. Simple example using Pop3 23.14.2. Opening a local storage 23.14.3. Opening a remote storage 23.14.4. Fetching messages and simple methods 23.14.5. Working with messages 23.14.6. Checking for flags 23.14.7. Using folders 23.14.8. Advanced Use 23.14.8.1. Using NOOP 23.14.8.2. Caching instances 23.14.8.3. Extending Protocol Classes 23.14.8.4. Using Quota (since 1.5) 24. Zend_Measure 24.1. Introduction 24.2. Creation of Measurements 24.2.1. Creating measurements from integers and floats 24.2.2. Creating measurements from strings 24.2.3. Measurements from localized strings 24.3. Outputting measurements 24.3.1. Automatic output 24.3.2. Outputting values 24.3.3. Output with unit of measurement 24.3.4. Output as localized string 24.4. Manipulating Measurements 24.4.1. Convert 24.4.2. Add and subtract 24.4.3. Compare 24.4.4. Compare 24.4.5. Manually change values 24.4.6. Manually change types 24.5. Types of measurements 24.5.1. Hints for Zend_Measure_Binary 24.5.2. Hints for Zend_Measure_Number 24.5.3. Roman numbers 25. Zend_Memory 25.1. 概述 25.1.1. 简介 25.1.2. 操作原理 25.1.2.1. 内存管理器 25.1.2.2. 内存容器 25.1.2.3. 锁定的内存 25.1.2.4. 可移动内存 25.2. 内存管理器 25.2.1. 创建一个内存管理器 25.2.2. 管理内存对象 25.2.2.1. 创建可移动的对象 25.2.2.2. 创建锁定的对象 25.2.2.3. 销毁对象 25.2.3. 内存管理器设置 25.2.3.1. 内存限制 25.2.3.2. MinSize 25.3. 内存对象 25.3.1. 可移动的 25.3.2. 锁定的 25.3.3. 内存容器 '值' 属性. 25.3.4. 内存容器接口 25.3.4.1. getRef() 方法 25.3.4.2. touch() 方法 25.3.4.3. lock() 方法 25.3.4.4. unlock() 方法 25.3.4.5. isLocked() 方法 26. Zend_Mime 26.1. Zend_Mime 26.1.1. 简介 26.1.2. 静态方法和常量 26.1.3. 实例化Zend_Mime 26.2. Zend_Mime_Message 26.2.1. 简介 26.2.2. 实例化 26.2.3. 增加MIME消息段 26.2.4. 分界线处理 26.2.5. 解析字符串,创建Zend_Mime_Message对象(实验性的) 26.3. Zend_Mime_Part 26.3.1. 简介 26.3.2. 实例化 26.3.3. 解析(rendering)消息段为字符串的方法 27. Zend_Pdf 27.1. 简介 27.2. 生成和加载 PDF 文档 27.3. 保存修改到 PDF 文档 27.4. 文档页面 27.4.1. 页面生成 27.4.2. 页面克隆 27.5. Drawing. 27.5.1. Geometry. 27.5.2. Colors. 27.5.3. Shape Drawing. 27.5.4. Text Drawing. 27.5.5. Using fonts. 27.5.6. Starting in 1.5, Extracting fonts. 27.5.7. Image Drawing. 27.5.8. Line drawing style. 27.5.9. Fill style. 27.5.10. Rotations. 27.5.11. Save/restore graphics state. 27.5.12. Clipping draw area. 27.5.13. Styles. 27.6. Zend_Pdf module usage example. 28. Zend_Registry 28.1. 使用对象注册表(Registry) 28.1.1. 设置Registry中的值 28.1.2. 获取Registry中的值 28.1.3. 创建一个Registry对象 28.1.4. 像访问数组一样访问Registry对象 28.1.5. 对象方式访问Registry 28.1.6. 查询一个索引是否存在 28.1.7. 扩展Registry对象 28.1.8. 删除静态注册表 29. Zend_Rest 29.1. Introduction 29.2. Zend_Rest_Client 29.2.1. Introduction 29.2.2. Responses 29.2.3. Request Arguments 29.3. Zend_Rest_Server 29.3.1. Introduction 29.3.2. REST Server Usage 29.3.3. Calling a Zend_Rest_Server Service 29.3.4. Sending A Custom Status 29.3.5. Returning Custom XML Responses 30. Zend_Search_Lucene 30.1. 概述 30.1.1. 简介 30.1.2. 文档和字段对象 30.1.3. 理解字段类型 30.2. 建立索引 30.2.1. 创建新索引 30.2.2. 更新索引 30.3. 搜索索引 30.3.1. 建立查询 30.3.2. 搜索结果 30.3.3. 结果评分 30.4. Query Language 30.4.1. Terms 30.4.2. Fields 30.4.3. Starting in 1.5, Wildcards 30.4.4. Term Modifiers 30.4.5. Starting in 1.5, Range Searches 30.4.6. Starting in 1.5, Fuzzy Searches 30.4.7. Proximity Searches 30.4.8. Boosting a Term 30.4.9. Boolean Operators 30.4.9.1. AND 30.4.9.2. OR 30.4.9.3. NOT 30.4.9.4. &&, ||, and ! operators 30.4.9.5. + 30.4.9.6. - 30.4.9.7. No Operator 30.4.10. Grouping 30.4.11. Field Grouping 30.4.12. Escaping Special Characters 30.5. 查询类型 30.5.1. 单项查询 30.5.2. 多项查询 30.5.3. 短语查询 30.6. 字符集 30.6.1. UTF-8 和单字节字符集支持 30.7. 扩展性 30.7.1. 文本分析 30.7.2. 评分算法 30.7.3. 存储容器 30.8. 与 Java Lucene 的互操作性 30.8.1. 文件格式 30.8.2. 索引目录 30.8.3. Java 源代码 30.9. Advanced 30.9.1. Using the index as static property 30.10. Best Practices 30.10.1. Field names 30.10.2. Indexing performance 30.10.3. Index during Shut Down 30.10.4. Retrieving documents by unique id 30.10.5. Memory Usage 30.10.6. Encoding 30.10.7. Index maintenance 31. Zend_Server 31.1. 简介 31.2. Zend_Server_Reflection 31.2.1. 简介 31.2.2. 用法 32. Zend_Service 32.1. 简介 32.2. Zend_Service_Akismet 32.2.1. Introduction 32.2.2. Verify an API key 32.2.3. Check for spam 32.2.4. Submitting known spam 32.2.5. Submitting false positives (ham) 32.2.6. Zend-specific Accessor Methods 32.3. Zend_Service_Amazon 32.3.1. Introduction 32.3.2. Country Codes 32.3.3. Looking up a Specific Amazon Item by ASIN 32.3.4. Performing Amazon Item Searches 32.3.5. Using the Alternative Query API 32.3.5.1. Introduction 32.3.6. Zend_Service_Amazon Classes 32.3.6.1. Zend_Service_Amazon_Item 32.3.6.1.1. Zend_Service_Amazon_Item::asXML() 32.3.6.1.2. Properties 32.3.6.2. Zend_Service_Amazon_Image 32.3.6.2.1. Properties 32.3.6.3. Zend_Service_Amazon_ResultSet 32.3.6.3.1. Zend_Service_Amazon_ResultSet::totalResults() 32.3.6.4. Zend_Service_Amazon_OfferSet 32.3.6.4.1. Properties 32.3.6.5. Zend_Service_Amazon_Offer 32.3.6.5.1. Zend_Service_Amazon_Offer Properties 32.3.6.6. Zend_Service_Amazon_SimilarProduct 32.3.6.6.1. Properties 32.3.6.7. Zend_Service_Amazon_Accessories 32.3.6.7.1. Properties 32.3.6.8. Zend_Service_Amazon_CustomerReview 32.3.6.8.1. Properties 32.3.6.9. Zend_Service_Amazon_EditorialReview 32.3.6.9.1. Properties 32.3.6.10. Zend_Service_Amazon_Listmania 32.3.6.10.1. Properties 32.4. Zend_Service_Audioscrobbler 32.4.1. Introduction to Searching Audioscrobbler 32.4.2. Users 32.4.3. Artists 32.4.4. Tracks 32.4.5. Tags 32.4.6. Groups 32.4.7. Forums 32.5. Zend_Service_Delicious 32.5.1. Introduction 32.5.2. Retrieving posts 32.5.3. Zend_Service_Delicious_PostList 32.5.4. Editing posts 32.5.5. Deleting posts 32.5.6. Adding new posts 32.5.7. Tags 32.5.8. Bundles 32.5.9. Public data 32.5.9.1. Public posts 32.5.10. HTTP client 32.6. Zend_Service_Flickr 32.6.1. 对Flickr搜索的介绍 32.6.2. 查找 Flickr 用户 32.6.3. 获得 Flickr 图像详细资料 32.6.4. Zend_Service_Flickr 类 32.6.4.1. Zend_Service_Flickr_ResultSet 32.6.4.1.1. 属性 32.6.4.1.2. Zend_Service_Flickr_ResultSet::totalResults() 32.6.4.2. Zend_Service_Flickr_Result 32.6.4.2.1. 属性 32.6.4.3. Zend_Service_Flickr_Image 32.6.4.3.1. 属性 32.7. Zend_Service_Simpy 32.7.1. Introduction 32.7.2. Links 32.7.3. Tags 32.7.4. Notes 32.7.5. Watchlists 32.8. Zend_Service_StrikeIron 32.8.1. Overview 32.8.2. Registering with StrikeIron 32.8.3. Getting Started 32.8.4. Making Your First Query 32.8.5. Examining Results 32.8.6. Handling Errors 32.8.7. Checking Your Subscription 32.9. Zend_Service_StrikeIron: Bundled Services 32.9.1. ZIP Code Information 32.9.2. U.S. Address Verification 32.9.3. Sales & Use Tax Basic 32.10. Zend_Service_StrikeIron: Advanced Uses 32.10.1. Using Services by WSDL 32.10.2. Viewing SOAP Transactions 32.11. Zend_Service_Yahoo 32.11.1. 简介 32.11.2. 用Yahoo!来搜索网页 32.11.3. 用Yahoo!来查找图片 32.11.4. Finding Local Businesses and Services with Yahoo! 32.11.5. 搜索Yahoo! 新闻 32.11.6. Zend_Service_Yahoo 类 32.11.6.1. Zend_Service_Yahoo_ResultSet 32.11.6.1.1. Zend_Service_Yahoo_ResultSet::totalResults() 32.11.6.1.2. Properties 32.11.6.2. Zend_Service_Yahoo_WebResultSet 32.11.6.3. Zend_Service_Yahoo_ImageResultSet 32.11.6.4. Zend_Service_Yahoo_LocalResultSet 32.11.6.5. Zend_Service_Yahoo_NewsResultSet 32.11.6.6. Zend_Service_Yahoo_Result 32.11.6.6.1. Properties 32.11.6.7. Zend_Service_Yahoo_WebResult 32.11.6.7.1. 属性 32.11.6.8. Zend_Service_Yahoo_ImageResult 32.11.6.8.1. 属性 32.11.6.9. Zend_Service_Yahoo_LocalResult 32.11.6.9.1. 属性 32.11.6.10. Zend_Service_Yahoo_NewsResult 32.11.6.10.1. 属性 32.11.6.11. Zend_Service_Yahoo_Image 32.11.6.11.1. Properties 33. Zend_Session 33.1. 简介 33.2. 基本用法 33.2.1. 实例教程 33.2.2. 迭代会话命名空间 33.2.3. 会话命名空间的访问器 33.3. 高级用法 33.3.1. 开启会话 33.3.2. 锁住会话命名空间 33.3.3. 命名空间过期 33.3.4. 会话封装和控制器 33.3.5. 防止每个命名空间有多重实例 33.3.6. 使用数组 33.3.7. 在对象中使用会话 33.3.8. 在单元测试中使用会话 33.4. 全局会话管理 33.4.1. 配置选项 33.4.2. 错误:Headers Already Sent 33.4.3. 会话标识符 33.4.3.1. 会话劫持和会话固定 33.4.4. rememberMe(integer $seconds) 33.4.5. forgetMe() 33.4.6. sessionExists() 33.4.7. destroy(bool $remove_cookie = true, bool $readonly = true) 33.4.8. stop() 33.4.9. writeClose($readonly = true) 33.4.10. expireSessionCookie() 33.4.11. setSaveHandler(Zend_Session_SaveHandler_Interface $interface) 33.4.12. namespaceIsset($namespace) 33.4.13. namespaceUnset($namespace) 33.4.14. namespaceGet($namespace) 33.4.15. getIterator() 34. Zend_Translate 34.1. 简介 34.1.1. 开始多语言化 34.2. Zend_Translate适配器 34.2.1. 如何判断使用哪种翻译适配器 34.2.1.1. Zend_Translate_Adapter_Array 34.2.1.2. Zend_Translate_Adapter_Csv 34.2.1.3. Zend_Translate_Adapter_Gettext 34.2.1.4. Zend_Translate_Adapter_Tbx 34.2.1.5. Zend_Translate_Adapter_Tmx 34.2.1.6. Zend_Translate_Adapter_Qt 34.2.1.7. Zend_Translate_Adapter_Xliff 34.2.1.8. Zend_Translate_Adapter_XmlTm 34.2.2. 集成编写自己的适配器 34.2.3. 加速所有的适配器 34.3. Using Translation Adapters 34.3.1. Translation Source Structures 34.3.2. Creating array source files 34.3.3. Creating Gettext Source Files 34.3.4. Creating TMX Source Files 34.3.5. Creating CSV Source Files 34.3.6. Options for adapters 34.3.7. Handling languages 34.3.7.1. Automatically handling of languages 34.3.8. Automatic source detection 34.3.8.1. Language through naming directories 34.3.8.2. Language through filenames 34.3.8.2.1. Complete Filename 34.3.8.2.2. Extension of the file 34.3.8.2.3. Filename tokens 34.3.9. Checking for translations 34.3.10. Access to the source data 35. Zend_Uri 35.1. Zend_Uri 35.1.1. 概述 35.1.2. 新建一个URI 35.1.3. 操作现有的URI 35.1.4. URI 验证 35.1.5. 公共实例方法 35.1.5.1. 取得URI的Schema 35.1.5.2. 取得整个URI 35.1.5.3. 验证URI 36. Zend_Validate 36.1. 简介 36.1.1. 什么是校验器(validator)? 36.1.2. 校验器的基本用法 36.1.3. 定制消息 36.1.4. 使用静态 is() 方法 36.2. 标准校验类 36.2.1. Alnum 36.2.2. Alpha 36.2.3. Barcode 36.2.4. Between 36.2.5. Ccnum 36.2.6. 日期 36.2.7. 数字 36.2.8. Email 地址 36.2.9. 浮点数 36.2.10. GreaterThan 36.2.11. 十六进制数 36.2.12. 主机名 36.2.13. InArray 36.2.14. 整数 36.2.15. Ip 36.2.16. LessThan 36.2.17. NotEmpty 36.2.18. Regex 36.2.19. StringLength 36.3. 校验器链 36.4. 编写校验器 37. Zend_Version 37.1. 读取Zend Framework的当前版本 38. Zend_View 38.1. 简介 38.1.1. 控制器脚本 38.1.2. 视图脚本 38.1.3. 选项 38.1.4. 实用访问器 38.2. 控制器脚本 38.2.1. 变量赋值 38.2.2. 调用视图脚本并打印输出 38.2.3. 视图脚本的路径 38.3. 视图脚本 38.3.1. 转义输出(Escaping Output) 38.3.2. 使用模板系统 38.3.2.1. 使用View脚本的模板系统 38.3.2.2. 通过Zend_View_Interface接口使用模板系统 38.4. 视图助手(View Helper) 38.4.1. 基本的助手 38.4.1.1. 动作视图助手 38.4.1.2. 区域助手(Partial Helper) 38.4.1.3. 占位符助手(Placeholder Helper) 38.4.1.3.1. 具体占位符实现 38.4.1.4. 文档类型助手(Doctype Helper) 38.4.1.5. HeadLink 助手 38.4.1.6. HeadMeta 助手 38.4.1.7. HeadScript 助手 38.4.1.8. HeadStyle 助手 38.4.1.9. HeadTitle 助手 38.4.1.10. InlineScript 助手 38.4.1.11. JSON 助手 38.4.1.12. 翻译助手 38.4.2. 助手的路径 38.4.3. 编写自定义的助手类 39. Zend_XmlRpc 39.1. 介绍 39.2. Zend_XmlRpc_Client 39.2.1. 介绍 39.2.2. 带参数 39.2.2.1. 以PHP本地变量的形式传递参数 39.2.2.2. 以Zend_XmlRpc_Value 对象的形式传递参数 39.2.2.3. 将一个XML字符串解析为XML-RPC参数 39.2.3. 参数类型提示 39.2.4. 获取响应 39.3. Zend_XmlRpc_Server 39.3.1. Introduction 39.3.2. Basic Usage 39.3.3. Server Structure 39.3.4. Conventions 39.3.5. Utilizing Namespaces 39.3.6. Custom Request Objects 39.3.7. Custom Responses 39.3.8. Handling Exceptions via Faults 39.3.9. Caching Server Definitions Between Requests 39.3.10. Usage Examples 39.3.10.1. Basic Usage 39.3.10.2. Attaching a class 39.3.10.3. Attaching several classes using namespaces 39.3.10.4. Specifying exceptions to use as valid fault responses 39.3.10.5. Utilizing a custom request object 39.3.10.6. Utilizing a custom response object 39.3.10.7. Cache server definitions between requests A. 系统需求 A.1. PHP 版本需求 A.2. PHP 扩展 A.3. Zend Framework 组件 B. Zend Framework PHP 编码标准 B.1. 绪论 B.1.1. 适用范围 B.1.2. 目标 B.2. PHP File 文件格式 B.2.1. 常规 B.2.2. 缩进 B.2.3. 行的最大长度 B.2.4. 行结束标志 B.3. 命名约定 B.3.1. 类 B.3.2. 接口 B.3.3. 文件名 B.3.4. 函数和方法 B.3.5. 变量 B.3.6. 常量 B.4. 编码风格 B.4.1. PHP 代码划分(Demarcation) B.4.2. 字符串 B.4.2.1. 字符串文字 B.4.2.2. 包含单引号(')的字符串文字 B.4.2.3. 变量替换 B.4.2.4. 字符串连接 B.4.3. 数组 B.4.3.1. 数字索引数组 Numerically Indexed Arrays B.4.3.2. 关联数组 B.4.4. 类 B.4.4.1. 类的声明 B.4.4.2. 类成员变量 B.4.5. 函数和方法 B.4.5.1. 函数和方方声明 B.4.5.2. 函数和方法的用法 B.4.6. 控制语句 B.4.6.1. If / Else / Elseif B.4.6.2. Switch B.4.7. 注释文档 B.4.7.1. 格式 B.4.7.2. 文件 B.4.7.3. 类 B.4.7.4. 函数 C. 版权信息 索引 表格清单 2.1. 一个CMS范例的访问控制 3.1. 配置选项 4.1. 核心前端选项 4.2. 函数前端选项 4.3. Class frontend options 4.4. File frontend options 4.5. Page frontend options 4.6. 文件后端选项 4.7. Sqlite 后端选项 4.8. Memcached 后端选项 5.1. Zend_Config_Ini 构造器参数 8.1. 选择货币描述的常量 8.2. 选择货币位置的常量 9.1. Date Parts 9.2. Basic Operations 9.3. Date Comparison Methods 9.4. Date Output Methods 9.5. Date Output Methods 9.6. Miscellaneous Methods 9.7. Operations involving Zend_Date::HOUR 9.8. Day Constants 9.9. Week Constants 9.10. Month Constants 9.11. Year Constants 9.12. Time Constants 9.13. Timezone Constants 9.14. Date Format Constants (formats include timezone) 9.15. Date and Time Formats (format varies by locale) 9.16. Constants for ISO 8601 date output 9.17. Constants for PHP date output 9.18. Types of supported horizons for sunset and sunrise 17.1. Zend_Http_Client_Adapter_Socket configuration parameters 17.2. Zend_Http_Client configuration parameters 21.1. Details for getTranslationList($type = null, $locale = null, $value = null) 21.2. Details for getTranslation($value = null, $type = null, $locale = null) 21.3. Differences between ZF 1.0 and ZF 1.5 21.4. Format tokens for self generated number formats 21.5. List of supported numeral systems 21.6. Key values for getDate() with option 'fix_date' 21.7. Return values 21.8. Format definition 21.9. Example formats 21.10. List of all supported languages 21.11. List of all supported regions 23.1. Mail Read Feature Overview 23.2. Mail Folder Names 24.1. List of measurement types 30.1. Zend_Search_Lucene_Field 类型 32.1. Zend_Service_Amazon_Item Properties 32.2. Zend_Service_Amazon_Image Properties 32.3. Zend_Service_Amazon_OfferSet Properties 32.4. Properties 32.5. Zend_Service_Amazon_SimilarProduct Properties 32.6. Zend_Service_Amazon_Accessories Properties 32.7. Zend_Service_Amazon_CustomerReview Properties 32.8. Zend_Service_Amazon_EditorialReview Properties 32.9. Zend_Service_Amazon_Listmania Properties 32.10. Methods for retrieving public data 32.11. Methods of the Zend_Service_Delicious_SimplePost class 32.12. Zend_Service_Flickr_ResultSet 属性 32.13. Zend_Service_Flickr_Result 属性 32.14. Zend_Service_Flickr_Image 属性 32.15. Zend_Service_Yahoo_ResultSet 32.16. Zend_Service_Yahoo_LocalResultSet 属性 32.17. Zend_Service_Yahoo_Result Properties 32.18. Zend_Service_Yahoo_WebResult 属性 32.19. Zend_Service_Yahoo_ImageResult 属性 32.20. Zend_Service_Yahoo_LocalResult 属性 32.21. Zend_Service_Yahoo_NewsResult 属性 32.22. Zend_Service_Yahoo_Image Properties 34.1. Zend_Translate适配器 34.2. Options for Translation Adapters 39.1. PHP本地变量类型转化为XML-RPC类型 39.2. Zend_XmlRpc_Value 对象声明的XML-RPC类型 A.1. Zend Framework 使用的 PHP 扩展 A.2. Zend Framework 组件以及其使用到的 PHP 扩展 范例清单 2.1. 角色之间的多重继承 3.1. 修改 Session 名字空间 3.2. 使用定制存储类 3.3. 基本用法 4.1. 调用 Zend_Cache::factory()取得一个前端 4.2. Caching a database query result 4.3. 用Zend_Cache 输出前端缓存输出 5.1. 使用 Zend_Config 本身 5.2. Using Zend_Config with a PHP Configuration File 5.3. 使用 Zend_Config_Ini 5.4. 使用Zend_Config_Xml 6.1. 使用短语法 6.2. 使用长语法 6.3. 捕捉 Getopt 异常 6.4. 使用 getOption() 6.5. 使用 __get() 和 __isset() 魔术方法 6.6. 使用 getRemainingArgs() 6.7. 使用 addRules() 6.8. 使用 setHelp() 6.9. 使用 setAliases() 6.10. 使用 addArguments() 和 setArguments() 6.11. 使用 setOption() 6.12. 使用 setOptions() 7.1. 如何处理不存在的动作 7.2. 用动作、控制器和模块名来添加一个任务 7.3. 使用请求对象添加一个任务 7.4. AutoCompletion with Dojo Using Zend MVC 7.5. 允许动作响应 Ajax 的请求 7.6. 设定选项 7.7. 使用默认设定 7.8. 使用goto()的_forward()API 7.9. 通过gotoRoute()使用路由组装(route assembly) 7.10. 基本用法 7.11. 禁用自动解析 7.12. 选择另外的视图脚本 7.13. 修改注册的视图Modifying the registered view 7.14. 修改路径规则 7.15. 一个动作中解析多个视图脚本 7.16. Standard usage 7.17. Setting a different error handler 7.18. Using accessors 8.1. 从实际地方创建 Zend_Currency 的实例 8.2. 创建 Zend_Currency 实例的其它例子 8.3. 为货币创建输出 8.4. 修改货币的显示格式 8.5. 从货币中获取信息 8.6. 设置新地方 8.7. 缓存货币 9.1. Setting a default timezone 9.2. Creating the current date 9.3. get() - output a date 9.4. set() - set a date 9.5. add() - adding dates 9.6. compare() - compare dates 9.7. equals() - identify a date or date part 9.8. User-specified input date format 9.9. Operating on Parts of Dates 9.10. Date creation by instance 9.11. Static date creation 9.12. Quick creation of dates from database date values 9.13. Convenient creation of dates from database date values 9.14. Date creation by array 9.15. Example usage for self-defined ISO formats 9.16. Example usage for self-defined formats with PHP specifier 9.17. Checking dates 9.18. Getting all available cities 9.19. Getting the location for a city 9.20. Calculating sun informations 9.21. Working with timezones 9.22. Multiple timezones 10.1. Creating a SQL statement object with query() 10.2. Using a SQL statement constructor 10.3. Executing a statement with positional parameters 10.4. Executing a statement with named parameters 10.5. Using fetch() in a loop 10.6. Using fetchAll() 10.7. Setting the fetch mode 10.8. Using fetchColumn() 10.9. Using fetchObject() 10.10. Fetching a Dependent Rowset 10.11. Fetching a Dependent Rowset By a Specific Rule 10.12. Fetching a Dependent Rowset using a Zend_Db_Table_Select 10.13. Fetching Dependent Rowsets using the Magic Method 10.14. Fetching the Parent Row 10.15. Fetching a Parent Row By a Specific Rule 10.16. Fetching the Parent Row using the Magic Method 10.17. Fetching a Rowset with the Many-to-many Method 10.18. Fetching a Rowset with the Many-to-many Method By a Specific Rule 10.19. Fetching Rowsets using the Magic Many-to-many Method 10.20. Example of a Cascading Delete 10.21. Example Declaration of Cascading Operations 11.1. dump()方法使用示例 12.1. 捕捉一个异常的例子 13.1. 用Zend_Feed来处理RSS Feed数据 13.2. Atom Feed的基本用法 13.3. 读取Atom Feed的单个条目 13.4. 用条目对象直接访问Atom Feed的单个条目 13.5. 修改一个已存在的条目 13.6. 用自定义的命名空间创建一个Atom条目元素 13.7. 用自定义的命名空间继承Atom条目类 14.1. Transforming CamelCaseText to another format 14.2. Setting Multiple Rules at Once 14.3. Using Zend_Config with Zend_Filter_Inflector 15.1. 定制标签 15.2. 为所有元素设置前缀路径 15.3. 为所有元素设置装饰器(Decorators) 15.4. 为所有元素设置过滤器 15.5. 为所有的显示组设置装饰器前缀路径 15.6. 为所有显示组设置装饰器 15.7. 注册表单示例 17.1. 执行一个基本的 GET 请求 17.2. 创建一个基本的Zend_Http_Client 17.3. 发送多条header信息 17.4. 发送请求到多个域名 17.5. 用Zend_Http_Client发送POST 数据 17.6. Forcing RFC 2616 Strict Redirections on 301 and 302 Responses 17.7. Setting Cookies Using setCookie() 17.8. Enabling Cookie Stickiness 17.9. Setting A Single Custom Request Header 17.10. Setting Multiple Custom Request Headers 17.11. Using setFileUpload to Upload Files 17.12. Sending Raw POST Data 17.13. Setting HTTP Authentication User and Password 17.14. Performing consecutive requests with one client 17.15. Changing the HTTPS transport layer 17.16. Using Zend_Http_Client behind a proxy server 17.17. Testing Against a Single HTTP Response Stub 17.18. Testing Against Multiple HTTP Response Stubs 17.19. Creating your own connection adapter 17.20. Instantiating a Zend_Http_Cookie object 17.21. Stringifying a Zend_Http_Cookie object 17.22. Using getter methods with Zend_Http_Cookie 17.23. Matching cookies 17.24. 处理HTTP应答 19.1. 传递选项给构造器或startMvc() 19.2. 使用setOption() 和 setConfig() 19.3. 使用访问器 19.4. 使用Zend_Layout访问器来修改变形器(inflector) 19.5. Zend_Layout 变形器的直接修改 19.6. 定制变形器(inflectors) 20.1. loadFile() 方法范例 20.2. Example of loadClass() method 20.3. isReadable()示例: 20.4. 注册 autoloader callback 方法范例 20.5. 从继承类注册 autoload callback 方法范例 21.1. Choosing a specific locale 21.2. Automatically selecting a locale 21.3. Using automatic locales 21.4. Handling locale exceptions 21.5. Setting a default locale 21.6. Dates default to correct locale of web users 21.7. Overriding default locale selection 21.8. Performance optimization when using a default locale 21.9. Dates default to correct locale of web users 21.10. Using STANDARD definitions for setOptions() 21.11. clone 21.12. Check for equal locales 21.13. Get default locales 21.14. setLocale 21.15. getLanguage and getRegion 21.16. getTranslationList 21.17. getTranslationList 21.18. Converting country name in one language to another 21.19. All available translations 21.20. All Languages written in their native language 21.21. getQuestion() 21.22. getLocaleList() 21.23. Number normalization 21.24. Number normalization with precision 21.25. Number localization 21.26. Number localization with precision 21.27. Using a self defined number format 21.28. Number testing 21.29. Floating point value normalization 21.30. Floating point value localization 21.31. Floating point value testing 21.32. Integer value normalization 21.33. Integer value localization 21.34. Integer value testing 21.35. Converting numerals from Eastern Arabic scripts to European/Latin scripts 21.36. Converting numerals from Latin script to Eastern Arabic script 21.37. Getting 4 letter CLDR script code using a native-language name of the script 21.38. Normalizing a date 21.39. Normalizing a date by locale 21.40. Normalizing a date with time 21.41. Normalizing a userdefined date 21.42. Automatic correction of input dates 21.43. Date testing 21.44. Normalize an unknown time 21.45. Testing a time 23.1. 使用Zend_Mail发送简单邮件 23.2. 传递另外的参数给 Zend_Mail_Transport_Sendmail 传送器 23.3. 通过 SMTP 发送邮件 23.4. 通过一个SMTP连接发送多个邮件 23.5. 手工控制传送器连接 23.6. 使用不同的Transport对象 23.7. 发送HTML邮件 23.8. 带附件的邮件 23.9. 更改MIME分界线 23.10. 外加邮件头信息 23.11. 在 Zend_Mail_Transport_Smtp 中使用身份验证 23.12. Enabling a secure connection within Zend_Mail_Transport_Smtp 24.1. Converting measurements 24.2. The meter measurement 24.3. Creation using integer and floating values 24.4. Creation using strings 24.5. Arbitrary text input containing measurements 24.6. Localized string 24.7. Automatic output 24.8. Output a value 24.9. Outputting units 24.10. Convert 24.11. Adding units 24.12. Subtract 24.13. Different measurements 24.14. Identical measurements 24.15. Difference 24.16. Changing a value 24.17. Changing the type 25.1. 使用 Zend_Memory 组件 27.1. 生成新的或加载 PDF 文档 27.2. 请求 PDF 文档的指定版本 27.3. Save PDF document. 27.4. PDF 文档页面管理 27.5. Cloning existing page. 27.6. Draw a string on the page. 27.7. Draw a UTF-8-encoded string on the page. 27.8. Create a standard font. 27.9. Create a TrueType font. 27.10. Create a TrueType font, but do not embed it in the PDF document. 27.11. Do not throw an exception for fonts that cannot be embeded. 27.12. Do not compress an embedded font. 27.13. Combining font embedding options. 27.14. Extracting fonts from a loaded document. 27.15. Extracting font from a loaded document by specifying font name. 27.16. Image drawing. 27.17. Zend_Pdf module usage demo. 28.1. set() 使用示例: 28.2. get() 方法示例: 28.3. 迭代一个registry对象: 28.4. 创建一个registry对象 28.5. Example of initializing the static registry 28.6. array 方式访问示例: 28.7. 对象形式的访问: 28.8. isRegistered() 示例: 28.9. isset() 示例: 28.10. 指定静态注册表的类名: 28.11. _unsetInstance() 示例: 29.1. A basic REST request 29.2. Response Status 29.3. Using Technorati's Rest Service 29.4. Example Technorati Response 29.5. Setting Request Arguments 29.6. Basic Zend_Rest_Server Usage - Classes 29.7. Basic Zend_Rest_Server Usage - Functions 29.8. Returning Custom Status 29.9. Return Custom XML 30.1. 自定义文本分析程序 32.1. isSpam() Usage 32.2. submitSpam() Usage 32.3. submitHam() Usage 32.4. Search Amazon Using the Traditional API 32.5. Search Amazon Using the Query API 32.6. Choosing an Amazon Web Service Country 32.7. Looking up a Specific Amazon Item by ASIN 32.8. Performing Amazon Item Searches 32.9. Using the ResponseGroup Option 32.10. Search Amazon Using the Alternative Query API 32.11. Retrieving User Profile Information 32.12. Retrieving a User's Weekly Artist Chart 32.13. Retrieving Related Artists 32.14. Get all posts 32.15. Accessing post lists 32.16. Filtering a Post List with Specific Tags 32.17. Filtering a Post List by URL 32.18. Post editing 32.19. Method call chaining 32.20. Deleting posts 32.21. Adding a post 32.22. Tags 32.23. Bundles 32.24. Retrieving public data 32.25. Changing the HTTP client of Zend_Rest_Client 32.26. Configuring your HTTP client to keep connections alive 32.27. 简单的 Flickr 照片搜索 32.28. 用email地址来查找Flickr用户 32.29. 获得 Flickr 图像详细资料 32.30. Querying Links 32.31. Modifying Links 32.32. Working With Tags 32.33. Working With Notes 32.34. Retrieving Watchlists 32.35. 用Yahoo!来搜索网页 32.36. 用Yahoo!来查找图片 32.37. 用Yahoo!查找本地商务和服务信息 32.38. 搜索Yahoo! 新闻 33.1. 页面浏览计数 33.2. 新方法: 使用命名空间避免冲突 33.3. 老方法: PHP会话访问 33.4. 会话迭代 33.5. 访问会话数据 33.6. 开启全局会话 33.7. 锁住会话命名空间 33.8. 过期的例子 33.9. 带有生命期的控制器命名空间会话 33.10. 限制命名空间访问单一实例 33.11. 修改带有会话命名空间的数组数据 33.12. 在会话存储之前构造数组 33.13. 方案:重新分配一个被修改的数组 33.14. 方案:存储包括引用的数组 33.15. PHPUnit Testing Code Dependent on Zend_Session 33.16. 使用Zend_Config配置Zend_Session 33.17. 会话固定 34.1. Example of single-language PHP code 34.2. Example of multi-lingual PHP code 34.3. Example TMX file 34.4. Example CSV file 34.5. Example CSV file two 34.6. Using translation options 34.7. Handling languages with adapters 34.8. How automatically language detection works 34.9. Scanning a directory structure for sources 34.10. Directory scanning for languages 34.11. Filename scanning for languages 34.12. Checking if a text is translatable 34.13. Handling languages with adapters 35.1. 使用Zend_Uri::factory()创建一个新的URI 35.2. 使用Zend_Uri::factory()操作一个现有的URI 35.3. 使用Zend_Uri::check()进行URI 验证 35.4. 从Zend_Uri_* 对象取得模式 35.5. 从一个Zend_Uri_* 对象取得整个URI 35.6. 验证一个 Zend_Uri_* 对象 36.1. 创建简单校验类 36.2. 编写有独立条件的校验类 36.3. 带有独立条件、多重失败原因的校验 37.1. compareVersion()方法示例: 38.1. 动作视图助手的基本用法 38.2. Partials 的基本用法 38.3. 使用 PartialLoop 来解析可迭代的(Iterable)的模型 38.4. 在其它模块中解析 Partials 38.5. 占位符的基本用法 38.6. 用占位符来聚合内容 38.7. 使用占位符(Placeholders)来抓取内容 38.8. Doctype 助手的基本用法 38.9. 获取 Doctype 38.10. HeadLink 助手的基本用法 38.11. HeadMeta 助手基本用法 38.12. HeadScript 助手基本用法 38.13. Capturing Scripts Using the HeadScript Helper 38.14. HeadStyle 助手的基本用法 38.15. 用 HeadStyle 助手抓取样式声明 38.16. HeadTitle 助手基本用法 38.17. 已注册的实例 38.18. 在视图里 38.19. 直接用法 38.20. 单个参数 38.21. 参数列表 38.22. 参数数组 38.23. 动态修改地点 (locale) 38.24. 静态修改地点 (locale) 38.25. 获得当前设置的地点 39.1. 一个基本的XML-RPC请求 39.2. 用类型提示来调用一个XML-RPC服务

“相关推荐”对你有帮助么?

  • 非常没帮助
  • 没帮助
  • 一般
  • 有帮助
  • 非常有帮助
提交
评论
添加红包

请填写红包祝福语或标题

红包个数最小为10个

红包金额最低5元

当前余额3.43前往充值 >
需支付:10.00
成就一亿技术人!
领取后你会自动成为博主和红包主的粉丝 规则
hope_wisdom
发出的红包
实付
使用余额支付
点击重新获取
扫码支付
钱包余额 0

抵扣说明:

1.余额是钱包充值的虚拟货币,按照1:1的比例进行支付金额的抵扣。
2.余额无法直接购买下载,可以购买VIP、付费专栏及课程。

余额充值