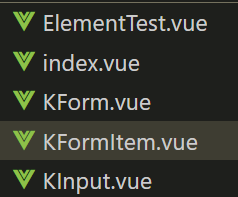
1. 代码结构
2. ElementTest.vue
<template>
  <el-form :model="userInfo" :rules="rules" ref="loginForm">
    <el-form-item label="用户名" prop="name">
      <el-input v-model="userInfo.name"></el-input>
    </el-form-item>
    <el-form-item label="密码" prop="password">
      <el-input v-model="userInfo.password" type="password"></el-input>
    </el-form-item>
    <el-form-item>
      <el-button @click="login">登录</el-button>
    </el-form-item>
  </el-form>
</template>
<script>
export default {
  data() {
    return {
      userInfo: {
        username: "",
        password: "",
      },
      rules: {
        username: [{ required: true, message: "请输入用户名称" }],
        password: [{ required: true, message: "请输入密码" }],
      },
    };
  },
  methods: {
    login() {
      this.$refs["loginForm"].validate((valid) => {
        if (valid) {
          alert("submit");
        } else {
          console.log("error submit!");
          return false;
        }
      });
    },
  },
};
</script>
3. index.vue
<template>
  <div>
    <!-- <ElementTest></ElementTest> -->
    <!-- KForm -->
    <KForm :model="userInfo" :rules="rules" ref="loginForm">
      <!-- 用户名 -->
      <KFormItem label="用户名" prop="username">
        <KInput v-model="userInfo.username" placeholder="请输入用户名"></KInput>
      </KFormItem>
      <!-- 密码 -->
      <KFormItem label="密码" prop="password">
        <KInput type="password" v-model="userInfo.password" placeholder="请输入用户名"></KInput>
      </KFormItem>
      <!-- 提交按钮 -->
      <KFormItem>
        <button @click="login">登录</button>
      </KFormItem>
    </KForm>
  </div>
</template>

<script>
import ElementTest from "@/components/form/ElementTest.vue";
import KInput from "@/components/form/KInput.vue";
import KFormItem from "@/components/form/KFormItem.vue";
import KForm from "@/components/form/KForm.vue";
import Notice from "@/components/Notice.vue";

export default {
  data() {
    return {
      userInfo: {
        username: "tom",
        password: ""
      },
      rules: {
        username: [{ required: true, message: "请输入用户名称" }],
        password: [{ required: true, message: "请输入密码" }]
      }
    };
  },
  components: {
    ElementTest,
    KInput,
    KFormItem,
    KForm
  },
  methods: {
    login() {
      this.$refs["loginForm"].validate(valid => {
        const notice = this.$create(Notice, {
          title: "社会你亮哥喊你来搬砖",
          message: valid ? "请求登录!" : "校验失败!",
          duration: 2000
        });
        notice.show();
        // if (valid) {
        //   alert("submit");
        // } else {
        //   console.log("error submit!");
        //   return false;
        // }
      });
    }
  }
};
</script>
4. KForm.vue
<template>
  <div>
    <slot></slot>
  </div>
</template>

<script>
export default {
  provide() {
    return {
      form: this
    };
  },
  props: {
    model: {
      type: Object,
      required: true
    },
    rules: {
      type: Object
    }
  },
  methods: {
    validate(cb) {
      // 获取所有孩子KFormItem
      // [resultPromise]
      const tasks = this.$children
        .filter(item => item.prop) // 过滤掉没有prop属性的Item
        .map(item => item.validate());

      // 统一处理所有Promise结果
      Promise.all(tasks)
        .then(() => cb(true))
        .catch(() => cb(false));
    }
  }
};
</script>
5. KFormItem.vue
<template>
  <div>
    <!-- label -->
    <label v-if="label">{{label}}</label>

    <slot></slot>

    <!-- 校验信息显示 -->
    <p v-if="error">{{error}}</p>
  </div>
</template>

<script>
// Asyc-validator
import Schema from "async-validator";

export default {
  inject: ["form"],
  data() {
    return {
      error: "" // error是空说明校验通过
    };
  },
  props: {
    label: {
      type: String,
      default: ""
    },
    prop: {
      type: String
    }
  },
  mounted() {
    this.$on("validate", () => {
      this.validate();
    });
  },
  methods: {
    validate() {
      // 规则
      const rules = this.form.rules[this.prop];
      // 当前值
      const value = this.form.model[this.prop];

      // 校验描述对象
      const desc = { [this.prop]: rules };
      // 创建Schema实例
      const schema = new Schema(desc);
      return schema.validate({ [this.prop]: value }, errors => {
        if (errors) {
          this.error = errors[0].message;
        } else {
          // 校验通过
          this.error = "";
        }
      });
    }
  }
};
</script>
6. KInput.vue
<template>
  <div>
    <!-- 自定义组件双向绑定::value  @input -->
    <!-- v-bind="$attrs"展开$attrs 把用户传的placeholder等属性绑定到input上-->
    <input :type="type" :value="value" @input="onInput" v-bind="$attrs">
  </div>
</template>

<script>
  export default {
      //传递给kinput组件的placeholder的属性,默认会绑定到该组件的根元素上,
      //这里设置false,就避免把属性绑定到根元素上
    inheritAttrs: false,
    props: {
      value: {
        type: String,
        default: ''
      },
      type: {
        type: String,
        default: 'text'
      }
    },
    methods: {
      onInput(e) {
        // 这里就是v-model的原理,派发一个input事件即可
        this.$emit('input', e.target.value)
        // 通知父级执行校验
        this.$parent.$emit('validate')
      }
    },
  }
</script>
问题
如果用户给kInput包裹了一层div,那么就会出现bug,
其内部this.$parent.$emit('validate')会找不到老爹
<KFormItem label="用户名" prop="username">
	<div>
		<KInput v-model="userInfo.username" placeholder="请输入用户名"></KInput>
	</div>
</KFormItem >
function broadcast(componentName, eventName, params) {
  this.$children.forEach(child => {
    var name = child.$options.componentName;

    if (name === componentName) {
      child.$emit.apply(child, [eventName].concat(params));
    } else {
      broadcast.apply(child, [componentName, eventName].concat([params]));
    }
  });
}
export default {
  methods: {
    dispatch(componentName, eventName, params) {
      var parent = this.$parent || this.$root;
      var name = parent.$options.componentName;

      while (parent && (!name || name !== componentName)) {
        parent = parent.$parent;

        if (parent) {
          name = parent.$options.componentName;
        }
      }
      if (parent) {
        parent.$emit.apply(parent, [eventName].concat(params));
      }
    },
    broadcast(componentName, eventName, params) {
      broadcast.call(this, componentName, eventName, params);
    }
  }
};
- 修改
KInput.vue的代码 - 在导出对象加上
mixins:[ emitter ],在顶部导入上面的提供的emitter.js代码,import emitter from "./emitter" this.$parent.$emit('validate')改为this.dispatch("KFormItem","validate")- 找老爹也需要,老爹应该有
KFormItem的名字,所以需要修改KFormItem.vue源码给他取上名字componentName:"KFormItem"
如果用户给KFormItem包裹了一层div,那么也会出现bug,
其Form内部this.$children会找不到KFormItem
<KForm :model="userInfo" :rules="rules" ref="loginForm">
  <div>
    <KFormItem label="用户名" prop="username">
      <KInput v-model="userInfo.username" placeholder="请输入用户名"></KInput>
    </KFormItem>
  </div>
</KForm>
解决方法:Element源码中form表单写法,其中this.fields
- 在KFormItem.vue内派发事件通知KForm.vue,新增一个KFormItem实例
- 和上面一样先添加
mixins: [ emitter ] this.dispatch('KForm','zanlan,form.addField')- 在KForm.vue内部需要监听
- 在created钩子函数内做收集

- 这样在KForm.vue组件内,就不需要使用
this.$children,而是使用this.fields


 777
777

 被折叠的 条评论
为什么被折叠?


