


LVS博客(构建不宕机的世界:LVS背后的高可用性秘籍)
LVS原理介绍
LVS (Linux Virtual Server) 是一种实现负载均衡和高可用性的技术,它允许将多个物理服务器整合成一个虚拟的服务群集,从而提高服务的可靠性和处理能力。LVS 是由章文嵩博士发起的一个开源项目,并且已经成为 Linux 标准内核的一部分。
LVS 的工作原理
LVS 利用 Linux 内核中的 netfilter 框架来实现负载均衡。当客户端向虚拟 IP (VIP) 发起连接请求时,请求会到达调度器 (Director Server),调度器负责将请求分发到后端的真实服务器 (Real Server) 上进行处理。处理完的响应数据则直接返回给客户端,而不需要再经过调度器。
LVS 的主要组件
- 调度器 (Director):接收客户端请求,并将其转发给后端服务器。
- 真实服务器 (Real Server):处理调度器转发过来的请求,并将响应直接返回给客户端。
- 共享存储:可选的,用于同步服务器间的会话状态或数据,保证高可用性。
LVS 的三种主要模式
LVS 支持三种主要的工作模式,每种模式都有其特点和适用场景:
-
NAT (Network Address Translation) 模式
- 工作流程:客户端向虚拟 IP (VIP) 发送请求,调度器接收到请求后,通过 NAT 技术修改请求的目标地址为后端服务器的实际 IP 地址,并将请求转发给后端服务器。后端服务器处理完请求后,直接将响应发回给客户端,但由于响应包的目的地址是调度器的 IP 地址,因此调度器再次进行地址转换,将响应包的目的地址改为客户端的 IP 地址。
- 优点:实现简单,不需要后端服务器之间的特殊配置。
- 缺点:所有响应都要经过调度器,这可能会成为瓶颈。
-
DR (Direct Routing) 模式
- 工作流程:客户端向虚拟 IP (VIP) 发送请求,调度器接收到请求后,通过修改 MAC 地址将请求直接转发给后端服务器。后端服务器处理完请求后,直接将响应发回给客户端。
- 优点:响应速度快,因为响应数据不需经过调度器。
- 缺点:所有后端服务器必须位于同一物理网络段内。
-
TUN (IP Tunneling) 模式
- 工作流程:客户端向虚拟 IP (VIP) 发送请求,调度器接收到请求后,创建一个新 IP 数据包并将原始请求封装在里面,然后将这个新数据包发送给后端服务器。后端服务器解封装并处理请求,然后直接将响应发回给客户端。
- 优点:适用于跨不同物理网络的情况。
- 缺点:需要在后端服务器上配置隧道接口。
LVS 在内核中的过程
- 客户端发起请求:客户端向虚拟 IP (VIP) 发送请求。
- 调度器接收请求:调度器使用 iptables 或 ipvs 规则捕获请求。
- 选择算法:调度器根据配置的负载均衡算法(如轮询、最少连接数等)选择一个后端服务器。
- 请求转发:根据选定的工作模式,调度器将请求转发给后端服务器。
- 响应返回:后端服务器处理请求后,将响应直接发送给客户端。
总结
LVS 是一种非常灵活且强大的负载均衡解决方案,可以通过不同的工作模式适应不同的网络环境和需求。通过合理配置和选择合适的模式,可以有效地提升系统的稳定性和性能。
LVS–nat配置
环境准备
| 主机名 | IP | 角色 | VMware网络硬件配置 |
|---|---|---|---|
| LVS.shanxin.org | 172.25.254.100(NAT网卡) 192.168.0.100(仅主机网卡) | LVS调度机(LVS) | 两块网卡:NAT网卡、仅主机网卡 |
| server1.shanxin.org | 192.168.0.10(仅主机网卡) | 真实服务器(RS) | 一块仅主机的网卡 |
| server2.shanxin.org | 192.168.0.20(仅主机网卡) | 真实服务器(RS) | 一块仅主机的网卡 |
| RHEL9(测试主机) | 172.25.254.103(NAT网卡) | 测试主机 | 一块NAT的网卡 |
提前打开LVS主机的内核路由转发功能
[root@LVS boot]# sysctl -a | grep ip_forward
net.ipv4.ip_forward = 0
net.ipv4.ip_forward_update_priority = 1
net.ipv4.ip_forward_use_pmtu = 0

[root@LVS boot]# vim /etc/sysctl.conf
[root@LVS boot]# cat /etc/sysctl.conf
net.ipv4.ip_forward=1

[root@LVS boot]# sysctl -p
net.ipv4.ip_forward = 1
server1.shanxin.org主机操作
# 网络配置
[root@webserver ~]# vim /etc/NetworkManager/system-connections/eth0.nmconnection
[root@webserver ~]# cat /etc/NetworkManager/system-connections/eth0.nmconnection
[connection]
id=eth0
type=ethernet
interface-name=eth0

[ipv4]
address1=192.168.0.10/24,192.168.0.100
method=manual

[root@webserver ~]# nmcli connection reload
[root@webserver ~]# nmcli connection up eth0
连接已成功激活(D-Bus 活动路径:/org/freedesktop/NetworkManager/ActiveConnection/3)

[root@webserver ~]# route -n
Kernel IP routing table
Destination     Gateway         Genmask         Flags Metric Ref    Use Iface
0.0.0.0         192.168.0.100   0.0.0.0         UG    100    0        0 eth0
192.168.0.0     0.0.0.0         255.255.255.0   U     100    0        0 eth0

# 配置web服务
[root@webserver ~]# dnf install httpd
[root@webserver ~]# echo "webserver1 - 192.168.0.10 " > /var/www/html/index.html
[root@webserver ~]# cat /var/www/html/index.html
webserver1 - 192.168.0.10
[root@webserver ~]# systemctl enable --now httpd

# 添加本地域名解析,为了之后的ipvsadm-save命令的进行
[root@webserver ~]# vim /etc/hosts
[root@webserver ~]# cat /etc/hosts
127.0.0.1   localhost localhost.localdomain localhost4 localhost4.localdomain4
::1         localhost localhost.localdomain localhost6 localhost6.localdomain6
192.168.0.100   lvs.shanxin.org
192.168.0.10    server1.shanxin.org
192.168.0.20    server2.shanxin.org
server2.shanxin.org主机操作
# 网络配置
[root@webserver2 ~]# vim /etc/NetworkManager/system-connections/eth0.nmconnection
[root@webserver2 ~]# cat /etc/NetworkManager/system-connections/eth0.nmconnection
[connection]
id=eth0
type=ethernet
interface-name=eth0

[ipv4]
address1=192.168.0.20/24,192.168.0.100
method=manual
[root@webserver2 ~]# nmcli connection reload
[root@webserver2 ~]# nmcli connection up eth0

[root@webserver2 ~]# route -n
Kernel IP routing table
Destination     Gateway         Genmask         Flags Metric Ref    Use Iface
0.0.0.0         192.168.0.100   0.0.0.0         UG    100    0        0 eth0
192.168.0.0     0.0.0.0         255.255.255.0   U     100    0        0 eth0

# 配置web服务
[root@webserver2 ~]# dnf install httpd -y

[root@webserver2 ~]# echo webserver2 - 192.168.0.20 > /var/www/html/index.html
[root@webserver2 ~]# cat /var/www/html/index.html
webserver2 - 192.168.0.20
[root@webserver2 ~]# systemctl enable --now httpd

# 添加本地域名解析,为了之后的ipvsadm-save命令的进行
[root@webserver2 ~]# vim /etc/hosts
[root@webserver2 ~]# cat /etc/hosts
127.0.0.1   localhost localhost.localdomain localhost4 localhost4.localdomain4
::1         localhost localhost.localdomain localhost6 localhost6.localdomain6
192.168.0.100   lvs.shanxin.org
192.168.0.10    server1.shanxin.org
192.168.0.20    server2.shanxin.org
LVS.shanxin.org主机操作
# 网络配置
[root@LVS boot]# vim /etc/NetworkManager/system-connections/eth1.nmconnection
[root@LVS boot]# nmcli connection reload
[root@LVS boot]# nmcli connection up eth1
[root@LVS boot]# cat /etc/NetworkManager/system-connections/eth1.nmconnection
[connection]
id=eth1
type=ethernet
interface-name=eth1

[ipv4]
address1=192.168.0.100/24
method=manual

[root@LVS boot]# cat /etc/NetworkManager/system-connections/eth0.nmconnection
[connection]
id=eth0
type=ethernet
interface-name=eth0

[ipv4]
address1=172.25.254.100/24,172.25.254.2
method=manual
dns=114.114.114.114;

[root@LVS boot]# route -n
Kernel IP routing table
Destination     Gateway         Genmask         Flags Metric Ref    Use Iface
0.0.0.0         172.25.254.2    0.0.0.0         UG    100    0        0 eth0
172.25.254.0    0.0.0.0         255.255.255.0   U     100    0        0 eth0
192.168.0.0     0.0.0.0         255.255.255.0   U     101    0        0 eth1

# 开启内核路由转发功能
[root@LVS boot]# sysctl -a | grep ip_forward
net.ipv4.ip_forward = 0
net.ipv4.ip_forward_update_priority = 1
net.ipv4.ip_forward_use_pmtu = 0
[root@LVS boot]# vim /etc/sysctl.conf
[root@LVS boot]# cat /etc/sysctl.conf
net.ipv4.ip_forward = 1

# 测试访问webserver1主机的网页和webserver2主机的网页
[root@LVS boot]# curl 192.168.0.10
webserver1 - 192.168.0.10
[root@LVS boot]# curl 192.168.0.20
webserver2 - 192.168.0.20

# 下载LVS管理命令
[root@LVS boot]# dnf install ipvsadm-1.31-6.el9.x86_64 -y
[root@LVS boot]# ipvsadm -A -t 172.25.254.100:80 -s rr
[root@LVS boot]# ipvsadm -Ln
IP Virtual Server version 1.2.1 (size=4096)
Prot LocalAddress:Port Scheduler Flags
  -> RemoteAddress:Port           Forward Weight ActiveConn InActConn
TCP  172.25.254.100:80 rr

[root@LVS boot]# ipvsadm -a -t 172.25.254.100:80 -r 192.168.0.10:80 -m
[root@LVS boot]# ipvsadm -Ln
IP Virtual Server version 1.2.1 (size=4096)
Prot LocalAddress:Port Scheduler Flags
  -> RemoteAddress:Port           Forward Weight ActiveConn InActConn
TCP  172.25.254.100:80 rr
  -> 192.168.0.10:80              Masq    1      0          0

[root@LVS boot]# ipvsadm -a -t 172.25.254.100:80 -r 192.168.0.20:80 -m
[root@LVS boot]# ipvsadm -Ln
IP Virtual Server version 1.2.1 (size=4096)
Prot LocalAddress:Port Scheduler Flags
  -> RemoteAddress:Port           Forward Weight ActiveConn InActConn
TCP  172.25.254.100:80 rr
  -> 192.168.0.10:80              Masq    1      0          0
  -> 192.168.0.20:80              Masq    1      0          0

[root@LVS boot]# vim /etc/hosts
[root@LVS boot]# cat /etc/hosts
127.0.0.1   localhost localhost.localdomain localhost4 localhost4.localdomain4
::1         localhost localhost.localdomain localhost6 localhost6.localdomain6
192.168.0.100   lvs.shanxin.org
192.168.0.10    server1.shanxin.org
192.168.0.20    server2.shanxin.org

# 保存ipvsadm的策略
[root@LVS boot]# ipvsadm-save
-A -t lvs.shanxin.org:http -s rr
-a -t lvs.shanxin.org:http -r server1.shanxin.org:http -m -w 1
-a -t lvs.shanxin.org:http -r server2.shanxin.org:http -m -w 1
测试主机操作
[root@RHEL9 ~]# for i in {1..10}
> do
> curl 172.25.254.100
> done
webserver2 - 192.168.0.20
webserver1 - 192.168.0.10
webserver2 - 192.168.0.20
webserver1 - 192.168.0.10
webserver2 - 192.168.0.20
webserver1 - 192.168.0.10
webserver2 - 192.168.0.20
webserver1 - 192.168.0.10
webserver2 - 192.168.0.20
webserver1 - 192.168.0.10
LVS进阶–DR配置
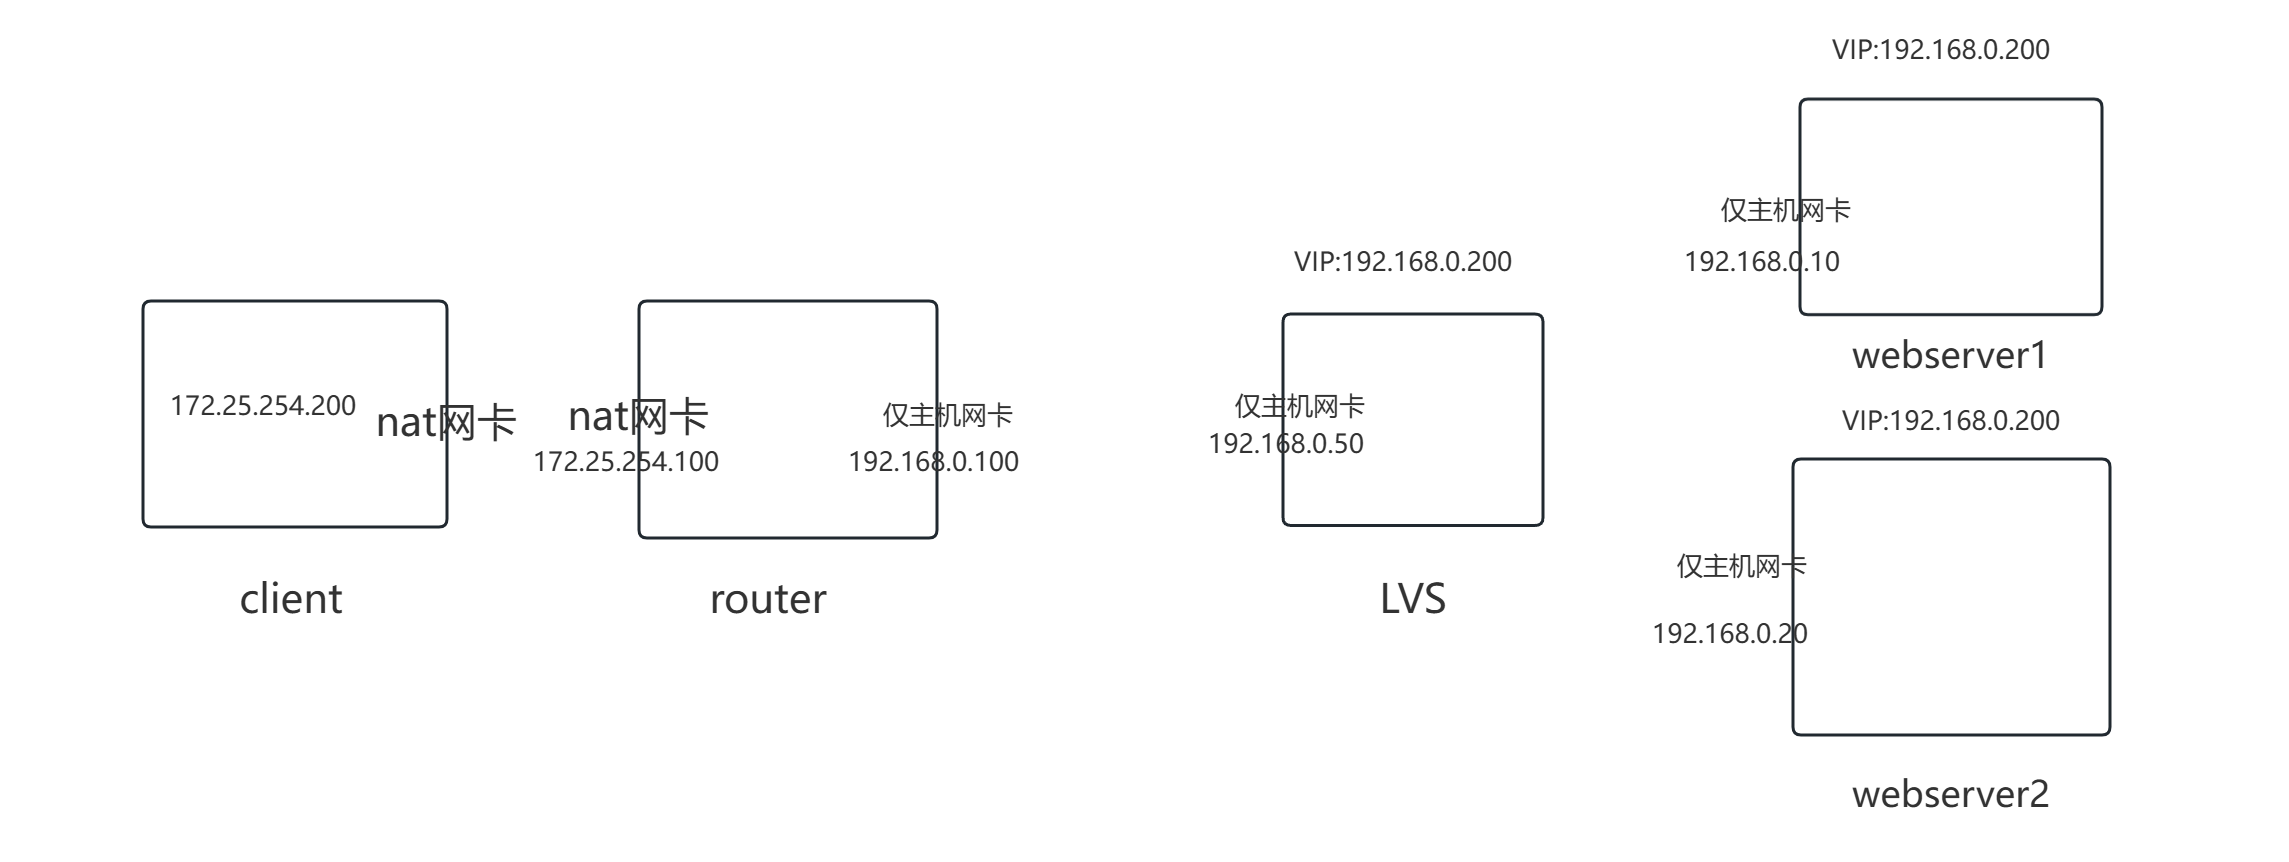
环境准备:
| 主机名 | IP | 角色 | VMware网络硬件配置 |
|---|---|---|---|
| client.shanxin.org | 172.25.254.200(NAT网卡) | 客户端 | 一块NAT的网卡 |
| router.shanxin.org | 172.25.254.100(NAT网卡) 192.168.0.100(仅主机网卡) | 路由器 | 两块网卡:NAT网卡、仅主机网卡 |
| LVS.shanxin.or | 192.168.0.50(仅主机网卡) 192.168.0.200(lo换回接口)VIP的IP | LVS调度机(LVS) | 一块网卡,一个环回接口 |
| rs1.shanxin.org | 192.168.0.10(仅主机网卡) | 真实服务器(RS) | 一块网卡,一个环回接口 |
| rs2.shanxin.org | 192.168.0.20(仅主机网卡) | 真实服务器(RS) | 一块网卡,一个环回接口 |
图解整个网络环境:
client主机操作
# 网络的配置
[root@client ~]# cat /etc/NetworkManager/system-connections/eth0.nmconnection
[connection]
id=eth0
type=ethernet
interface-name=eth0

[ipv4]
address1=172.25.254.200/24,172.25.254.2
method=manual
dns=114.114.114.114;

# 测试网页的访问性
[root@client ~]# curl 192.168.0.10
webserver1 - 192.168.0.10
[root@client ~]# curl 192.168.0.20
webserver2 - 192.168.0.20

# 最终测试,访问192.168.0.200(VIP)
[root@client ~]# for i in {1..10}; do  curl 192.168.0.200; done
webserver2 - 192.168.0.20
webserver1 - 192.168.0.10
webserver2 - 192.168.0.20
webserver2 - 192.168.0.20
webserver1 - 192.168.0.10
webserver2 - 192.168.0.20
webserver2 - 192.168.0.20
webserver1 - 192.168.0.10
webserver2 - 192.168.0.20
webserver2 - 192.168.0.20
router主机操作
# 网络的配置
[root@router ~]# cat /etc/NetworkManager/system-connections/eth0.nmconnection
[connection]
id=eth0
type=ethernet
interface-name=eth0

[ipv4]
address1=172.25.254.100/24,172.25.254.2
method=manual
dns=114.114.114.114;
[root@router ~]# cat /etc/NetworkManager/system-connections/eth1.nmconnection
[connection]
id=eth1
type=ethernet
interface-name=eth1

[ipv4]
address1=192.168.0.100/24
method=manual

[root@router ~]# ifconfig
eth0: flags=4163<UP,BROADCAST,RUNNING,MULTICAST>  mtu 1500
        inet 172.25.254.100  netmask 255.255.255.0  broadcast 172.25.254.255
        inet6 fe80::90f:e474:22df:53f  prefixlen 64  scopeid 0x20<link>
        ether 00:0c:29:93:e1:f6  txqueuelen 1000  (Ethernet)
        RX packets 384  bytes 41140 (40.1 KiB)
        RX errors 0  dropped 0  overruns 0  frame 0
        TX packets 312  bytes 35487 (34.6 KiB)
        TX errors 0  dropped 0 overruns 0  carrier 0  collisions 0

eth1: flags=4163<UP,BROADCAST,RUNNING,MULTICAST>  mtu 1500
        inet 192.168.0.100  netmask 255.255.255.0  broadcast 192.168.0.255
        inet6 fe80::262a:2083:2024:41ff  prefixlen 64  scopeid 0x20<link>
        ether 00:0c:29:93:e1:00  txqueuelen 1000  (Ethernet)
        RX packets 12  bytes 768 (768.0 B)
        RX errors 0  dropped 0  overruns 0  frame 0
        TX packets 24  bytes 1668 (1.6 KiB)
        TX errors 0  dropped 0 overruns 0  carrier 0  collisions 0

lo: flags=73<UP,LOOPBACK,RUNNING>  mtu 65536
        inet 127.0.0.1  netmask 255.0.0.0
        inet6 ::1  prefixlen 128  scopeid 0x10<host>
        loop  txqueuelen 1000  (Local Loopback)
        RX packets 0  bytes 0 (0.0 B)
        RX errors 0  dropped 0  overruns 0  frame 0
        TX packets 0  bytes 0 (0.0 B)
        TX errors 0  dropped 0 overruns 0  carrier 0  collisions 0

[root@router ~]# route -n
Kernel IP routing table
Destination     Gateway         Genmask         Flags Metric Ref    Use Iface
0.0.0.0         172.25.254.2    0.0.0.0         UG    100    0        0 eth0
172.25.254.0    0.0.0.0         255.255.255.0   U     100    0        0 eth0
192.168.0.0     0.0.0.0         255.255.255.0   U     101    0        0 eth1

# 打开内核路由转发功能
[root@router ~]# sysctl -a | grep ip_forward
net.ipv4.ip_forward = 0
net.ipv4.ip_forward_update_priority = 1
net.ipv4.ip_forward_use_pmtu = 0
[root@router ~]# vim /etc/sysctl.conf
[root@router ~]# sysctl -p
net.ipv4.ip_forward = 1
[root@router ~]# cat /etc/sysctl.conf
net.ipv4.ip_forward = 1

[root@router ~]# vim /etc/NetworkManager/system-connections/eth1.nmconnection


[root@router ~]# nmcli connection reload
[root@router ~]# nmcli connection up eth1
LVS主机操作
# 网络的配置
[root@LVS ~]# vim /etc/NetworkManager/system-connections/eth0.nmconnection
[root@LVS ~]# cat /etc/NetworkManager/system-connections/eth0.nmconnection
[connection]
id=eth0
type=ethernet
interface-name=eth0

[ipv4]
address1=192.168.0.50/24,192.168.0.100
method=manual

[root@LVS ~]# nmcli connection reload
[root@LVS ~]# nmcli connection up eth0

[root@LVS ~]# route -n
Kernel IP routing table
Destination     Gateway         Genmask         Flags Metric Ref    Use Iface
0.0.0.0         192.168.0.100   0.0.0.0         UG    100    0        0 eth0
192.168.0.0     0.0.0.0         255.255.255.0   U     100    0        0 eth0

# 添加lo的VIP
[root@LVS ~]# ip addr add 192.168.0.200/32 dev lo
[root@LVS ~]# ip addr show lo
1: lo: <LOOPBACK,UP,LOWER_UP> mtu 65536 qdisc noqueue state UNKNOWN group default qlen 1000
    link/loopback 00:00:00:00:00:00 brd 00:00:00:00:00:00
    inet 127.0.0.1/8 scope host lo
       valid_lft forever preferred_lft forever
    inet 192.168.0.200/32 scope global lo
       valid_lft forever preferred_lft forever
    inet6 ::1/128 scope host
       valid_lft forever preferred_lft forever

[root@LVS ~]# dnf install ipvsadm-1.31-6.el9.x86_64  -y
[root@LVS ~]# ipvsadm -A -t 192.168.0.200:80 -s wrr
[root@LVS ~]# ipvsadm -a -t 192.168.0.200:80 -r 192.168.0.10:80 -g -w 1
[root@LVS ~]# ipvsadm -a -t 192.168.0.200:80 -r 192.168.0.20:80 -g -w 2
[root@LVS ~]# ipvsadm -Ln
IP Virtual Server version 1.2.1 (size=4096)
Prot LocalAddress:Port Scheduler Flags
  -> RemoteAddress:Port           Forward Weight ActiveConn InActConn
TCP  192.168.0.200:80 wrr
  -> 192.168.0.10:80              Route   1      0          0
  -> 192.168.0.20:80              Route   2      0          0

# 持久化存储策略
[root@LVS ~]# ipvsadm-save -n > /etc/sysconfig/ipvsadm
[root@LVS ~]# cat /etc/sysconfig/ipvsadm
-A -t 192.168.0.200:80 -s wrr
-a -t 192.168.0.200:80 -r 192.168.0.10:80 -g -w 1
-a -t 192.168.0.200:80 -r 192.168.0.20:80 -g -w 2
rs1主机操作
# 网络的配置
[root@rs1 ~]# vim /etc/NetworkManager/system-connections/eth0.nmconnection
[root@rs1 ~]# cat /etc/NetworkManager/system-connections/eth0.nmconnection
[connection]
id=eth0
type=ethernet
interface-name=eth0

[ipv4]
address1=192.168.0.10/24
method=manual
[root@rs1 ~]# nmcli connection reload
[root@rs1 ~]# nmcli connection up eth0

[root@rs1 ~]# route -n
Kernel IP routing table
Destination     Gateway         Genmask         Flags Metric Ref    Use Iface

# 临时关闭arp功能
[root@rs1 ~]# echo 1 > /proc/sys/net/ipv4/conf/all/arp_ignore
[root@rs1 ~]# echo 2 > /proc/sys/net/ipv4/conf/all/arp_announce
[root@rs1 ~]# echo 2 > /proc/sys/net/ipv4/conf/lo/arp_announce
[root@rs1 ~]# echo 1 > /proc/sys/net/ipv4/conf/lo/arp_ignore

# 添加lo的VIP
[root@rs1 ~]# ip addr add 192.168.0.200/32 dev lo
[root@rs1 ~]# ip addr show lo
1: lo: <LOOPBACK,UP,LOWER_UP> mtu 65536 qdisc noqueue state UNKNOWN group default qlen 1000
    link/loopback 00:00:00:00:00:00 brd 00:00:00:00:00:00
    inet 127.0.0.1/8 scope host lo
       valid_lft forever preferred_lft forever
    inet 192.168.0.200/32 scope global lo
       valid_lft forever preferred_lft forever
    inet6 ::1/128 scope host
       valid_lft forever preferred_lft forever

[root@rs1 ~]# dnf install httpd -y
[root@rs1 ~]# echo webserver1 - 192.168.0.10 > /var/www/html/index.html
[root@rs1 ~]# systemctl enable --now httpd
Created symlink /etc/systemd/system/multi-user.target.wants/httpd.service → /usr/lib/systemd/system/httpd.service.
rs2主机操作
# 网络的配置
[root@rs2 ~]# vim /etc/NetworkManager/system-connections/eth0.nmconnection
[root@rs2 ~]# cat /etc/NetworkManager/system-connections/eth0.nmconnection
[connection]
id=eth0
type=ethernet
interface-name=eth0

[ipv4]
address1=192.168.0.20/24
method=manual
[root@rs2 ~]# nmcli connection reload
[root@rs2 ~]# nmcli connection up eth0
连接已成功激活(D-Bus 活动路径:/org/freedesktop/NetworkManager/ActiveConnection/3)
[root@rs2 ~]# route -n
Kernel IP routing table
Destination     Gateway         Genmask         Flags Metric Ref    Use Iface
192.168.0.0     0.0.0.0         255.255.255.0   U     100    0        0 eth0

# 这里的操作顺序必须是先修改conf/all,然后才可以修改conf/lo,
# 所有这下面的操作是对lo进行ARP关闭的
[root@rs2 ~]# echo 1 > /proc/sys/net/ipv4/conf/all/arp_ignore
[root@rs2 ~]# echo 2 > /proc/sys/net/ipv4/conf/all/arp_announce
[root@rs2 ~]# echo 2 > /proc/sys/net/ipv4/conf/lo/arp_announce
[root@rs2 ~]# echo 1 > /proc/sys/net/ipv4/conf/lo/arp_ignore
[root@rs2 ~]# ip addr add 192.168.0.200/32 dev lo
[root@rs2 ~]# ip addr show lo
1: lo: <LOOPBACK,UP,LOWER_UP> mtu 65536 qdisc noqueue state UNKNOWN group default qlen 1000
    link/loopback 00:00:00:00:00:00 brd 00:00:00:00:00:00
    inet 127.0.0.1/8 scope host lo
       valid_lft forever preferred_lft forever
    inet 192.168.0.200/32 scope global lo
       valid_lft forever preferred_lft forever
    inet6 ::1/128 scope host
       valid_lft forever preferred_lft forever

[root@rs2 ~]# dnf install httpd -y
[root@rs2 ~]# echo webserver2 - 192.168.0.20 > /var/www/html/index.html
[root@rs2 ~]# systemctl enable --now httpd
Created symlink /etc/systemd/system/multi-user.target.wants/httpd.service → /usr/lib/systemd/system/httpd.service.


 279
279

 被折叠的 条评论
为什么被折叠?
被折叠的 条评论
为什么被折叠?
 到【灌水乐园】发言


