


控件的简单自定义代码
先是全部代码,后面来分步拆分
1、自定义View类里的代码
public class MyTitleView extends RelativeLayout implements View.OnClickListener {
    private Drawable mLeftImg;
    private String mLeftTxt, mTitleTxt, mRightTxt;
    private LayoutInflater mLayoutInflater;
    //声明接口
    private onCustomViewClickListener mOnCustomViewClickListener;

    /**
     * 定义接口
     */
    public interface onCustomViewClickListener {
        public void onTitleViewClick(View view);
    }

    /**
     * 注册
     *
     * @param listener
     */
    public void setOnCustomViewClickListener(onCustomViewClickListener listener) {
        mOnCustomViewClickListener = listener;
    }

    public MyTitleView(Context context) {
        super(context);
    }

    public MyTitleView(Context context, AttributeSet attrs) {
        super(context, attrs);
        init(context, attrs);
    }

    public MyTitleView(Context context, AttributeSet attrs, int defStyleAttr) {
        super(context, attrs, defStyleAttr);
        init(context, attrs);
    }

    /**
     * 从自定义属性(attrs.xml)中获取属性值,并赋给全局变量
     * @param context
     * @param attrs
     */
    public void init(Context context, AttributeSet attrs) {
        TypedArray typedArray = null;
        try {
            typedArray = context.getTheme().obtainStyledAttributes(attrs, R.styleable.MyTitleView, 0, 0);
            mLeftImg = typedArray.getDrawable(R.styleable.MyTitleView_left_img);
            mLeftTxt = typedArray.getString(R.styleable.MyTitleView_left_txt);
            mTitleTxt = typedArray.getString(R.styleable.MyTitleView_title_txt);
            mRightTxt = typedArray.getString(R.styleable.MyTitleView_right_txt);
        } finally {
            typedArray.recycle();//回收
        }

        mLayoutInflater = LayoutInflater.from(context);
        setView();
    }

    /**
     * 得到自定义的布局(想要的自定义控件的真正外观布局),并把属性值赋给布局上的控件
     */
    public void setView() {
        //引用自定义的布局
        View view = mLayoutInflater.inflate(R.layout.custom_view_title_layout, this, true);
        if (mLeftImg != null) {
            ImageView leftImg = (ImageView) view.findViewById(R.id.title_left_img);
            leftImg.setImageDrawable(mLeftImg);
            leftImg.setOnClickListener(this);
        }
        if (mLeftTxt != null) {
            TextView leftTxt = (TextView) view.findViewById(R.id.title_left_txt);
            leftTxt.setText(mLeftTxt);
            leftTxt.setOnClickListener(this);
        }
        if (mTitleTxt != null) {
            TextView titleTxt = (TextView) view.findViewById(R.id.title_title_txt);
            titleTxt.setText(mTitleTxt);
        }
        if (mTitleTxt != null) {
            TextView rightTxt = (TextView) findViewById(R.id.title_right_txt);
            rightTxt.setText(mRightTxt);
            rightTxt.setOnClickListener(this);
        }

    }

    /**
     * 控件点击事件时使用接口回调
     * @param v
     */
    @Override
    public void onClick(View v) {
        if (mOnCustomViewClickListener != null) {
            mOnCustomViewClickListener.onTitleViewClick(v);
        }
    }
}
2、Activity里的代码
public class CustomViewTestActivity extends Activity implements MyTitleView.onCustomViewClickListener{
    private MyTitleView mMyTitleView;

    @Override
    protected void onCreate(Bundle savedInstanceState) {
        super.onCreate(savedInstanceState);
        requestWindowFeature(Window.FEATURE_NO_TITLE);
        setContentView(R.layout.activity_custom_view_test_layout);
        mMyTitleView = (MyTitleView) findViewById(R.id.custom_title_view);
//        setContentView(R.layout.sample_my_view_auto);

        //注册
        mMyTitleView.setOnCustomViewClickListener(this);

    }

    /**
     * 回调的监听事件
     * @param view
     */
    @Override
    public void onTitleViewClick(View view) {
        switch (view.getId()){
            case R.id.title_left_img:
                Toast.makeText(this,"img返回",Toast.LENGTH_SHORT).show();
                finish();
                break;
            case R.id.title_left_txt:
                Toast.makeText(this,"txt返回",Toast.LENGTH_SHORT).show();
                finish();
                break;
            case R.id.title_right_txt:
                Toast.makeText(this,"设置",Toast.LENGTH_SHORT).show();
                break;
        }
    }
}
3、(values文件夹下)attrs.xml里的代码
<?xml version="1.0" encoding="utf-8"?>
<!--declare-styleable name="MyTitleView"一般是自定义控件类的类名-->
<resources>
    <declare-styleable name="MyTitleView">
        <attr name="left_img" format="reference"/>
        <attr name="left_txt" format="string"/>
        <attr name="title_txt" format="string"/>
        <attr name="right_txt" format="string"/>
    </declare-styleable>
</resources>
4、你想自定义的控件的最终样子的布局代码
<RelativeLayout xmlns:android="http://schemas.android.com/apk/res/android"
    android:layout_width="match_parent"
    android:layout_height="wrap_content"
    android:background="@color/meituan_login_green">

    <!--android:src="@drawable/travel__ic_arrow_white_down"-->
    <ImageView
        android:id="@+id/title_left_img"
        android:layout_width="wrap_content"
        android:layout_height="wrap_content"
        android:layout_centerVertical="true"
        android:paddingBottom="10dp"
        android:paddingLeft="15dp"
        android:paddingTop="10dp" />

    <!--android:text="返回"-->
    <TextView
        android:id="@+id/title_left_txt"
        android:layout_width="wrap_content"
        android:layout_height="wrap_content"
        android:layout_centerVertical="true"
        android:layout_marginLeft="5dp"
        android:layout_toRightOf="@id/title_left_img"
        android:textColor="@android:color/background_light"
        android:textSize="18sp" />

    <!--android:text="标题"-->
    <TextView
        android:id="@+id/title_title_txt"
        android:layout_width="wrap_content"
        android:layout_height="wrap_content"
        android:layout_centerInParent="true"
        android:paddingBottom="15dp"
        android:paddingTop="15dp"
        android:textColor="@android:color/background_light"
        android:textSize="23sp" />

    <!--android:text="更多"-->
    <TextView
        android:id="@+id/title_right_txt"
        android:layout_width="wrap_content"
        android:layout_height="wrap_content"
        android:layout_alignParentRight="true"
        android:layout_centerVertical="true"
        android:layout_marginRight="15dp"
        android:textColor="@android:color/background_light"
        android:textSize="18sp" />

</RelativeLayout>
5、Activity里布局最终使用的控件代码
<LinearLayout xmlns:android="http://schemas.android.com/apk/res/android"
    xmlns:app="http://schemas.android.com/apk/res-auto"
    android:orientation="vertical"
    android:layout_width="match_parent"
    android:layout_height="match_parent">

    <com.customview.MyTitleView
        android:id="@+id/custom_title_view"
        android:layout_width="match_parent"
        android:layout_height="wrap_content"
        app:left_img="@drawable/travel__ic_arrow_white_down"
        app:title_txt="首页"
        app:right_txt="设置"
        app:left_txt="返回"/>

</LinearLayout>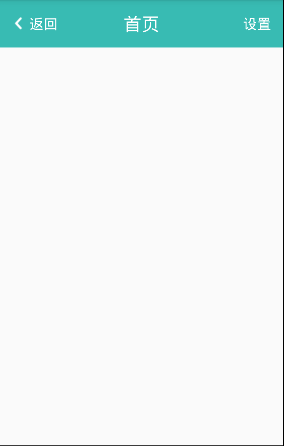
自定义控件的分步代码
1、在values文件夹下建一个attrs.xml文件,设置自定义控件的属性
<?xml version="1.0" encoding="utf-8"?>
<!--declare-styleable name="MyTitleView"一般是自定义控件类的类名-->
<resources>
    <declare-styleable name="MyTitleView">
        <attr name="left_img" format="reference"/>
        <attr name="left_txt" format="string"/>
        <attr name="title_txt" format="string"/>
        <attr name="right_txt" format="string"/>
    </declare-styleable>
</resources>
2、建一个类,继承自一个布局(如:RelativeLayout),重写他的构造方法
public class MyTitleView extends RelativeLayout{
    public MyTitleView(Context context) {
        super(context);
    }

    public MyTitleView(Context context, AttributeSet attrs) {
        super(context, attrs);
        init(context, attrs);//调用下面初始化方法
    }

    public MyTitleView(Context context, AttributeSet attrs, int defStyleAttr) {
        super(context, attrs, defStyleAttr);
        init(context, attrs);//调用下面初始化方法
    }
}
3、定义一个初始化方法
    private Drawable mLeftImg;
    private String mLeftTxt, mTitleTxt, mRightTxt;
    private LayoutInflater mLayoutInflater;
/**
     * 从自定义属性(attrs.xml)中获取属性值,并赋给全局变量
     * @param context
     * @param attrs
     */
    public void init(Context context, AttributeSet attrs) {
        TypedArray typedArray = null;
        try {
            typedArray = context.getTheme().obtainStyledAttributes(attrs, R.styleable.MyTitleView, 0, 0);
            mLeftImg = typedArray.getDrawable(R.styleable.MyTitleView_left_img);
            mLeftTxt = typedArray.getString(R.styleable.MyTitleView_left_txt);
            mTitleTxt = typedArray.getString(R.styleable.MyTitleView_title_txt);
            mRightTxt = typedArray.getString(R.styleable.MyTitleView_right_txt);
        } finally {
            typedArray.recycle();//回收
        }
        //实例化LayoutInflater
        mLayoutInflater = LayoutInflater.from(context);
        //调用下面得到自定义控件最终样子布局的方法
        setView();
    }
4、建一个布局文件(你自定义控件最终想要的样子)
<RelativeLayout xmlns:android="http://schemas.android.com/apk/res/android"
    android:layout_width="match_parent"
    android:layout_height="wrap_content"
    android:background="@color/meituan_login_green">

    <!--android:src="@drawable/travel__ic_arrow_white_down"-->
    <ImageView
        android:id="@+id/title_left_img"
        android:layout_width="wrap_content"
        android:layout_height="wrap_content"
        android:layout_centerVertical="true"
        android:paddingBottom="10dp"
        android:paddingLeft="15dp"
        android:paddingTop="10dp" />

    <!--android:text="返回"-->
    <TextView
        android:id="@+id/title_left_txt"
        android:layout_width="wrap_content"
        android:layout_height="wrap_content"
        android:layout_centerVertical="true"
        android:layout_marginLeft="5dp"
        android:layout_toRightOf="@id/title_left_img"
        android:textColor="@android:color/background_light"
        android:textSize="18sp" />

    <!--android:text="标题"-->
    <TextView
        android:id="@+id/title_title_txt"
        android:layout_width="wrap_content"
        android:layout_height="wrap_content"
        android:layout_centerInParent="true"
        android:paddingBottom="15dp"
        android:paddingTop="15dp"
        android:textColor="@android:color/background_light"
        android:textSize="23sp" />

    <!--android:text="更多"-->
    <TextView
        android:id="@+id/title_right_txt"
        android:layout_width="wrap_content"
        android:layout_height="wrap_content"
        android:layout_alignParentRight="true"
        android:layout_centerVertical="true"
        android:layout_marginRight="15dp"
        android:textColor="@android:color/background_light"
        android:textSize="18sp" />

</RelativeLayout>
5、定义一个方法
/**
     * 得到自定义的布局(想要的自定义控件的真正外观布局),并把属性值赋给布局上的控件
     */
    public void setView() {
        //引用自定义的布局
        View view = mLayoutInflater.inflate(R.layout.custom_view_title_layout, this, true);
        if (mLeftImg != null) {
            ImageView leftImg = (ImageView) view.findViewById(R.id.title_left_img);
            leftImg.setImageDrawable(mLeftImg);
            leftImg.setOnClickListener(this);//点击事件的注册
        }
        if (mLeftTxt != null) {
            TextView leftTxt = (TextView) view.findViewById(R.id.title_left_txt);
            leftTxt.setText(mLeftTxt);
            leftTxt.setOnClickListener(this);//点击事件的注册
        }
        if (mTitleTxt != null) {
            TextView titleTxt = (TextView) view.findViewById(R.id.title_title_txt);
            titleTxt.setText(mTitleTxt);
        }
        if (mTitleTxt != null) {
            TextView rightTxt = (TextView) findViewById(R.id.title_right_txt);
            rightTxt.setText(mRightTxt);
            rightTxt.setOnClickListener(this);//点击事件的注册
        }
    }
6、在Activity中使用此控件,在布局中代码
<LinearLayout xmlns:android="http://schemas.android.com/apk/res/android"
    xmlns:app="http://schemas.android.com/apk/res-auto"
    android:orientation="vertical"
    android:layout_width="match_parent"
    android:layout_height="match_parent">

    <com.customview.MyTitleView
        android:id="@+id/custom_title_view"
        android:layout_width="match_parent"
        android:layout_height="wrap_content"
        app:left_img="@drawable/travel__ic_arrow_white_down"
        app:title_txt="首页"
        app:right_txt="设置"
        app:left_txt="返回"/>

</LinearLayout>
7、控件的点击监听事件(采用接口回调的方法)
(1)在自定义控件类(MyTitleView)中定义一个接口(也可以直接引用系统的接口(onClickListener)),我这里是自定义一个接口
/**
     * 定义接口
     */
    public interface onCustomViewClickListener {
        public void onTitleViewClick(View view);
    }
(2)在自定义控件类(MyTitleView)中声明接口
//声明接口
    private onCustomViewClickListener mOnCustomViewClickListener;
(3)在自定义控件类(MyTitleView)中定义注册接口的方法
/**
     * 注册
     *
     * @param listener
     */
    public void setOnCustomViewClickListener(onCustomViewClickListener listener) {
        mOnCustomViewClickListener = listener;
    }
(4)使自定义控件类(MyTitleView)实现onClickListener接口
public class MyTitleView extends RelativeLayout implements View.OnClickListener {}(5)在重写的onClick方法中调用自定义接口方法,把view传过去,在上面的setView()方法中记得要注册点击事件接口
/**
     * 控件点击事件时使用接口回调
     * @param v
     */
    @Override
    public void onClick(View v) {
        if (mOnCustomViewClickListener != null) {
            mOnCustomViewClickListener.onTitleViewClick(v);
        }
    }
(6)在Activity中实现上述自定义接口,并在onCreate()方法中注册接口,在重写的方法中写入处理点击事件代码
public class CustomViewTestActivity extends Activity implements MyTitleView.onCustomViewClickListener{
    private MyTitleView mMyTitleView;//声明控件

    @Override
    protected void onCreate(Bundle savedInstanceState) {
        super.onCreate(savedInstanceState);
        requestWindowFeature(Window.FEATURE_NO_TITLE);
        setContentView(R.layout.activity_custom_view_test_layout);
        //得到控件实例
        mMyTitleView = (MyTitleView) findViewById(R.id.custom_title_view);
        //注册
        mMyTitleView.setOnCustomViewClickListener(this);

    }

    /**
     * 回调的监听事件
     * @param view
     */
    @Override
    public void onTitleViewClick(View view) {
        switch (view.getId()){
            case R.id.title_left_img:
                Toast.makeText(this,"img返回",Toast.LENGTH_SHORT).show();
                finish();
                break;
            case R.id.title_left_txt:
                Toast.makeText(this,"txt返回",Toast.LENGTH_SHORT).show();
                finish();
                break;
            case R.id.title_right_txt:
                Toast.makeText(this,"设置",Toast.LENGTH_SHORT).show();
                break;
        }
    }
}


 501
501

 被折叠的 条评论
为什么被折叠?
被折叠的 条评论
为什么被折叠?
 到【灌水乐园】发言


