


一、Classpath扫描与组件管理
1.从Spring3.0开始,Spring JavaConfig项目提供了很多特性,包括使用java而不是XML定义bean,比如@Configuration,@Bean,@Import,@DependsOn。
2.@Component是一个通用注解,可用于任何bean。
3.@Repository,@Service,@Controller是更有针对性的注解
——@Repository通常用于注解DAO类,即持久层
——@Service通常用于注解Service类,即服务层
——@Controller通常用于Controller类,即控制层
4.元注解
——许多Spring提供的注解可以作为自己的代码,即“元数据注解”,元注解是一个简单的注解,可以应用到另一个注解。
——除了value(),元注解还可以有其他的属性,允许定制
二、类的自动检测与注册Bean
1.Spring可以自动检测类并注册Bean到ApplicationContext中。


2.为了能够检测这些类并注册相应的Bean,需要下面的内容
<?xml version="1.0" encoding="UTF-8"?>
<beans xmlns="http://www.springframework.org/schema/beans"
    xmlns:xsi="http://www.w3.org/2001/XMLSchema-instance"
    xmlns:context="http://www.springframework.org/schema/context"
    xsi:schemaLocation="http://www.springframework.org/schema/beans
        http://www.springframework.org/schema/beans/spring-beans.xsd
        http://www.springframework.org/schema/context
        http://www.springframework.org/schema/context/spring-context.xsd" >

        <context:component-scan base-package="com.csdn.example"></context:component-scan>

 </beans>
——<context:component-scan>包含<context:annotation-config>,通常在使用前者后,不用在使用后者。
——AutowiredAnnotationBeanPostProcessor和CommonAnnotationBeanPostProcessor也会被包含进来。
3.使用过滤器进行自定义扫描
——默认情况下,类被自动发现并注册bean的条件是:使用@Component,@Repository,@Service,@Controller注解或者使用@Component的自定义注解。
——可以通过过滤器修改上面的行为,如:XML配置忽略所有的@Repository注解并用“Stub”代替。
<beans>
 <context:component-scan base-package="com.csdn.example"
>
  <!--包含Repository-->
  <context:include-filter type="regex" expression=".*Stub.*Repository"/>
  <!--排除Repository-->
  <context:exclude-filter type="annotation" expression="org.springframework.stereotype.Repository"/>
 </context:component-scan>
</beans>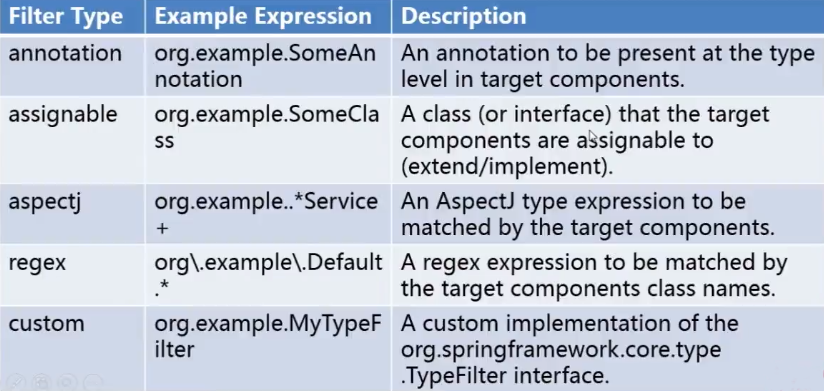
——还可使用use-default-filters="false"禁用自动发现与注册。
4.定义Bean
——扫描过程中组件被自动检测,那么Bean名称是由BeanNameGenerator生成的(@Component,@Repository,@Service,@Controller都会有个name属性用于显式设置BeanName)默认是以类名为基础,首字母小写。
——可自定义bean命名策略,实现BeanNameGenerator接口,并一定要包含一个无参数构造器。
<beans>
 <context:component-scan base-package="com.csdn.example"  name-generator="com.csdn.example.MyNameGenerator" />
</beans>
5.作用域(Scope)
——通常情况下自动查找的Spring组件,其scope是singleton(单例),Spring2.5提供了一个标识scope的注解@Scope
@Scope("prototype")
@Repository
public class MovieFinderImpl implements MovieFinder{
 //...
}
——也可以自定义scope策略,实现ScopeMetaDataResolver接口并提供一个无参构造器
<beans>
    <context:component-scan base-package="com.csdn.example"  scope-resolver="com.csdn.example.MyScopeResolver" />
</beans>
6.代理方式
——可以使用scoped-proxy属性指定代理,有三个值可选:no,interfaces,targetClass
三、<context:annotation-config/>
1.通过在基于XML的Spring配置如下标签(包含上下文命名空间)
2.<context:annotation-config/>仅会查找在同一个applicationContext中的bean注解。
<?xml version="1.0" encoding="UTF-8"?>
<beans xmlns="http://www.springframework.org/schema/beans"
    xmlns:xsi="http://www.w3.org/2001/XMLSchema-instance"
    xmlns:context="http://www.springframework.org/schema/context"
    xsi:schemaLocation="http://www.springframework.org/schema/beans
        http://www.springframework.org/schema/beans/spring-beans.xsd
        http://www.springframework.org/schema/context
        http://www.springframework.org/schema/context/spring-context.xsd" >

        <context:annotation-config/>

 </beans>
四、@Component,@Repository,@Service,@Controller
五、@Required
1.@Resource注解适用于bean属性的setter方法。
2.这个注解仅仅表示,受影响的bean属性必须在配置时被填充,通过在bean定义或通过自动装配一个明确的属性值。
六、@Autowired
1.可以将@Autowired注解为“传统”的setter方法。
2.可用于构造器或成员变量。
3.默认情况下,如果因找不到合适的bean将会导致autowiring失败抛出异常,可以通过@Autowired(required=false)避免。
4.每个类只能有一个构造器被标记为required=true。
5.@Autowired的必要属性,建议使用@Required注解。
public interface InjectionDAO {

	public void save(String arg);

}
@Repository
public class InjectionDAOImpl implements InjectionDAO {

	public void save(String arg) {
		//模拟数据库保存操作
		System.out.println("保存数据:" + arg);
	}

}
public interface InjectionService {
public void save(String arg);
}@Service
public class InjectionServiceImpl implements InjectionService {
// @Autowired
private InjectionDAO injectionDAO;
@Autowired
public InjectionServiceImpl(InjectionDAO injectionDAO) {
this.injectionDAO = injectionDAO;
}
// @Autowired
public void setInjectionDAO(InjectionDAO injectionDAO) {
this.injectionDAO = injectionDAO;
}
public void save(String arg) {
//模拟业务操作
System.out.println("Service接收参数:" + arg);
arg = arg + ":" + this.hashCode();
injectionDAO.save(arg);
}
}@RunWith(BlockJUnit4ClassRunner.class)
public class TestInjection extends UnitTestBase {
public TestInjection() {
super("classpath:spring-beanannotation.xml");
}
@Test
public void testAutowired() {
InjectionService service = super.getBean("injectionServiceImpl");
service.save("This is autowired.");
}
}<?xml version="1.0" encoding="UTF-8"?>
<beans xmlns="http://www.springframework.org/schema/beans"
xmlns:xsi="http://www.w3.org/2001/XMLSchema-instance"
xmlns:context="http://www.springframework.org/schema/context"
xsi:schemaLocation="http://www.springframework.org/schema/beans
http://www.springframework.org/schema/beans/spring-beans.xsd
http://www.springframework.org/schema/context
http://www.springframework.org/schema/context/spring-context.xsd" >
<context:component-scan base-package="com.csdn.beanannotation"></context:component-scan>
</beans>6.可以使用@Autowired注解那些众所周知的解析依赖性接口,比如:BeanFactory,ApplicationContext,Environment,ResourceLoader,ApplicationEventPublisher,andMessageSource。
7.可以通过添加注解给需要该类型的数组的字段或方法,以提供ApplicationContext中的所有特定类型的bean
8.可以用于装配Kev为String的Map
9.如果希望数组有序,可以让bean实现org.springframework.core.Ordered接口或使用的@Order注解。
10.@Autowired是由Spring BeanPostProcessor处理的,所以不能在自己的BeanPostProcessor或BeanFactoryPostProcessor类型应用这些注解,这些类型必须通过XML或者Spring的@Bean注解加载。
public interface BeanInterface {

}
@Order(2)
@Component
public class BeanImplOne implements BeanInterface {
}@Order(1)
@Component
public class BeanImplTwo implements BeanInterface {
}@Component
public class BeanInvoker {
@Autowired
private List<BeanInterface> list;
@Autowired
private Map<String, BeanInterface> map;
public void say() {
if (null != list && 0 != list.size()) {
System.out.println("list...");
for (BeanInterface bean : list) {
System.out.println(bean.getClass().getName());
}
} else {
System.out.println("List<BeanInterface> list is null !!!!!!!!!!");
}
System.out.println();
if (null != map && 0 != map.size()) {
System.out.println("map...");
for (Map.Entry<String, BeanInterface> entry : map.entrySet()) {
System.out.println(entry.getKey() + " " + entry.getValue().getClass().getName());
}
} else {
System.out.println("Map<String, BeanInterface> map is null !!!!!!!!!!");
}
}
}@RunWith(BlockJUnit4ClassRunner.class)
public class TestInjection extends UnitTestBase {
public TestInjection() {
super("classpath:spring-beanannotation.xml");
}
@Test
public void testMultiBean() {
BeanInvoker invoker = super.getBean("beanInvoker");
invoker.say();
}
}11.CustomAutowireConfigurer
——CustomAutowireConfigurer是BeanFactoryPostProcessor的子类,通过它可以注册自己的qualifier注解类型(即使没有使用Spring的@Qualifier注解)。

——该AutowireCandidateResolver决定自动装配的候选者:
①每个bean定义的autowire-candidate值
②任何<bean/>中的default-autowire-candidates
③@Qualifier注解及使用CustomAutowireConfigurer的自定义类型
七、@Qualifier
1.按类型自动装配可能多个bean实例的情况,可以使用Spring的@Qualifier注解缩小范围(或指定唯一),也可以用于指定单独的构造器参数或方法参数。
2.可用于注解集合类型变量。
3.如果通过名字进行注解注入,主要使用的不是@Autowired(即使在技术上能够通过@Qualifier指定bean的名字),替代方式是使用JSR-250@Resource注解,它是通过其独特的名称来定义来识别特定的目标(这是一个与所声明的类型是无关的匹配过程)。
4.因语义差异,集合或Map类型的bean无法通过@Autowired来注入,因为没有类型匹配到这样的bean,为这些bean使用@Resource注解,通过唯一名称引用集合或Map的bean。
5.@Autowired适用于fields,constructors,multi-argumentmethods这些允许在参数级别使用@Qualifier注解缩小范围的情况。
6.@Resource适用于成员变量、只有一个参数的setter方法,所以在目标是构造器或一个多参数方法时,最好的方式是使用qualifiers。
衔接上——
@Component
public class BeanInvoker {

	@Autowired
	private List<BeanInterface> list;

	@Autowired
	private Map<String, BeanInterface> map;

	@Autowired
	@Qualifier("beanImplTwo")
	private BeanInterface beanInterface;

	public void say() {
		if (null != list && 0 != list.size()) {
			System.out.println("list...");
			for (BeanInterface bean : list) {
				System.out.println(bean.getClass().getName());
			}
		} else {
			System.out.println("List<BeanInterface> list is null !!!!!!!!!!");
		}

		System.out.println();

		if (null != map && 0 != map.size()) {
			System.out.println("map...");
			for (Map.Entry<String, BeanInterface> entry : map.entrySet()) {
				System.out.println(entry.getKey() + "      " + entry.getValue().getClass().getName());
			}
		} else {
			System.out.println("Map<String, BeanInterface> map is null !!!!!!!!!!");
		}

		System.out.println();
		if (null != beanInterface) {
			System.out.println(beanInterface.getClass().getName());
		} else {
			System.out.println("beanInterface is null...");
		}


	}

}
八、@Resource
1.Spring还支持使用JSR-250@Resource注解的变量或setter方法,这是一种在Java EE 5和6的通用模式,Spring管理的对象也支持这种模式。
2.@Resource有一个name属性,并且默认Spring解释该值作为被注入bean的名称。
3.如果没有显式地指定@Resource的name,默认的名称是从属性名或者setter方法得出。
4.注解提供的名字被解析为一个bean的名称,这是由ApplicationContext的中的CommonAnnotationBeanPostProcessor发现并处理的。
5.PostConstruct、@PreDestroy
——CommonAnnotationBeanPostProcessor不仅能识别JSR-250中的生命周期注解@Resource,在Spring2.5中引入支持初始化回调和销毁回调,前提是CommonAnnotationBeanPostProcessor是Spring的ApplicationContext中注册的。
6.使用JSR330标准注解
——从Spring3.0开始支持JSR330标准注解(依赖注入注解),其扫描方式与Spring注解一致。
——使用JSR330需要依赖javax.inject包。
7.@Inject
——@Inject等效于@Autowired,可以使用于类、属性、方法、构造器。
8.@Named
——如果想使用特定名称进行依赖注入,使用@Named。
——@Named与@Component是等效的。
@Repository
public class JsrDAO {

	public void save() {
		System.out.println("JsrDAO invoked.");
	}

}
//@Service
@Named
public class JsrServie {
// @Resource
// @Inject
private JsrDAO jsrDAO;
// @Resource
@Inject
public void setJsrDAO(@Named("jsrDAO") JsrDAO jsrDAO) {
this.jsrDAO = jsrDAO;
}
@PostConstruct
public void init() {
System.out.println("JsrServie init.");
}
@PreDestroy
public void destroy() {
System.out.println("JsrServie destroy.");
}
public void save() {
jsrDAO.save();
}
}@RunWith(BlockJUnit4ClassRunner.class)
public class TestJsr extends UnitTestBase {
public TestJsr() {
super("classpath*:spring-beanannotation.xml");
}
@Test
public void testSave() {
JsrServie service = getBean("jsrServie");
service.save();
}
}九、基于Java的容器注解
1.@Bean标识一个用于配置和初始化一个由SpringIoC容器管理的新对象的方法,类似于XML配置文件的<bean/>。
2.可以在Spring的@Component注解的类中使用@Bean注解任何方法(仅仅是可以),通常使用的是@Configuration。
@Configuration
public class AppConfig{

    @Bean
    public MyService myService(){
        return new MyServiceImpl();
    }
}
<beans>
<bean id="myService" class="com.csdn.services.MyServiceImpl">
</beans>3.@ImportResource和@Value。
4.默认@Bean是单例的,使用@Scope修改。
5.基于泛型的自动装配。
public interface Store<T> {

}
public class IntegerStore implements Store<Integer> {
}public class StringStore implements Store<String> {
public void init() {
System.out.println("This is init.");
}
public void destroy() {
System.out.println("This is destroy.");
}
}public class MyDriverManager {
public MyDriverManager(String url, String userName, String password) {
System.out.println("url : " + url);
System.out.println("userName: " + userName);
System.out.println("password: " + password);
}
}@Configuration
@ImportResource("classpath:config.xml")
public class StoreConfig {
// @Value("${url}")
// private String url;
//
// @Value("${jdbc.username}") //username取到当前操作系统的用户名
// private String username;
//
// @Value("${password}")
// private String password;
//
// @Bean
// public MyDriverManager myDriverManager() {
// return new MyDriverManager(url, username, password);
// }
// @Bean(name = "stringStore", initMethod="init", destroyMethod="destroy")
// public Store stringStore() {
// return new StringStore();
// }
// @Bean(name = "stringStore")
// @Scope(value="prototype", proxyMode = ScopedProxyMode.TARGET_CLASS)
// public Store stringStore() {
// return new StringStore();
// }
@Autowired
private Store<String> s1;
@Autowired
private Store<Integer> s2;
@Bean
public StringStore stringStore() {
return new StringStore();
}
@Bean
public IntegerStore integerStore() {
return new IntegerStore();
}
// @Bean(name = "stringStoreTest")
// public Store stringStoreTest() {
// System.out.println("s1 : " + s1.getClass().getName());
// System.out.println("s2 : " + s2.getClass().getName());
// return new StringStore();
// }
}<?xml version="1.0" encoding="UTF-8"?>
<beans xmlns="http://www.springframework.org/schema/beans"
xmlns:xsi="http://www.w3.org/2001/XMLSchema-instance"
xmlns:context="http://www.springframework.org/schema/context"
xsi:schemaLocation="http://www.springframework.org/schema/beans
http://www.springframework.org/schema/beans/spring-beans.xsd
http://www.springframework.org/schema/context
http://www.springframework.org/schema/context/spring-context.xsd" >
<context:property-placeholder location="classpath:/config.properties"/>
</beans>@RunWith(BlockJUnit4ClassRunner.class)
public class TestJavabased extends UnitTestBase {
public TestJavabased() {
super("classpath*:spring-beanannotation.xml");
}
@Test
public void test() {
Store store = super.getBean("stringStore");
System.out.println(store.getClass().getName());
}
@Test
public void testMyDriverManager() {
MyDriverManager manager = super.getBean("myDriverManager");
System.out.println(manager.getClass().getName());
}
@Test
public void testScope() {
Store store = super.getBean("stringStore");
System.out.println(store.hashCode());
store = super.getBean("stringStore");
System.out.println(store.hashCode());
}
@Test
public void testG() {
StringStore store = super.getBean("stringStoreTest");
}
}


 220
220

 被折叠的 条评论
为什么被折叠?
被折叠的 条评论
为什么被折叠?
 到【灌水乐园】发言


