


What is VNCserver?
VNC stands for Virtual Network Computing. It was originally developed by AT&T as a way to administer machines without using the console. If you have used Windows Terminal Services (RDP), VNC will seem very familiar.Why use VNCserver?
In Linux, everything can be done from a shell. However, there may be a time when you need to access the machine as if you were at the console.Getting Started
You will need several things to get started:- root privledges
- VNC client software (tightVNC, you can download it here.)
- A good password!
[root@roswell etc]# service vncserver start
Starting VNC server:                                       [  OK  ]
[root@roswell etc]#
[root@roswell etc]# vncpasswd
Password:
Verify:
[root@roswell etc]#
[root@roswell etc]# vncserver

New 'roswell:1 (root)' desktop is roswell:1

Starting applications specified in /root/.vnc/xstartup
Log file is /root/.vnc/roswell:1.log

[root@roswell etc]#
So what did we do there? First, we started the vncserver service. It may or may not have already been running on your system. Next we set a password to access the VNC desktop. When you set the password, you will not see any characters on the screen, and you must enter the password twice. You will only need to do this the very first time you run vncserver. The password will be saved in the Linux filesystem, and you can change it at any time by invoking the vncpasswd command again. Last, to activate the VNC desktop, we simply invoked the vncserver command. Notice the output; the desktop is named "roswell:1" which can also be replaced via the machines IP address.
Connecting
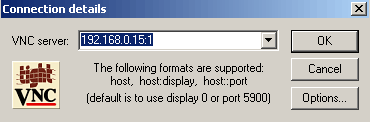
Assuming you already installed TightVNC or another VNC client, enter the desktop name: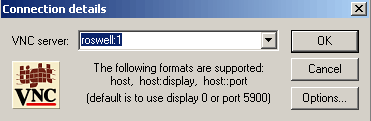
You can replace the server name with an IP address if you are logging in from outside your LAN. Remember, if you are using NAT port 5900 must be forwarded to your VNCserver.
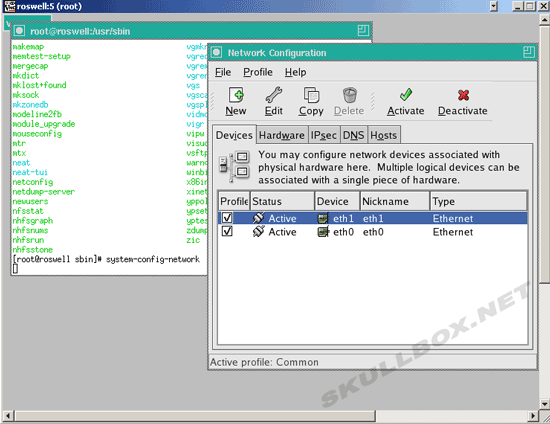
Upon successful connection, you will be prompted for a password. You will then see a terminal screen that will allow you to execute commands:
VNCserver in Runlevel 5 (KDE or Gnome)
If you are new to linux, running VNC server with a terminal isn't going to do you much good. You might want to have a menu-driven GUI like Windows. No problem. Follow these steps:First, we are going to assume that VNCserver is running under the root user, as shown with the example above. For this example, I will be editing my VNCserver to enter Gnome. You can specify a KDE desktop if you have KDE installed on your server. Make sure you are in the root directory.
[root@roswell ~]# ls -a
.                                   cacti-0.8.6c.tar.gz  .gnome2_private     .lftp                  queue.dat          temp
..                                  client.cfg           .gnupg              machinedependent.dat  .recently-used      Templates
.config                             FAHlog-Prev.txt      .gstreamer-0.8      .metacity             .rhn-applet.cache  .themes
.cshrc                              FAHlog.txt           .gtkrc              .mozilla              .rhn-applet.conf   .thumbnails
.bash_history                       Desktop              .fonts.cache-1      .gtkrc-1.2-gnome2     .rnd               .Trash
.bash_logout                        .dmrc                .gconf              .ICEauthority         .mysql_history      scripts
.bash_profile                       .eggcups             .gconfd             .icons                .nautilus          .sh_history
.viminfo                            .bashrc              .bashdevl           .esd_auth             .gnome              php-4.11
.ssh                                .vnc                  cacti-0.8.6c       .gnome2                install.log
[root@roswell ~]# cd .vnc
[root@roswell .vnc]# ls
passwd         roswell:1.pid  roswell:2.pid  roswell:3.pid  roswell:4.pid  roswell:5.pid             roswell.area51.lan:1.pid
roswell:1.log  roswell:2.log  roswell:3.log  roswell:4.log  roswell:5.log  roswell.area51.lan:1.log  roswell.area51.lan:2.log
xstartup
[root@roswell .vnc]# vi xstartup
Using vi (vim) to edit the xstartup file, make sure your file matches this one:
#!/bin/sh

# Uncomment the following two lines for normal desktop:
 unset SESSION_MANAGER
 exec /etc/X11/xinit/xinitrc

[ -x /etc/vnc/xstartup ] && exec /etc/vnc/xstartup
[ -r $HOME/.Xresources ] && xrdb $HOME/.Xresources
xsetroot -solid grey
vncconfig -iconic &
xterm -geometry 80x24+10+10 -ls -title "$VNCDESKTOP Desktop" &
startx &
Notice that the last line is "startx &" as this command will launch Gnome upon login via VNCserver. If you are using a KDE desktop, the line "startkde &" should replace the last line.
VNC相关命令:vncconfig <wbr>vncpasswd <wbr>vncserver<wbr>vncviewer<br><br><span>1.检查vnc客户端(tscleint/vncviewer)和服务器是否已经安装在你的系统中</span><br><span># rpm -qa|grep vnc</span><br><span>vnc-4.1.2-14.el5_3.1</span><br><span>vnc-server-4.1.2-14.el5_3.1</span><br><span>如果没有安装vncviewer,那么运行:</span><br><span># yum install vnc</span><br><span>客户端我们也可以使用tscleint。</span><br><br><span>2.配置vncserver</span><br><span>vim /etc/sysconfig/vncservers</span><br><span>增加:VNCSERVERS="1:root"</span><br><br><span>3.vncpasswd创建一个vnc的口令</span><br><span>注意这将同时在你的home目录下,创建一个隐藏的目录.vnc,其中有一个文件passwd保存着你的vnc口令.</span><br><br><span>4. #service vncserver start</span><br><br><span>5. # vncserver</span> (第一次启动时,需要指定一个密码)<br><span>You will require a password to access your desktops.</span><br><span>Password:</span><br><span>Verify:</span><br><span>New 'lpi:1 (root)' desktop is lpi:1</span><br><span>Creating default startup script /root/.vnc/xstartup</span><br><span>Starting applications specified in /root/.vnc/xstartup</span><br><span>Log file is /root/.vnc/lpi:1.log</span><br><br><span>可以以多个用户身份,启动多个VNC,共享多个用户的桌面:</span><br><span># lsof -i:{5901,5904}</span><br><span>COMMAND <wbr>PID USER <wbr><wbr>FD <wbr><wbr>TYPE DEVICE SIZE NODE NAME</wbr></wbr></wbr></wbr></wbr></span><br><span>Xvnc <wbr><wbr><wbr>2373 root <wbr><wbr><wbr>4u <wbr>IPv4 <wbr><wbr>6975 <wbr><wbr><wbr><wbr><wbr><wbr>TCP *:5901 (LISTEN)</wbr></wbr></wbr></wbr></wbr></wbr></wbr></wbr></wbr></wbr></wbr></wbr></wbr></wbr></wbr></span><br><span>Xvnc <wbr><wbr><wbr>4236 test <wbr><wbr><wbr>4u <wbr>IPv4 <wbr>16231 <wbr><wbr><wbr><wbr><wbr><wbr>TCP *:5904 (LISTEN)</wbr></wbr></wbr></wbr></wbr></wbr></wbr></wbr></wbr></wbr></wbr></wbr></wbr></wbr></span><br><br><span>可以手工指定display#,例如:</span><br><span># vncserver :99</span><br><span>New 'lpi.123.com:99 (root)' desktop is server01.123.com:99</span><br><span>Starting applications specified in /root/.vnc/xstartup</span><br><span>Log file is /root/.vnc/server01.123.com:99.log</span><br><br><span>6.停止 vncserver(vncserver -kill :display#): <wbr></wbr></span><br><span># vncserver -kill :1</span><br><span>Killing Xvnc process ID 2373</span><br><br><span>7.设置自动运行:ntsysv</span><br><br><span>8.VNC给浏览器的端口是5800+N,给vncviewer的端口是5900+N,N是设置的display号</span><br><span>http://192.168.1.1:5801/</span><br><span>ultravnc:192.168.1.1:5901</span><br><span># lsof -i:5801,5901</span><br><span>COMMAND <wbr><wbr>PID USER <wbr><wbr>FD <wbr><wbr>TYPE DEVICE SIZE NODE NAME</wbr></wbr></wbr></wbr></wbr></wbr></span><br><span>Xvnc <wbr><wbr><wbr>31742 root <wbr><wbr><wbr>4u <wbr>IPv4 <wbr>51969 <wbr><wbr><wbr><wbr><wbr><wbr>TCP *:5901 (LISTEN)</wbr></wbr></wbr></wbr></wbr></wbr></wbr></wbr></wbr></wbr></wbr></wbr></wbr></wbr></span><br><span>Xvnc <wbr><wbr><wbr>31742 root <wbr><wbr><wbr>5u <wbr>IPv4 <wbr>51970 <wbr><wbr><wbr><wbr><wbr><wbr>TCP *:5801 (LISTEN)</wbr></wbr></wbr></wbr></wbr></wbr></wbr></wbr></wbr></wbr></wbr></wbr></wbr></wbr></span><br><br><span>9.修改VNC密码</span><br><span># vncpasswd /root/.vnc/passwd</span><br><span>Password:</span><br><span>Verify:</span><br><br><span>VNC日志文件位于:$HOME/.vnc下的log文件,此目录也包含了一个VNC的xstartup启动文件。</span><br><br><span style="font-weight:bold">以GNOME方式显示,修改xstartup文件</span><br><span style="color:#033cc">#!/bin/sh</span><br style="color:rgb(0,51,204)"><br style="color:rgb(0,51,204)"><span style="color:#033cc"># Uncomment the following two lines for normal desktop:</span><br style="color:rgb(0,51,204)"><span style="color:#033cc">unset SESSION_MANAGER</span><br style="color:rgb(0,51,204)"><span style="color:#033cc">exec /etc/X11/xinit/xinitrc</span><br style="color:rgb(0,51,204)"><br style="color:rgb(0,51,204)"><span style="color:#033cc">[ -x /etc/vnc/xstartup ] && exec /etc/vnc/xstartup</span><br style="color:rgb(0,51,204)"><span style="color:#033cc">[ -r $HOME/.Xresources ] && xrdb $HOME/.Xresources</span><br style="color:rgb(0,51,204)"><span style="color:#033cc">xsetroot -solid grey</span><br style="color:rgb(0,51,204)"><span style="color:#033cc">vncconfig -iconic &</span><br style="color:rgb(0,51,204)"><span style="color:#033cc">xterm -geometry 80x24+10+10 -ls -title "$VNCDESKTOP Desktop" &</span><br style="color:rgb(0,51,204)"><span style="color:#033cc">gnome-session &</span><br><span># tsclient</span><br><span>出现错误:unable to connect to host: Connection refused (111)</span><br><span>一般是没有指定连接的display#,例如地址输入:192.168.1.1出错,192.168.1.1:1就正确了<br> VNCserver auto run<br></span><span style="background-color:#ffff00"><span>启动vncserver服务时,出现no displays configured :此错误,请编辑vncservers文件</span><br><span>#vim /etc/sysconfig/vncservers</span><br><span style="color:#033cc"># The VNCSERVERS variable is a list of display:user pairs.</span><br style="color:rgb(0,51,204)"><span style="color:#033cc">#</span><br style="color:rgb(0,51,204)"><span style="color:#033cc"># Uncomment the lines below to start a VNC server on display :2</span><br style="color:rgb(0,51,204)"><span style="color:#033cc"># as my 'myusername' (adjust this to your own). <wbr>You will also</wbr></span><br style="color:rgb(0,51,204)"><span style="color:#033cc"># need to set a VNC password; run 'man vncpasswd' to see how</span><br style="color:rgb(0,51,204)"><span style="color:#033cc"># to do that. <wbr></wbr></span><br style="color:rgb(0,51,204)"><span style="color:#033cc">#</span><br style="color:rgb(0,51,204)"><span style="color:#033cc"># DO NOT RUN THIS SERVICE if your local area network is</span><br style="color:rgb(0,51,204)"><span style="color:#033cc"># untrusted! <wbr>For a secure way of using VNC, see</wbr></span><br style="color:rgb(0,51,204)"><span style="color:#033cc"># <URL:http://www.uk.research.att.com/archive/vnc/sshvnc.html>.</span><br style="color:rgb(0,51,204)"><br style="color:rgb(0,51,204)"><span style="color:#033cc"># Use "-nolisten tcp" to prevent X connections to your VNC server via TCP.</span><br style="color:rgb(0,51,204)"><br style="color:rgb(0,51,204)"><span style="color:#033cc"># Use "-nohttpd" to prevent web-based VNC clients connecting.</span><br style="color:rgb(0,51,204)"><br style="color:rgb(0,51,204)"><span style="color:#033cc"># Use "-localhost" to prevent remote VNC clients connecting except when</span><br style="color:rgb(0,51,204)"><span style="color:#033cc"># doing so through a secure tunnel. <wbr>See the "-via" option in the</wbr></span><br style="color:rgb(0,51,204)"><span style="color:#033cc"># `man vncviewer' manual page.</span><br style="color:rgb(0,51,204)"><br style="color:rgb(0,51,204)"><span style="color:#033cc">VNCSERVERS="1:root"</span><br style="color:rgb(0,51,204)"><span style="color:#033cc">VNCSERVERARGS[2]="-geometry 800x600 -nolisten tcp -nohttpd -localhost"</span></span></wbr></wbr></wbr>


 1万+
1万+

 被折叠的 条评论
为什么被折叠?
被折叠的 条评论
为什么被折叠?
 到【灌水乐园】发言


