


在数据库中,表和表之间的关系有:一对一,一对多和多对多。
通过Hibernate,我们可以把实体对象直接映射到数据库中,完成建表。
今天我要总结的是在Hibernate 中实现一对一映射关系,其中一对一分为外键关联和主键关联。
一、外键关联
1.先创建 2个实体类
public class Student {
    private Integer id;
    private String stuname;
    private int password;
    private Date birthday;
    private Phone phone;

    public Student() {
    }

    public Student(String stuname, int password, Date birthday) {
        this.stuname = stuname;
        this.password = password;
        this.birthday = birthday;
    }

    public Phone getPhone() {
        return phone;
    }

    public void setPhone(Phone phone) {
        this.phone = phone;
    }

    public Integer getId() {
        return id;
    }

    public void setId(Integer id) {
        this.id = id;
    }

    public String getStuname() {
        return stuname;
    }

    public void setStuname(String stuname) {
        this.stuname = stuname;
    }

    public int getPassword() {
        return password;
    }

    public void setPassword(int password) {
        this.password = password;
    }

    public Date getBirthday() {
        return birthday;
    }

    public void setBirthday(Date birthday) {
        this.birthday = birthday;
    }

    @Override
    public String toString() {
        return "Student [id=" + id + ", stuName=" + stuname + ", password=" + password + ", birthday=" + birthday + "]";
    }

}
public class Phone {
private Integer id;
private String telephone;
private String homephone;
private Student stu;
public Student getStu() {
return stu;
}
public void setStu(Student stu) {
this.stu = stu;
}
public Phone() {
}
public Phone(String telephone, String homephone) {
super();
this.telephone = telephone;
this.homephone = homephone;
}
public Integer getId() {
return id;
}
public void setId(Integer id) {
this.id = id;
}
public String getTelephone() {
return telephone;
}
public void setTelephone(String telephone) {
this.telephone = telephone;
}
public String getHomephone() {
return homephone;
}
public void setHomephone(String homephone) {
this.homephone = homephone;
}
@Override
public String toString() {
return "Phone [id=" + id + ", telephone=" + telephone + ", homephone=" + homephone + "]";
}
}
我们要做的就是让student和phone表形成一对一的关系。
2.hibernate.cfg.xml文件配置
cfg文件用来配置连接数据库相关属性
<!DOCTYPE hibernate-configuration PUBLIC
    "-//Hibernate/Hibernate Configuration DTD 3.0//EN"
    "http://www.hibernate.org/dtd/hibernate-configuration-3.0.dtd">

<hibernate-configuration>
    <session-factory>
<!-- 指定方言,更好的操作数据库,因为数据库都有一些区别,通过方言的设置可以对应使用目标数据库的特点支持事务的MySQL5InnoDBDialect用于5.5之后。 -->
        <property name="hibernate.dialect">org.hibernate.dialect.MySQL5InnoDBDialect</property>

        <property name="hibernate.connection.driver_class">com.mysql.jdbc.Driver</property>
        <property name="hibernate.connection.url">jdbc:mysql:///hiber</property>
        <property name="hibernate.connection.username">root</property>
        <property name="hibernate.connection.password">root</property>
        <!--
            数据库自动创建表操作
            #hibernate.hbm2ddl.auto create-drop 程序启动时创建数据库表,程序退出时删除之前创建的
            #hibernate.hbm2ddl.auto create      程序启动时删除上一次创建的表,然后再创建新的表结果
            #hibernate.hbm2ddl.auto update      程序启动时如果没有表就创建表,有就检查有没有更新(推荐)
            #hibernate.hbm2ddl.auto validate    程序启动是检查表结构,不会创建
         -->
        <property name="hibernate.hbm2ddl.auto">update</property>
        <!-- 显示执行的sql语句 -->
        <property name="show_sql">true</property>
        <!-- 格式化显示执行的sql语句 -->
        <property name="hibernate.format_sql">false</property>
        <!-- 引入需要持久化的映射文件配置文件 -->
        <mapping resource="entity/Student.hbm.xml"/>
        <!-- <mapping resource="entity/Phone.hbm.xml"/> -->
    </session-factory>
</hibernate-configuration>
3.只配置student.hbm.xml映射文件
在这里我把phone和student的映射整合在一起,即把phone的映射配置写在student.hbm.xml中,所以只需要一个xml。(此xml文件放在实体类所在包中)
<?xml version="1.0"?>
<!DOCTYPE hibernate-mapping PUBLIC
    "-//Hibernate/Hibernate Mapping DTD 3.0//EN"
    "http://www.hibernate.org/dtd/hibernate-mapping-3.0.dtd">

<hibernate-mapping package="entity" >
    <class name="Student" >
        <id name="id" >
            <generator class="native"></generator>
        </id>
        <property name="stuname" ></property>
        <property name="password" ></property>
        <property name="birthday" ></property>

        <!-- 级联操作 student和phone关联-->
        <one-to-one name="phone" cascade="all" />
    </class>
    <!--配置phone的映射-->
    <class name="Phone" >
        <id name="id" >
            <generator class="native"></generator>
        </id>
        <property name="telephone" ></property>
        <property name="homephone" ></property>
        <!--many代表外键关联-->
        <many-to-one name="stu" column="stu_id" unique="true" not-null="true"></many-to-one>
    </class>
</hibernate-mapping>
4 . 测试类
public class TestHiber {
    SessionFactory factory = null;
    Session session = null;

    @Before
    public void setUp() throws Exception {
        Configuration config = new Configuration().configure();
        ServiceRegistry sr = new ServiceRegistryBuilder().applySettings(config.getProperties()).buildServiceRegistry();
        factory = config.buildSessionFactory(sr);
        session = factory.openSession();
    }

    @After
    public void tearDown() throws Exception {
        if(session != null){
            if(session.isOpen()){
                session.close();
            }
        }
    }

    /*
     * 新增
     */
    @Test
    public void testsave1() {
        Transaction tx = session.beginTransaction();

        Student stu = new Student("zhangsan", 123456, new Date());
        Phone p = new Phone("110", "119");

        stu.setPhone(p);
        p.setStu(stu);

        session.save(stu);
        session.save(p);

        tx.commit();
        }
进入mysql可以看到2张表已经建好,如图:
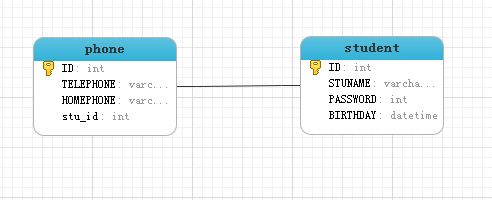
stu-id是phone的外键,关联student
- -
二、主键关联
只需修改student.hbm.xml配置即可
<hibernate-mapping  >
    <class name="entity.Student" >
        <id name="id" >
            <generator class="native"></generator>
        </id>
        <property name="stuname" ></property>
        <property name="password" ></property>
        <property name="birthday" ></property>

        <!-- 级联操作 -->
        <one-to-one name="phone" cascade="all"></one-to-one>
    </class>

    <class name="entity.Phone"  >
        <id name="id" >
            <!-- 从表的id不由自己生成,而且必须和主表保持一致 -->
            <generator class="foreign">
                <!-- 指定从表的id来源 ,值为phone中指定的属性名-->
                <param name="property">stu</param>
            </generator>
        </id>
        <property name="telephone" ></property>
        <property name="homephone" ></property>
        <!-- 设置约束管理 -->
        <one-to-one name="stu" constrained="true"></one-to-one>
    </class>
</hibernate-mapping>
进入mysql 效果如图
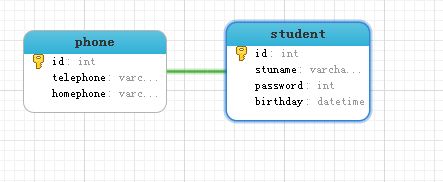
采用主键关联的方法就没用外键关联的stu-id了。


 672
672

 被折叠的 条评论
为什么被折叠?
被折叠的 条评论
为什么被折叠?
 到【灌水乐园】发言


