


前言
本文介绍Android实现全局设置自定义字体和局部设置自定义字体即单个TextView设置字体,同时也提供了一些优秀的三方字体框架,基本可以满足开发者对字体设置的全部要求。
使用自定义字体前后效果图 
一、assets是什么?
首先需要了解Android之assets 简而言之,你的图片、svg文件放在工程的res/drawabe下,则设置字体用到的字体文件则位于assets下面。 如何创建assets目录、点击进入
二、APP全局字体
2.1.引入库
代码如下(示例):
//用以设置App全局字体
implementation 'uk.co.chrisjenx:calligraphy:2.2.0'
2.2.在Application中初始化calligraphy
代码如下(示例):
public class MyApplication extends Application {
@Override
public void onCreate() {
super.onCreate();
instance = this;
//app字体
CalligraphyConfig.initDefault(
new CalligraphyConfig.Builder()
.setDefaultFontPath("fonts/OpenSans-Regular.ttf")
.setFontAttrId(R.attr.fontPath)
.build()
);
}
public static LightMeterApplication getInstance() {
return instance;
}
}
在AndroidManifest.xml配置自定义MyApplication以替代默认Application
    <application
        android:name=".MyApplication"
        android:allowBackup="false"
        android:hardwareAccelerated="true"
        android:icon="@drawable/ic_launcher"
        android:label="@string/app_name"
        android:theme="@style/AppTheme">
下面是我的字体目录

下载字体,点击进入提取码:2555 你也可以导入Windows自带字体, 字体路径:C:\Windows\Fonts 我的Win10自带263种字体文件,下面是字体文件截图

2.3.让指定的Activity配置自定义字体
重写attachBaseContext
2.3.1 Java设置
    //不重写的Activity还是安卓默认字体
    @Override
    protected void attachBaseContext(Context newBase) {
        super.attachBaseContext(CalligraphyContextWrapper.wrap(newBase));
    }
2.3.2 kotlin设置
override fun attachBaseContext(newBase: Context) {
    super.attachBaseContext(CalligraphyContextWrapper.wrap(newBase))
}
2.4 Android Q 以及 Android X 开发环境报错
如果你的项目升级了AndroidX环境以及 android Q 上调试时则会报以下错误
E/AndroidRuntime: FATAL EXCEPTION: main
    Process: com.bigcat.edulearnaid, PID: 21204
    java.lang.RuntimeException: Unable to start activity ComponentInfo{com.bigcat.edulearnaid/com.bigcat.edulearnaid.ui.StartActivity}: android.view.InflateException: Binary XML file line #17 in com.bigcat.edulearnaid:layout/abc_screen_simple: Binary XML file line #17 in com.bigcat.edulearnaid:layout/abc_screen_simple: Error inflating class androidx.appcompat.widget.FitWindowsLinearLayout
        at android.app.ActivityThread.performLaunchActivity(ActivityThread.java:3895)
解决方法:
在项目build.gradle中添加如下依赖替代 uk.co.chrisjenx:calligraphy:2.2.0
implementation 'io.github.inflationx:calligraphy3:3.1.1'
implementation 'io.github.inflationx:viewpump:2.0.3'
Application的onCreate()中初始化:
2.4.1 java设置
ViewPump.init(ViewPump.builder()
            .addInterceptor(new CalligraphyInterceptor(
                new CalligraphyConfig.Builder()
                    .setDefaultFontPath("你的字体")
                    .setFontAttrId(R.attr.fontPath)
                    .build()))
                .build());
2.4.2 Kotlin设置
ViewPump.init(
    ViewPump.builder()
        .addInterceptor(
            CalligraphyInterceptor(
                CalligraphyConfig.Builder()
                    .setDefaultFontPath("你的字体")
                    .setFontAttrId(R.attr.fontPath)
                    .build()
            )
        )
        .build()
)
@Override
protected void attachBaseContext(Context newBase) {
    super.attachBaseContext(ViewPumpContextWrapper.wrap(newBase));
}
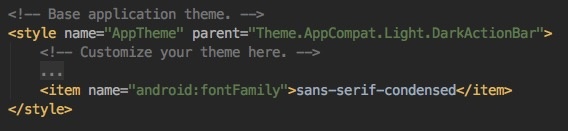
2.5 利用主题修改全局字体
在 application 中,通过 android:theme 来配置一个 App 的主题。一般新创建的项目,都是 @style/AppTheme 。在其中追加关于字体的属性 android:fontFamily,它就可以完成对全局设置一个系统字体。
三、单个TextView设置字体
和设置全局字体不同的是无需配置Application,无需引入依赖库calligraphy,仍需配置字体路径,使用下面的方法完成字体设置
3.1 使用Typeface + .ttf实现
3.1.1 java
protected Typeface tfRegular;//定义字体
{
    tfRegular = Typeface.createFromAsset(getActivity().getAssets(), "fonts/OpenSans-Regular.ttf");//初始化字体
    textView.setTypeface(tfRegular);
}
3.1.2 kotlin
protected var tfRegular: Typeface? = null // 定义字体 get() = field ?: Typeface.createFromAsset(requireActivity().assets, "fonts/OpenSans-Regular.ttf") // 初始化字体 textView.typeface = tfRegular // 设置字体
3.2 使用SDK自带字体
noraml (普通字体,系统默认使用的字体) sans(非衬线字体) serif (衬线字体) monospace(等宽字体)
3.2.1 通过xml实现
<TextView
    android:layout_width="match_parent"
    android:layout_height="wrap_content"
    android:text="580.6Ix"
    android:gravity="center"
    android:textStyle="bold"
    android:textSize="20sp"
    android:typeface="serif"
    android:textColor="@color/white"/>
    <!--  android:textStyle="bold"字体加粗   -->
    <!--  android:letterSpacing="0.2" 字体增加间距   -->
    <!--  android:typeface="serif" 设置SDK自带字体   -->
3.2.2 通过Java逻辑代码实现
    vSansText = (TextView) findViewById(R.id.sans);
    vSerifText = (TextView) findViewById(R.id.serif);
    vMonospaceText = (TextView) findViewById(R.id.monospace);

    //设置字体样式
    vSansText.setTypeface(Typeface.SANS_SERIF);
    vSerifText.setTypeface(Typeface.SERIF);
    vMonospaceText.setTypeface(Typeface.MONOSPACE);
3.2.3 通过kotlin逻辑代码实现
vSansText = findViewById(R.id.sans) vSerifText = findViewById(R.id.serif) vMonospaceText = findViewById(R.id.monospace) // 设置字体样式 vSansText.typeface = Typeface.SANS_SERIF vSerifText.typeface = Typeface.SERIF vMonospaceText.typeface = Typeface.MONOSPACE
3.3 使用RoBoto在xml设置字体
通过xml实现自定义设置字体的还包括RoBoto,Android4.0后默认字体就使用了Roboto,想要了解更多关于 Robote 的内容,可以去 Google 的网站上查看。下面介绍一下使用方法:
3.3.1 xml中使用 android:fontFamily
android:fontFamily="sans-serif" // roboto regular
android:fontFamily="sans-serif-light" // roboto light
android:fontFamily="sans-serif-condensed" // roboto condensed
android:fontFamily="sans-serif-thin" // roboto thin (android 4.2)
//in combination with
android:textStyle="normal|bold|italic"
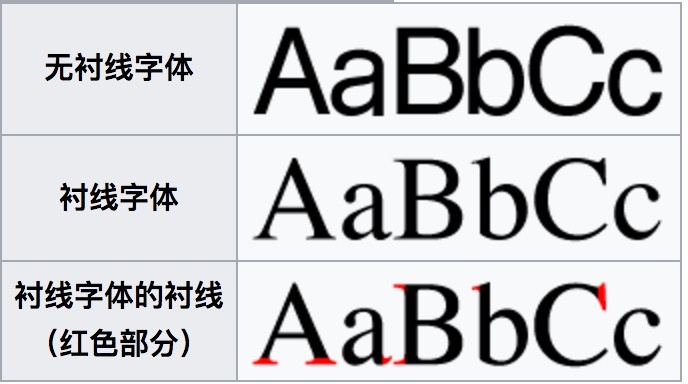
normal 和 sans 的字体其实是一样的,serif 是一个带衬线的字体,而 nonospace 是等宽字体。
serif 在默认的字体上,增加了衬线。而 nonospace 限制了每个字符的宽度,让它们达到一个等宽的效果。
3.3.2 fontFamily参数属性
| 字体 | 属性特征 |
|---|---|
| Regular | 标准字体 |
| Italic | 字体倾斜 |
| Bold | 字体加粗 |
| Bold-italic | 加粗和倾斜 |
| Light | 无衬线体字体 |
| Light-italic | 无衬线斜体 |
| Thin | 细体 |
| Thin-italic | 细斜体 |
| Condensed regular | 用于文本装潢、信息展示、网页设计、篆刻制模[cr] |
| Condensed italic | 斜体版cr |
| Condensed bold | 粗体版cr |
| Condensed bold-italic | 粗斜体版cr |
3.3.3 fontFamily加载font资源包下的字体
1.将下载好的字体放到如下文件中
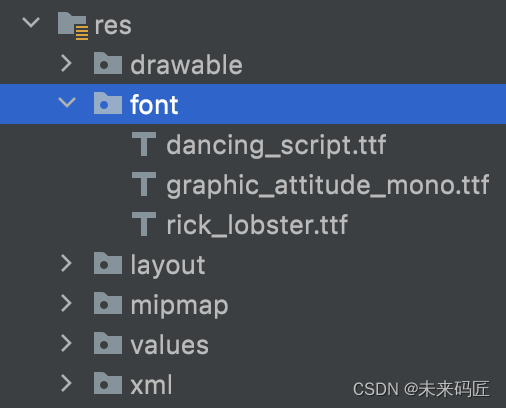
2.在xml中引用
<TextView
    android:layout_width="match_parent"
    android:layout_height="wrap_content"
    android:fontFamily="@font/anyeguihuapiaoxiang"
    android:text="设置单个TextView的字体-通过font资源文件" />
需要注意的是,如果同时配置了 typeface 和 fontFamily ,将使用 fontFamily 配置的字体。
3.4 textStyle
textStyle 主要用于设定一些字体的样式,它是对所有的字体都生效的。也就是说哪怕你替换了字体,依然可以使用 textStyle 来修饰它的样式。textStyle 本身支持的可选项有 normal|bold|italic,它们也非常的好理解,就是普通|粗体|斜体。
3.4.1 xml中使用
<TextView
    android:layout_width="match_parent"
    android:layout_height="wrap_content"
    android:text="设置单个TextView的字体-textStyle"
    android:textStyle="bold|italic" />
3.5 Andorid 8.0+ 在资源中定义使用字体
1.右键单击res文件夹,然后转到“新建”>“Android资源目录”。此时会出现“新建资源目录”窗口。
2.在“资源类型”列表中,选择字体,然后单击“确定”。
3.将字体文件添加到字体文件夹中。
4.双击字体文件可以在编辑器中预览文件的字体。
这四步就是创建一个font资源文件,把下载好的字体放到文件中
3.5.1 创建字体
1.右键单击字体文件夹,然后转到“New”>“Font resource文件”。此时将显示“新建资源文件”窗口。
2.输入文件名,然后单击“确定”。新的字体资源XML将在编辑器中打开。
3.将每个字体文件、样式和权重属性封装在<font>元素中。以下XML说明了在字体资源XML中添加与字体相关的属性:
<?xml version="1.0" encoding="utf-8"?>
<font-family xmlns:android="http://schemas.android.com/apk/res/android">
    <font
        android:fontStyle="normal"
        android:fontWeight="400"
        android:font="@font/lobster_regular" />
    <font
        android:fontStyle="italic"
        android:fontWeight="400"
        android:font="@font/lobster_italic" />
</font-family>
3.5.2 在TextView中使用
在布局XML文件中,将fontFamily属性设置为要访问的字体文件。
    <TextView
        android:layout_width="wrap_content"
        android:layout_height="wrap_content"
        android:fontFamily="@font/lobster"/>
3.5.3 动态调用
Typeface typeface = ResourcesCompat.getFont(context, R.font.lobster);
四、优秀的个性化字体功能框架
4.1 通过Spannables设置文本样式
BabushkaText ★659 -
4.2 使关键词带有可点击的下划线TextView
UnderLineLinkTextView ★327 -
4.3 用手势缩放字体大小
PinchZoomTextView ★272 -
4.4 用颜色标记一些短语
ColorTextView ★214 -


 1547
1547


 被折叠的 条评论
为什么被折叠?
被折叠的 条评论
为什么被折叠?
 到【灌水乐园】发言


