


https://github.com/tinyproxy/tinyproxy
Tinyproxy is a light-weight HTTP/HTTPS proxy daemon for POSIX operating systems. Designed from the ground up to be fast and yet small, it is an ideal solution for use cases such as embedded deployments where a full featured HTTP proxy is required, but the system resources for a larger proxy are unavailable.
Tinyproxy是为POSIX操作系统的设计的一个轻量级HTTP/HTTPS代理服务器(守护进程)。它的设计初衷是快速而小巧,它为需要功能齐全的HTTP代理但不能提供较大代理资源的嵌入式系统提供了一个好的解决方案。
一、安装
Huawei Cloud Ubuntu 20.04:
sudo apt install tinyproxy
二、配置更新
tinyproxy安装完成了,可以在系统中找到三个文件:
- /lib/systemd/system/tinyproxy.service
- /etc/default/tinyproxy
- /etc/tinyproxy/tinyproxy.conf
根据测试验证,这些配置文件需要根据实际运行环境做必要调整。
/lib/systemd/system/tinyproxy.service
[Unit]
Description=Tinyproxy lightweight HTTP Proxy
After=network.target
Documentation=man:tinyproxy(8) man:tinyproxy.conf(5)

[Service]
PassEnvironment=-/etc/default/tinyproxy
Type=forking
ExecStart=/usr/bin/tinyproxy $FLAGS
PIDFile=/run/tinyproxy/tinyproxy.pid
PrivateDevices=yes
User=root

[Install]
WantedBy=multi-user.target
/etc/default/tinyproxy
### tinyproxy defaults

# Edit to configure alternate config file...
#
# If running under systemd, please make sure to uncomment
# both variables below!

CONFIG="/etc/tinyproxy/tinyproxy.conf"
FLAGS="-c $CONFIG"

# Add more command line options, as desired...

#FLAGS="$FLAGS ..."
** /etc/tinyproxy/tinyproxy.conf**
##
## tinyproxy.conf -- tinyproxy daemon configuration file
##
## This example tinyproxy.conf file contains example settings
## with explanations in comments. For decriptions of all
## parameters, see the tinproxy.conf(5) manual page.
##

#
# User/Group: This allows you to set the user and group that will be
# used for tinyproxy after the initial binding to the port has been done
# as the root user. Either the user or group name or the UID or GID
# number may be used.
#
User root
Group root

#
# Port: Specify the port which tinyproxy will listen on.  Please note
# that should you choose to run on a port lower than 1024 you will need
# to start tinyproxy using root.
#
Port 8888

#
# Listen: If you have multiple interfaces this allows you to bind to
# only one. If this is commented out, tinyproxy will bind to all
# interfaces present.
#
#Listen 192.168.0.1

#
# Bind: This allows you to specify which interface will be used for
# outgoing connections.  This is useful for multi-home'd machines where
# you want all traffic to appear outgoing from one particular interface.
#
#Bind 192.168.0.1

#
# BindSame: If enabled, tinyproxy will bind the outgoing connection to the
# ip address of the incoming connection.
#
#BindSame yes

#
# Timeout: The maximum number of seconds of inactivity a connection is
# allowed to have before it is closed by tinyproxy.
#
Timeout 600

#
# ErrorFile: Defines the HTML file to send when a given HTTP error
# occurs.  You will probably need to customize the location to your
# particular install.  The usual locations to check are:
#   /usr/local/share/tinyproxy
#   /usr/share/tinyproxy
#   /etc/tinyproxy
#
#ErrorFile 404 "/usr/share/tinyproxy/404.html"
#ErrorFile 400 "/usr/share/tinyproxy/400.html"
#ErrorFile 503 "/usr/share/tinyproxy/503.html"
#ErrorFile 403 "/usr/share/tinyproxy/403.html"
#ErrorFile 408 "/usr/share/tinyproxy/408.html"

#
# DefaultErrorFile: The HTML file that gets sent if there is no
# HTML file defined with an ErrorFile keyword for the HTTP error
# that has occured.
#
DefaultErrorFile "/usr/share/tinyproxy/default.html"

#
# StatHost: This configures the host name or IP address that is treated
# as the stat host: Whenever a request for this host is received,
# Tinyproxy will return an internal statistics page instead of
# forwarding the request to that host.  The default value of StatHost is
# tinyproxy.stats.
#
#StatHost "tinyproxy.stats"
#

#
# StatFile: The HTML file that gets sent when a request is made
# for the stathost.  If this file doesn't exist a basic page is
# hardcoded in tinyproxy.
#
StatFile "/usr/share/tinyproxy/stats.html"

#
# LogFile: Allows you to specify the location where information should
# be logged to.  If you would prefer to log to syslog, then disable this
# and enable the Syslog directive.  These directives are mutually
# exclusive. If neither Syslog nor LogFile are specified, output goes
# to stdout.
#
LogFile "/var/log/tinyproxy/tinyproxy.log"

#
# Syslog: Tell tinyproxy to use syslog instead of a logfile.  This
# option must not be enabled if the Logfile directive is being used.
# These two directives are mutually exclusive.
#
#Syslog On

#
# LogLevel: Warning
#
# Set the logging level. Allowed settings are:
#       Critical        (least verbose)
#       Error
#       Warning
#       Notice
#       Connect         (to log connections without Info's noise)
#       Info            (most verbose)
#
# The LogLevel logs from the set level and above. For example, if the
# LogLevel was set to Warning, then all log messages from Warning to
# Critical would be output, but Notice and below would be suppressed.
#
LogLevel Info

#
# PidFile: Write the PID of the main tinyproxy thread to this file so it
# can be used for signalling purposes.
# If not specified, no pidfile will be written.
#
PidFile "/run/tinyproxy/tinyproxy.pid"

#
# XTinyproxy: Tell Tinyproxy to include the X-Tinyproxy header, which
# contains the client's IP address.
#
#XTinyproxy Yes

#
# Upstream:
#
# Turns on upstream proxy support.
#
# The upstream rules allow you to selectively route upstream connections
# based on the host/domain of the site being accessed.
#
# Syntax: upstream type (user:pass@)ip:port ("domain")
# Or:     upstream none "domain"
# The parts in parens are optional.
# Possible types are http, socks4, socks5, none
#
# For example:
#  # connection to test domain goes through testproxy
#  upstream http testproxy:8008 ".test.domain.invalid"
#  upstream http testproxy:8008 ".our_testbed.example.com"
#  upstream http testproxy:8008 "192.168.128.0/255.255.254.0"
#
#  # upstream proxy using basic authentication
#  upstream http user:pass@testproxy:8008 ".test.domain.invalid"
#
#  # no upstream proxy for internal websites and unqualified hosts
#  upstream none ".internal.example.com"
#  upstream none "www.example.com"
#  upstream none "10.0.0.0/8"
#  upstream none "192.168.0.0/255.255.254.0"
#  upstream none "."
#
#  # connection to these boxes go through their DMZ firewalls
#  upstream http cust1_firewall:8008 "testbed_for_cust1"
#  upstream http cust2_firewall:8008 "testbed_for_cust2"
#
#  # default upstream is internet firewall
#  upstream http firewall.internal.example.com:80
#
# You may also use SOCKS4/SOCKS5 upstream proxies:
#  upstream socks4 127.0.0.1:9050
#  upstream socks5 socksproxy:1080
#
# The LAST matching rule wins the route decision.  As you can see, you
# can use a host, or a domain:
#  name     matches host exactly
#  .name    matches any host in domain "name"
#  .        matches any host with no domain (in 'empty' domain)
#  IP/bits  matches network/mask
#  IP/mask  matches network/mask
#
#Upstream http some.remote.proxy:port

#
# MaxClients: This is the absolute highest number of threads which will
# be created. In other words, only MaxClients number of clients can be
# connected at the same time.
#
MaxClients 100

#
# MinSpareServers/MaxSpareServers: These settings set the upper and
# lower limit for the number of spare servers which should be available.
#
# If the number of spare servers falls below MinSpareServers then new
# server processes will be spawned.  If the number of servers exceeds
# MaxSpareServers then the extras will be killed off.
#
MinSpareServers 5
MaxSpareServers 20

#
# StartServers: The number of servers to start initially.
#
StartServers 10

#
# MaxRequestsPerChild: The number of connections a thread will handle
# before it is killed. In practise this should be set to 0, which
# disables thread reaping. If you do notice problems with memory
# leakage, then set this to something like 10000.
#
MaxRequestsPerChild 0

#
# Allow: Customization of authorization controls. If there are any
# access control keywords then the default action is to DENY. Otherwise,
# the default action is ALLOW.
#
# The order of the controls are important. All incoming connections are
# tested against the controls based on order.
#
#Allow 127.0.0.1
#Allow 192.168.0.0/16
#Allow 172.16.0.0/12
#Allow 10.0.0.0/8

# BasicAuth: HTTP "Basic Authentication" for accessing the proxy.
# If there are any entries specified, access is only granted for authenticated
# users.
#BasicAuth user password

#
# AddHeader: Adds the specified headers to outgoing HTTP requests that
# Tinyproxy makes. Note that this option will not work for HTTPS
# traffic, as Tinyproxy has no control over what headers are exchanged.
#
#AddHeader "X-My-Header" "Powered by Tinyproxy"

#
# ViaProxyName: The "Via" header is required by the HTTP RFC, but using
# the real host name is a security concern.  If the following directive
# is enabled, the string supplied will be used as the host name in the
# Via header; otherwise, the server's host name will be used.
#
ViaProxyName "tinyproxy"

#
# DisableViaHeader: When this is set to yes, Tinyproxy does NOT add
# the Via header to the requests. This virtually puts Tinyproxy into
# stealth mode. Note that RFC 2616 requires proxies to set the Via
# header, so by enabling this option, you break compliance.
# Don't disable the Via header unless you know what you are doing...
#
#DisableViaHeader Yes

#
# Filter: This allows you to specify the location of the filter file.
#
#Filter "/etc/tinyproxy/filter"

#
# FilterURLs: Filter based on URLs rather than domains.
#
#FilterURLs On

#
# FilterExtended: Use POSIX Extended regular expressions rather than
# basic.
#
#FilterExtended On

#
# FilterCaseSensitive: Use case sensitive regular expressions.
#
#FilterCaseSensitive On

#
# FilterDefaultDeny: Change the default policy of the filtering system.
# If this directive is commented out, or is set to "No" then the default
# policy is to allow everything which is not specifically denied by the
# filter file.
#
# However, by setting this directive to "Yes" the default policy becomes
# to deny everything which is _not_ specifically allowed by the filter
# file.
#
#FilterDefaultDeny Yes

#
# Anonymous: If an Anonymous keyword is present, then anonymous proxying
# is enabled.  The headers listed are allowed through, while all others
# are denied. If no Anonymous keyword is present, then all headers are
# allowed through.  You must include quotes around the headers.
#
# Most sites require cookies to be enabled for them to work correctly, so
# you will need to allow Cookies through if you access those sites.
#
#Anonymous "Host"
#Anonymous "Authorization"
#Anonymous "Cookie"

#
# ConnectPort: This is a list of ports allowed by tinyproxy when the
# CONNECT method is used.  To disable the CONNECT method altogether, set
# the value to 0.  If no ConnectPort line is found, all ports are
# allowed.
#
# The following two ports are used by SSL.
#
ConnectPort 443
ConnectPort 563

#
# Configure one or more ReversePath directives to enable reverse proxy
# support. With reverse proxying it's possible to make a number of
# sites appear as if they were part of a single site.
#
# If you uncomment the following two directives and run tinyproxy
# on your own computer at port 8888, you can access Google using
# http://localhost:8888/google/ and Wired News using
# http://localhost:8888/wired/news/. Neither will actually work
# until you uncomment ReverseMagic as they use absolute linking.
#
# ReversePath "/google/"	"http://www.google.com/"
# ReversePath "/wired/"		"http://www.wired.com/"

#
# When using tinyproxy as a reverse proxy, it is STRONGLY recommended
# that the normal proxy is turned off by uncommenting the next directive.
#
#ReverseOnly Yes

#
# Use a cookie to track reverse proxy mappings. If you need to reverse
# proxy sites which have absolute links you must uncomment this.
#
#ReverseMagic Yes

#
# The URL that's used to access this reverse proxy. The URL is used to
# rewrite HTTP redirects so that they won't escape the proxy. If you
# have a chain of reverse proxies, you'll need to put the outermost
# URL here (the address which the end user types into his/her browser).
#
# If not set then no rewriting occurs.
#
#ReverseBaseURL "http://localhost:8888/"
注:tinyproxy的详细配置介绍可参考:https://tinyproxy.github.io/
三、服务管理
ubuntu环境下,tinyproxy默认使用systemd进行管理。
# 启动进程
sudo systemctl start tinyproxy
# 停止进程
sudo systemctl stop tinyproxy
# 重启进程
sudo systemctl restart tinyproxy

# 查看状态
sudo systemctl status tinyproxy
# 查看systemd日志
sudo journalctl -u tinyproxy.service -f
注:查看tinyproxy实时日志输出:tail -f /var/log/tinyproxy/tinyproxy.log
四、测试验证
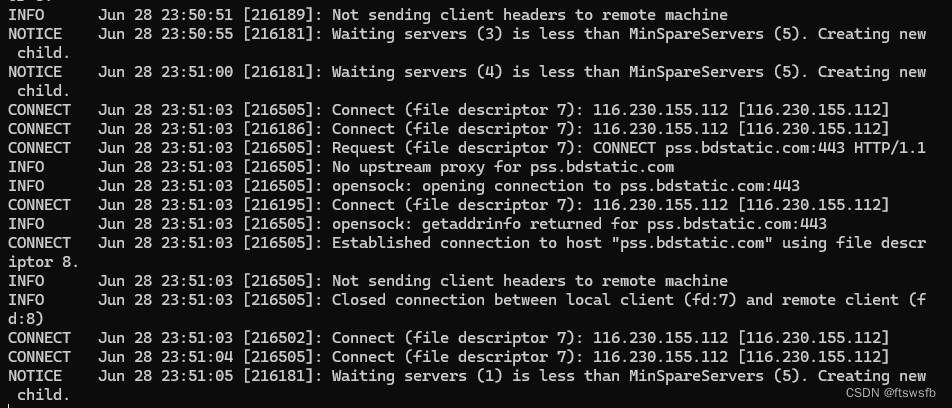
tinyproxy日志实时监控:
tail -f /var/log/tinyproxy/tinyproxy.log
1、command line
1、设置环境变量
export http_proxy="http://xxx.xxx.xxx.xxx:8888/"
export https_proxy="http://xxx.xxx.xxx.xxx:8888/"
2、wget访问网络·
wget baidu.com
3、观测日志输出

2、firefox browser
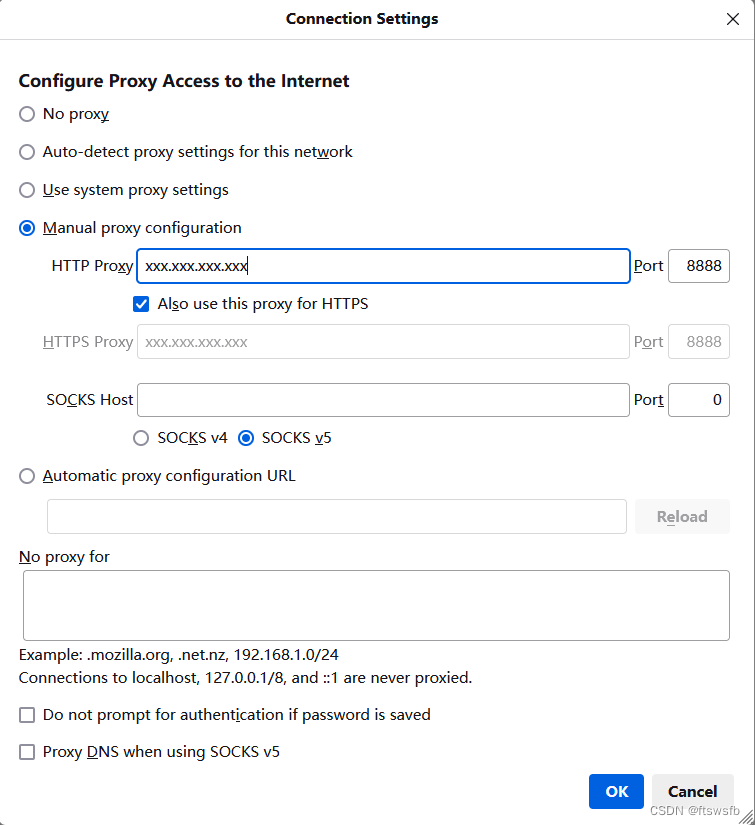
1、设置代理服务器
打开浏览器,依次点击“Settings” -》 “General” -》 “Network Settings” -》 “Settings”,选择“Manual proxy configuration”并设置正确的代理服务器ip和端口。
2、访问百度首页(www.baidu.con)
3、观测日志输出
五、应用场景
- …


 1160
1160

 被折叠的 条评论
为什么被折叠?
被折叠的 条评论
为什么被折叠?
 到【灌水乐园】发言


