项目源码Github:https://github.com/csuldw/SSM_OEP
通过前面两个博文 Spring+SpringMVC+Mybatis整合系列(一)Maven安装和Eclipse配置 和 Spring+SpringMVC+Mybatis整合系列(二)Eclipse新建Maven web项目的讲解,我们的项目已经新建好了。这一部分将是最长的一部分,也是最重要的一部分。如果你知道搭建环境并且知道怎么新建Maven web项目,就直接从这篇文章开始吧。
跟之前一样,说明一下版本:
- JDK 1.7.0
- Eclipse 4.3.2
- Maven 3.3.3
同时给出spring和mybatis的版本
- Spring 4.0.2
- Mybatis 3.2.6
首先给出一个项目最后的目录结构:
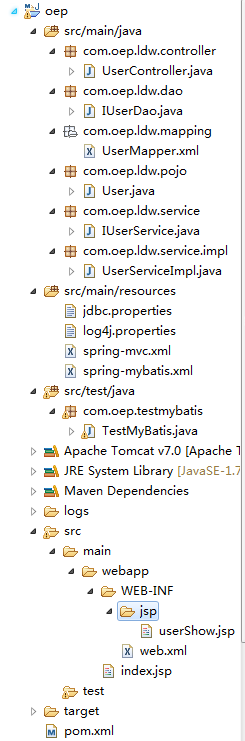
下面来详细介绍如何搭建SSM框架。
一、Spring与Mybatis整合
说明:项目是在上篇文章的基础上进行进一步的操作,项目名称为oep。
1.1 使用Maven引入相关jar包
为了方便后面配置是不需要引入相关JAR包,在这里,直接给出所有需要的JAR包,都是些基本的JAR包,每个包的是干什么的都有注释,就不多说了。下面这个是pom.xml文件的jar包的dependencies的内容:
<properties>
<spring.version>4.0.2.RELEASE</spring.version>
<mybatis.version>3.2.6</mybatis.version>
<slf4j.version>1.7.7</slf4j.version>
<log4j.version>1.2.17</log4j.version>
</properties>
<dependencies>
<dependency>
<groupId>junit</groupId>
<artifactId>junit</artifactId>
<version>4.11</version>
<scope>test</scope>
</dependency>
<dependency>
<groupId>org.springframework</groupId>
<artifactId>spring-core</artifactId>
<version>${spring.version}</version>
</dependency>
<dependency>
<groupId>org.springframework</groupId>
<artifactId>spring-web</artifactId>
<version>${spring.version}</version>
</dependency>
<dependency>
<groupId>org.springframework</groupId>
<artifactId>spring-oxm</artifactId>
<version>${spring.version}</version>
</dependency>
<dependency>
<groupId>org.springframework</groupId>
<artifactId>spring-tx</artifactId>
<version>${spring.version}</version>
</dependency>
<dependency>
<groupId>org.springframework</groupId>
<artifactId>spring-jdbc</artifactId>
<version>${spring.version}</version>
</dependency>
<dependency>
<groupId>org.springframework</groupId>
<artifactId>spring-webmvc</artifactId>
<version>${spring.version}</version>
</dependency>
<dependency>
<groupId>org.springframework</groupId>
<artifactId>spring-aop</artifactId>
<version>${spring.version}</version>
</dependency>
<dependency>
<groupId>org.springframework</groupId>
<artifactId>spring-context-support</artifactId>
<version>${spring.version}</version>
</dependency>
<dependency>
<groupId>org.springframework</groupId>
<artifactId>spring-test</artifactId>
<version>${spring.version}</version>
</dependency>
<dependency>
<groupId>org.mybatis</groupId>
<artifactId>mybatis</artifactId>
<version>${mybatis.version}</version>
</dependency>
<dependency>
<groupId>org.mybatis</groupId>
<artifactId>mybatis-spring</artifactId>
<version>1.2.2</version>
</dependency>
<dependency>
<groupId>javax</groupId>
<artifactId>javaee-api</artifactId>
<version>7.0</version>
</dependency>
<dependency>
<groupId>mysql</groupId>
<artifactId>mysql-connector-java</artifactId>
<version>5.1.30</version>
</dependency>
<dependency>
<groupId>commons-dbcp</groupId>
<artifactId>commons-dbcp</artifactId>
<version>1.2.2</version>
</dependency>
<dependency>
<groupId>jstl</groupId>
<artifactId>jstl</artifactId>
<version>1.2</version>
</dependency>
<dependency>
<groupId>log4j</groupId>
<artifactId>log4j</artifactId>
<version>${log4j.version}</version>
</dependency>
<dependency>
<groupId>com.alibaba</groupId>
<artifactId>fastjson</artifactId>
<version>1.1.41</version>
</dependency>
<dependency>
<groupId>org.slf4j</groupId>
<artifactId>slf4j-api</artifactId>
<version>${slf4j.version}</version>
</dependency>
<dependency>
<groupId>org.slf4j</groupId>
<artifactId>slf4j-log4j12</artifactId>
<version>${slf4j.version}</version>
</dependency>
<dependency>
<groupId>org.codehaus.jackson</groupId>
<artifactId>jackson-mapper-asl</artifactId>
<version>1.9.13</version>
</dependency>
<dependency>
<groupId>commons-fileupload</groupId>
<artifactId>commons-fileupload</artifactId>
<version>1.3.1</version>
</dependency>
<dependency>
<groupId>commons-io</groupId>
<artifactId>commons-io</artifactId>
<version>2.4</version>
</dependency>
<dependency>
<groupId>commons-codec</groupId>
<artifactId>commons-codec</artifactId>
<version>1.9</version>
</dependency>
</dependencies>
- 1
- 2
- 3
- 4
- 5
- 6
- 7
- 8
- 9
- 10
- 11
- 12
- 13
- 14
- 15
- 16
- 17
- 18
- 19
- 20
- 21
- 22
- 23
- 24
- 25
- 26
- 27
- 28
- 29
- 30
- 31
- 32
- 33
- 34
- 35
- 36
- 37
- 38
- 39
- 40
- 41
- 42
- 43
- 44
- 45
- 46
- 47
- 48
- 49
- 50
- 51
- 52
- 53
- 54
- 55
- 56
- 57
- 58
- 59
- 60
- 61
- 62
- 63
- 64
- 65
- 66
- 67
- 68
- 69
- 70
- 71
- 72
- 73
- 74
- 75
- 76
- 77
- 78
- 79
- 80
- 81
- 82
- 83
- 84
- 85
- 86
- 87
- 88
- 89
- 90
- 91
- 92
- 93
- 94
- 95
- 96
- 97
- 98
- 99
- 100
- 101
- 102
- 103
- 104
- 105
- 106
- 107
- 108
- 109
- 110
- 111
- 112
- 113
- 114
- 115
- 116
- 117
- 118
- 119
- 120
- 121
- 122
- 123
- 124
- 125
- 126
- 127
- 128
- 129
- 130
- 131
- 132
- 133
- 134
- 135
- 136
- 137
- 138
- 139
- 140
- 141
- 142
- 143
- 144
- 145
- 146
- 147
- 148
- 149
- 150
- 151
- 152
- 153
- 154
- 155
- 156
- 157
在配置pom.xml引入jar包之后,Maven会自动下载。在jar包下载完成后,我碰到了几个问题,下面一一介绍下:
(1)Description Resource Path Location Type JAX-RS (REST Web Services) 2.0 requires Java 1.6 or newer. oep line 1 Maven Java EE Configuration Problem
解决方法:因为maven使用的jdk是老版本的,所以只要在pom.xml中更换Java版本即可,下面我只写出pom.xml中build里面的一个plugins,代码如下:
<build>
    <finalName>oep</finalName>
    <plugins>
        <plugin>
            <groupId>org.apache.maven.plugins</groupId>
            <artifactId>maven-compiler-plugin</artifactId>
            <configuration>
                <source>1.7</source>
                <target>1.7</target>
            </configuration>
        </plugin>
    </plugins>
(2)问题:Description Resource Path Location Type JavaServer Faces 2.2 requires Dynamic Web Module 2.5 or newer. oep line 1 Maven Java EE Configuration Problem
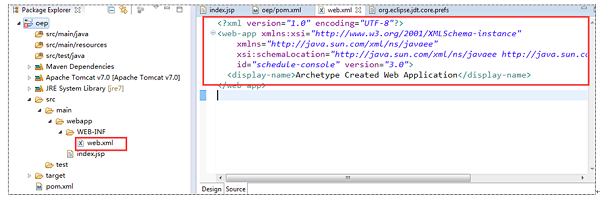
解决方法:首先,把src–>main–>webapp–> WEB-INF下面web.xml中的Servlet改成3.0。下面打开项目的web.xml,修改内容如下:
<?xml version="1.0" encoding="UTF-8"?>
<web-app xmlns:xsi="http://www.w3.org/2001/XMLSchema-instance"
    xmlns="http://java.sun.com/xml/ns/javaee"
    xsi:schemaLocation="http://java.sun.com/xml/ns/javaee http://java.sun.com/xml/ns/javaee/web-app_3_0.xsd"
    id="schedule-console" version="3.0">
截图如下所示:
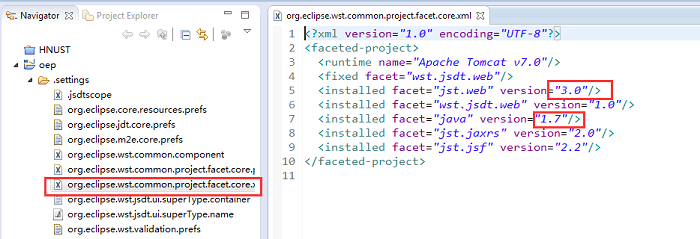
然后,在javaEE视角下打开项目.settings文件中的org.eclipse.wst.common.project.facet.core.xml
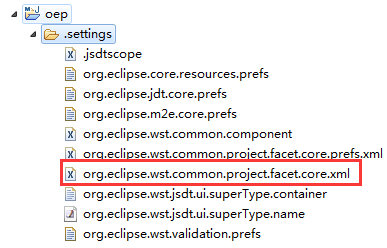
把1.5改成1.7(上面build中的配置其实已经完成了这一步工作),同时version改为3.0
接着,查看Project Facets:右击项目–>properties–>Project Facets,结果图如下:
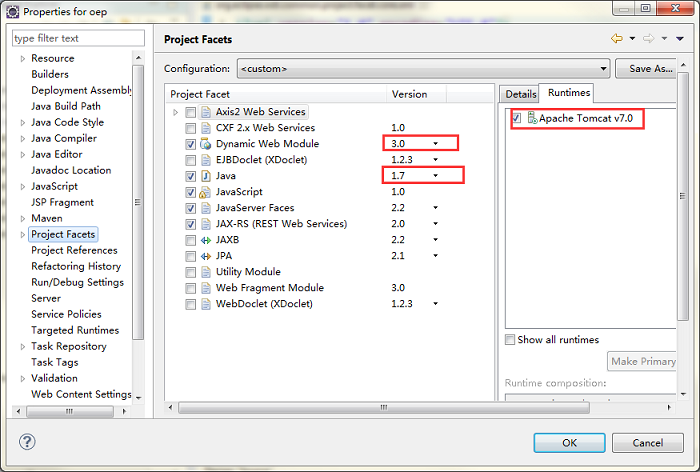
OK项目调试正常,错误消除完毕,继续下走!
下面使用JUnit测试Spring和mybatis是否集成好。
1.2 建立测试
1.2.1 创建数据库
我这里使用的是MySQL,在mysql中建立一个简单的表:db_oep
数据库测试代码:
DROP TABLE IF EXISTS `user_t`;
CREATE TABLE `user_t` (
`id` int(11) NOT NULL AUTO_INCREMENT,
`user_name` varchar(40) NOT NULL,
`password` varchar(255) NOT NULL,
`age` int(4) NOT NULL,
PRIMARY KEY (`id`)
) ENGINE=InnoDB AUTO_INCREMENT=2 DEFAULT CHARSET=utf8;
insert into `user_t`(`id`,`user_name`,`password`,`age`) values (1,'xiaoxiao','920304',23);
1.2.2 使用MyBatis Generator自动创建代码
关于mybatis Generator自动生成映射映射文件的文章,参考Github中的mybatis-generator-core自动生成代码的工具。最后将生成的文件拷贝到目录中来:

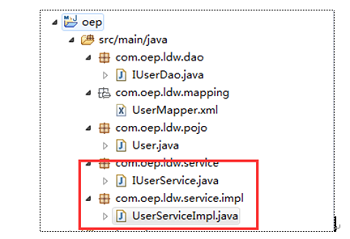
1.2.3 建立Service接口和实现类
目录结构:
下面给出具体的内容:
IUserService.java
package com.oep.ldw.service;

import com.oep.ldw.pojo.User;

public interface IUserService {
    public User getUserById(int userId);
}
UserServiceImpl.java
package com.oep.ldw.service.impl;
import javax.annotation.Resource;
import org.springframework.stereotype.Service;
import com.oep.ldw.dao.IUserDao;
import com.oep.ldw.pojo.User;
import com.oep.ldw.service.IUserService;
@Service("userService")
public class UserServiceImpl implements IUserService {
@Resource
private IUserDao userDao;
@Override
public User getUserById(int userId) {
return this.userDao.selectByPrimaryKey(userId);
}
}
- 1
- 2
- 3
- 4
- 5
- 6
- 7
- 8
- 9
- 10
- 11
- 12
- 13
- 14
- 15
- 16
- 17
- 18
- 19
- 20
- 21
- 22
- 1
- 2
- 3
- 4
- 5
- 6
- 7
- 8
- 9
- 10
- 11
- 12
- 13
- 14
- 15
- 16
- 17
- 18
- 19
- 20
- 21
- 22
1.2.4 建立JDBC属性文件
jdbc.properties(文件编码修改为utf-8)
driver=com.mysql.jdbc.Driver
url=jdbc:mysql://localhost:3306/db_oep
username=root
password=123456
initialSize=0
maxActive=20
maxIdle=20
minIdle=1
maxWait=60000
1.2.5 建立spring-mybatis.xml配置文件
这个文件就是用来完成spring和mybatis的整合的。这里面也没多少行配置,主要的就是自动扫描,自动注入,配置数据库。注释也很详细,大家看看就明白了。
spring-mybatis.xml
<?xml version="1.0" encoding="UTF-8"?>
<beans xmlns="http://www.springframework.org/schema/beans"
xmlns:xsi="http://www.w3.org/2001/XMLSchema-instance" xmlns:p="http://www.springframework.org/schema/p"
xmlns:context="http://www.springframework.org/schema/context"
xmlns:mvc="http://www.springframework.org/schema/mvc"
xsi:schemaLocation="http://www.springframework.org/schema/beans
http://www.springframework.org/schema/beans/spring-beans-3.1.xsd
http://www.springframework.org/schema/context
http://www.springframework.org/schema/context/spring-context-3.1.xsd
http://www.springframework.org/schema/mvc
http://www.springframework.org/schema/mvc/spring-mvc-4.0.xsd">
<context:component-scan base-package="com.oep.ldw" />
<bean id="propertyConfigurer"
class="org.springframework.beans.factory.config.PropertyPlaceholderConfigurer">
<property name="location" value="classpath:jdbc.properties" />
</bean>
<bean id="dataSource" class="org.apache.commons.dbcp.BasicDataSource"
destroy-method="close">
<property name="driverClassName" value="${driver}" />
<property name="url" value="${url}" />
<property name="username" value="${username}" />
<property name="password" value="${password}" />
<property name="initialSize" value="${initialSize}"></property>
<property name="maxActive" value="${maxActive}"></property>
<property name="maxIdle" value="${maxIdle}"></property>
<property name="minIdle" value="${minIdle}"></property>
<property name="maxWait" value="${maxWait}"></property>
</bean>
<bean id="sqlSessionFactory" class="org.mybatis.spring.SqlSessionFactoryBean">
<property name="dataSource" ref="dataSource" />
<property name="mapperLocations" value="classpath:com/oep/ldw/mapping/*.xml"></property>
</bean>
<bean class="org.mybatis.spring.mapper.MapperScannerConfigurer">
<property name="basePackage" value="com.oep.ldw.dao" />
<property name="sqlSessionFactoryBeanName" value="sqlSessionFactory"></property>
</bean>
<bean id="transactionManager"
class="org.springframework.jdbc.datasource.DataSourceTransactionManager">
<property name="dataSource" ref="dataSource" />
</bean>
</beans>
- 1
- 2
- 3
- 4
- 5
- 6
- 7
- 8
- 9
- 10
- 11
- 12
- 13
- 14
- 15
- 16
- 17
- 18
- 19
- 20
- 21
- 22
- 23
- 24
- 25
- 26
- 27
- 28
- 29
- 30
- 31
- 32
- 33
- 34
- 35
- 36
- 37
- 38
- 39
- 40
- 41
- 42
- 43
- 44
- 45
- 46
- 47
- 48
- 49
- 50
- 51
- 52
- 53
- 54
- 55
- 56
- 57
- 1
- 2
- 3
- 4
- 5
- 6
- 7
- 8
- 9
- 10
- 11
- 12
- 13
- 14
- 15
- 16
- 17
- 18
- 19
- 20
- 21
- 22
- 23
- 24
- 25
- 26
- 27
- 28
- 29
- 30
- 31
- 32
- 33
- 34
- 35
- 36
- 37
- 38
- 39
- 40
- 41
- 42
- 43
- 44
- 45
- 46
- 47
- 48
- 49
- 50
- 51
- 52
- 53
- 54
- 55
- 56
- 57
1.2.6 Log4j的配置
下面给出配置文件内容(路径src/main/resources):
#定义LOG输出级别
log4j.rootLogger=INFO,Console,File
#定义日志输出目的地为控制台
log4j.appender.Console=org.apache.log4j.ConsoleAppender
log4j.appender.Console.Target=System.out
#可以灵活地指定日志输出格式,下面一行是指定具体的格式
log4j.appender.Console.layout = org.apache.log4j.PatternLayout
log4j.appender.Console.layout.ConversionPattern=[%c] - %m%n

#文件大小到达指定尺寸的时候产生一个新的文件
log4j.appender.File = org.apache.log4j.RollingFileAppender
#指定输出目录
log4j.appender.File.File = logs/ssm.log
#定义文件最大大小
log4j.appender.File.MaxFileSize = 10MB
# 输出所以日志,如果换成DEBUG表示输出DEBUG以上级别日志
log4j.appender.File.Threshold = ALL
log4j.appender.File.layout = org.apache.log4j.PatternLayout
log4j.appender.File.layout.ConversionPattern =[%p] [%d{yyyy-MM-dd HH\:mm\:ss}][%c]%m%n
- 1
- 2
- 3
- 4
- 5
- 6
- 7
- 8
- 9
- 10
- 11
- 12
- 13
- 14
- 15
- 16
- 17
- 18
- 19
- 1
- 2
- 3
- 4
- 5
- 6
- 7
- 8
- 9
- 10
- 11
- 12
- 13
- 14
- 15
- 16
- 17
- 18
- 19
1.2.7 使用JUnit测试
测试类在src/test/java中建立,下面测试类中注释掉的部分是不使用Spring时,一般情况下的一种测试方法;如果使用了Spring那么就可以使用注解的方式来引入配置文件和类,然后再将service接口对象注入,就可以进行测试了。
package com.oep.testmybatis
import javax.annotation.Resource
import org.apache.log4j.Logger
import org.junit.Before
import org.junit.Test
import org.junit.runner.RunWith
import org.springframework.context.ApplicationContext
import org.springframework.context.support.ClassPathXmlApplicationContext
import org.springframework.test.context.ContextConfiguration
import org.springframework.test.context.junit4.SpringJUnit4ClassRunner
import com.alibaba.fastjson.JSON
import com.oep.ldw.pojo.User
import com.oep.ldw.service.IUserService
@RunWith(SpringJUnit4ClassRunner.class) //表示继承了SpringJUnit4ClassRunner类
@ContextConfiguration(locations = {"classpath:spring-mybatis.xml"})
public class TestMyBatis {
private static Logger logger = Logger.getLogger(TestMyBatis.class)
// private ApplicationContext ac = null
@Resource
private IUserService userService = null
// @Before
// public void before() {
// ac = new ClassPathXmlApplicationContext("applicationContext.xml")
// userService = (IUserService) ac.getBean("userService")
// }
@Test
public void test1() {
User user = userService.getUserById(1)
// System.out.println(user.getUserName())
// logger.info("值:"+user.getUserName())
logger.info(JSON.toJSONString(user))
}
}
- 1
- 2
- 3
- 4
- 5
- 6
- 7
- 8
- 9
- 10
- 11
- 12
- 13
- 14
- 15
- 16
- 17
- 18
- 19
- 20
- 21
- 22
- 23
- 24
- 25
- 26
- 27
- 28
- 29
- 30
- 31
- 32
- 33
- 34
- 35
- 36
- 37
- 38
- 39
- 40
- 1
- 2
- 3
- 4
- 5
- 6
- 7
- 8
- 9
- 10
- 11
- 12
- 13
- 14
- 15
- 16
- 17
- 18
- 19
- 20
- 21
- 22
- 23
- 24
- 25
- 26
- 27
- 28
- 29
- 30
- 31
- 32
- 33
- 34
- 35
- 36
- 37
- 38
- 39
- 40
点击右键使用junit测试,如果测试成功,表示Spring和Mybatis已经整合成功了。输出信息使用的是Log4j打印到控制台。

注意:映射文件mapping的一一对应。
到这一步,我们已经完成了Spring和mybatis这两大框架的整合,下面在继续进行SpringMVC的整合。
二、整合SpringMVC
上面已经完成了2大框架的整合,SpringMVC的配置文件单独放,然后在web.xml中配置整合。
2.1配置spring-mvc.xml
主要是自动扫描控制器,视图模式,注解的启动这三个
<?xml version="1.0" encoding="UTF-8"?>
<beans xmlns="http://www.springframework.org/schema/beans"
xmlns:xsi="http://www.w3.org/2001/XMLSchema-instance" xmlns:p="http://www.springframework.org/schema/p"
xmlns:context="http://www.springframework.org/schema/context"
xmlns:mvc="http://www.springframework.org/schema/mvc"
xsi:schemaLocation="http://www.springframework.org/schema/beans
http://www.springframework.org/schema/beans/spring-beans-3.1.xsd
http://www.springframework.org/schema/context
http://www.springframework.org/schema/context/spring-context-3.1.xsd
http://www.springframework.org/schema/mvc
http://www.springframework.org/schema/mvc/spring-mvc-4.0.xsd">
<context:component-scan base-package="com.oep.ldw.controller" />
<bean id="mappingJacksonHttpMessageConverter"
class="org.springframework.http.converter.json.MappingJacksonHttpMessageConverter">
<property name="supportedMediaTypes">
<list>
<value>text/html;charset=UTF-8</value>
</list>
</property>
</bean>
<bean
class="org.springframework.web.servlet.mvc.annotation.AnnotationMethodHandlerAdapter">
<property name="messageConverters">
<list>
<ref bean="mappingJacksonHttpMessageConverter" />
</list>
</property>
</bean>
<bean class="org.springframework.web.servlet.view.InternalResourceViewResolver">
<property name="prefix" value="/WEB-INF/jsp/" />
<property name="suffix" value=".jsp" />
</bean>
<bean id="multipartResolver"
class="org.springframework.web.multipart.commons.CommonsMultipartResolver">
<property name="defaultEncoding" value="utf-8" />
<property name="maxUploadSize" value="10485760000" />
<property name="maxInMemorySize" value="40960" />
</bean>
</beans>
- 1
- 2
- 3
- 4
- 5
- 6
- 7
- 8
- 9
- 10
- 11
- 12
- 13
- 14
- 15
- 16
- 17
- 18
- 19
- 20
- 21
- 22
- 23
- 24
- 25
- 26
- 27
- 28
- 29
- 30
- 31
- 32
- 33
- 34
- 35
- 36
- 37
- 38
- 39
- 40
- 41
- 42
- 43
- 44
- 45
- 46
- 47
- 48
- 49
- 50
- 51
- 52
- 53
- 54
- 1
- 2
- 3
- 4
- 5
- 6
- 7
- 8
- 9
- 10
- 11
- 12
- 13
- 14
- 15
- 16
- 17
- 18
- 19
- 20
- 21
- 22
- 23
- 24
- 25
- 26
- 27
- 28
- 29
- 30
- 31
- 32
- 33
- 34
- 35
- 36
- 37
- 38
- 39
- 40
- 41
- 42
- 43
- 44
- 45
- 46
- 47
- 48
- 49
- 50
- 51
- 52
- 53
- 54
2.2 配置web.xml文件
这里面对spring-mybatis.xml的引入以及配置的spring-mvc的Servlet就是为了完成SSM整合,之前2框架整合不需要在此处进行任何配置。配置一样有详细注释,不多解释了。
web.xml
<?xml version="1.0" encoding="UTF-8"?>
<web-app xmlns:xsi="http://www.w3.org/2001/XMLSchema-instance"
xmlns="http://java.sun.com/xml/ns/javaee"
xsi:schemaLocation="http://java.sun.com/xml/ns/javaee http://java.sun.com/xml/ns/javaee/web-app_3_0.xsd"
version="3.0">
<display-name>Archetype Created Web Application</display-name>
<context-param>
<param-name>contextConfigLocation</param-name>
<param-value>classpath:spring-mybatis.xml</param-value>
</context-param>
<filter>
<filter-name>encodingFilter</filter-name>
<filter-class>org.springframework.web.filter.CharacterEncodingFilter</filter-class>
<async-supported>true</async-supported>
<init-param>
<param-name>encoding</param-name>
<param-value>UTF-8</param-value>
</init-param>
</filter>
<filter-mapping>
<filter-name>encodingFilter</filter-name>
<url-pattern>/*</url-pattern>
</filter-mapping>
<listener>
<listener-class>org.springframework.web.context.ContextLoaderListener</listener-class>
</listener>
<listener>
<listener-class>org.springframework.web.util.IntrospectorCleanupListener</listener-class>
</listener>
<servlet>
<servlet-name>SpringMVC</servlet-name>
<servlet-class>org.springframework.web.servlet.DispatcherServlet</servlet-class>
<init-param>
<param-name>contextConfigLocation</param-name>
<param-value>classpath:spring-mvc.xml</param-value>
</init-param>
<load-on-startup>1</load-on-startup>
<async-supported>true</async-supported>
</servlet>
<servlet-mapping>
<servlet-name>SpringMVC</servlet-name>
<url-pattern>/</url-pattern>
</servlet-mapping>
<welcome-file-list>
<welcome-file>/index.jsp</welcome-file>
</welcome-file-list>
</web-app>
- 1
- 2
- 3
- 4
- 5
- 6
- 7
- 8
- 9
- 10
- 11
- 12
- 13
- 14
- 15
- 16
- 17
- 18
- 19
- 20
- 21
- 22
- 23
- 24
- 25
- 26
- 27
- 28
- 29
- 30
- 31
- 32
- 33
- 34
- 35
- 36
- 37
- 38
- 39
- 40
- 41
- 42
- 43
- 44
- 45
- 46
- 47
- 48
- 49
- 50
- 51
- 52
- 53
- 54
- 55
- 56
- 57
- 58
- 1
- 2
- 3
- 4
- 5
- 6
- 7
- 8
- 9
- 10
- 11
- 12
- 13
- 14
- 15
- 16
- 17
- 18
- 19
- 20
- 21
- 22
- 23
- 24
- 25
- 26
- 27
- 28
- 29
- 30
- 31
- 32
- 33
- 34
- 35
- 36
- 37
- 38
- 39
- 40
- 41
- 42
- 43
- 44
- 45
- 46
- 47
- 48
- 49
- 50
- 51
- 52
- 53
- 54
- 55
- 56
- 57
- 58
2.3 新建测试页面
新建jsp页面
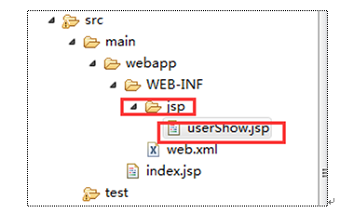
userShow.jsp此页面仅输出一下用户名,完成一个完整的简单流程。
<%@ page language="java" import="java.util.*" pageEncoding="utf-8"%>
<!DOCTYPE HTML PUBLIC "-//W3C//DTD HTML 4.01 Transitional//EN">
<html>
  <head>
    <title>测试</title>
  </head>

  <body>
    ${user.userName}
    ${user.age }
  </body>
</html>
2.4 新建UserController类
UserController.java 控制器
package com.oep.ldw.controller
import javax.annotation.Resource
import javax.servlet.http.HttpServletRequest
import org.springframework.stereotype.Controller
import org.springframework.ui.Model
import org.springframework.web.bind.annotation.RequestMapping
import com.oep.ldw.pojo.User
import com.oep.ldw.service.IUserService
@Controller
@RequestMapping("/user")
public class UserController {
@Resource
private IUserService userService
@RequestMapping("/userShow")
public String toIndex(HttpServletRequest request, Model model) {
int userId = Integer.parseInt(request.getParameter("id"))
User user = this.userService.getUserById(userId)
model.addAttribute("user", user)
return "userShow"
}
}
- 1
- 2
- 3
- 4
- 5
- 6
- 7
- 8
- 9
- 10
- 11
- 12
- 13
- 14
- 15
- 16
- 17
- 18
- 19
- 20
- 21
- 22
- 23
- 24
- 25
- 26
- 27
- 1
- 2
- 3
- 4
- 5
- 6
- 7
- 8
- 9
- 10
- 11
- 12
- 13
- 14
- 15
- 16
- 17
- 18
- 19
- 20
- 21
- 22
- 23
- 24
- 25
- 26
- 27
三、项目部署
如果你直接使用Run as来运行tomcat无误的话,那么恭喜你,你运气太好了。
结果应该是这样子的:
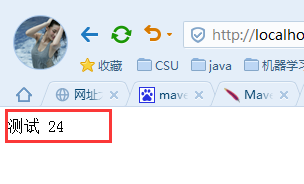
下面介绍下我的部署过程:
首先把tomcat的conf目录下的tomcat-users.xml导数第二行添加
<role rolename="manager"/>
<role rolename="admin"/>
<role rolename="manager-gui"/>
<user username = "admin" password = "password" roles = "admin,manager,manager-gui,manager-script,manager-jmx,manager-status" />
然后修改maven安装路径下的setting.xml文件,在servers节点中,添加server内容
<server>
    <id>tomcat</id>
    <username>admin</username>
    <password>password</password>
</server>
接着maven配置文件pom.xml里的tomcat插件一般像下面这样配置:
<plugin>
<artifactId>maven-war-plugin</artifactId>
<version>2.1.1</version>
<configuration>
<packagingExcludes>WEB-INF/web.xml</packagingExcludes>
</configuration>
</plugin>
<plugin>
<groupId>org.codehaus.mojo</groupId>
<artifactId>tomcat-maven-plugin</artifactId>
<version>1.1</version>
<configuration>
<url>http://localhost:8080/manager/text</url>
<server>tomcat</server>
<username>admin</username>
<password>password</password>
<update>true</update>
</configuration>
</plugin>
- 1
- 2
- 3
- 4
- 5
- 6
- 7
- 8
- 9
- 10
- 11
- 12
- 13
- 14
- 15
- 16
- 17
- 18
- 19
- 20
- 21
- 1
- 2
- 3
- 4
- 5
- 6
- 7
- 8
- 9
- 10
- 11
- 12
- 13
- 14
- 15
- 16
- 17
- 18
- 19
- 20
- 21
然后按照下面的方法部署项目,(保证tomcat7是启动的):
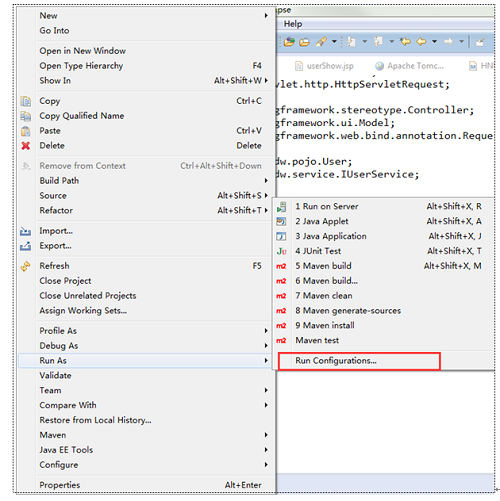
然后使用tomcat:redeploy部署项目:

好了,整个项目的配置到此结束,如有问题,请留言即可。


 331
331

 被折叠的 条评论
为什么被折叠?
被折叠的 条评论
为什么被折叠?
 到【灌水乐园】发言


