


长期以来,MCP工具的异地通信主要是以SSE传输方式为主,这种通信方法既没有多通道并发同时也不够稳定,很难真正的适用于企业级应用场景。因此,在2月初,在MCP官方GitHub项目主页上,就有开发者提出了采用更先进的流式HTTP传输方法代替SSE传输的技术方案,相比SSE传输,HTTP流式传输并发更高、通信更加稳定,同时也更容易集成和部署,这也是当代服务器与客户端异地通信的最佳解决方案。
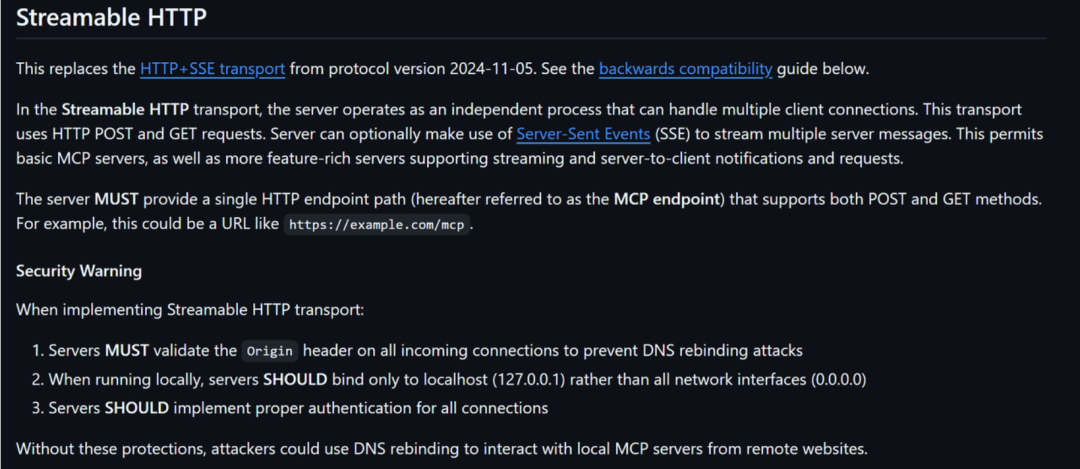
但流式HTTP MCP服务器功能复杂,相关SDK的研发难度也很高,因此在今年的3月,MCP官方首先发布了MCP的流式HTTP通信协议,其中详细说明了HTTP流式传输的基本协议。
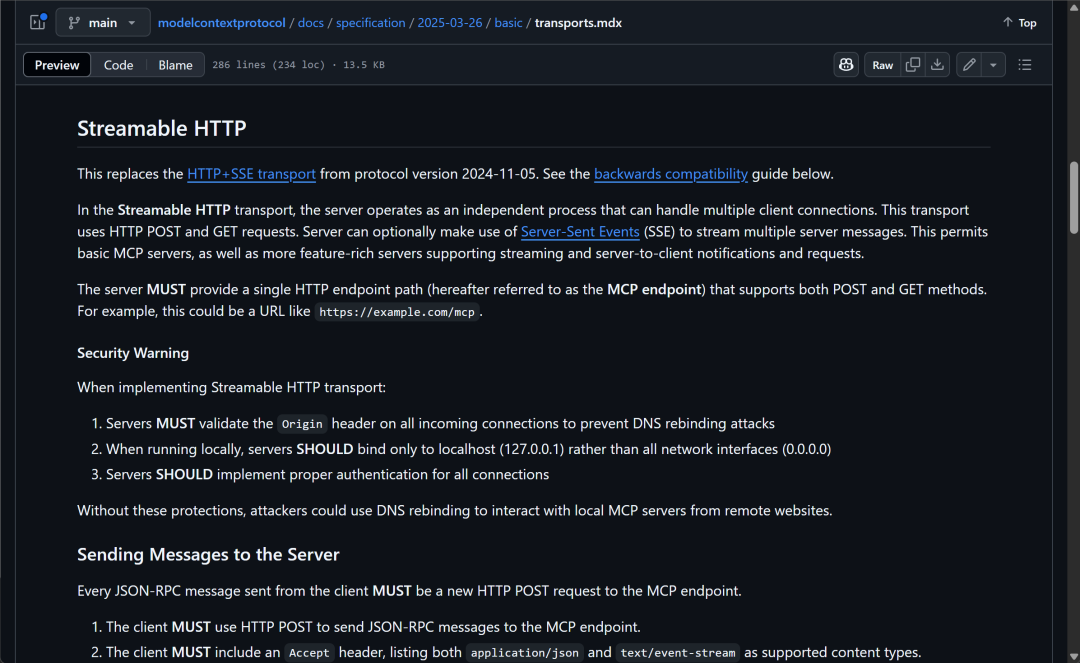
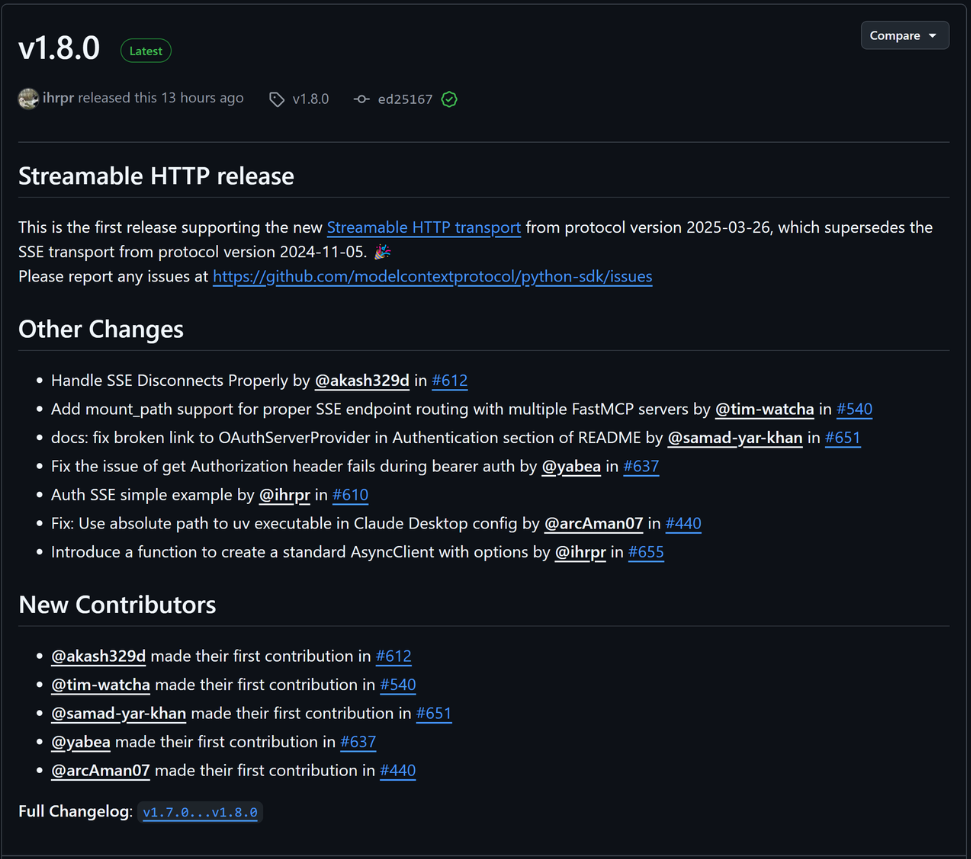
然后在5月9号的1.8.0版本更新中,正式在SDK中加入了HTTP流式MCP服务器的相关功能支持。自此开发者就可以通过MCP SDK,高效快速开发流式HTTP MCP服务器,并顺利进行多通道并发的企业级MCP工具部署。毫无疑问,这将是MCP技术迈向企业级应用的至关重要的一步。
本期公开课,就为大家从零介绍流式HTTP MCP服务器开发、测试、部署上线的全流程,并提供完整MCP服务器功能测试客户端脚本。公开课完整课件扫码即可领取。

一、基于HTTP流式传输的MCP服务器开发流程
-
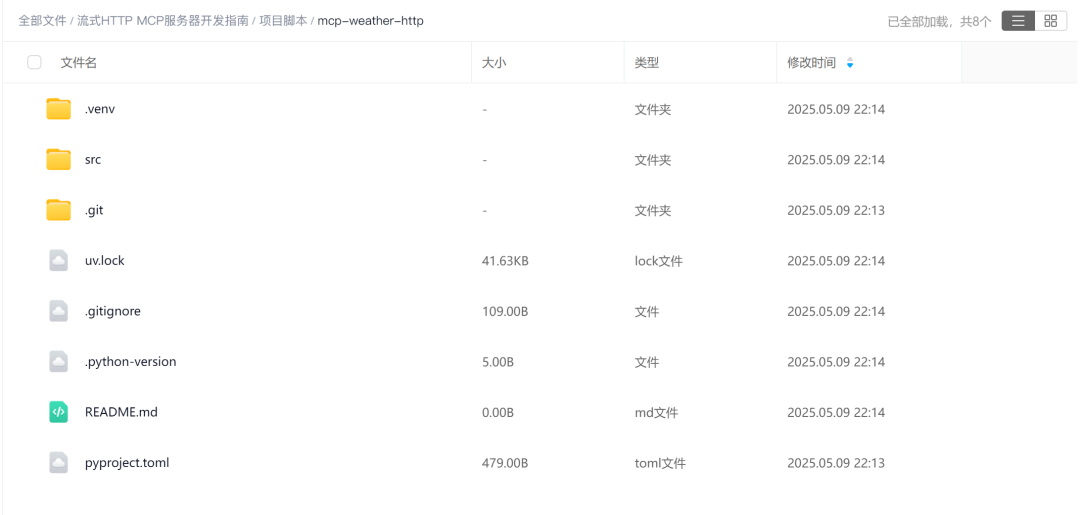
创建项目文件:
#cd /root/autodl-tmp/MCP
uv init mcp-weather-http
cd mcp-weather-http

# 创建虚拟环境
uv venv

# 激活虚拟环境
source .venv/bin/activate

uv add mcp httpx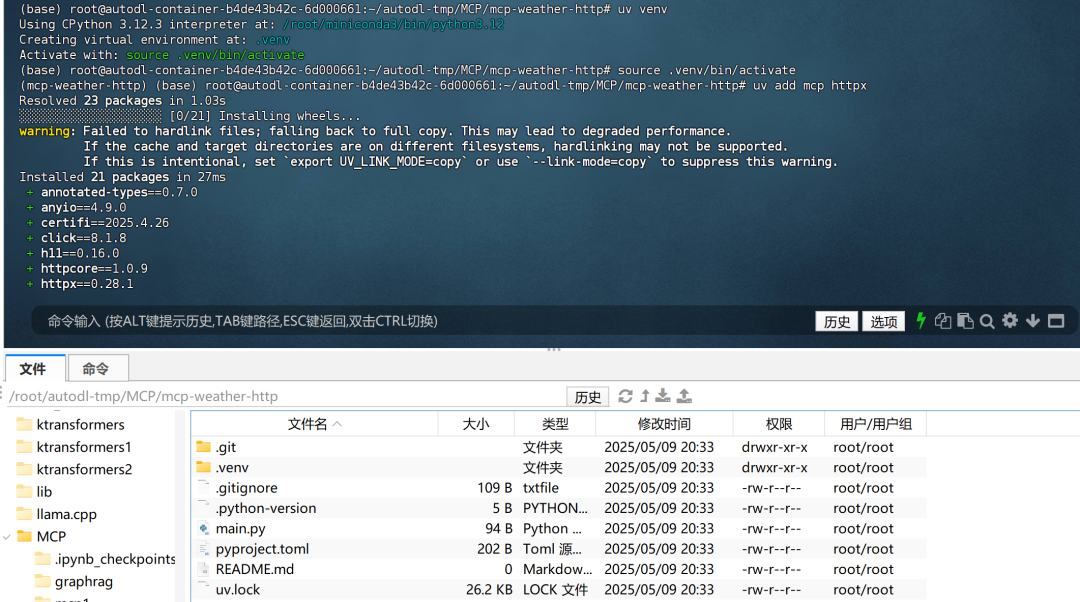
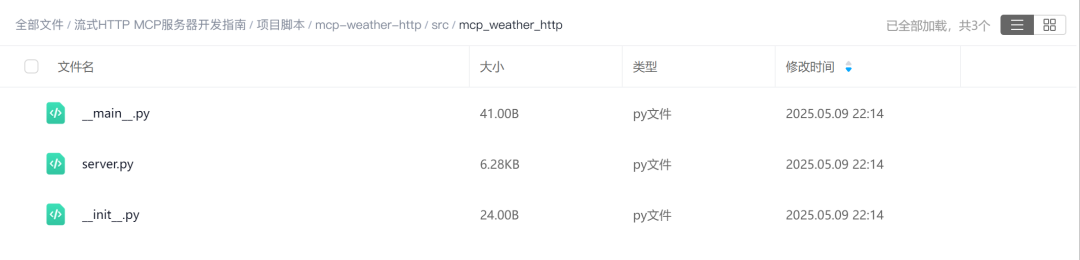
这里我们采用src_layer的风格进行项目文件编排,因此需要删除main.py,并创建mcp_weather_http目录。
mkdir -p ./src/mcp_weather_http
cd ./src/mcp_weather_http
然后创建在src/mcp_weather_http中创建三个代码文件:

并在__init__.py中写入
from .server import main而在__main__.py中写入:
from mcp_weather_http import main

main()
然后在server.py中写入如下代码:
import contextlib
import logging
import os
from collections.abc import AsyncIterator

import anyio
import click
import httpx
import mcp.types as types
from mcp.server.lowlevel import Server
from mcp.server.streamable_http_manager import StreamableHTTPSessionManager
from starlette.applications import Starlette
from starlette.routing import Mount
from starlette.types import Receive, Scope, Send

# ---------------------------------------------------------------------------
# Weather helpers
# ---------------------------------------------------------------------------
OPENWEATHER_URL = "https://api.openweathermap.org/data/2.5/weather"
DEFAULT_UNITS = "metric"# use Celsius by default
DEFAULT_LANG = "zh_cn"# Chinese descriptions


asyncdeffetch_weather(city: str, api_key: str) -> dict[str, str]:
"""Call OpenWeather API and return a simplified weather dict.

    Raises:
        httpx.HTTPStatusError: if the response has a non-2xx status.
    """
    params = {
"q": city,
"appid": api_key,
"units": DEFAULT_UNITS,
"lang": DEFAULT_LANG,
    }
asyncwith httpx.AsyncClient(timeout=10) as client:
        r = await client.get(OPENWEATHER_URL, params=params)
        r.raise_for_status()
        data = r.json()
# Extract a concise summary
    weather_main = data["weather"][0]["main"]
    description = data["weather"][0]["description"]
    temp = data["main"]["temp"]
    feels_like = data["main"]["feels_like"]
    humidity = data["main"]["humidity"]
return {
"city": city,
"weather": weather_main,
"description": description,
"temp": f"{temp}°C",
"feels_like": f"{feels_like}°C",
"humidity": f"{humidity}%",
    }


@click.command()
@click.option("--port", default=3000, help="Port to listen on for HTTP")
@click.option(
"--api-key",
    envvar="OPENWEATHER_API_KEY",
    required=True,
    help="OpenWeather API key (or set OPENWEATHER_API_KEY env var)",
)
@click.option(
"--log-level",
    default="INFO",
    help="Logging level (DEBUG, INFO, WARNING, ERROR, CRITICAL)",
)
@click.option(
"--json-response",
    is_flag=True,
    default=False,
    help="Enable JSON responses instead of SSE streams",
)
defmain(port: int, api_key: str, log_level: str, json_response: bool) -> int:
"""Run an MCP weather server using Streamable HTTP transport."""

# ---------------------- Configure logging ----------------------
    logging.basicConfig(
        level=getattr(logging, log_level.upper()),
        format="%(asctime)s - %(name)s - %(levelname)s - %(message)s",
    )
    logger = logging.getLogger("weather-server")

# ---------------------- Create MCP Server ----------------------
    app = Server("mcp-streamable-http-weather")

# ---------------------- Tool implementation -------------------
    @app.call_tool()
asyncdefcall_tool(name: str, arguments: dict) -> list[types.TextContent]:
"""Handle the 'get-weather' tool call."""
        ctx = app.request_context
        city = arguments.get("location")
ifnot city:
raise ValueError("'location' is required in arguments")

# Send an initial log message so the client sees streaming early.
await ctx.session.send_log_message(
            level="info",
            data=f"Fetching weather for {city}…",
            logger="weather",
            related_request_id=ctx.request_id,
        )

try:
            weather = await fetch_weather(city, api_key)
except Exception as err:
# Stream the error to the client and re-raise so MCP returns error.
await ctx.session.send_log_message(
                level="error",
                data=str(err),
                logger="weather",
                related_request_id=ctx.request_id,
            )
raise

# Stream a success notification (optional)
await ctx.session.send_log_message(
            level="info",
            data="Weather data fetched successfully!",
            logger="weather",
            related_request_id=ctx.request_id,
        )

# Compose human-readable summary for the final return value.
        summary = (
f"{weather['city']}:{weather['description']},温度 {weather['temp']},"
f"体感 {weather['feels_like']},湿度 {weather['humidity']}。"
        )

return [
            types.TextContent(type="text", text=summary),
        ]

# ---------------------- Tool registry -------------------------
    @app.list_tools()
asyncdeflist_tools() -> list[types.Tool]:
"""Expose available tools to the LLM."""
return [
            types.Tool(
                name="get-weather",
                description="查询指定城市的实时天气(OpenWeather 数据)",
                inputSchema={
"type": "object",
"required": ["location"],
"properties": {
"location": {
"type": "string",
"description": "城市的英文名称,如 'Beijing'",
                        }
                    },
                },
            )
        ]

# ---------------------- Session manager -----------------------
    session_manager = StreamableHTTPSessionManager(
        app=app,
        event_store=None,  # 无状态;不保存历史事件
        json_response=json_response,
        stateless=True,
    )

asyncdefhandle_streamable_http(scope: Scope, receive: Receive, send: Send) -> None:# noqa: D401,E501
await session_manager.handle_request(scope, receive, send)

# ---------------------- Lifespan Management --------------------
    @contextlib.asynccontextmanager
asyncdeflifespan(app: Starlette) -> AsyncIterator[None]:
asyncwith session_manager.run():
            logger.info("Weather MCP server started! 🚀")
try:
yield
finally:
                logger.info("Weather MCP server shutting down…")

# ---------------------- ASGI app + Uvicorn ---------------------
    starlette_app = Starlette(
        debug=False,
        routes=[Mount("/mcp", app=handle_streamable_http)],
        lifespan=lifespan,
    )

import uvicorn

    uvicorn.run(starlette_app, host="0.0.0.0", port=port)

return0


if __name__ == "__main__":
    main()
代码解释如下:
-
引入各种功能模块
import contextlib
import logging
import os
from collections.abc import AsyncIterator

import anyio
import click
import httpx
import mcp.types as types
from mcp.server.lowlevel import Server
from mcp.server.streamable_http_manager import StreamableHTTPSessionManager
from starlette.applications import Starlette
from starlette.routing import Mount
from starlette.types import Receive, Scope, Send
💡解释:
-
这些都是“工具箱”,你可以理解为在写一个天气小程序之前,先导入一些现成的功能组件:
-
httpx: 用来联网查天气。
-
mcp: 提供了让大模型调用工具的能力。
-
starlette: 帮你搭建 HTTP 网络服务。
-
click: 帮你写命令行参数,比如 --api-key=xxx。
-
其它模块则帮助你处理异步任务、打印日志、读取环境变量等。
-
-
查询天气的函数
asyncdeffetch_weather(city: str, api_key: str) -> dict[str, str]:💡解释:
-
这个函数是你天气服务器的核心功能——根据城市名去 OpenWeather 网站查询天气。
-
它用 httpx.AsyncClient 这个工具联网发请求,返回的结果包括:天气情况、气温、湿度等等。
-
启动服务器的主函数 main()
@click.command()
@click.option("--port", default=3000, ...)
@click.option("--api-key", envvar="OPENWEATHER_API_KEY", ...)
def main(port, api_key, ...):
💡解释:
-
这是你运行服务器的“入口”,你以后运行时只需要:
python weather_mcp_streamable_http_server.py --port 3000 --api-key xxxx-
click 是个很好用的命令行工具,帮你接收参数;
-
api_key 可以通过环境变量设置,方便又安全。
-
MCP工具注册:让大模型能调用 get-weather
@app.call_tool()
asyncdefcall_tool(name: str, arguments: dict):
💡解释:
-
这就是你注册给大语言模型用的“工具”,名字叫 get-weather。
-
当模型说“我需要查北京的天气”,MCP就会触发这个函数。
-
你在里面解析出 "location" 字段,然后调用上面那个 fetch_weather() 函数拿数据。
它还有一个 亮点功能:会实时往客户端推送消息:
awaitctx.session.send_log_message(...)这些就是所谓的 “流式日志通知”(比如“正在查询…”、“成功了!”)。
-
MCP告诉模型有哪些工具(工具列表)
@app.list_tools()
asyncdeflist_tools() -> list[types.Tool]:
💡解释:
-
MCP 会定期问你:“你这里都有哪些工具可以用?”
-
你就返回一个叫 get-weather 的工具描述,告诉模型:
-
输入需要一个 location,是城市名。
-
流式会话管理器配置
session_manager = StreamableHTTPSessionManager(
    app=app,
    event_store=None,
    json_response=json_response,
    stateless=True,
)
💡解释:
-
这一句创建了 MCP 的“HTTP 会话处理中心”,负责处理所有 /mcp 路由的请求;
-
stateless=True 表示不保存历史对话,每次都是新请求;
-
json_response=False 表示用流式 SSE(你也可以改成一次性 JSON 响应)。
-
构建 Starlette Web 应用
starlette_app = Starlette(
    routes=[Mount("/mcp", app=handle_streamable_http)],
    lifespan=lifespan,
)
💡解释:
-
这是将 MCP 服务挂载到你的网站 /mcp 路径上;
-
用户访问这个路径时,就会进入刚才创建的 MCP 会话管理器。
-
启动服务器
import uvicorn
uvicorn.run(starlette_app, host="0.0.0.0", port=port)
💡解释:
-
这行代码启动你的 MCP HTTP 服务器,监听指定端口;
-
如果你传的是 --port 3000,访问路径就是:
http://localhost:3000/mcp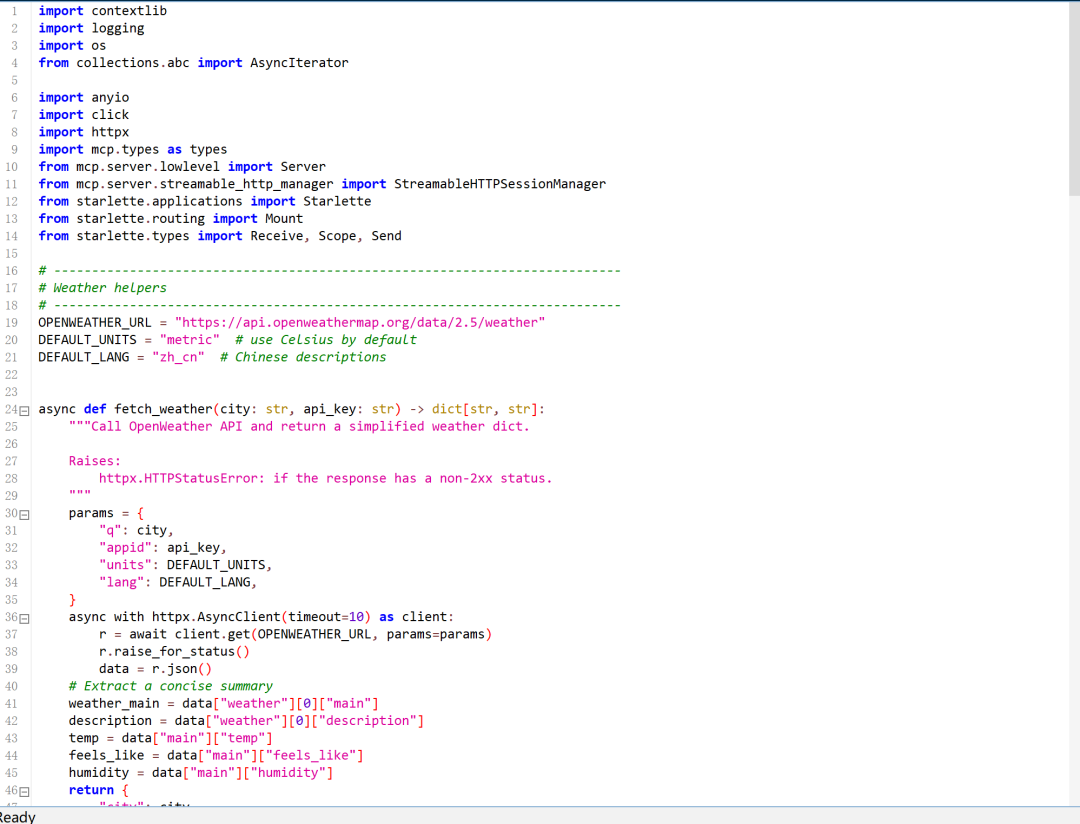
同时需要回到主目录,修改项目配置文件pyproject.toml:
[build-system]
requires = ["setuptools>=61.0", "wheel"]
build-backend = "setuptools.build_meta"

[project]
name = "mcp-weather-http"
version = "1.1.0"
description = "输入OpenWeather-API-KEY,获取天气信息。"
readme = "README.md"
requires-python = ">=3.9"
dependencies = [
"httpx>=0.28.1",
"mcp>=1.8.0",
]

[project.scripts]
mcp-weather-http = "mcp_weather_http:main"

[tool.setuptools]
package-dir = {"" = "src"}

[tool.setuptools.packages.find]
where = ["src"]
至此即完成了整个项目的代码编写工作。完整项目代码可在网盘中领取:

二、HTTP流式传输MCP服务器开启与测试
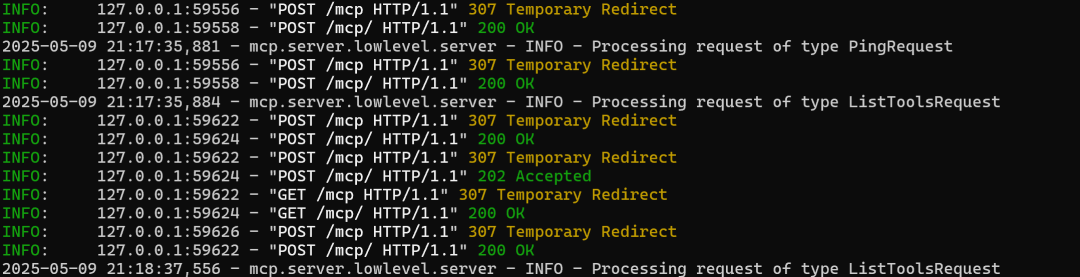
在创建完server.py后,我们可以开启服务并进行测试。需要注意的是,我们需要先开启流式HTTP MCP服务器,然后再开启Inspector:
-
开启流式HTTP MCP服务器:
# 回到项目主目录
#cd /root/autodl-tmp/MCP/mcp-weather-http

uv run ./src/mcp_weather_http/server.py --api-key YOUR_KEY
-
开启Inspector
# 回到项目主目录
#cd /root/autodl-tmp/MCP/mcp-weather-http
#source .venv/bin/activate

npx -y @modelcontextprotocol/inspector uv run main.py --api-key YOUR_KEY
-
进行测试
-
同样,如果是使用AutoDL,则先需要使用隧道工具将端口映射到本地进行运行:

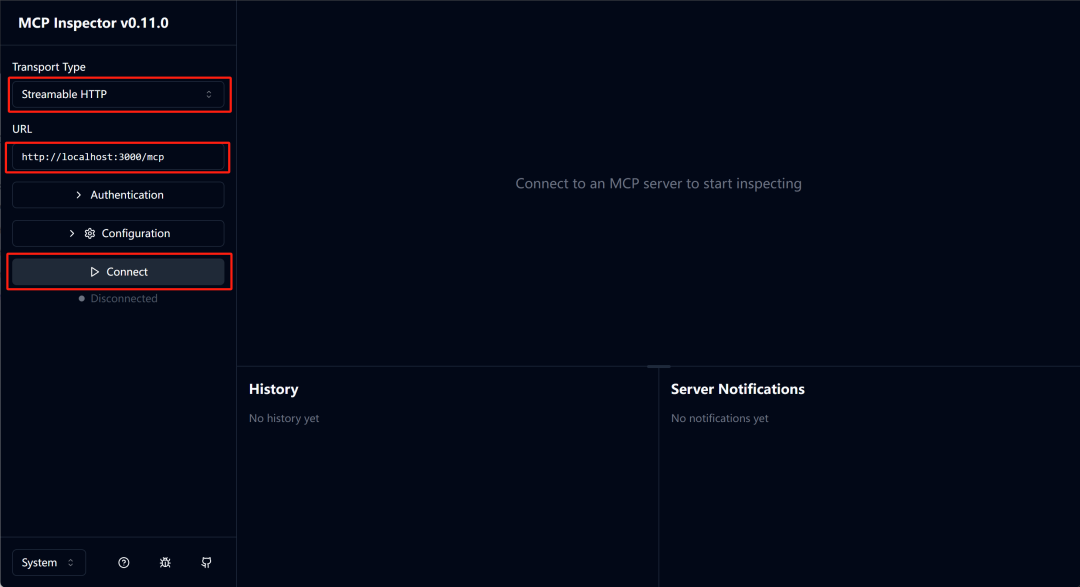
然后打开Inspector,并选择HTTP流式模式,选择默认运行地址:http://localhost:3000/mcp,然后点击connect:
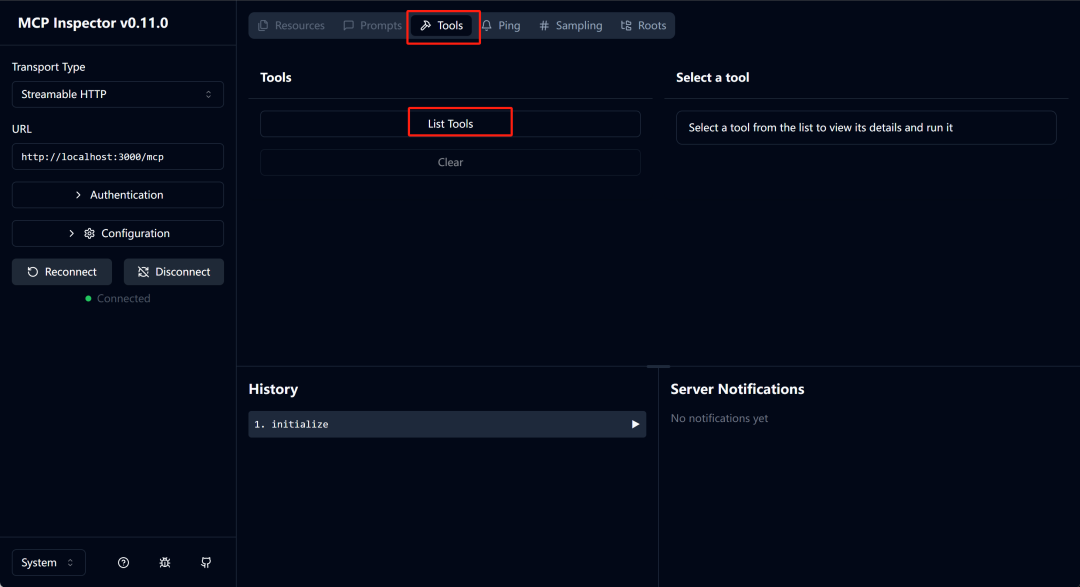
然后点击List Tools:
然后点击get-weather:

然后输入地名进行测试:
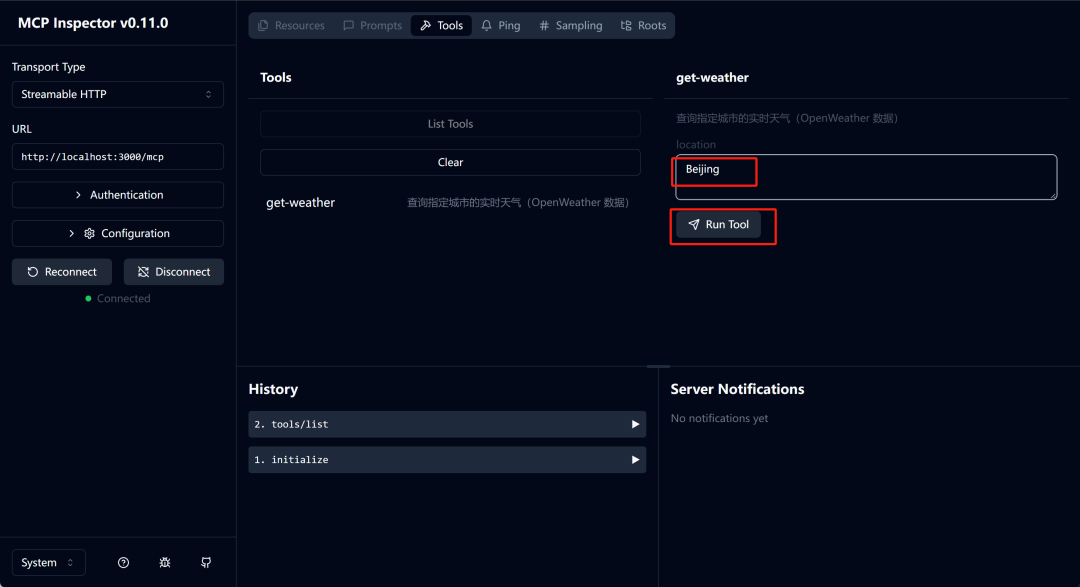
若能正常返回结果,则说明服务器运行正常。
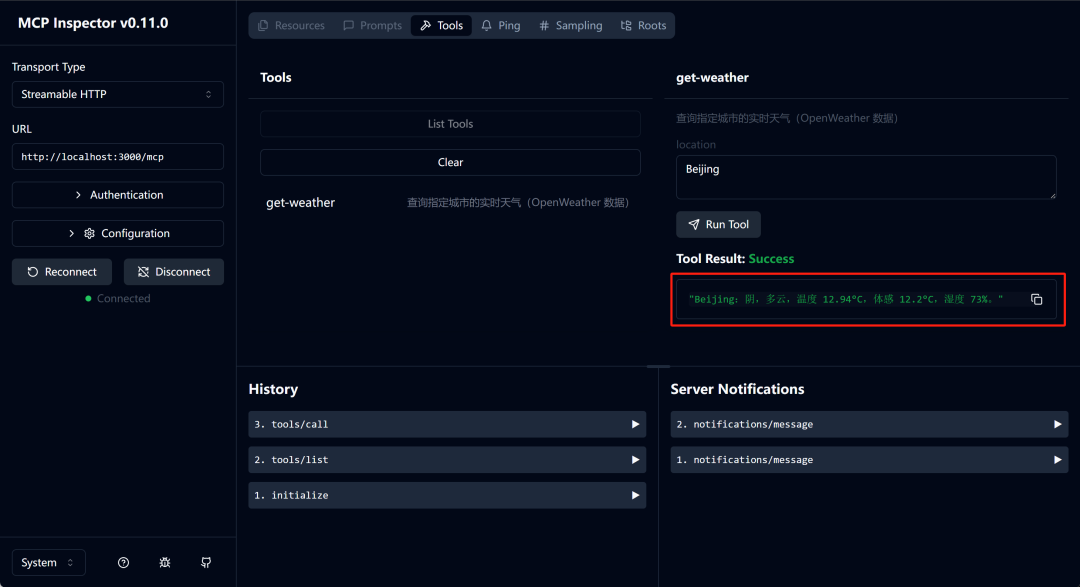
完整测试流程如下所示:
三、流式HTTP MCP服务器异地调用
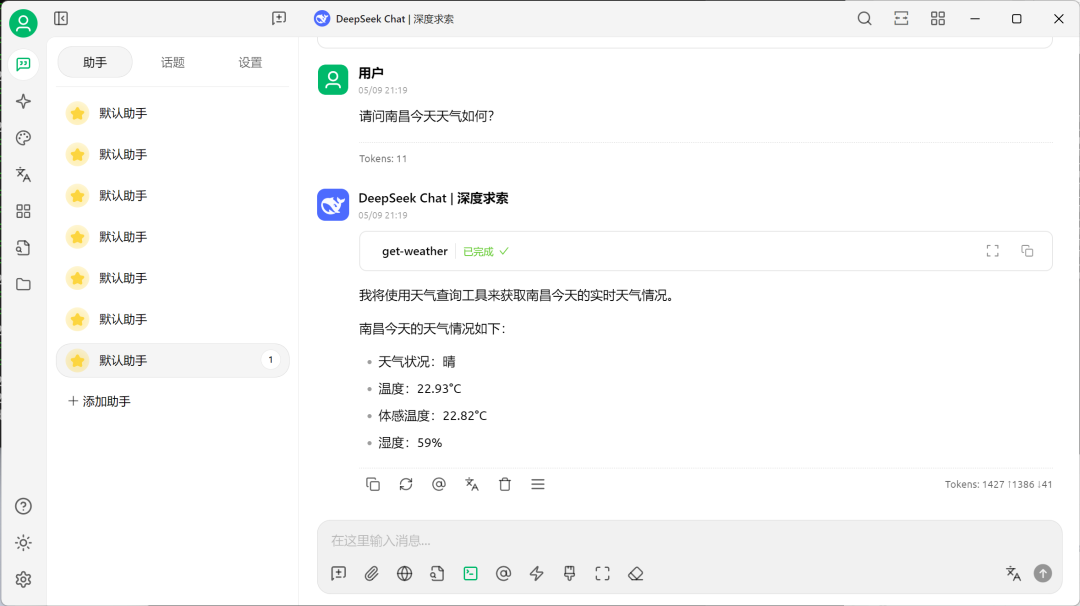
接下来即可在异地环境(也可以是本地)通过HTTP方式调用MCP服务了。这里以本地安装的Cherry Studio为例,进行调用演示。此处需要保持远程流式HTTP MCP服务器处于开启状态,然后按照如下流程进行调用。
首先点击添加服务器:
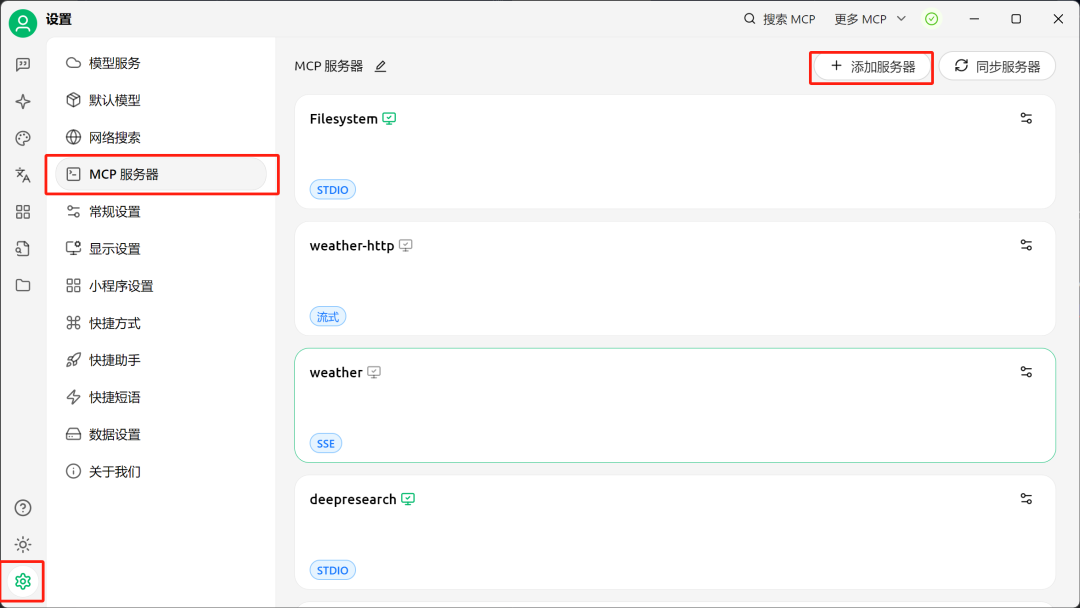
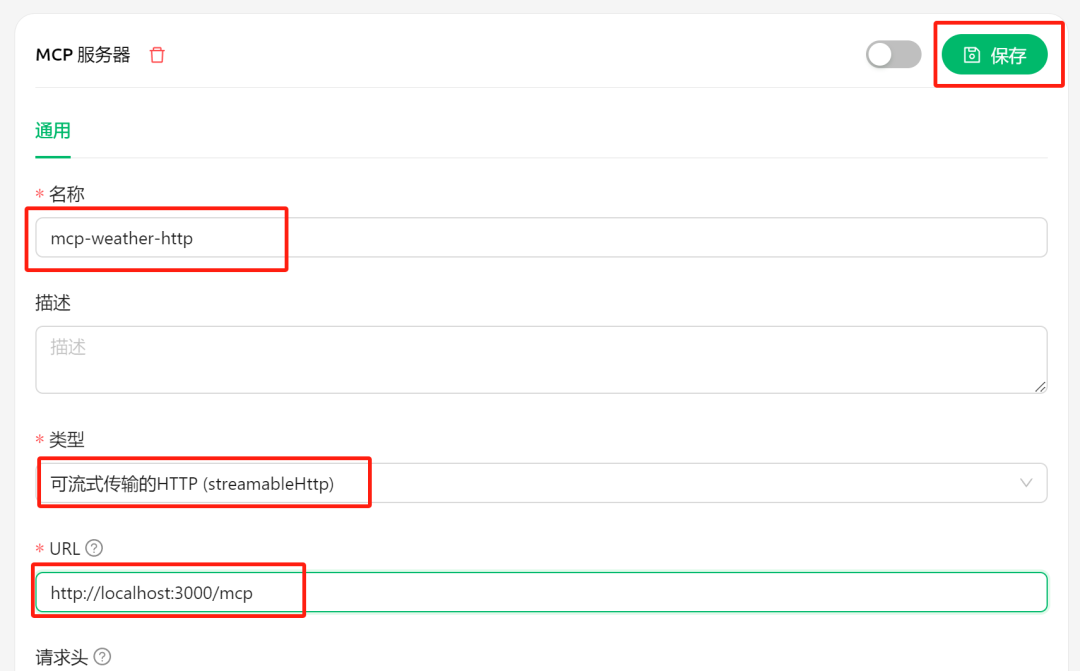
然后输入服务器名称mcp-weather-http,并选择流式传输类型,并选择服务器地址:http://localhost:3000/mcp ,然后点击保存:

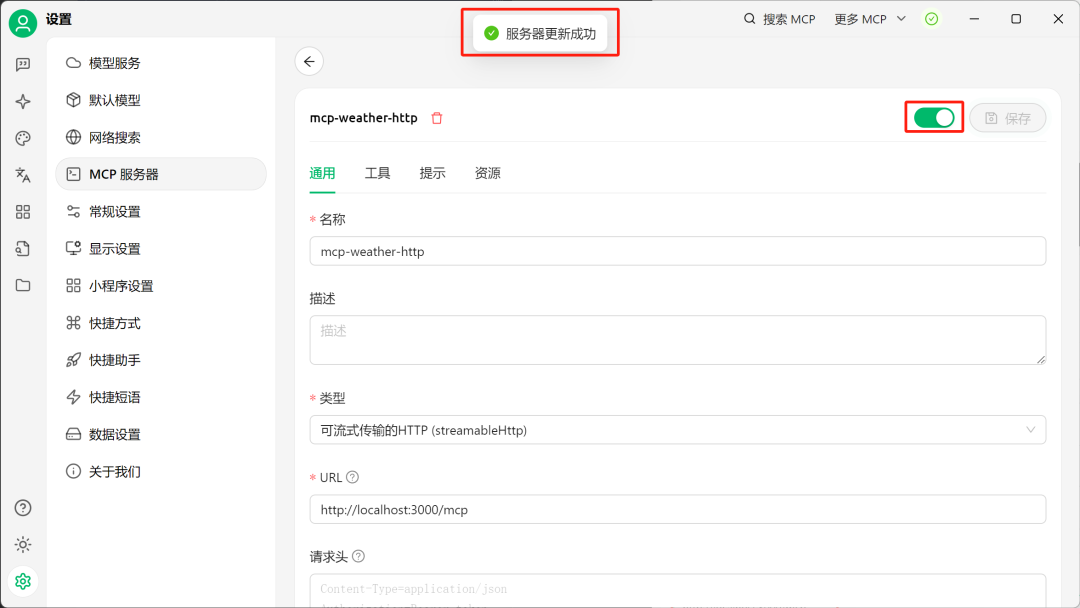
若显示服务器更新成功,则表示已经连接上MCP服务器:

此时后台显示如下:

然后即可进行对话测试,这里回到对话页面,选择MCP服务器,
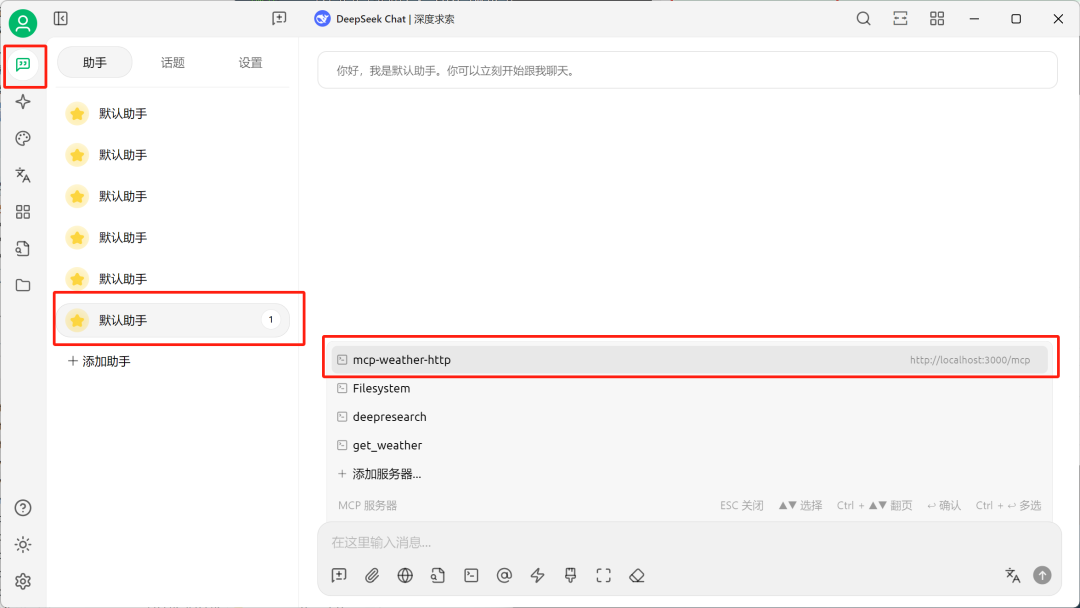
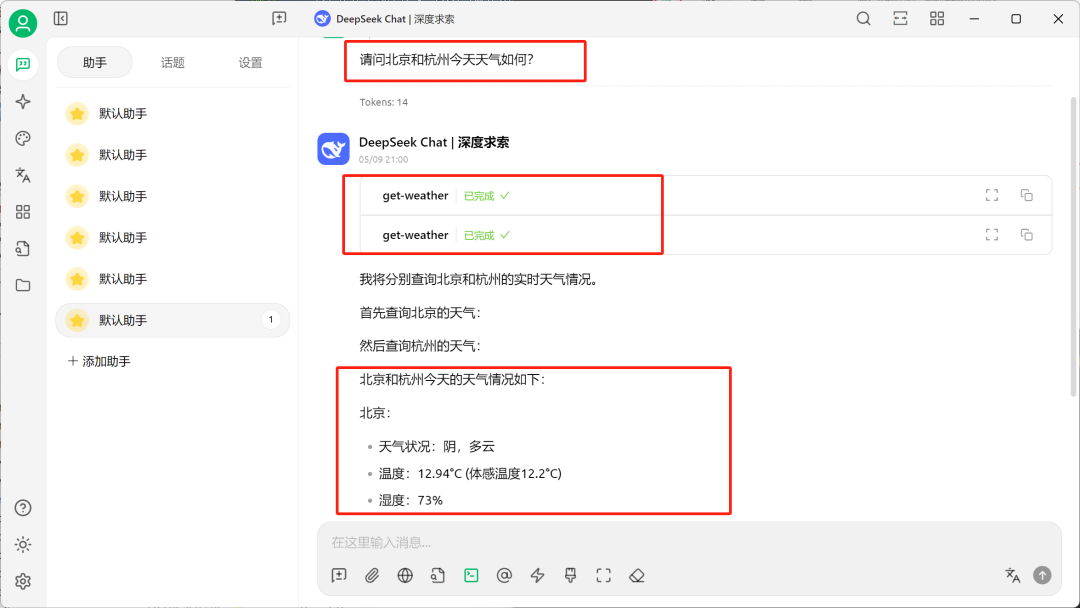
然后进行天气查询测试:请问北京和杭州今天天气如何?,然后即可查看回答结果:
完整设置与调用流程演示如下:
四、流式HTTP MCP服务器发布流程
测试完成后,即可上线发布。这里仍然考虑发布到pypi平台,并使用cherry studio进行本地调用测试。完整项目代码可在网盘中领取:

-
打包上传:
# 回到项目主目录
#cd /root/autodl-tmp/MCP/mcp-weather-http

uv pip install build twine
python -m build
python -m twine upload dist/*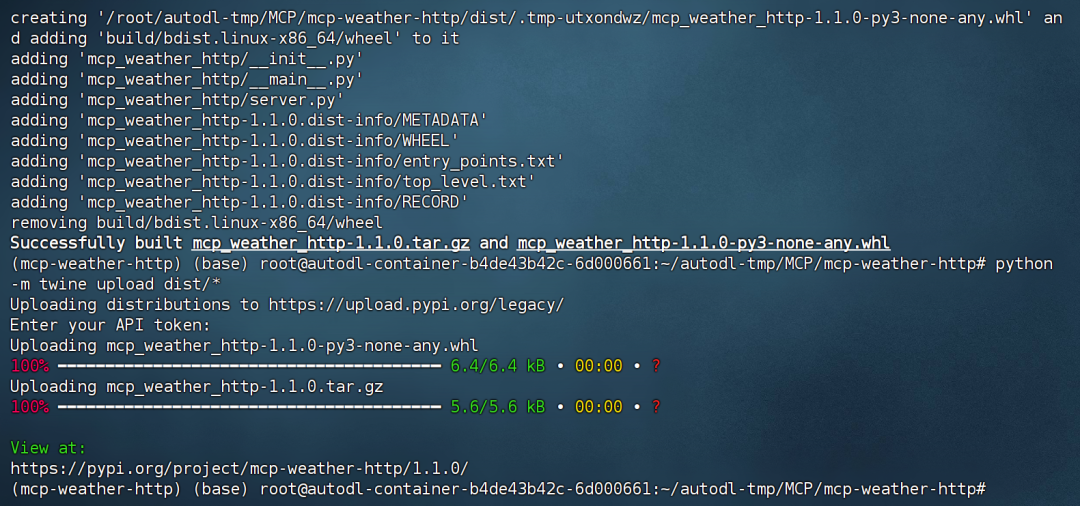
-
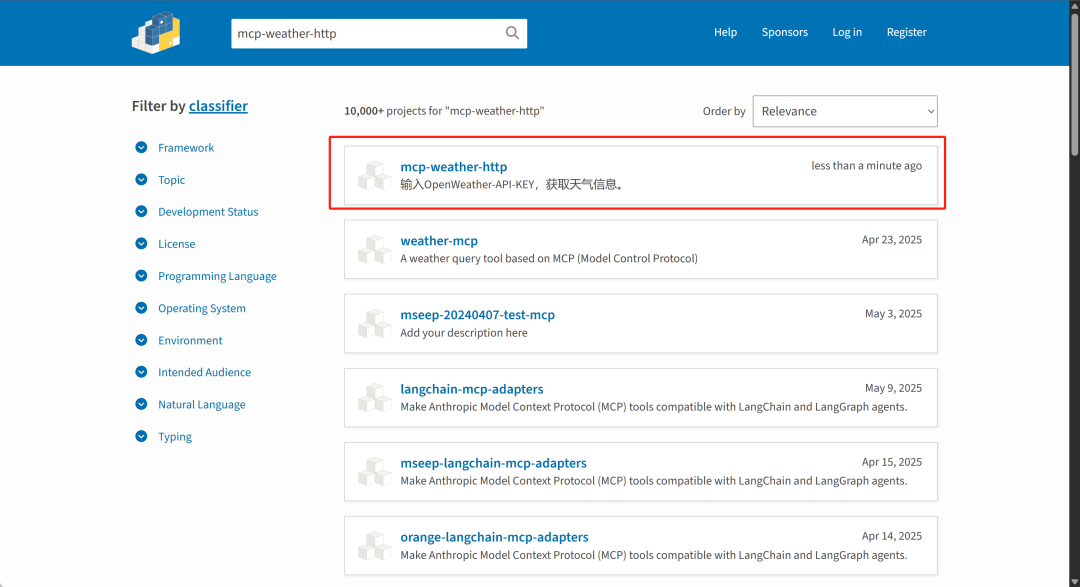
查看发布的库:https://pypi.org/search/?q=mcp-weather-http&o=
-
本地安装:
pip install mcp-weather-http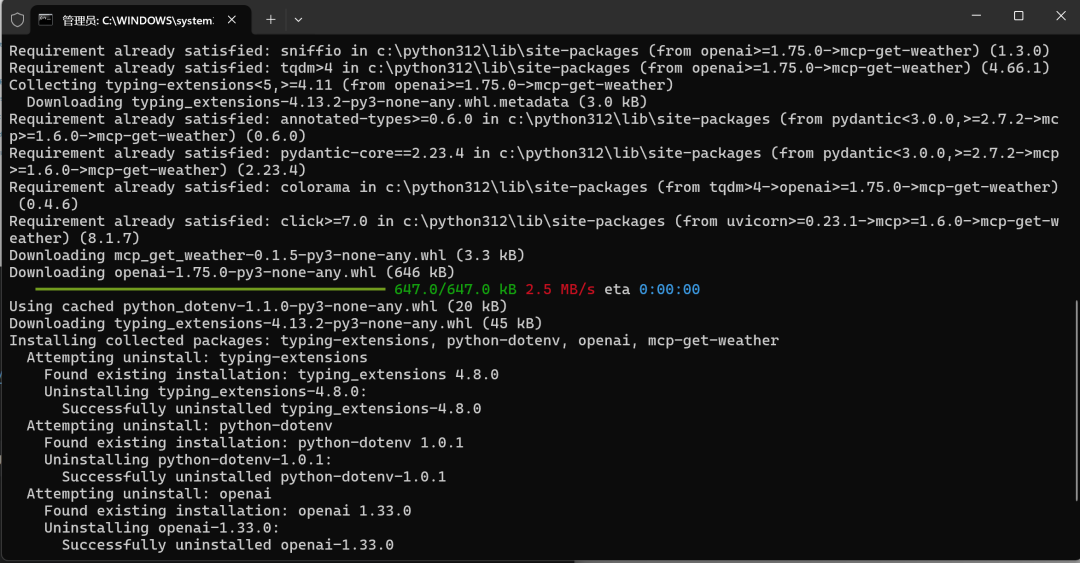

-
开启服务:uv run mcp-weather-http --api-key YOUR_API_KEY

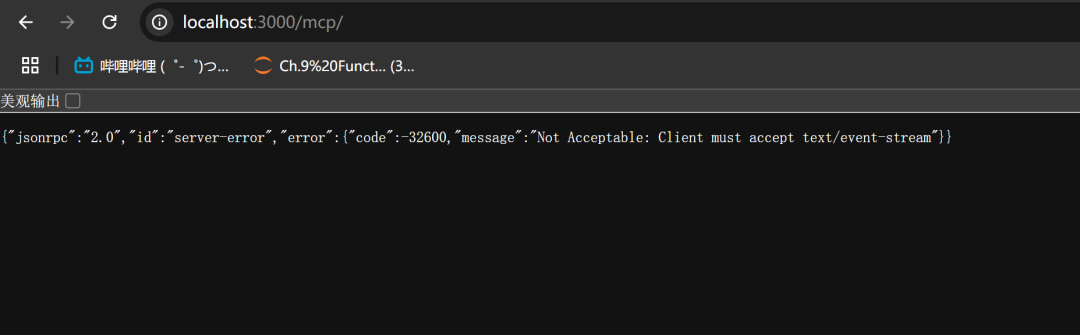
然后即可打开浏览器输入http://localhost:3000/mcp测试连接情况
-
使用Cherry studio进行连接
然后即可使用Cherry studio连接流式HTTP模式下的MCP服务器,还是和此前一样的连接流程,输入服务器名称mcp-weather-http,并选择流式传输类型,并选择服务器地址:http://localhost:3000/mcp ,然后点击保存:
若显示服务器更新成功,则表示已经连接上MCP服务器:
此时本地环境后台显示内容如下:
接下来即可进行对话测试:
至此,我们就完成了流式HTTP MCP工具的发布、下载与调用测试流程。
以上就是本期全部内容啦,整理自九天老师的B站视频,还有更多的MCP系列的开发、部署、上线教程等等📍进入赋范大模型技术社区即可领取~

为每个人提供最有价值的技术赋能!【公益】大模型技术社区已经上线!
内容完全免费,涵盖20多套工业级方案 + 10多个企业实战项目 + 400万开发者筛选的实战精华~不定期开展大模型硬核技术直播公开课,对标市面千元价值品质,社区成员限时免费听!


 被折叠的 条评论
为什么被折叠?
被折叠的 条评论
为什么被折叠?
 到【灌水乐园】发言


