


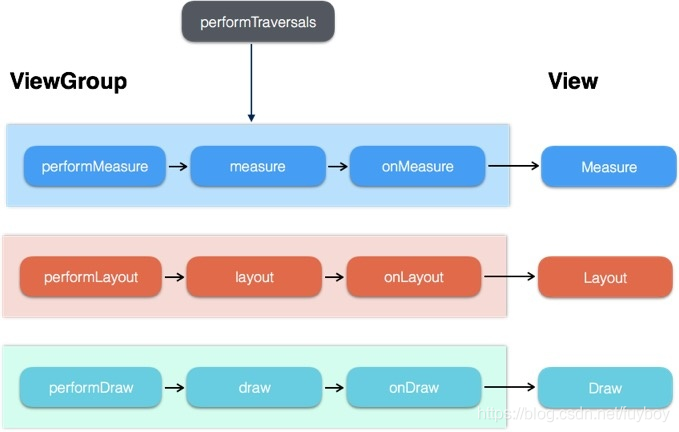
View的绘制流程是从ViewRoot的performTraversals方法开始的,经过measure、layout和draw三个过程才能其最终将一个View绘制出来,流程如下:
首先是measure的过程,在此之前需要先理解MeasureSpec:
MeasureSpec:32位的 int 值,高2位代表SpecMode(测量模式),低30位代表SpecSize(大小);MeasureSpec通过将SecMode和SpedSize打包成一个int值来避免过多的对象内存分配,并提供了打包和解包的方法;
SpecMode有三类:
UNSPECIFIDE :父容器不对View有任何限制,要多大给多大,一般用在系统内部;
EXACTLY:精确模式,对应match_parent和具体数值,父容器已经测量出View所需的大小,即为SpecSize的值;
AT_MOST:最大模式,对应wrap_content属性,父容器指定了SpecSize的值,子View的大小不能大于这个值;
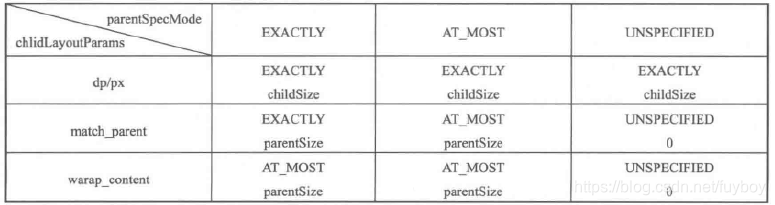
MeasureSpec的计算:
1、对于DecorView ,确定MeasureSpec是通过屏幕大小和自身的布局参数LayoutParams;
2、对于普通View,确定MeasureSpec是通过父布局的MeasureSpec和自身的布局参数LaoutParams,参考ViewGroup源码 :
public static int getChildMeasureSpec(int spec, int padding, int childDimension) {
    int specMode = MeasureSpec.getMode(spec);
    int specSize = MeasureSpec.getSize(spec);

    int size = Math.max(0, specSize - padding);

    int resultSize = 0;
    int resultMode = 0;

    switch (specMode) {
    case MeasureSpec.EXACTLY:
//子view的LaoutParams>0,即有确切值
        if (childDimension >= 0) {
            resultSize = childDimension;
            resultMode = MeasureSpec.EXACTLY;
        } else if (childDimension == LayoutParams.MATCH_PARENT) {
            // Child wants to be our size. So be it.
            resultSize = size;
            resultMode = MeasureSpec.EXACTLY;
        } else if (childDimension == LayoutParams.WRAP_CONTENT) {
            // Child wants to determine its own size. It can't be
            // bigger than us.
            resultSize = size;
            resultMode = MeasureSpec.AT_MOST;
        }
        break;

    // Parent has imposed a maximum size on us
    case MeasureSpec.AT_MOST:
        if (childDimension >= 0) {
            // Child wants a specific size... so be it
            resultSize = childDimension;
            resultMode = MeasureSpec.EXACTLY;
        } else if (childDimension == LayoutParams.MATCH_PARENT) {
            // Child wants to be our size, but our size is not fixed.
            // Constrain child to not be bigger than us.
            resultSize = size;
            resultMode = MeasureSpec.AT_MOST;
        } else if (childDimension == LayoutParams.WRAP_CONTENT) {
            // Child wants to determine its own size. It can't be
            // bigger than us.
            resultSize = size;
            resultMode = MeasureSpec.AT_MOST;
        }
        break;

    // Parent asked to see how big we want to be
    case MeasureSpec.UNSPECIFIED:
        if (childDimension >= 0) {
            // Child wants a specific size... let him have it
            resultSize = childDimension;
            resultMode = MeasureSpec.EXACTLY;
        } else if (childDimension == LayoutParams.MATCH_PARENT) {
            // Child wants to be our size... find out how big it should
            // be
            resultSize = View.sUseZeroUnspecifiedMeasureSpec ? 0 : size;
            resultMode = MeasureSpec.UNSPECIFIED;
        } else if (childDimension == LayoutParams.WRAP_CONTENT) {
            // Child wants to determine its own size.... find out how
            // big it should be
            resultSize = View.sUseZeroUnspecifiedMeasureSpec ? 0 : size;
            resultMode = MeasureSpec.UNSPECIFIED;
        }
        break;
    }
    //noinspection ResourceType
    return MeasureSpec.makeMeasureSpec(resultSize, resultMode);
}
总结出来即是:
一、mesaure过程:
measure过程分两种情况,如果只是单一的view,通过自生的measure方法就完成了测量过程,如果是viewGroup,除了完成自己的测量过程外,还会遍历去调用所有子元素的measure方法;
1、view的measure过程
view的measure过程由其measure方法完成,measure是一个final类型的方法,意味着子类不能重写该方法,在measure方法中会调用onMeasure方法:
protected void onMeasure(int widthMeasureSpec, int heightMeasureSpec) {
    setMeasuredDimension(getDefaultSize(getSuggestedMinimumWidth(), widthMeasureSpec),
            getDefaultSize(getSuggestedMinimumHeight(), heightMeasureSpec));
}
setMeasureDimension方法会去设置宽/高的测量值;再看到getDefaultSize方法返回的内容:
public static int getDefaultSize(int size, int measureSpec) {
    int result = size;
    int specMode = MeasureSpec.getMode(measureSpec);
    int specSize = MeasureSpec.getSize(measureSpec);

    switch (specMode) {
    case MeasureSpec.UNSPECIFIED:
        result = size;
        break;
    case MeasureSpec.AT_MOST:
    case MeasureSpec.EXACTLY:
        result = specSize;
        break;
    }
    return result;
}
在AT_MOST和EXACTLY两种模式下返回的就是测量后的specSize;
对于UNSPECIFIED模式通常用在系统内部的测量过程,返回的为传入的size,在看下size如何获取:
protected int getSuggestedMinimumWidth() {
    return (mBackground == null) ? mMinWidth : max(mMinWidth, mBackground.getMinimumWidth());
}
protected int getSuggestedMinimumHeight() {
    return (mBackground == null) ? mMinHeight : max(mMinHeight, mBackground.getMinimumHeight());
}
如果没有设置背景,返回值即为mMinWidth,对应的即为android:minWidth属性的值,默认0;
如果设置了背景,返回值为max(mMinWidth, mBackground.getMinimumWidth()),再看下mBackground.getMinimumWidth()的值是多少:
public int getMinimumWidth() {
    final int intrinsicWidth = getIntrinsicWidth();
    return intrinsicWidth > 0 ? intrinsicWidth : 0;
}
返回的是Drawable的原始宽度,如果没有原始宽度则返回0;
可以看出如果我们在自定义view的时候设置了wrap_content,则返回specSize,在使用效果上和match_parent没有区别,所以可以按需求重写onMeasure方法,判断wrap_content的情况。
2、viewGroup的measure过程:
和view不同的是,viewGroup是一个抽象方法,因此没有重写view的onMeasure方法,但是提供了measureChildren方法:
protected void measureChildren(int widthMeasureSpec, int heightMeasureSpec) {
    final int size = mChildrenCount;
    final View[] children = mChildren;
    for (int i = 0; i < size; ++i) {
        final View child = children[i];
        if ((child.mViewFlags & VISIBILITY_MASK) != GONE) {
            measureChild(child, widthMeasureSpec, heightMeasureSpec);
        }
    }
}
遍历子元素,调用measureChild方法:
protected void measureChild(View child, int parentWidthMeasureSpec,
        int parentHeightMeasureSpec) {
    final LayoutParams lp = child.getLayoutParams();

    final int childWidthMeasureSpec = getChildMeasureSpec(parentWidthMeasureSpec,
            mPaddingLeft + mPaddingRight, lp.width);
    final int childHeightMeasureSpec = getChildMeasureSpec(parentHeightMeasureSpec,
            mPaddingTop + mPaddingBottom, lp.height);
    child.measure(childWidthMeasureSpec, childHeightMeasureSpec);
}
大体逻辑是先获取子元素的LayoutParams,然后通过getChildMeasureSpec方法获取子元素的MeasureSpec,然后传给view的measure方法进行测量。
可以看出viewGroup没有具体的测量流程,其测量过程需要各个子view的measure方法,因为不同的viewGroup具有不同的特性,测量细节也不同,无法统一实现。
当View的measure完成后,就可以通过getMeasureWidth/Height方法就可以正确的获取View的测量宽/高;在某些极端情况下可能需要多次measure才能最终确定测量宽/高,此时onMeasure方法中拿到的测量宽/高可能不准确,最好是在onLayout方法中获取测量宽/高。
二、layout过程
layout的作用的确定view的位置,入口在view 的 layout 方法:
部分关键代码:
public void layout(int l, int t, int r, int b) {
    if ((mPrivateFlags3 & PFLAG3_MEASURE_NEEDED_BEFORE_LAYOUT) != 0) {
        onMeasure(mOldWidthMeasureSpec, mOldHeightMeasureSpec);
        mPrivateFlags3 &= ~PFLAG3_MEASURE_NEEDED_BEFORE_LAYOUT;
    }

    int oldL = mLeft;
    int oldT = mTop;
    int oldB = mBottom;
    int oldR = mRight;

    boolean changed = isLayoutModeOptical(mParent) ?
            setOpticalFrame(l, t, r, b) : setFrame(l, t, r, b);

    if (changed || (mPrivateFlags & PFLAG_LAYOUT_REQUIRED) == PFLAG_LAYOUT_REQUIRED) {
        onLayout(changed, l, t, r, b);
。。。。
    }
。。。。
}
首先会调用 setOpticalFrame/setFrame 方法设置四个顶点位置:
private boolean setOpticalFrame(int left, int top, int right, int bottom) {
    Insets parentInsets = mParent instanceof View ?
            ((View) mParent).getOpticalInsets() : Insets.NONE;
    Insets childInsets = getOpticalInsets();
    return setFrame(
            left   + parentInsets.left - childInsets.left,
            top    + parentInsets.top  - childInsets.top,
            right  + parentInsets.left + childInsets.right,
            bottom + parentInsets.top  + childInsets.bottom);
}
protected boolean setFrame(int left, int top, int right, int bottom) {
    boolean changed = false;

    if (DBG) {
        Log.d(VIEW_LOG_TAG, this + " View.setFrame(" + left + "," + top + ","
                + right + "," + bottom + ")");
    }

    if (mLeft != left || mRight != right || mTop != top || mBottom != bottom) {
        changed = true;

        // Remember our drawn bit
        int drawn = mPrivateFlags & PFLAG_DRAWN;

        int oldWidth = mRight - mLeft;
        int oldHeight = mBottom - mTop;
        int newWidth = right - left;
        int newHeight = bottom - top;
        boolean sizeChanged = (newWidth != oldWidth) || (newHeight != oldHeight);

        // Invalidate our old position
        invalidate(sizeChanged);

        mLeft = left;
        mTop = top;
        mRight = right;
        mBottom = bottom;
        mRenderNode.setLeftTopRightBottom(mLeft, mTop, mRight, mBottom);

        mPrivateFlags |= PFLAG_HAS_BOUNDS;


        if (sizeChanged) {
            sizeChange(newWidth, newHeight, oldWidth, oldHeight);
        }

        if ((mViewFlags & VISIBILITY_MASK) == VISIBLE || mGhostView != null) {
            // If we are visible, force the DRAWN bit to on so that
            // this invalidate will go through (at least to our parent).
            // This is because someone may have invalidated this view
            // before this call to setFrame came in, thereby clearing
            // the DRAWN bit.
            mPrivateFlags |= PFLAG_DRAWN;
            invalidate(sizeChanged);
            // parent display list may need to be recreated based on a change in the bounds
            // of any child
            invalidateParentCaches();
        }

        // Reset drawn bit to original value (invalidate turns it off)
        mPrivateFlags |= drawn;

        mBackgroundSizeChanged = true;
        mDefaultFocusHighlightSizeChanged = true;
        if (mForegroundInfo != null) {
            mForegroundInfo.mBoundsChanged = true;
        }

        notifySubtreeAccessibilityStateChangedIfNeeded();
    }
    return changed;
}
可以看到setOpticalFrame 方法最终也是调用了 setFrame 方法,在setFrame 方法中初始化了mLeft、mTop、mRight、mBottom四个顶点值,确定了view的四个顶点,也就等与是确定了在父容器的位置。
接着会调用 onLayout 方法,这个方法主要是用在父容器确定子元素的位置;对于单一view来说没有子元素,所以是空实现;对于ViewpGroup来说,不同的布局有不同的实现,需要子类去重写实现方式,整体的流程还是在onLayout方法里面遍历子元素,调用子元素的layout方法去设置自己的位置。
getWidth()/getHeight()和getMeasureWidth()/getMeasureHeight()的区别:
从方法实现可以看出,getWidth()/getHeight()是在layout过程中生成的,getMeasureWidth()/getMeasureHeight()是在measure过程生成的,在默认情况下值都是相同的;但是在一些特殊情况下会导致两种结果不相同,比如:需要多次measure,或者重写layout方法人为改变值等。
三、draw过程
完成layout后就是调用draw方法将view绘制出来,绘制的入口在view的draw()方法:
public void draw(Canvas canvas) {
    final int privateFlags = mPrivateFlags;
    mPrivateFlags = (privateFlags & ~PFLAG_DIRTY_MASK) | PFLAG_DRAWN;

    /*
     * Draw traversal performs several drawing steps which must be executed
     * in the appropriate order:
     *
     *      1. Draw the background
     *      2. If necessary, save the canvas' layers to prepare for fading
     *      3. Draw view's content
     *      4. Draw children
     *      5. If necessary, draw the fading edges and restore layers
     *      6. Draw decorations (scrollbars for instance)
     */

    // Step 1, draw the background, if needed
    int saveCount;

    drawBackground(canvas);

    // skip step 2 & 5 if possible (common case)
    final int viewFlags = mViewFlags;
    boolean horizontalEdges = (viewFlags & FADING_EDGE_HORIZONTAL) != 0;
    boolean verticalEdges = (viewFlags & FADING_EDGE_VERTICAL) != 0;
    if (!verticalEdges && !horizontalEdges) {
        // Step 3, draw the content
        onDraw(canvas);

        // Step 4, draw the children
        dispatchDraw(canvas);

        drawAutofilledHighlight(canvas);

        // Overlay is part of the content and draws beneath Foreground
        if (mOverlay != null && !mOverlay.isEmpty()) {
            mOverlay.getOverlayView().dispatchDraw(canvas);
        }

        // Step 6, draw decorations (foreground, scrollbars)
        onDrawForeground(canvas);

        // Step 7, draw the default focus highlight
        drawDefaultFocusHighlight(canvas);

        if (debugDraw()) {
            debugDrawFocus(canvas);
        }

        // we're done...
        return;
    }
。。。。。。
}
通过注释可以看出大致分一下几个步骤:
1、先调用drawBackground()方法绘制背景;
2、调用onDraw()方法绘制自身内容
3、调用dispatchDraw()绘制子元素
4、调用onDrawForeground()方法绘制装饰
可以看到onDraw()方法,默认是空实现,只是应为不同的view内容不一样,在自定义view的时候需要自己实现;
对于dispatchDraw()方法,由于单一view没有子元素,不需要实现,而是在viewGroup复写了该方法,遍历所有子元素,分别绘制子元素:
protected void dispatchDraw(Canvas canvas) {
......
for (int i = 0; i < childrenCount; i++) {
    while (transientIndex >= 0 && mTransientIndices.get(transientIndex) == i) {
        final View transientChild = mTransientViews.get(transientIndex);
        if ((transientChild.mViewFlags & VISIBILITY_MASK) == VISIBLE ||
                transientChild.getAnimation() != null) {
            more |= drawChild(canvas, transientChild, drawingTime);
        }
        transientIndex++;
        if (transientIndex >= transientCount) {
            transientIndex = -1;
        }
    }

    final int childIndex = getAndVerifyPreorderedIndex(childrenCount, i, customOrder);
    final View child = getAndVerifyPreorderedView(preorderedList, children, childIndex);
    if ((child.mViewFlags & VISIBILITY_MASK) == VISIBLE || child.getAnimation() != null) {
        more |= drawChild(canvas, child, drawingTime);
    }
}
......
}
protected boolean drawChild(Canvas canvas, View child, long drawingTime) {
    return child.draw(canvas, this, drawingTime);
}
遍历子元素,调用drawChild()方法,最终调用子元素的draw方法完成绘制。


 1855
1855


 被折叠的 条评论
为什么被折叠?
被折叠的 条评论
为什么被折叠?
 到【灌水乐园】发言


