


Spring 框架中用到的设计模式非常多,不下十几种。本文只挑选几种典型的来解析。
适配器模式应用在Spring MVC中
Spring MVC定义一个Controller最常用的方式是,通过@Controller注解来标记某个类是Controller类,通过@RequesMapping注解来标记函数对应的URL。不过,定义一个Controller远不止这一种方法。我们还可以通过让类实现Controller接口或者Servlet接口,来定义一个 Controller。这三种定义方式示例代码,如下所示:
//方法一:通过@Controller、@RequestMapping来定义
@Controller
public class DemoController {

    @RequestMapping("/getUserName")
    public ModelAndView getUserName() {
        ModelAndView model = new ModelAndView("Greeting");
        model.addObject("message", "TOM");
        return model;
    }
}
//方法二:实现Controller接口 + xml配置文件:配置DemoController与URL的对应关系
public class DemoControllerImpl implements Controller {
    @Override
    public ModelAndView handleRequest(HttpServletRequest request, HttpServletResponse response) throws Exception {
        ModelAndView model = new ModelAndView("HelloWorld");
        model.addObject("message", "HelloWorld");
        return model;
    }
}
//方法三:继承HttpServlet抽象类 + xml配置文件:配置DemoExtendServletController类与URL的对应关系
public class DemoExtendServletController extends HttpServlet {

    @Override
    protected void doGet(HttpServletRequest req, HttpServletResponse resp) throws ServletException, IOException {
        this.doPost(req, resp);
    }

    @Override
    protected void doPost(HttpServletRequest req, HttpServletResponse resp) throws ServletException, IOException {
        resp.getWriter().write("Hello World!");
    }
}
在应用启动的时候,Spring容器会加载这些Controller类,并且解析出URL对应的处理函数,封装成Handler对象,存储到HandlerMapping对象中。当有请求到来的时候,DispatcherServlet从HanderMapping中,查找请求URL对应的Handler,然后调用执行Handler对应的函数代码,最后将执行结果返回给客户端。
但是不同方式定义的Controller,其函数的定义(函数名、入参、返回值等)是不统一的。方法一中的函数的定义很随意、不固定,方法二中的函数定义是 handleRequest()、方法三中的函数定义是HttpServlet的service()方法(实际上这里用到了模板方法模式,Servlet中的service()调用了doGet()或doPost()方法,DispatcherServlet调用的是service()方法)。
DispatcherServlet需要根据不同类型的Controller,调用不同的函数,下面是伪代码:
Handler handler = handlerMapping.get(URL);
if (handler instanceof Controller) {
  ((Controller)handler).handleRequest();
} else if (handler instanceof Servlet) {
  ((Servlet)handler).service(...);
} else if (handler.getClass().getAnnotation(Controller.class) != null) {
  //反射调用RequestMapping修饰的方法...
}
这种实现方式会有很多if-else分支判断,而且,如果要增加一个新的 Controller的定义方法,我们就要在DispatcherServlet类代码中,对应地增加一段如上伪代码所示的if逻辑,这显然不符合开闭原则。
可以利用是适配器模式对代码进行改造,让其满足开闭原则,能更好地支持扩展,适配器其中一个作用是“统一多个类的接口设计”。利用适配器模式,我们将不同方式定义的Controller类中的函数适配为统一的函数定义。这样,我们就能在DispatcherServlet类代码中,移除掉if-else分支判断逻辑,调用统一的函数。
来具体看下Spring的代码实现。Spring定义了统一的接口HandlerAdapter,并且对每种Controller定义了对应的适配器类。这些适配器类包括:AnnotationMethodHandlerAdapter、SimpleControllerHandlerAdapter、SimpleServletHandlerAdapter等,源码如下。
//统一的controller处理器适配接口
public interface HandlerAdapter {
  boolean supports(Object var1);
  ModelAndView handle(HttpServletRequest var1, HttpServletResponse var2, Object var3) throws Exception;
  long getLastModified(HttpServletRequest var1, Object var2);
}
// 对应实现Controller接口的Controller
public class SimpleControllerHandlerAdapter implements HandlerAdapter {
  public SimpleControllerHandlerAdapter() {
  }

  @Override
  public boolean supports(Object handler) {
    return handler instanceof Controller;
  }

  @Override
  public ModelAndView handle(HttpServletRequest request, HttpServletResponse response, Object handler) throws Exception {
    return ((Controller)handler).handleRequest(request, response);
  }

  @Override
  public long getLastModified(HttpServletRequest request, Object handler) {
    return handler instanceof LastModified ? ((LastModified)handler).getLastModified(request) : -1L;
  }
}
// 对应实现Servlet接口的Controller
public class SimpleServletHandlerAdapter implements HandlerAdapter {
  public SimpleServletHandlerAdapter() {
  }

  @Override
  public boolean supports(Object handler) {
    return handler instanceof Servlet;
  }

  @Override
  public ModelAndView handle(HttpServletRequest request, HttpServletResponse response, Object handler) throws Exception {
    ((Servlet)handler).service(request, response);
    return null;
  }
  //省略...
}
//AnnotationMethodHandlerAdapter对应通过注解实现的Controller,
public class AnnotationMethodHandlerAdapter extends WebContentGenerator
    implements HandlerAdapter, Ordered, BeanFactoryAware {

  @Override
  public boolean supports(Object handler) {
    return getMethodResolver(handler).hasHandlerMethods();
  }

  @Override
  public ModelAndView handle(HttpServletRequest request, HttpServletResponse response, Object handler)
      throws Exception {
    Class<?> clazz = ClassUtils.getUserClass(handler);
    Boolean annotatedWithSessionAttributes = this.sessionAnnotatedClassesCache.get(clazz);
    if (annotatedWithSessionAttributes == null) {
      annotatedWithSessionAttributes = (AnnotationUtils.findAnnotation(clazz, SessionAttributes.class) != null);
      this.sessionAnnotatedClassesCache.put(clazz, annotatedWithSessionAttributes);
    }
    if (annotatedWithSessionAttributes) {
      checkAndPrepare(request, response, this.cacheSecondsForSessionAttributeHandlers, true);
    } else {
      checkAndPrepare(request, response, true);
    }
    //...省略
    return invokeHandlerMethod(request, response, handler);
  }
    //...省略
}
在DispatcherServlet类中,我们就不需要区分对待不同的Controller对象了,统一调用HandlerAdapter的handle()函数就可以了,这样就没有烦人的if-else逻辑了。以下摘抄Spring-web-mvc-5.1.14.RELEASE-sources.jar中的DispatcherServlet类中与HandlerAdapter相关的部分核心代码,可以看到在容器启动后,通过调用initHandlerAdapters()函数获取context中的类型为HandlerAdapter的bean列表,在doDispatch()函数中会根据当前handler的类型,挑选出合适的适配器。
public class DispatcherServlet extends FrameworkServlet {

	/** List of HandlerAdapters used by this servlet. */
	@Nullable
	private List<HandlerAdapter> handlerAdapters;

	/** Detect all HandlerAdapters or just expect "handlerAdapter" bean?. */
	private boolean detectAllHandlerAdapters = true;
	//省略大部分属性....

	protected void doDispatch(HttpServletRequest request, HttpServletResponse response) throws Exception {
		HttpServletRequest processedRequest = request;
		HandlerExecutionChain mappedHandler = null;
		boolean multipartRequestParsed = false;
		WebAsyncManager asyncManager = WebAsyncUtils.getAsyncManager(request);
		try {
			ModelAndView mv = null;
			Exception dispatchException = null;
			try {
				processedRequest = checkMultipart(request);
				multipartRequestParsed = (processedRequest != request);
				// Determine handler for the current request.
				mappedHandler = getHandler(processedRequest);
				if (mappedHandler == null) {
					noHandlerFound(processedRequest, response);
					return;
				}
				// Determine handler adapter for the current request.
				HandlerAdapter ha = getHandlerAdapter(mappedHandler.getHandler());

				//中间部分省略...

				// Actually invoke the handler.
				mv = ha.handle(processedRequest, response, mappedHandler.getHandler());
				//各种catch异常的逻辑省略...
		}
	}

	//获取适配器,找到第一个匹配的就返回
	protected HandlerAdapter getHandlerAdapter(Object handler) throws ServletException {
		if (this.handlerAdapters != null) {
			for (HandlerAdapter adapter : this.handlerAdapters) {
				if (adapter.supports(handler)) {
					return adapter;
				}
			}
		}
		throw new ServletException("No adapter for handler [" + handler +
				"]: The DispatcherServlet configuration needs to include a HandlerAdapter that supports this handler");
	}

	@Override
	protected void onRefresh(ApplicationContext context) {
		initStrategies(context);
	}

	protected void initStrategies(ApplicationContext context) {
		//省略...
		initHandlerAdapters(context);
		//省略...
	}

	//初始化适配器列表
	private void initHandlerAdapters(ApplicationContext context) {
		this.handlerAdapters = null;

		if (this.detectAllHandlerAdapters) {
			// Find all HandlerAdapters in the ApplicationContext, including ancestor contexts.
			Map<String, HandlerAdapter> matchingBeans =
					BeanFactoryUtils.beansOfTypeIncludingAncestors(context, HandlerAdapter.class, true, false);
			if (!matchingBeans.isEmpty()) {
				this.handlerAdapters = new ArrayList<>(matchingBeans.values());
				// We keep HandlerAdapters in sorted order.
				AnnotationAwareOrderComparator.sort(this.handlerAdapters);
			}
		}
		//以下省略...
	}
}
策略模式的应用
Spring中的AOP是通过动态代理来实现的。具体到代码实现,Spring支持两种动态代理实现方式,一种是JDK提供的动态代理实现方式,另一种是Cglib提供的动态代理实现方式。前者需要被代理的类有抽象的接口定义,后者不需要。针对不同的被代理类,Spring会在运行时动态地选择不同的动态代理实现方式。
动态选择代理策略,这里就用到了策略模式。策略模式包含三部分,策略的定义、创建和使用。具体到Spring中的策略模式,策略的定义这一部分很简单,我们只需要定义一个策略接口,让不同的策略类都实现这一个策略接口。对应到Spring的源码AopProxy是策略接口,JdkDynamicAopProxy、CglibAopProxy是两个实现了AopProxy接口的策略类。其中,AopProxy接口的定义如下所示:
public interface AopProxy {
    Object getProxy();
    Object getProxy(ClassLoader var1);
}
策略的创建一般通过工厂方法来实现。对应到Spring源码,AopProxyFactory是一个工厂类接口,DefaultAopProxyFactory是一个默认的工厂类,用来创建AopProxy对象。两者的源码如下所示:
public interface AopProxyFactory {
    AopProxy createAopProxy(AdvisedSupport var1) throws AopConfigException;
}


public class DefaultAopProxyFactory implements AopProxyFactory, Serializable {

  @Override
  public AopProxy createAopProxy(AdvisedSupport config) throws AopConfigException {
  	//optimized默认是false || proxy-target-class=true || 没有接口
    if (config.isOptimize() || config.isProxyTargetClass() || hasNoUserSuppliedProxyInterfaces(config)) {
      Class<?> targetClass = config.getTargetClass();
      if (targetClass == null) {
        throw new AopConfigException("TargetSource cannot determine target class: " +
            "Either an interface or a target is required for proxy creation.");
      }
      //被代理类是接口,创建JDK代理
      if (targetClass.isInterface() || Proxy.isProxyClass(targetClass)) {
        return new JdkDynamicAopProxy(config);
      }
      return new ObjenesisCglibAopProxy(config);
    }
    else {
      return new JdkDynamicAopProxy(config);
    }
  }

  /**
   * Determine whether the supplied {@link AdvisedSupport} has only the
   * {@link org.springframework.aop.SpringProxy} interface specified
   * (or no proxy interfaces specified at all).
   */
  private boolean hasNoUserSuppliedProxyInterfaces(AdvisedSupport config) {
    Class<?>[] ifcs = config.getProxiedInterfaces();
    return (ifcs.length == 0 || (ifcs.length == 1 && SpringProxy.class.isAssignableFrom(ifcs[0])));
  }

}
策略模式的典型应用场景,一般是通过环境变量、状态值、计算结果等动态地决定使用哪个策略。对应到Spring源码中,我们可以参看刚刚给出的DefaultAopProxyFactory类中的createAopProxy()函数的代码实现。其中包含了多处if-else分支,用来判断要用哪种策略生成代理类。
Spring对观察者模式的实现
Java及Google Guava都提供了观察者模式的实现框架。Java 提供的框架比较简单,只包含java.util.Observable和java.util.Observer两个类。Google Guava提供的框架功能比较完善和强大:通过EventBus事件总线来实现观察者模式,可以参见之前的博文观察者模式及EventBus框架简单实现去了解Guava是怎样实现观察者模式的。
实际上,Spring中的事件驱动模型也叫作发布订阅模式,是观察者模式的一个典型的应用。Spring中实现的观察者模式包含三部分:Event事件(相当于消息)、Listener 监听者(相当于观察者)、Publisher发送者(相当于被观察者)。我们通过一个例子来看下,Spring提供的观察者模式使用代码如下所示:
// Event事件
public class DemoEvent extends ApplicationEvent {
  private String message;

  public DemoEvent(Object source, String message) {
    super(source);
  }

  public String getMessage() {
    return this.message;
  }
}

// Listener监听者
@Component
public class DemoListener implements ApplicationListener<DemoEvent> {
  @Override
  public void onApplicationEvent(DemoEvent demoEvent) {
    String message = demoEvent.getMessage();
    System.out.println(message);
  }
}

// Publisher发送者
@Component
public class DemoPublisher {
  public void publishEvent(DemoEvent demoEvent) {
    SpringContext.getApplicationContext.publishEvent(demoEvent);
  }
}


// 创建一个Spring上下文bean,拿到ApplicationContext
@Component
public class SpringContext implements ApplicationContextAware {
    private static ApplicationContext applicationContext;

    @Override
    public void setApplicationContext(ApplicationContext applicationContext) throws BeansException {
        SpringContext.applicationContext = applicationContext;
    }

    public static ApplicationContext getApplicationContext() {
        return applicationContext;
    }
}
框架使用起来并不复杂,主要包含三部分工作:定义一个继承 ApplicationEvent的事件(DemoEvent);定义一个实现了 ApplicationListener的监听器(DemoListener);定义一个发送者(DemoPublisher),发送者调用ApplicationContext来发送事件消息。其中,ApplicationEvent和ApplicationListener的代码实现都非常简单,内部并不包含太多属性和方法。实际上,它们最大的作用是做类型标识之用:继承自ApplicationEvent的类是事件,实现了ApplicationListener的类是监听器。
在观察者模式中,观察者是需要事先注册到被观察者中的。那在Spring的实现中,观察者注册到了哪里呢?又是如何注册的呢?Spring把观察者注册到了ApplicationContext对象中。这里的ApplicationContext就相当于Google EventBus框架中的“事件总线”。不过ApplicationContext这个类并不只是为观察者模式服务的。它底层依赖BeanFactory(IOC 的主要实现类),提供应用启动、运行时的上下文信息。具体到源码来说,ApplicationContext只是一个接口,具体的代码实现包含在它的实现类AbstractApplicationContext中,该类中事件相关的代码摘抄如下:
public abstract class AbstractApplicationContext extends DefaultResourceLoader
    implements ConfigurableApplicationContext, DisposableBean {

  //....省略

  /** Helper class used in event publishing */
  private ApplicationEventMulticaster applicationEventMulticaster;

  /** Statically specified listeners */
  private final Set<ApplicationListener<?>> applicationListeners = new LinkedHashSet<ApplicationListener<?>>();

  @Override
  public void publishEvent(ApplicationEvent event) {
    publishEvent(event, null);
  }

  @Override
  public void publishEvent(Object event) {
    publishEvent(event, null);
  }

  protected void publishEvent(Object event, ResolvableType eventType) {
    Assert.notNull(event, "Event must not be null");
    if (logger.isTraceEnabled()) {
      logger.trace("Publishing event in " + getDisplayName() + ": " + event);
    }
    // Decorate event as an ApplicationEvent if necessary
    ApplicationEvent applicationEvent;
    if (event instanceof ApplicationEvent) {
      applicationEvent = (ApplicationEvent) event;
    } else {
      applicationEvent = new PayloadApplicationEvent<Object>(this, event);
      if (eventType == null) {
        eventType = ((PayloadApplicationEvent) applicationEvent).getResolvableType();
      }
    }

    // Multicast right now if possible - or lazily once the multicaster is initialized
    if (this.earlyApplicationEvents != null) {
      this.earlyApplicationEvents.add(applicationEvent);
    } else {
      getApplicationEventMulticaster().multicastEvent(applicationEvent, eventType);
    }

    // Publish event via parent context as well...
    if (this.parent != null) {
      if (this.parent instanceof AbstractApplicationContext) {
        ((AbstractApplicationContext) this.parent).publishEvent(event, eventType);
      } else {
        this.parent.publishEvent(event);
      }
    }
  }

  @Override
  public void addApplicationListener(ApplicationListener<?> listener) {
    Assert.notNull(listener, "ApplicationListener must not be null");
    if (this.applicationEventMulticaster != null) {
      this.applicationEventMulticaster.addApplicationListener(listener);
    } else {
      this.applicationListeners.add(listener);
    }
  }

  // ApplicationEventMulticaster初始化
  protected void initApplicationEventMulticaster() {
    ConfigurableListableBeanFactory beanFactory = getBeanFactory();
    if (beanFactory.containsLocalBean(APPLICATION_EVENT_MULTICASTER_BEAN_NAME)) {
      this.applicationEventMulticaster = beanFactory.getBean(APPLICATION_EVENT_MULTICASTER_BEAN_NAME, ApplicationEventMulticaster.class);
      if (logger.isDebugEnabled()) {
        logger.debug("Using ApplicationEventMulticaster [" + this.applicationEventMulticaster + "]");
      }
    } else {
      this.applicationEventMulticaster = new SimpleApplicationEventMulticaster(beanFactory);
      beanFactory.registerSingleton(APPLICATION_EVENT_MULTICASTER_BEAN_NAME, this.applicationEventMulticaster);
      if (logger.isDebugEnabled()) {
        logger.debug("Unable to locate ApplicationEventMulticaster with name '" +
            APPLICATION_EVENT_MULTICASTER_BEAN_NAME +
            "': using default [" + this.applicationEventMulticaster + "]");
      }
    }
  }

  protected void registerListeners() {
    // Register statically specified listeners first.
    for (ApplicationListener<?> listener : getApplicationListeners()) {
      getApplicationEventMulticaster().addApplicationListener(listener);
    }

    // Do not initialize FactoryBeans here: We need to leave all regular beans
    // uninitialized to let post-processors apply to them!
    String[] listenerBeanNames = getBeanNamesForType(ApplicationListener.class, true, false);
    for (String listenerBeanName : listenerBeanNames) {
    getApplicationEventMulticaster().addApplicationListenerBean(listenerBeanName);
    }

    // Publish early application events now that we finally have a multicaster...
    Set<ApplicationEvent> earlyEventsToProcess = this.earlyApplicationEvents;
    this.earlyApplicationEvents = null;
    if (earlyEventsToProcess != null) {
      for (ApplicationEvent earlyEvent : earlyEventsToProcess) {
        getApplicationEventMulticaster().multicastEvent(earlyEvent);
      }
    }
  }

  //....省略

}
从上面的代码中,我们发现,真正的消息发送以及观察者注册实际上是通过 ApplicationEventMulticaster这个类来完成的。这个类的源码我只摘抄最关键的一部分,也就是multicastEvent()这个消息发送函数。部分关键代码如下,它通过线程池,支持异步非阻塞、同步阻塞这两种类型的观察者模式。
public class SimpleApplicationEventMulticaster extends AbstractApplicationEventMulticaster {

  private Executor taskExecutor;

  public SimpleApplicationEventMulticaster() {
  }

  public void setTaskExecutor(Executor taskExecutor) {
    this.taskExecutor = taskExecutor;
  }

  protected Executor getTaskExecutor() {
    return this.taskExecutor;
  }

  @Override
  public void multicastEvent(ApplicationEvent event) {
    multicastEvent(event, resolveDefaultEventType(event));
  }

  @Override
  public void multicastEvent(final ApplicationEvent event, ResolvableType eventType) {
    ResolvableType type = (eventType != null ? eventType : resolveDefaultEventType(event));
    for (final ApplicationListener<?> listener : getApplicationListeners(event, type)) {
      Executor executor = getTaskExecutor();
      if (executor != null) {
        executor.execute(new Runnable() {
          @Override
          public void run() {
            invokeListener(listener, event);
          }
        });
      } else {
        invokeListener(listener, event);
      }
    }
  }
}
借助Spring提供的观察者模式的骨架代码,如果我们要在Spring下实现某个事件的发送和监听,只需要做很少的工作:定义事件、定义监听器、往ApplicationContext中发送事件就可以了。剩下的工作都由Spring框架来完成。这体现了Spring框架的扩展性,也就是在不需要修改任何代码的情况下,扩展新的事件和监听。在Spring boot中可支持直接使用@EnableAsync、@EventListener等注解定义异步或同步监听器。
模板方法模式的应用
Java IO类库中的很多类都用到了模板方法模式,许多xxxxTemplate类都用到了回调模式,详情见模板方法模式与回调函数这篇博客。
职责链模式实现Spring Interceptor
职责链模式:将能够处理同一类请求的对象连成一条链,使这些对象都有机会处理请求,所提交的请求沿着链传递。从而避免请求的发送者和接受者之间的耦合关系。链上的对象逐个判断是否有能力处理该请求,如果能则就处理,如果不能,则传给链上的下一个对象,直到有一个对象处理它为止。
用一张生动一些的图来描述一下,就是下面这样。在公司中不同的岗位拥有不同的职责与权限。以上述的请假流程为例,当员工请 1天假时,只要组长审批就可以了,不需要流转到主管和总监。如果职责链上的某个环节无法处理当前的请求,在含有下个环节时,则会把请求转交给下个环节来处理。

职责链的UML图如下:

职责链模式的典型示例代码如下:
public interface IHandler {
  boolean handle();
}

public class HandlerA implements IHandler {
  @Override
  public boolean handle() {
    boolean handleResult = false;
    //...
    return handleResult;
  }
}

public class HandlerB implements IHandler {
  @Override
  public boolean handle() {
    boolean handleResult = false;
    //...
    return handleResult;
  }
}

public class HandlerChain {
  private List<IHandler> handlers = new ArrayList<>();

  public void addHandler(IHandler handler) {
    this.handlers.add(handler);
  }

  public void handle() {
    for (IHandler handler : handlers) {
      boolean handleResult = handler.handle();
      if (handleResult) {
        break;
      }
    }
  }
}

// 使用举例
public class Application {
  public static void main(String[] args) {
    HandlerChain chain = new HandlerChain();
    chain.addHandler(new HandlerA());
    chain.addHandler(new HandlerB());
    chain.handle();
  }
}
Spring框架中的Interceptor用来实现对HTTP请求进行拦截处理。它与Servlet Filter有所不同,Servlet Filter是Servlet规范的一部分,实现依赖于Web容器。Spring Interceptor是Spring MVC框架的一部分,由Spring MVC来提供实现。客户端发送的请求,会先经过Servlet Filter,然后再经过Spring Interceptor,最后到达具体的业务代码中。具体处理流程如下图所示:
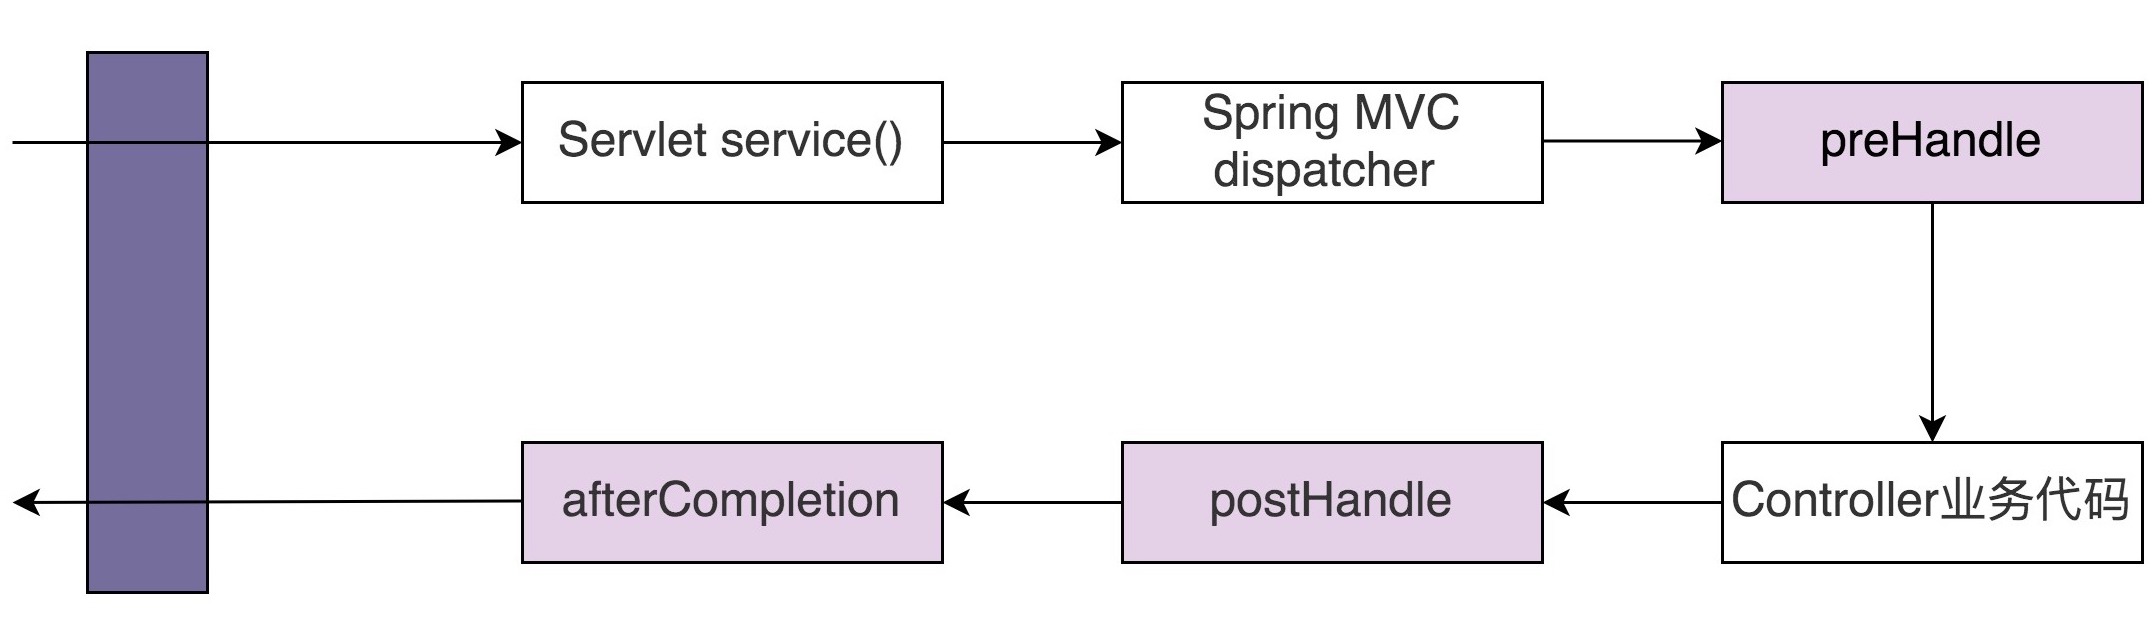
对应到Spring Interceptor的源码就是HandlerInterceptor接口和 HandlerExecutionChain。HandlerInterceptor接口源码如下, 对请求的拦截定义为preHandle()方法,对响应的拦截定义为postHandle()方法。
public interface HandlerInterceptor {

  boolean preHandle(HttpServletRequest request, HttpServletResponse response, Object handler)
      throws Exception;

  void postHandle(
      HttpServletRequest request, HttpServletResponse response, Object handler, ModelAndView modelAndView)
      throws Exception;

  void afterCompletion(
      HttpServletRequest request, HttpServletResponse response, Object handler, Exception ex)
      throws Exception;

}
以下示例代码,写一个ControllerInterceptor类去实现HandlerInterceptor接口。
@Component
public class ControllerInterceptor implements HandlerInterceptor {

  @Override
  public boolean preHandle(HttpServletRequest request, HttpServletResponse response, Object handler) throws Exception {
    System.out.println("拦截客户端发送来的请求.");
    return true; // 继续后续的处理
  }

  @Override
  public void postHandle(HttpServletRequest request, HttpServletResponse response, Object handler, ModelAndView modelAndView) throws Exception {
    System.out.println("拦截发送给客户端的响应.");
  }

  @Override
  public void afterCompletion(HttpServletRequest request, HttpServletResponse response, Object handler, Exception ex) throws Exception {
    System.out.println("这里总是被执行.");
  }
}
向Spring MVC框架配置自定义的ControllerInterceptor。
@Configuration
public class WebMvcConfigurer extends WebMvcConfigurerAdapter {

    @Resource
    private ControllerInterceptor controllerInterceptor;

    @Override
    public void addInterceptors(InterceptorRegistry registry) {
        registry.addInterceptor(controlToolInterceptor).addPathPatterns("/**");
        super.addInterceptors(registry);
    }
}
Spring Interceptor也是基于职责链模式实现的,HandlerExecutionChain类就是职责链模式中的处理器链。它的实现不需要使用递归,主要是因为它将请求和响应的拦截工作,拆分到了两个函数中去实现。HandlerExecutionChain的关键源码摘抄如下:
public class HandlerExecutionChain {

   private static final Log logger = LogFactory.getLog(HandlerExecutionChain.class);

   private final Object handler;

   private HandlerInterceptor[] interceptors;

   private List<HandlerInterceptor> interceptorList;

   private int interceptorIndex = -1;

   public HandlerExecutionChain(Object handler) {
      this(handler, (HandlerInterceptor[]) null);
   }

   public HandlerExecutionChain(Object handler, HandlerInterceptor... interceptors) {
      if (handler instanceof HandlerExecutionChain) {
         HandlerExecutionChain originalChain = (HandlerExecutionChain) handler;
         this.handler = originalChain.getHandler();
         this.interceptorList = new ArrayList<HandlerInterceptor>();
         CollectionUtils.mergeArrayIntoCollection(originalChain.getInterceptors(), this.interceptorList);
         CollectionUtils.mergeArrayIntoCollection(interceptors, this.interceptorList);
      } else {
         this.handler = handler;
         this.interceptors = interceptors;
      }
   }

   public void addInterceptor(HandlerInterceptor interceptor) {
      initInterceptorList().add(interceptor);
   }

   public void addInterceptors(HandlerInterceptor... interceptors) {
      if (!ObjectUtils.isEmpty(interceptors)) {
         CollectionUtils.mergeArrayIntoCollection(interceptors, initInterceptorList());
      }
   }

   private List<HandlerInterceptor> initInterceptorList() {
      if (this.interceptorList == null) {
         this.interceptorList = new ArrayList<HandlerInterceptor>();
         if (this.interceptors != null) {
            // An interceptor array specified through the constructor
            CollectionUtils.mergeArrayIntoCollection(this.interceptors, this.interceptorList);
         }
      }
      this.interceptors = null;
      return this.interceptorList;
   }

   boolean applyPreHandle(HttpServletRequest request, HttpServletResponse response) throws Exception {
      HandlerInterceptor[] interceptors = getInterceptors();
      if (!ObjectUtils.isEmpty(interceptors)) {
         for (int i = 0; i < interceptors.length; i++) {
            HandlerInterceptor interceptor = interceptors[i];
            if (!interceptor.preHandle(request, response, this.handler)) {
               triggerAfterCompletion(request, response, null);
               return false;
            }
            this.interceptorIndex = i;
         }
      }
      return true;
   }

   void applyPostHandle(HttpServletRequest request, HttpServletResponse response, ModelAndView mv) throws Exception {
      HandlerInterceptor[] interceptors = getInterceptors();
      if (!ObjectUtils.isEmpty(interceptors)) {
         for (int i = interceptors.length - 1; i >= 0; i--) {
            HandlerInterceptor interceptor = interceptors[i];
            interceptor.postHandle(request, response, this.handler, mv);
         }
      }
   }

   void triggerAfterCompletion(HttpServletRequest request, HttpServletResponse response, Exception ex)
         throws Exception {

      HandlerInterceptor[] interceptors = getInterceptors();
      if (!ObjectUtils.isEmpty(interceptors)) {
         for (int i = this.interceptorIndex; i >= 0; i--) {
            HandlerInterceptor interceptor = interceptors[i];
            try {
               interceptor.afterCompletion(request, response, this.handler, ex);
            }
            catch (Throwable ex2) {
               logger.error("HandlerInterceptor.afterCompletion threw exception", ex2);
            }
         }
      }
   }

}
在Spring框架中,DispatcherServlet的doDispatch()方法用来分发请求,它在真正的业务逻辑执行前后,会执行HandlerExecutionChain中的 applyPreHandle()和applyPostHandle()函数,用来实现对请求与响应的拦截功能。
职责链模式常用在框架开发中,用来实现框架的过滤器、拦截器功能,让框架的使用者在不需要修改框架源码的情况下,添加新的过滤拦截功能,体现了对扩展开放、对修改关闭的设计原则。


 2411
2411

 被折叠的 条评论
为什么被折叠?
被折叠的 条评论
为什么被折叠?
 到【灌水乐园】发言


