


转载请指明出处:http://blog.csdn.net/fxdaniel/article/details/46933225
本文的目标是使用HorizonalScrollView实现listview中的滑动删除功能。
这种实现方式不需要自定义listview,实现起来比较简单,当然,扩展性不如自定义的强。
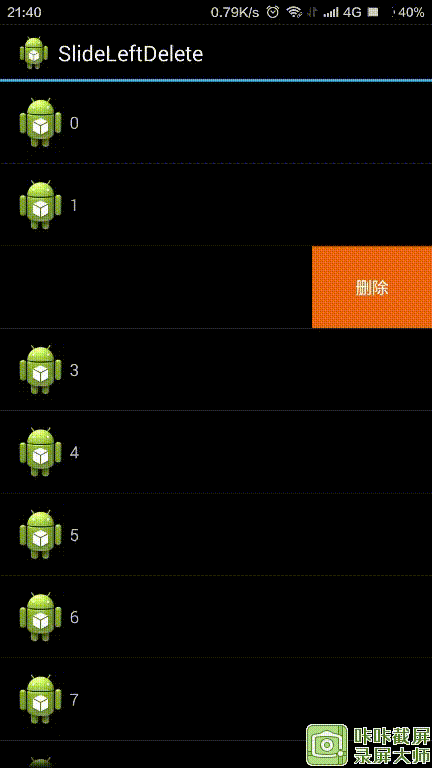
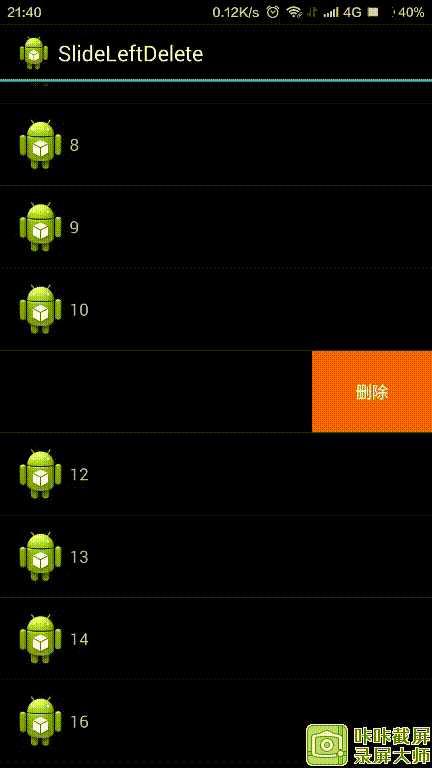
效果图:
下面开始分步走:
第一步:编写Item布局
这种实现方式的核心就是用HorizontalScrollView来实现滑动的功能。
创建一个Item的布局文件,最外层用HorizontalScrollView包裹,将要显示在屏幕上的内容和隐藏的删除按钮横向顺序布局。最关键的就是将内容区域的宽度设置为屏幕宽度,那么删除按钮就到屏幕外面去了。
下面看代码:
<?xml version="1.0" encoding="utf-8"?>
<HorizontalScrollView xmlns:android="http://schemas.android.com/apk/res/android"
    android:layout_width="match_parent"
    android:layout_height="match_parent"
    android:scrollbars="none">

    <LinearLayout
        android:layout_width="wrap_content"
        android:layout_height="match_parent"
        android:orientation="horizontal"
        >
        <!-- 正常显示的内容放在这儿 -->
        <LinearLayout
            android:id="@+id/content"
            android:layout_width="match_parent"
            android:layout_height="match_parent"
            android:orientation="horizontal"
            android:padding="10dp" >

            <TextView
                android:id="@+id/textview"
                android:layout_width="wrap_content"
                android:layout_height="match_parent"
                android:text="item"
                android:gravity="center_vertical"
                android:drawableLeft="@drawable/ic_launcher" />
        </LinearLayout>
        <!-- 删除按钮放这儿 -->
        <TextView
            android:id="@+id/btn_delete"
            android:layout_width="100dp"
            android:layout_height="match_parent"
            android:background="#ffEE6911"
            android:gravity="center"
            android:text="删除"
            android:textColor="#ffffffff" />
    </LinearLayout>

</HorizontalScrollView>
这个布局有几点要注意:
1 根布局是一个HorizonScrollView,里面只能包含一个子布局
2 HorizonScrollView的scrollbar要设为none,如android:scrollbars="none",不然会看到丑陋的滚动条
第二步:在Adapter中获取布局
public View getView(int position, View convertView, ViewGroup parent) {

        final int curPos=position;

        ViewHolder holder;
        if(convertView==null){

            convertView=LayoutInflater.from(context).inflate(R.layout.item, null);

            holder=new ViewHolder();
            // 内容区域
            holder.content=(LinearLayout)convertView.findViewById(R.id.content);
            // 这里是重点:将内容区域显示为屏幕宽度,隐藏删除按钮
            ViewGroup.LayoutParams params = holder.content.getLayoutParams();
            // 获取屏幕宽度
            int screenW=((Activity)context).getWindowManager().getDefaultDisplay().getWidth();
            params.width=screenW;// 设为屏幕宽度

            holder.textView=(TextView)convertView.findViewById(R.id.textview);
            // 删除按钮被“挤出”屏幕了
            holder.btnDel=(TextView)convertView.findViewById(R.id.btn_delete);
            // 给删除按钮设置监听
            holder.btnDel.setOnClickListener(new OnClickListener() {

                @Override
                public void onClick(View v) {
                    dataList.remove(curPos);
                    notifyDataSetChanged();
                }
            });
            convertView.setTag(holder);
        }else{
            holder=(ViewHolder)convertView.getTag();
        }
        // 设置显示的内容
        holder.textView.setText(dataList.get(position));

        return convertView;
    }
这里面最重要的就是将内容区域设置为屏幕宽度了,这样才能把删除按钮隐藏起来:
// 内容区域
            holder.content=(LinearLayout)convertView.findViewById(R.id.content);
            // 这里是重点:将内容区域显示为屏幕宽度,隐藏删除按钮
            ViewGroup.LayoutParams params = holder.content.getLayoutParams();
            // 获取屏幕宽度
            int screenW=((Activity)context).getWindowManager().getDefaultDisplay().getWidth();
            params.width=screenW;// 设为屏幕宽度
第三步:在Activity中测试
下面可以测试一下,看看效果了
public class MainActivity extends Activity {

    private ListView mListView;
    private MyAdapter mAdapter;
    private List<String> mData=new ArrayList<String>();
    @Override
    protected void onCreate(Bundle savedInstanceState) {
        super.onCreate(savedInstanceState);
        setContentView(R.layout.activity_main);

        initData();// 设置测试数据

        mListView=(ListView)findViewById(R.id.listview);
        mAdapter=new MyAdapter(this,mData);
        mListView.setAdapter(mAdapter);
    }

    private void initData(){
        for(int i=0;i<20;i++){
            mData.add(i+"");
        }
    }
给张效果图
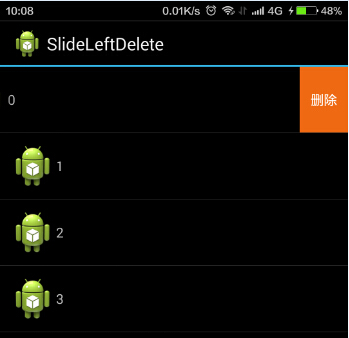
可以看到效果还是不错的,下面就来接着完善一下效果。
第四步:加入自动滑开和隐藏效果
当我们向左滑动距离超过一半的时候让它自动滑开,向右滑动超过一半的时候自动隐藏。在上面的代码基础上添加代码:
if(convertView==null){
            ……// 省略部分代码
            // 加入自动滑动和隐藏效果
            holder.scrollView=(HorizontalScrollView)convertView.findViewById(R.id.scrollview);
            holder.scrollView.setOnTouchListener(new OnTouchListener() {

                @Override
                public boolean onTouch(View v, MotionEvent event) {
                    switch (event.getAction()) {
                    case MotionEvent.ACTION_UP:
                        // 手抬起的时候判断滑动距离
                        int slideDistance=holder.scrollView.getScrollX();// 获取向左滑动的距离,是一个非负数,px
                        int btnDelW= holder.btnDel.getWidth();// 删除按钮的宽度,单位px
                        // 当滑动距离大于删除按钮宽度的一半时,就自动滑动到最左边,完全显示删除按钮,所谓的最左边就是滑动距离等于删除按钮宽度
                        // 当滑动距离小于删除按钮宽度的一半时,就隐藏删除按钮,即滑动距离等于0的位置
                        if(slideDistance>=btnDelW/2){
                            holder.scrollView.scrollTo(btnDelW, 0);
                        }else{
                            holder.scrollView.scrollTo(0, 0);
                        }
                        break;

                    default:
                        break;
                    }
                    return false;
                }
            });
            convertView.setTag(holder);
        }else{
            holder=(ViewHolder)convertView.getTag();
        }
其他代码不用修改,这样就可以了。
这时候发现还有问题,可以同时滑开多个item,这个是会出问题的,所以我们再加一些逻辑,一次只允许滑开一个item,当滑开另一个item的时候会自动隐藏前一个item。 这个我们可以在adapter中保存一个当前滑开的item的索引,当需要再次滑动的时候进行判断即可。
另外,当我们在滑动listview的时候,如果当前有item被滑开了,它应当被自动隐藏,否则会出现混乱的情况,因为item是会复用的。这个在listview的滑动事件里进行处理即可。
下面来解决上述两个问题。
第五步:滑动逻辑处理
首先,我们创建一个全局变量:
private HorizontalScrollView currentSlideView;// 保存当前滑开的item
接着,在上面的自动滑动和隐藏的效果实现代码里添加如下两天语句:
                        if(slideDistance>=btnDelW/2){
                            holder.scrollView.scrollTo(btnDelW, 0);
                            currentSlideView=holder.scrollView;// 保存当前滑开的item
                        }else{
                            holder.scrollView.scrollTo(0, 0);
                            currentSlideView=null;// 清空
                        }
然后我们再封装一个函数,用于实现自动隐藏,因为这个功能用到的次数比较多:
    /**
     * 自动隐藏删除按钮
     */
    public void autoHide(){
        if(currentSlideView!=null){
            currentSlideView.scrollTo(0, 0);
            currentSlideView=null;
        }
    }
最后,在HorizonalScrollView的touch事件里添加move事件的处理:
                        case MotionEvent.ACTION_MOVE:
                        // 滑动的时候判断当前有没有其它滑开的item,有的话就隐藏
                        if(currentSlideView!=holder.scrollView){
                            autoHide();
                        }
                        break;
这样就实现了一次只能滑开一个item了。
再到MainActivity中添加listview滑动事件处理:
mListView.setOnScrollListener(new OnScrollListener() {

            @Override
            public void onScrollStateChanged(AbsListView view, int scrollState) {
                // TODO Auto-generated method stub

            }

            @Override
            public void onScroll(AbsListView view, int firstVisibleItem,
                    int visibleItemCount, int totalItemCount) {
                mAdapter.autoHide();

            }
        });
这样就OK了。
但是在使用过程中发现还是存在bug,比如手指快速滑动的时候,item有可能不自动滑开或者隐藏,处于半打开状态。再去滑动其它item的时候,这个半打开状态的item也不自动隐藏。蛋疼ing。。。
这其实是HorizonalScrollView自身的惯性滑动效果和我们的scrollTo效果冲突了。这怎么解决呢?看代码:
    public void scrollTo(final HorizontalScrollView scrollView,final int maxDx){
        new Handler().postDelayed(new Runnable() {

            @Override
            public void run() {
                int scrollX=scrollView.getScrollX();
                if(scrollX>=maxDx/2){
                    scrollView.smoothScrollTo(maxDx, 0);
                    currentSlideView=scrollView;
                }else{
                    scrollView.smoothScrollTo(0, 0);
                    currentSlideView=null;
                }
            }
        },100);
}我们新建一个方法叫srollTo,用这个来替代前面用到的holder.scrollView.scrollTo方法。在这个方法里,我们通过消息队列的方式延迟计算滑动距离的时机,这样就能得到HorizonalScrollView惯性滑动以后的ScrollX值,用这个值来和maxDx参数比较。同时这里调用了HorizonalScrollView的smoothScrollTo方法,scrollTo方法在这里没有效果。
用这个方法替换之前的代码:
case MotionEvent.ACTION_UP:
    ……
    scrollTo(holder.scrollView, btnDelW);// 替换下面注释的代码
//  if(slideDistance>=btnDelW/2){
//  holder.scrollView.scrollTo(btnDelW, 0);
//  currentSlideView=holder.scrollView;// 保存当前滑开的item
//  }else{
//  holder.scrollView.scrollTo(0, 0);
//  currentSlideView=null;// 清空
//  }
break;
现在看起来好很多了,但是当我们同时滑动两个item的时候,发现两个item都会打开,这个怎么解决呢?这个比较麻烦,我用的比较拙劣的方法,看代码吧:
先改写一下HorizontalScrollView
package com.example.slideleftdelete;

import android.content.Context;
import android.util.AttributeSet;
import android.view.MotionEvent;
import android.widget.HorizontalScrollView;

/**
 * @author:fangxuan
 * @date:2015年7月24日
 * @description:
 */
public class MyHorizontalScrollView extends HorizontalScrollView {

    public MyHorizontalScrollView(Context context) {
        super(context);
    }
    public MyHorizontalScrollView(Context context, AttributeSet attrs,
            int defStyleAttr) {
        super(context, attrs, defStyleAttr);
    }
    public MyHorizontalScrollView(Context context, AttributeSet attrs) {
        super(context, attrs);
    }
    private boolean canScroll;// 是否可以滑动
    public boolean isCanScroll() {
        return canScroll;
    }
    public void setCanScroll(boolean canScroll) {
        this.canScroll = canScroll;
    }

    @Override
    public boolean onTouchEvent(MotionEvent ev) {
        if(canScroll){
            return super.onTouchEvent(ev);
        }else
            return true;

    }
}

在这里用一个变量控制MyHorizontalScrollView是否可以滑动。

然后在Adapter中改写:
final MyHorizontalScrollView thisScrollView=(MyHorizontalScrollView)convertView;
thisScrollView.setCanScroll(false);// 默认所有都不可滑动,只有第一个触摸的item可以滑动
thisScrollView.setOnTouchListener(new OnTouchListener() {
@Override
public boolean onTouch(View v, MotionEvent event) {
switch (event.getAction()&MotionEvent.ACTION_MASK) {
case MotionEvent.ACTION_UP:
// 抬起手指后,将该view从触摸的view的集合中删除
touchedViews.remove(curPos);
Log.d("touch", "up:"+curPos+" size:"+touchedViews.size());
// 手抬起的时候判断滑动距离
final int btnDelW= holder.btnDel.getWidth();// 删除按钮的宽度,单位px
if(currentSlidingView!=null&¤tSlidingView==thisScrollView){
scrollTo(currentSlidingView, btnDelW);
}
if(touchedViews.size()==0){// 全部手指都抬起来了
((MyHorizontalScrollView)currentSlidingView).setCanScroll(false);
currentSlidingView=null;
}
break;
case MotionEvent.ACTION_MOVE:
if(currentSlidingView==null){
currentSlidingView=thisScrollView;
thisScrollView.setCanScroll(true);
}
touchedViews.add(curPos);
// 滑动的时候判断当前有没有其它滑开的item,有的话就隐藏
if(currentSlideView!=thisScrollView){
autoHide();
}
break;
case MotionEvent.ACTION_DOWN:
Log.d("touch", "down");
break;
}
return false;
}
});
“`
解决方法不够优雅,而且当快速滑动多个item的时候还是会有问题,没想到好的解决办法,先这样吧。
代码链接在此:http://download.csdn.net/detail/fxdaniel/8930919


 3143
3143


 被折叠的 条评论
为什么被折叠?
被折叠的 条评论
为什么被折叠?
 到【灌水乐园】发言


