


关于Context和ContextImpl还有ContextWrapper的关系
1.Context和ContextImpl还有ContextWrapper的关系
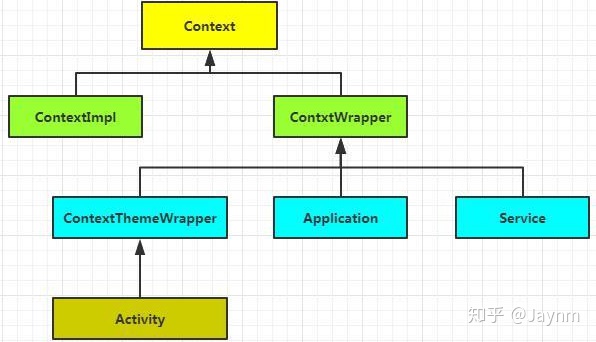
图一.Context和ContextImpl还有ContextWrapper的关系示意图
1.1.ContextImpl是Context的实现类
从Context和ContextImpl的源代码中,可以看出Context是一个抽象类,具体的实现类是ContextImpl
public abstract class Context {
Context.java文件
class ContextImpl extends Context {....}
ContextImpl.java文件
1.2.ContextWrapper是Context的包装类
从ContextWrapper的源代码可以看出,ContextWrapper继承自Context; 并且ContextWrapper类持有Context的引用;
所以最终是要通过java的多态这个属性,调用Context类的相关方法,实际上是调用ContextImpl类里面的方法
public class ContextWrapper extends Context {
    @UnsupportedAppUsage
    Context mBase;
ContextWrapper.java文件
2.ContextImpl跟ContextWrapper的关联过程
2.1.ContextWrapper可以关联的可能入口
根据下面的ContextWrapper的源码的解读,如果ContextWrapper关联ContextImpl,
只有两个地方可以把Context作为参数传进来
第一个:ContextWrapper的构造函数
第二个:attachBaseContext函数
这两个函数都会把context 赋值给名字为mBase的Context的属性
public class ContextWrapper extends Context {
    @UnsupportedAppUsage
    Context mBase;

    @GuardedBy("mLock")
    @VisibleForTesting
    public List<ComponentCallbacks> mCallbacksRegisteredToSuper;

    private final Object mLock = new Object();

    public ContextWrapper(Context base) {
        mBase = base;
    }

    protected void attachBaseContext(Context base) {
        if (mBase != null) {
            throw new IllegalStateException("Base context already set");
        }
        mBase = base;
    }
2.2.Context创建过程
public Application makeApplication(boolean forceDefaultAppClass,
            Instrumentation instrumentation) {

             //TODO
             ......
            ContextImpl appContext = ContextImpl.createAppContext(mActivityThread, this);
            // The network security config needs to be aware of multiple
            // applications in the same process to handle discrepancies
            NetworkSecurityConfigProvider.handleNewApplication(appContext);
            app = mActivityThread.mInstrumentation.newApplication(
                    cl, appClass, appContext);
            appContext.setOuterContext(app);
        } catch (Exception e) {
            if (!mActivityThread.mInstrumentation.onException(app, e)) {
                Trace.traceEnd(Trace.TRACE_TAG_ACTIVITY_MANAGER);
                throw new RuntimeException(
                    "Unable to instantiate application " + appClass
                    + " package " + mPackageName + ": " + e.toString(), e);
            }
        }
        //TODO
        ......

        return app;
    }
LoadedApk.java
在LoadedApk的函数makeApplication中,下面这段语句通过调用了ContextImpl.createAppContext 生成了ContextImpl对象
ContextImpl appContext = ContextImpl.createAppContext(mActivityThread, this);
在ContextImpl类中,createAppContext函数,调用了另外一个带3个参数的重写函数createAppContext,
可以看出在这个函数里面,通过ContextImpl context = new ContextImpl 这个语句 创建了ContextImpl类的对象,
然后通过函数返回,返回了这个ContextImpl类的对象.
@UnsupportedAppUsage
    static ContextImpl createAppContext(ActivityThread mainThread, LoadedApk packageInfo) {
        return createAppContext(mainThread, packageInfo, null);
    }

    static ContextImpl createAppContext(ActivityThread mainThread, LoadedApk packageInfo,
            String opPackageName) {
        if (packageInfo == null) throw new IllegalArgumentException("packageInfo");
        ContextImpl context = new ContextImpl(null, mainThread, packageInfo,
            ContextParams.EMPTY, null, null, null, null, null, 0, null, opPackageName);
        context.setResources(packageInfo.getResources());
        context.mContextType = isSystemOrSystemUI(context) ? CONTEXT_TYPE_SYSTEM_OR_SYSTEM_UI
                : CONTEXT_TYPE_NON_UI;
        return context;
    }
上面的步骤创建了appContext,然后通过下面的函数调用把对象appContext传递下去
app = mActivityThread.mInstrumentation.newApplication(
                    cl, appClass, appContext);
在Instrumentation源代码中,newApplication 函数中,Application的attach函数,通过此函数, 把context传递下去
    public Application newApplication(ClassLoader cl, String className, Context context)
            throws InstantiationException, IllegalAccessException,
            ClassNotFoundException {
        Application app = getFactory(context.getPackageName())
                .instantiateApplication(cl, className);
        app.attach(context);
        return app;
    }
Instrumentation.java
Application类的attach函数,在这个函数中,会把传递进来的context 传递给attachBaseContext函数, attachBaseContext 函数是父类ContextWrapper的函数
同时验证了上面的结论(2.1.ContextWrapper可以关联的可能入口)
public class Application extends ContextWrapper implements ComponentCallbacks2 {
    @UnsupportedAppUsage
    /* package */ final void attach(Context context) {
        attachBaseContext(context);
        mLoadedApk = ContextImpl.getImpl(context).mPackageInfo;
    }
Application.java
在ContextWrapper的源代码中,可以看到context会在attachBaseContext中赋值给名字为mBase的Context对象的属性
public class ContextWrapper extends Context {
    @UnsupportedAppUsage
    Context mBase;

    public ContextWrapper(Context base) {
        mBase = base;
    }

    /**
     * Set the base context for this ContextWrapper.  All calls will then be
     * delegated to the base context.  Throws
     * IllegalStateException if a base context has already been set.
     *
     * @param base The new base context for this wrapper.
     */
    protected void attachBaseContext(Context base) {
        if (mBase != null) {
            throw new IllegalStateException("Base context already set");
        }
        mBase = base;
    }
ContextWrapper.java
到此处为止,ContextImpl 跟ContextWrapper 的关联已经完成


 2463
2463

 被折叠的 条评论
为什么被折叠?
被折叠的 条评论
为什么被折叠?
 到【灌水乐园】发言


