


目录
4.使用Inotifywait/Inotifywatch工具测试
一、关于Rsync
1.定义
Rsync(Remote Sync 远程同步)是一款开源的快速备份工具,支持本地复制,或者与其他SSH、Rsync主机同步;可以在不同主机之间镜像同步整个目录树,支持增量备份,并保持链接和权限,且采用优化的同步算法,传输前执行压缩,因此非常适用于异地备份、镜像服务器等应用。
官方网站:http://rsync.samba.org
在远程同步任务中,负责发起rsync同步操作的客户机称为发起端,而负责响应来自客户机的rsync同步操作的服务器称为同步源。在同步过程中,同步源负责提供文件的原始位置,发起端应对该位置具有读取权限。
Rsync 是 Linux 系统下的数据镜像备份工具,使用快速增量备份工具 Remote Sync 可以远程同步, 可以在不同主机之间进行同步,可实现全量备份与增量备份,保持链接和权限,且采用优化的同步算法, 传输前执行压缩,因此非常适合用于架构集中式备份或异地备份等应用。同时Rsync支持本地复制,或者与其他 SSH、rsync 主机同步
2.Rsync同步方式
- 完整备份:每次备份都是从备份源将所有的文件或目录备份到目的地。
- 差量备份:备份上次完全备份以后有变化的数据(针对上次的完全备份,备份过程中不清除存档属性)。
- 增量备份:备份上次备份以后有变化的数据(不管是那种类型的备份,有变化的数据就备份,会清除存档属性)
CP命令与Rsync的区别
- CP命令:将源文件完整复制到指定路径下,使用完整备份的方式进行备份
- Rsync命令:
- 本地复制:
- 首先将源文件和目标位置文件做对比,然后找出差异部分
- 根据目标位置文件与源文件差异的部分,进行一致性同步
- Rsync只做差异备份
3.备份的方式
- 发起端:负责发起rsync同步操作的客户机叫做发起端,通知服务器我要备份你的数据
- 备份源:负责响应来自客户机rsync同步操作的服务器叫做备份源,被需要备份的服务器
- 服务端:运行rsyncd服务,一般来说,需要备份的服务器
- 客户端:存放备份数据
4.Rsync命令
语法格式:
rsync [选项] 原始位置 目标位置
#原始位置:用户名@ip::共享模块名(自定义的名称)
#例: rsync -avz cxk@192.168.241.11::wwwroot /opt/cxk_backup/
     rsync://用户名@IP::共享模块名://cxk@192.168.241.11/wwwroot /opt/cxk_backup/


#工作建议频繁使用的格式为 rsync -avz -e "ssh -p ssh端口号" 原始位置 目标位置
#例,rsync -avz -e "ssh -p 22" root@192.168.241.11:/var/www/html /opt/cxk_backup/| 选项 | 含义 |
|---|---|
| -r | 递归模式,包含目录及子目录中的所有文件 |
| -l(L的小写) | 对于符号链接文件仍然复制为符号链接文件 |
| -v | 显示同步过程的详细(verbose)信息 |
| -z | 在传输文件时进行压缩(compress) |
| -a | 归档模式,保留文件的权限、属性等信息,等同于组合选项“-rlptgoD” |
| -p | 保留文件的权限标记 |
| -t | 保留文件的时间标记 |
| -g | 保留文件的属组标记(仅超级用户使用) |
| -o | 保留文件的属主标记(仅超级用户使用) |
| -H | 保留硬连接文件 |
| -A | 保留 ACL 属性信息 |
| -D | 保留设备文件及其他特殊文件 |
| --delete | 删除目标位置有而原始位置没有的文件 |
| --checksum | 根据校验和(而不是文件大小、修改时间)来决定是否跳过文件 |
5.配置源的两种表达方法
用户名@主机地址::共享模块名
rsync -avz backuper@192.168.241.11::wwwroot /opt/
rsync://用户名@主机地址/共享模块名
rsync -avz rsync://backuper@192.168.241.11/wwwroot /opt/二、配置服务端与客户端的实验——下载

服务端 192.168.241.11
客户端 192.168.241.22
1.准备工作
systemctl stop firewalld
setenforce 0
2.服务端配置
[root@server ~]#rpm -qc rsync
#查看rsync服务相关文件位置  一般rsync是默认安装的
/etc/rsyncd.conf
/etc/sysconfig/rsyncd
[root@server opt]#cp /etc/rsyncd.conf{,bak}
#做配置文件备份
[root@server opt]#ls /etc/|grep rsync
rsyncd.conf
rsyncd.confbak


[root@server opt]#vim /etc/rsyncd.conf
[root@server opt]#sed -n '7,10p' /etc/rsyncd.conf
uid = root
gid = root
use chroot = yes
#禁锢在源目录
port 873
#监听端口 tcp/udp 873,可通过cat /etc/services | grep rsync查看


[root@server opt]#sed -n '11,12p' /etc/rsyncd.conf
pid file = /var/run/rsyncd.pid
#存放进程 ID 的文件位置
log file = /var/log/rsyncd.log
#日志文件位置


[root@server opt]#sed -n '17,18p' /etc/rsyncd.conf
host allow = 192.168.241.0/24
#允许访问的客户机地址
dont compress   = *.gz *.tgz *.zip *.z *.Z *.rpm *.deb *.bz2
#同步时不再压缩的文件类型


[root@server opt]#sed -n '23,28p' /etc/rsyncd.conf
[cxk]
#共享模块名称
path = /var/www/html
#源目录的实际路径
comment = Document root of www.cxk.com
read only = yes
#是否为只读
auth users = cxk
#授权账户,多个账号以空格分隔
secrets file = /etc/rsyncd_users.db
#存放账户信息的数据文件
[root@server opt]#vim /etc/rsyncd_users.db
[root@server opt]#cat /etc/rsyncd_users.db
cxk:123123
[root@server opt]#chmod 600 /etc/rsyncd_users.db
[root@server opt]#mkdir /var/www/html -p
[root@server opt]#chmod +r /var/www/html/
#保证所有用户对源目录/var/www/html 都有读取权限
[root@server opt]#ls -ld /var/www/html/
#显示当前文件夹详细信息
drwxr-xr-x 2 root root 6 4月   7 15:24 /var/www/html/
[root@server opt]#rsync --daemon
#启动 rsync 服务,以独立监听服务的方式(守护进程)运行
[root@server opt]#netstat -antlp|grep rsync
tcp 0 0 0.0.0.0:873 0.0.0.0:* LISTEN 4534/rsync
tcp6 0 0 :::873 :::* LISTEN 4534/rsync
[root@server opt]#cat /var/run/rsyncd.pid
4534 3.客户端配置同步
[root@client ~]#ls /opt/
rh
[root@client ~]#mkdir /opt/cxk_backup
[root@server opt]#cd /var/www/html/
[root@server html]#ls
[root@server html]#echo "cxk ctrl" > cxk.txt
[root@server html]#ls
cxk.txt
[root@server html]#cat cxk.txt
cxk ctrl
[root@client ~]#rsync -avz cxk@192.168.241.11::cxk /opt/cxk_backup/
#将指定的资源下载到本地/opt 目录下进行备份
Password:
receiving incremental file list
./
cxk.txt

sent 74 bytes  received 162 bytes  42.91 bytes/sec
total size is 9  speedup is 0.04
[root@client ~]#ls /opt/
cxk_backup  rh
[root@client ~]#cat /opt/cxk_backup/cxk.txt
cxk ctrl
4.免交互数据同步
[root@server html]#ls
cxk.txt
[root@server html]#echo "wyb skateboarding" > wyb.txt
[root@server html]#ls
cxk.txt  wyb.txt
[root@server html]#cat wyb.txt
wyb skateboarding
[root@client ~]#echo "123123" > /etc/server.pass
[root@client ~]#cat /etc/server.pass
123123
[root@client ~]#chmod 600 /etc/server.pass
[root@client ~]#rsync -avz --password-file=/etc/server.pass cxk@192.168.241.11::cxk /opt/cxk_backup/
receiving incremental file list
./
wyb.txt
sent 74 bytes received 191 bytes 176.67 bytes/sec
total size is 27 speedup is 0.10
[root@client ~]#ls /opt/cxk_backup/
cxk.txt wyb.txt
[root@client ~]#cat /opt/cxk_backup/wyb.txt
wyb skateboarding
5.源服务器删除数据是否会同步
[root@server html]#ls
cxk.txt  wyb.txt
[root@server html]#rm -rf wyb.txt
[root@server html]#ls
cxk.txt
[root@client ~]#rsync -avz --password-file=/etc/server.pass cxk@192.168.241.11::cxk /opt/cxk_backup/
receiving incremental file list
./

sent 55 bytes  received 117 bytes  344.00 bytes/sec
total size is 9  speedup is 0.05
[root@client ~]#ls /opt/cxk_backup/
cxk.txt  wyb.txt
如果加入--delete
[root@client ~]#rsync -avz --delete --password-file=/etc/server.pass cxk@192.168.241.11::cxk /opt/cxk_backup/
receiving incremental file list
deleting wyb.txt

sent 52 bytes  received 114 bytes  332.00 bytes/sec
total size is 9  speedup is 0.05
[root@client ~]#ls /opt/cxk_backup/
cxk.txt
6.可以定期执行数据同步
crontab -e
30 22 * * * /usr/bin/rsync -az --delete --password-file=/etc/server.pass backuper@192.168.241.11::wwwroot /opt/
#为了在同步过程中不用输入密码,需要创建一个密码文件,保存 backuper 用户的密码,如 /etc/server.pass。在执行 rsync 同步时使用选项 “--password-file=/etc/server.pass” 指定即可。

systemctl restart crond
systemctl enable crond
三、关于Inotify
Linux内核的Inotify机制,从版本2.6.13开始提供,可以监控文件系统的变动情况,并做出通知响应
辅助软件:Inotify-tools
使用inotify通知接口,可以用来监控文件系统的各种变化情况,如文件存取、删除、移动、修改等。利用这一机制,可以非常方便地实现文件异动告警、增量备份,并针对目录或文件的变化及时作出响应。
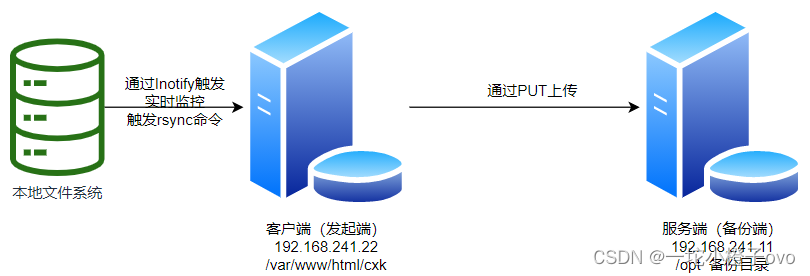
将inotify机制与rsync工具相结合,可以实现触发式备份(实时同步),即只要原始位置的文档发生变化,则立即启动增量备份操作;否则处于静默等待状态。这样,就避免了按固定周期备份时存在的延迟性、周期过密等问题。
上行同步必须是在应用服务器上执行(应用服务器:中间件,提供应用服务的,如Nginx、Apache等)
四、配置客户端与服务端的实验——上传
1.服务端配置
[root@server ~]#vim /etc/rsyncd.conf
[root@server ~]#sed -n '7,10p' /etc/rsyncd.conf
uid = root
gid = root
use chroot = yes
port 873
[root@server ~]#sed -n '12,13p' /etc/rsyncd.conf
pid file = /var/run/rsyncd.pid
log file = /var/log/rsyncd.log
[root@server ~]#sed -n '18,19p' /etc/rsyncd.conf
host allow = 192.168.241.0/24
dont compress   = *.gz *.tgz *.zip *.z *.Z *.rpm *.deb *.bz2
[root@server ~]#sed -n '24,29p' /etc/rsyncd.conf
[cxk]
path = /opt/
comment = Document root of www.cxk.com
read only = no
#修改仅只读为no  否则无法在服务端进行备份数据
auth users = cxk
secrets file = /etc/rsyncd_users.db
[root@server ~]#rsync --daemon
[root@server ~]#netstat -antp| grep rsync
tcp        0      0 0.0.0.0:873             0.0.0.0:*               LISTEN      5628/rsync
tcp6       0      0 :::873                  :::*                    LISTEN      5628/rsync
[root@server ~]#chmod 777 /opt/
[root@server ~]#ls -ld /opt/
drwxrwxrwx. 3 root root 16 12月 19 00:14 /opt/
2.客户端配置
[root@client ~]#mkdir /var/www/html/cxk/ -p
[root@client ~]#ls -ld /var/www/html/cxk/
drwxr-xr-x. 2 root root 6 Apr  8 01:59 /var/www/html/cxk/
[root@client ~]#cd /opt/
[root@client opt]#ls
cxk_backup  rh
[root@client opt]#rz -E
rz waiting to receive.
[root@client opt]#ls
cxk_backup  inotify-tools-3.14.tar.gz  rh
[root@client opt]#tar zxvf inotify-tools-3.14.tar.gz


#编译安装前先调整内核
[root@client opt]#ls
cxk_backup  inotify-tools-3.14  inotify-tools-3.14.tar.gz  rh
[root@client opt]#cd inotify-tools-3.14/
[root@client inotify-tools-3.14]#ls
aclocal.m4    config.h.in   COPYING     libinotifytools  man      src
AUTHORS       config.sub    depcomp     ltmain.sh        missing
ChangeLog     configure     INSTALL     Makefile.am      NEWS
config.guess  configure.ac  install-sh  Makefile.in      README


[root@client inotify-tools-3.14]#cat /proc/sys/fs/inotify/max_queued_events
16384
[root@client inotify-tools-3.14]#cat /proc/sys/fs/inotify/max_user_instances 128
[root@client inotify-tools-3.14]#cat /proc/sys/fs/inotify/max_user_watches
8192

[root@client inotify-tools-3.14]#vim /etc/sysctl.conf
[root@client inotify-tools-3.14]#sed -n '11,13p' /etc/sysctl.conf
fs.inotify.max_queued_events = 16384
#监控事件队列,默认值为16384
fs.inotify.max_user_instances = 1024
#最多监控实例数,默认值为128
fs.inotify.max_user_watches = 1048576
#每个实例最多监控文件数,默认值为8192

#当要监控的目录、文件数量较多或者变化较频繁时,建议加大这三个参数的值。
[root@client inotify-tools-3.14]#sysctl -p
fs.inotify.max_queued_events = 16384
fs.inotify.max_user_instances = 1024
fs.inotify.max_user_watches = 1048576
3.编译安装Inotify-tools工具
用 inotify 机制还需要安装 inotify-tools,以便提供 inotifywait、inotifywatch 辅助工具程序,用来监控、汇总改动情况。
[root@client inotify-tools-3.14]#./configure
[root@client inotify-tools-3.14]#make && make install


#这里如果无法进行编译安装的话   可能会出现如下报错
checking for gcc... no  checking for cc... no
make: *** No targets specified and no makefile found.  Stop.

#这里我们就需要去安装编译工具  yum  install -y gcc  gcc-c++  make即可继续进行编译
4.使用Inotifywait/Inotifywatch工具测试
- inotifywait:可监控modify(修改)、create(创建)、move(移动)、delete(删除)、attrib(属性更改)等各种事件,一有变动立即输出结果。
- inotifywatch:可用来收集文件系统变动情况,并在运行结束后输出汇总的变化情况。
| 选项 | 含义 |
|---|---|
| -e | 用来指定要监控哪些事件 |
| -m | 表示持续监控 |
| -r | 表示递归整个目录 |
| -q | 简化输出信息 |
4.1执行创建命令
[root@client ~]#inotifywait -mrq -e modify,create,move,delete /var/www/html/cxk/
#使用Inotifywait辅助工具  进行监控 modify(修改),create(创建),move(移动),delete(删除)等选择   监控的目录站点是/var/www/html/cxk目录
[root@client ~]#mkdir /var/www/html/cxk/wyb
/var/www/html/cxk/ CREATE,ISDIR wyb
#监控实时显示信息  在站点/var/www/html/cxk目录下 create(创建) 文件夹wyb
4.2执行删除命令
/var/www/html/cxk/ DELETE,ISDIR wyb
#监控实时显示 被监控站点目录 /var/www/html/cxk/目录下 删除 wyb文件夹
4.3编写脚本
[root@client ~]#vim inotify.sh
[root@client ~]#cat inotify.sh
#!/bin/bash
INOTIFY_CMD="inotifywait -mrq -e modify,create,move,delete,attrib /var/www/html/cxk/"
RSYNC_CMD="rsync -azH --delete --password-file=/etc/server.pass /var/www/html/cxk cxk@192.168.241.11::cxk"

$INOTIFY_CMD | while read directory event file
#while判断是否接收到监控记录 此处管道符作用是将
do
    if [ $(pgrep rsync | wc -l) -le 0 ];then
    fi
done

#该脚本用来监控本机/var/www/html/cxk目录下的变动情况,一旦有更新触发rsync同步操作,上传备份至服务器192.168.241.11的cxk共享目录下
触发式上行同步的验证过程:
1.在本机运行Inotify.sh脚本
2.切换到本机的/var/www/html/cxk目录下,执行增加、删除、修改文件等操作
3.查看远端服务器是否监控变化


[root@client ~]#chmod +x inotify.sh
[root@client ~]#chmod 777 /var/www/html/cxk/
[root@client ~]#chmod +x /etc/rc.d/rc.local
[root@client ~]#echo './inotify.sh' >> /etc/rc.d/rc.local
4.4测试
[root@client ~]#cd /var/www/html/cxk/
[root@client cxk]#ls
wyb
[root@client ~]#./inotify.sh[root@client cxk]#pwd
/var/www/html/cxk
[root@client cxk]#ls
[root@client cxk]#mkdir cxk
[root@client cxk]#echo "ctrl" > cxk/cxk.txt
[root@server opt]#ls
cxk
[root@server opt]#cd cxk/
[root@server cxk]#ls
cxk
[root@server cxk]#cd cxk/
[root@server cxk]#ls
cxk.txt
[root@server cxk]#cat cxk.txt
ctrl
五、总结
Rsync是一个远程同步命令,实现了复制统计比较全方位的数据同步
1.上行同步——上传
客户端(源服务器),通过Rsync命令,同步给服务端(目标服务器),客户端备份数据到服务端
上行同步过程:
首先在客户端和服务器之间建立一个连接,然后比较两个文件;只有在客户端上创建新的或者已更改的文件才会被上传到服务器
一般结合Inotify(文件实时监控)进行使用
2.下行同步——下载
服务器(源服务器),通过Rsync命令,同步给客户端(目标服务器),服务端备份数据到客户端
下行同步过程:
Rsync首先在服务器和客户端之间建立一个连接,然后比较两个文件,只有在服务端上新建的或者已更改的文件才会被下载到客户端


 297
297


 被折叠的 条评论
为什么被折叠?
被折叠的 条评论
为什么被折叠?
 到【灌水乐园】发言


