


1.java sevice
https://blog.csdn.net/weixin_39190897/article/details/122204264
上一篇介绍了系统服务vibrate使用,
# 2 系统服务分类
除了使用aidl编写的java服务外,还存在另一种形式native service
adb shell service list可列出当前Anndroid系统的服务列表信息

android系统服务大致分为三大类,本地守护进程,native系统服务,java系统服务
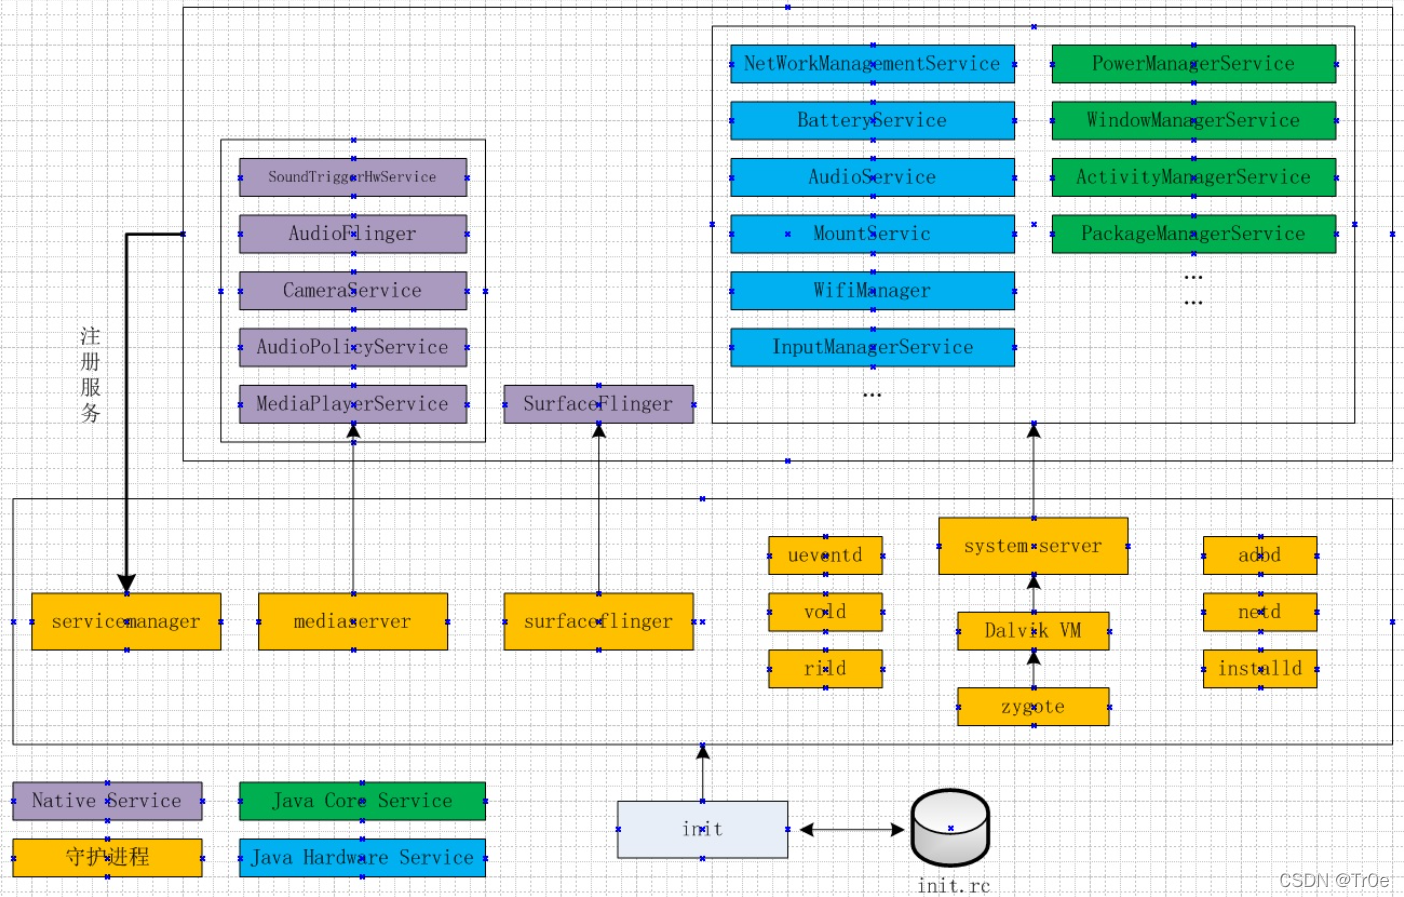
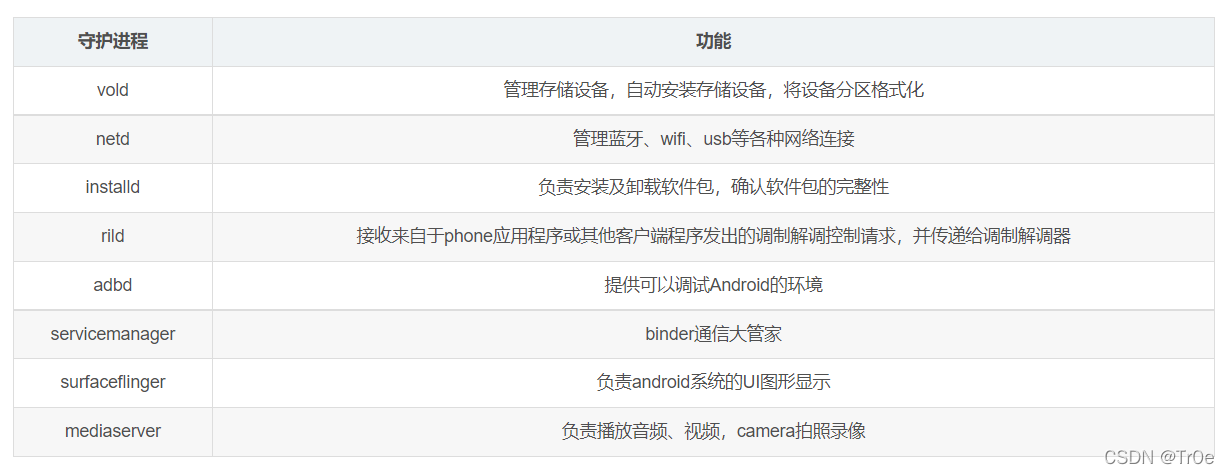
2.2 本地守护进程
init进程根据init.r定义,启动本地守护进程,这些进程常驻系统中,有的只会启动一次,有的推出后还会被init启动,具体启动方式在init.rc中定义。
2.3 native service
Native Service 是android系统里的一种特色。 c++/c写的,供java远程调用的Remote Service。因为c/c++编译生成的是Native代码(机器码),所以叫Native Service。 java不能直接进行系统调用.必须通过jni调用C代码访问系统功能,native service可以直接进行系统调用, 于是访问操作系统或是硬件功能时,不再需要jni,代码实现上更加统一。native代码比java这种解释型语言语言执行效率更高,随着android系统性能需求越来越高,Native Service需求将越来越高。
系统服务运行在本地守护进程中,(是否都是这样?存疑)比如 mediaserver 守护进程中就包含 AudioFlinger、MediaPlayerService、CameraService、AudioPolicyService和SoundTriggerHwService 等服务。在 mediaserver 进程的 main 函数中,初始化这些服务的实例,代码如下:
int main(int argc __unused, char** argv)
{
    ...
    sp<ProcessState> proc(ProcessState::self());
    sp<IServiceManager> sm = defaultServiceManager();
    ALOGI("ServiceManager: %p", sm.get());
    AudioFlinger::instantiate();
    MediaPlayerService::instantiate();
    CameraService::instantiate();
    AudioPolicyService::instantiate();
    SoundTriggerHwService::instantiate();
    ...
    ProcessState::self()->startThreadPool();
    IPCThreadState::self()->joinThreadPool();
}
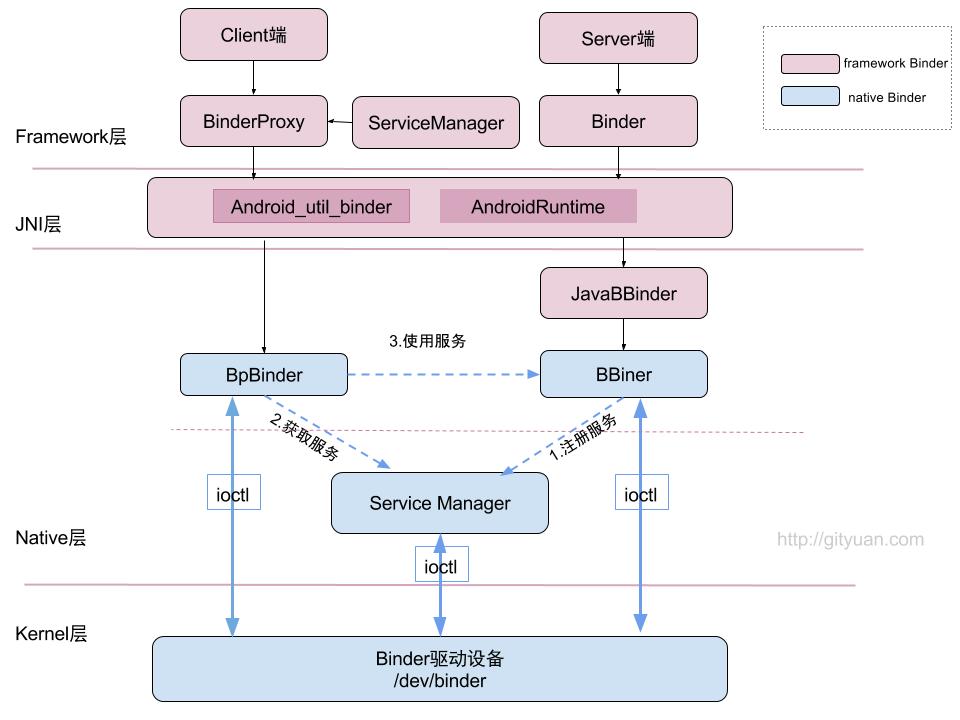
在所属进程初始化的时候 ,将Native系统服务注册到了ServiceManager中,这样其他应用或服务就可以通过binder机制调用Native系统服务了。跟vibrate中的ServiceManager.addService("vibrator", vibrator);一样。

当然,我们可以自己开发一个Native系统服务,实现其Binder接口,这样,Native层的其他应用或服务就可以调用该服务了。如果我们开发的native系统服务想提供给java层应用使用,就需要实现一个java接口,然后通过jni调用Native系统服务。
注意与下面java 系统服务的对比:
-
Native Service定义Bpxxx 对应java service中的 Stub.Proxy
- Bp Binder proxy,
- 发送的Binder通信,经由BpBinder::transact()方法发送
- java环境与Native环境 Proxy本质上是一回事,只是提供的编程语言环境里的不同实现而已。
- 接收与处理端,IPCThreadState对象回调到BBinder引用的OnTransact()
- 此时BBinder不再是javaBBinder对象,而是拓展出来的Bnxxx。Binder Native
- BBinder::onTransact方法里,可以处理Binder消息,并将结果返回。
3 自定义native service
通过读取和设置蓝牙地址的例子,
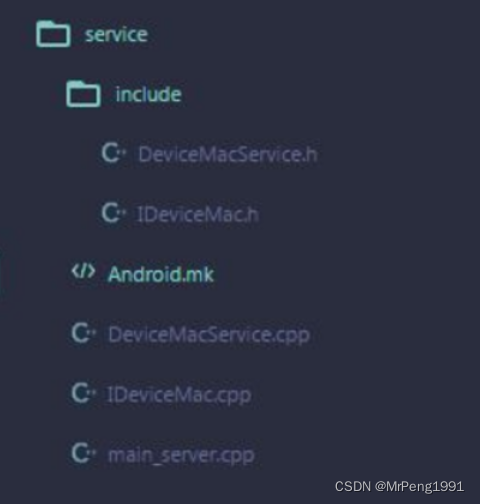
3.1 IDeviceMac.h接口文件
//接口名IDeviceMac.h
#ifndef XTC_IDEVICEMAC_H
#define XTC_IDEVICEMAC_H

#include <utils/RefBase.h>
#include <binder/IInterface.h>
#include <binder/Parcel.h>
#include <utils/String8.h>
#include <android/log.h>

#ifdef TAG
#undef TAG
#endif
#define TAG "DeviceMac"

#define LOGD(...) __android_log_print(ANDROID_LOG_DEBUG,TAG ,__VA_ARGS__)
#define LOGI(...) __android_log_print(ANDROID_LOG_INFO,TAG ,__VA_ARGS__)
#define LOGW(...) __android_log_print(ANDROID_LOG_WARN,TAG ,__VA_ARGS__)
#define LOGE(...) __android_log_print(ANDROID_LOG_ERROR,TAG ,__VA_ARGS__)
#define LOGF(...) __android_log_print(ANDROID_LOG_FATAL,TAG ,__VA_ARGS__)

namespace android {

class IDeviceMac : public IInterface {
public:
    enum {
        SET_BT_MAC = IBinder::FIRST_CALL_TRANSACTION,
        GET_BT_MAC,
    };

    virtual int setBTMac(String8 bt) = 0;

    virtual String8 getBTMac() = 0;
//宏定义,用来定义继承IInterface必须实现的两个方法,asInterface()函数和 getInterfaceDescriptor() 函数;
    DECLARE_META_INTERFACE(DeviceMac);
};

class BnDeviceMac : public BnInterface<IDeviceMac> {
public:
    virtual status_t onTransact( uint32_t code,
                                const Parcel& data,
                                Parcel* reply,
                                uint32_t flags);
};

} // end namespace android
#endif
- 定义一个 IDeviceMac 类继承自接口类IInterface( IInterface 跟Java环境一下,可用于提供 asBinder() 方法,返回一个IBinder引用), IDeviceMac 类里定义了对外提供的服务接口(如setBTMac()、getBTMac());
- 同时注意到DECLARE_META_INTERFACE(DeviceMac);是一个宏定义,用来定义继承IInterface必须实现的两个方法,**asInterface()**函数和 getInterfaceDescriptor() 函数;
- Java 环境里的 IBinder 会有 asInterface() 接口方法,在 libbinder 里通过 C++ 实现的 IBinder 则不能提供这一接口,于是需要通过一个全局有效的 interface_cast() 宏来完成这一功能,interface_cast() 是调用一个尚未定义的 INTERFACE::asInterface() 宏,于是只会在有明确定义 asInterface() 的地方,interface_cast() 才会有效;
- 可以看到我们定义IDeviceMac后,还定义了一个类BnDeviceMac,这个是Binder调用的一个规范,即定义Ixxx接口后,Bpxxx表示Client端接口,Bnxxx表示Service端接口, Bpxxx和Bnxxx都需要我们去实现具体内容,并且Bnxxx和Bpxxx中的方法和Ixxx中的方法是一一对应的。
3.2 接口实现文件 IDeviceMac.cpp
//IDeviceMac.cpp
#include "IDeviceMac.h"

namespace android {

class BpDeviceMac : public BpInterface<IDeviceMac> {

public:
    BpDeviceMac(const sp<IBinder>& impl) : BpInterface<IDeviceMac>(impl)
    {
    }

    int setBTMac(String8 bt) {
        LOGI("Bp setBT");
        Parcel data, reply;
        data.writeInterfaceToken(IDeviceMac::getInterfaceDescriptor());
        data.writeString8(bt);
        remote()->transact(SET_BT_MAC, data, &reply);
        return reply.readInt32();
    }

    String8 getBTMac() {
        LOGI("Bp getBT");
        Parcel data, reply;
        data.writeInterfaceToken(IDeviceMac::getInterfaceDescriptor());
        remote()->transact(GET_BT_MAC, data, &reply);
        return reply.readString8();
    }
};

IMPLEMENT_META_INTERFACE(DeviceMac, "DeviceMac");//宏定义代表的实际代码就是下面的注释
/* Macro above expands to code below.
const android::String16 IDeviceMac::descriptor("DeviceMac");
const android::String16& IDeviceMac::getInterfaceDescriptor() const {
    return IDeviceMac::descriptor;
}
android::sp<IDeviceMac> IDeviceMac::asInterface(const android::sp<android::IBinder>& obj) {
    android::sp<IDeviceMac> intr;
    if (obj != NULL) {
        intr = static_cast<IDeviceMac*>(obj->queryLocalInterface(IDeviceMac::descriptor).get());
        if (intr == NULL) {
            intr = new BpDeviceMac(obj);
        }
    }
    return intr;
}
*/

status_t BnDeviceMac::onTransact(
        uint32_t code, const Parcel& data, Parcel* reply, uint32_t flags) {
    CHECK_INTERFACE(IDeviceMac, data, reply);
    LOGI("Bn onTransact code:%d", code);
    switch(code) {
        case SET_BT_MAC:
            reply->writeInt32(setBTMac(data.readString8()));
            return NO_ERROR;
        case GET_BT_MAC:
            reply->writeString8(getBTMac());
            return NO_ERROR;
        default:
            return BBinder::onTransact(code, data, reply, flags);
    }
}

} // end namespace android
- 上面代码中IMPLEMENT_META_INTERFACE(DeviceMac, “DeviceMac”);下面注释掉的内容就是这个宏定义代表的实际代码,也是就是说IDeviceMac.h中的那个宏定义其实就是定义这两个方法;
- BpDeviceMac 里面的内容就是把相关参数写到Parcel中,这是一个用来读写跨进程参数的类, 然后调用remote()->transact(), 就调用到BnDeviceMac::onTransact()中,BnDeviceMac::onTransact()函数中已经跨过进程了,具体怎么做到的就涉及到 IPC 原理了,这里不做讨论;
- 接下来定义的 BnDeviceMac::onTransact 做的事情也很简单,就是从Parcel中将Client传过来的数据读出来,然后调用BnDeviceMac中对应的实现方法,这里需要注意,由于BnDeviceMac::onTransact()代码和BpDeviceMac写在了同一个文件中,看起来有点像BnDeviceMac调用BpDeviceMac的 一样,其实是BnDeviceMac::onTranscat()中调用的setBTMac() getBTMac()是在调用BnDeviceMac中实现的方法, 接下来就讲BnDeviceMac的实现。
3.3 DeviceMacService服务实现文件
//DeviceMacService.h
#ifndef XTC_DEVICEMACSERVICE_H
#define XTC_DEVICEMACSERVICE_H

#include "IDeviceMac.h"

#define SERVER_NAME "DeviceMacService"

namespace android {

class DeviceMacService : public BnDeviceMac {
public:
    DeviceMacService();
    virtual ~DeviceMacService();
    //IDeviceMac
    virtual int setBTMac(String8 bt);
    virtual String8 getBTMac();
};

} // end namespace android
#endif


//==========DeviceMacService.cpp=====================================

#include "DeviceMacService.h"

namespace android {

DeviceMacService::DeviceMacService() {

}

DeviceMacService::~DeviceMacService() {

}

int DeviceMacService::setBTMac(String8 bt) {
    LOGI("Bn setBT, bt:%s", bt.string());
    return NO_ERROR;
}

String8 DeviceMacService::getBTMac() {
    LOGI("Bn getBT");
    return String8("4a:4b:4c:3a:3b:3c");
}

} // end namespace android
DeviceMacService这个类继承了BnDeviceMac, 实现了其中的方法,所以BnDeviceMac::onTransact()方法中相关调用就会调到DeviceMacService,在DeviceMacService中,我们就能做我们实际想做的事情了。
3.4 注册service和客户端调用
//main_server.cpp
#include "DeviceMacService.h"
#include <binder/ProcessState.h>
#include <binder/IServiceManager.h>
#include <binder/IPCThreadState.h>

using namespace android;

sp<IDeviceMac> getService() {
    sp<IServiceManager> sm = defaultServiceManager();
    sp<IBinder> binder = sm->getService(String16(SERVER_NAME));
    //interfa_cast()的函数
    sp<IDeviceMac> service = interface_cast<IDeviceMac>(binder);
    return service;
}

int main(int argc, char** argv) {
    if (argc == 1) {
        LOGI("start DeviceMacService");
        //addService()函数用于注册服务  三行代码,固定操作
        defaultServiceManager()->addService(String16(SERVER_NAME), new DeviceMacService());
        android::ProcessState::self()->startThreadPool();
        IPCThreadState::self()->joinThreadPool();
    } else if (argc == 2) {
        sp<IDeviceMac> devMacServer = getService();
        devMacServer->setBTMac(String8("1a:1b:1c:1a:1b:1c"));
        String8 bt = devMacServer->getBTMac();
        LOGI("get bt mac:%s", bt.string());
    }
    return 0;
}
需要注意:
- 添加服务的代码很简单, 三行代码,固定的操作;
- 获取服务过程中,有个interfa_cast的函数,会将IBinder作为参数 new 一个BpDeviceMac对象,我们通过这个对象进行相关接口调用,最终调用到DeviceMacService;
- 注: 为了测试方便,此处将添加 Service 和调用 Service 写在了同一个可执行文件中,实际项目都是分开的。
3.4 编译和运行
LOCAL_PATH := $(call my-dir)
include $(CLEAR_VARS)

LOCAL_MODULE := macserver
LOCAL_MODULE_TAGS := optional

LOCAL_C_INCLUDES := $(LOCAL_PATH)/include \
        frameworks/native/include \
        system/core/include

LOCAL_SRC_FILES := IDeviceMac.cpp DeviceMacService.cpp main_server.cpp
LOCAL_SHARED_LIBRARIES := libutils libcutils libbinder libhardware

include $(BUILD_EXECUTABLE)
- 确保当前Android源码全部编译通过(有些依赖需先编译好);
- 将service目录放到Android源码目录中(比如vendor/qcom/service);
- 在Android源码根目录执行 mmm vendor/qcom/service;
- 执行完后编译的可执行文件在out/target/product/xxx/system/bin/下面(xxx为lunch的product);
- 将编译好的可执行文件macserver通过adb push 到手机system/bin/下面(adb需要root, 即执行 adb root , adb remount);
- 执行adb shell chmod 777 /system/bin/macserver加上可执行权限, 然后启动服务, 执行adb shell /system/bin/macserver(会阻塞当前窗口);
- 重新开一个窗口执行adb命令adb shell /system/bin/macserver 1即可调用Service,可以通过logcat过滤 DeviceMac 来查看log。
如果想开机自启动,并且指定Service所属的用户组,可在init.rc中加入
service macserver /system/bin/macserver
     class main
     user root
     group root
3.5 编写aidl
可不可以像java那样自动生成Ixxx.cpp,也有实现方法,就是编写AIDL文件,和 Java 里面的 AIDL 类似,只不过你要放在Android源码里面进行编译,系统会自动根据Ixxx.aidl在编译过程中生成Ixxx.cpp,这个cpp文件中就和上面我们写的IDeviceMac.cpp内容基本一致,也就是说这部分代码可以自动生成了,然后你只需要在Service端写一个类继承Bnxxx然后实现AIDL文件中定义的方法即可,使用非常方便,Android 7.1 上面的ICameraService.aidl就是以这种方式实现的,部分代码如下,可以参考一下:
//   frameworks/av/camera/aidl/android/hardware/ICameraService.aidl
/**
     * Types for getNumberOfCameras
     */
    const int CAMERA_TYPE_BACKWARD_COMPATIBLE = 0;
    const int CAMERA_TYPE_ALL = 1;

    /**
     * Return the number of camera devices available in the system
     */
    int getNumberOfCameras(int type);

    /**
     * Fetch basic camera information for a camera device
     */
    CameraInfo getCameraInfo(int cameraId);

    /**
     * Default UID/PID values for non-privileged callers of
     * connect(), connectDevice(), and connectLegacy()
     */
    const int USE_CALLING_UID = -1;
    const int USE_CALLING_PID = -1;

    /**
     * Open a camera device through the old camera API
     */
    ICamera connect(ICameraClient client,
            int cameraId,
            String opPackageName,
            int clientUid, int clientPid);
mk中需要加入
LOCAL_AIDL_INCLUDES := \
    frameworks/av/camera/aidl \

LOCAL_SRC_FILES := \
    aidl/android/hardware/ICameraService.aidl \
如果你想要看下自动生成的Ixxx.cpp的代码,其路径为:out/target/product/xxx1/obj/xxx2/xxx3_intermediates/aidl-generated/
xxx1表示你 lunch 时选的 product, xxx2表示你编译的模块类型,通常是 SHARED_LIBRARIES 或者
EXECUTABLES,xxx3表示你编译的模块中 LOCAL_MODULE 定义的名字。例如: out/target/product/msm8953/obj/SHARED_LIBRARIES/libcamera_client_intermediates/aidl-generated/src/aidl/android/hardware/ICameraService.cpp。
4 一个加减乘除功能的native 服务
- 创建一个名为 arithmetic 的文件夹,创建 Android.mk、ArithmeticService.cpp、ArithmeticService.h 和 IArithmeticService.cpp 这四个文件;
- 在 arithmetic 文件夹内再创建一个 include 子文件夹并创建一个 IArithmeticService.h 文件;
- 在 arithmetic 文件夹内再添加一个 ari_client 目录,在目录内添加 Android.mk 和 main_client.cpp 文件。
4.1 IArithmeticService.h
首先创建一个 IArithmeticService.h 类,这个类作为 BpArithmeticService 和 BnArithmeticService 的父类存在,我们在这里定义实际需要完成的 Binder 工作函数,同时定义出 BnArithmeticService 类,代码如
#ifndef ANDROID_IARITHMETIC_H
#define ANDROID_IARITHMETIC_H

#include <utils/Errors.h>  // for status_t
#include <utils/RefBase.h>
#include <utils/String8.h>
#include <binder/IInterface.h>
#include <binder/Parcel.h>

namespace android {

    class IArithmeticService : public IInterface
    {
        public:
            // 重要的宏定义,提供Service的asInterface方法和descriptor成员
            DECLARE_META_INTERFACE(ArithmeticService);

            // 实际工作的成员函数
            virtual double add(double a, double b) = 0;
            virtual double div(double a, double b) = 0;
            virtual double mul(double a, double b) = 0;
            virtual double sub(double a, double b) = 0;
    };

    class BnArithmeticService : public BnInterface<IArithmeticService>
    {
    public:
        virtual status_t onTransact( uint32_t code, const Parcel & data, Parcel * reply, uint32_t flags = 0);
    };
}

#endif
4.2 IArithmeticService.cpp
完成BpArithmeticService 和BnArithmeticService类的实际编写
#include <stdint.h>
#include <sys/types.h>

#include <binder/Parcel.h>
#include <binder/IMemory.h>
#include <IArithmeticService.h>

#include <utils/Errors.h>
#include <utils/String8.h>

namespace android {
    // 定义Binder传输的code值
    // 注意第一个值都必须是IBinder::FIRST_CALL_TRANSACTION
    enum {
        ADD = IBinder::FIRST_CALL_TRANSACTION,
        SUB,
        MUL,
        DIV
    };

    // BpArithmeticService从BpInterface模板类继承而来
    class BpArithmeticService : public BpInterface<IArithmeticService>
    {
    public:
        BpArithmeticService(const sp<IBinder>& impl)
                : BpInterface<IArithmeticService>(impl)
        {
        }

        // 如前所述,没有做什么特别工作,只是打包数据并发送
        virtual double add(double a, double b)
        {
            Parcel data, reply;
            double result;
            data.writeInterfaceToken(IArithmeticService::getInterfaceDescriptor());
            data.writeDouble(a);
            data.writeDouble(b);
            remote()->transact(ADD, data, &reply);
            reply.readDouble(&result);
            return result;
        }

        virtual double sub(double a, double b)
        {
            Parcel data, reply;
            double result;
            data.writeInterfaceToken(IArithmeticService::getInterfaceDescriptor());
            data.writeDouble(a);
            data.writeDouble(b);
            remote()->transact(SUB, data, &reply);
            reply.readDouble(&result);
            return result;
        }

        virtual double mul(double a, double b)
        {
            Parcel data, reply;
            double result;
            data.writeInterfaceToken(IArithmeticService::getInterfaceDescriptor());
            data.writeDouble(a);
            data.writeDouble(b);
            remote()->transact(MUL, data, &reply);
            reply.readDouble(&result);
            return result;
        }

        virtual double div(double a, double b)
        {
            Parcel data, reply;
            double result;
            data.writeInterfaceToken(IArithmeticService::getInterfaceDescriptor());
            data.writeDouble(a);
            data.writeDouble(b);
            remote()->transact(DIV, data, &reply);
            reply.readDouble(&result);
            return result;
        }
    };

    // 关键的宏,完成DECLARE_META_INTERFACE宏中定义的方法
    IMPLEMENT_META_INTERFACE(ArithmeticService, "ArithmeticService");

    // BnArithmeticService::onTransact方法的定义,如前所述根据具体的code值
    // 调用实际的方法进行数据处理,并将结果写入reply中返回
    status_t BnArithmeticService::onTransact(
        uint32_t code, const Parcel& data, Parcel* reply, uint32_t flags)
    {
        switch(code) {
            case ADD: {
                CHECK_INTERFACE(IArithmeticService, data, reply);
                const double a = data.readDouble();
                const double b = data.readDouble();
                double result = add(a, b);
                reply->writeDouble(result);
                return NO_ERROR;
            } break;

            case SUB: {
                CHECK_INTERFACE(IArithmeticService, data, reply);
                const double a = data.readDouble();
                const double b = data.readDouble();
                double result = sub(a, b);
                reply->writeDouble(result);
                return NO_ERROR;
            } break;

            case MUL: {
                CHECK_INTERFACE(IArithmeticService, data, reply);
                const double a = data.readDouble();
                const double b = data.readDouble();
                double result = mul(a, b);
                reply->writeDouble(result);
                return NO_ERROR;
            } break;

            case DIV: {
                CHECK_INTERFACE(IArithmeticService, data, reply);
                const double a = data.readDouble();
                const double b = data.readDouble();
                double result = div(a, b);
                reply->writeDouble(result);
                return NO_ERROR;
            } break;

            default:
                return BBinder::onTransact(code, data, reply, flags);

        }
    }
}
4.3 ArithmeticService.h
这里就是实际的 Service 类,从 BnXXXXXService 类中继承而来
#include <utils/Errors.h>
#include "include/IArithmeticService.h"

namespace android {

    class ArithmeticService : public BnArithmeticService
    {
    public:
        ArithmeticService();
        // 注册service时调用
        static void instantiate();

        virtual double add(double a, double b);
        virtual double sub(double a, double b);
        virtual double mul(double a, double b);
        virtual double div(double a, double b);
    };
}
4.3 ArithmeticService.cpp
#define LOG_TAG "ArithmeticService"
#include <utils/Log.h>
#include <cutils/log.h>

#include <binder/IPCThreadState.h>
#include <binder/IServiceManager.h>
#include <utils/Errors.h>
#include <utils/String8.h>
#include <utils/String16.h>

#include <IArithmeticService.h>

#include "ArithmeticService.h"

namespace android{

// 注册service用
void ArithmeticService::instantiate() {
    ALOGD("%s start", __FUNCTION__);
    defaultServiceManager()->addService(String16("arithmetic"), new ArithmeticService());
}

ArithmeticService::ArithmeticService() {
    ALOGD("ArithmeticService constructor.");
}

double ArithmeticService::add(double a, double b) {
    double result = a + b;
    ALOGD("a = %lf, b = %lf, result = %lf", a ,b, result);

    return result;
}

double ArithmeticService::sub(double a, double b) {
    double result = a - b;
    ALOGD("a = %lf, b = %lf, result = %lf", a ,b, result);

    return result;
}

double ArithmeticService::mul(double a, double b) {
    double result = a * b;
    ALOGD("a = %lf, b = %lf, result = %lf", a ,b, result);

    return result;
}

double ArithmeticService::div(double a, double b) {
    double result = a / b;
    ALOGD("a = %lf, b = %lf, result = %lf", a ,b, result);

    return result;
}
}
4.4 启动设置和编译运行
4.4.1 添加启动代码
首先在 framework/av/media/mediaserver/Android.mk 中的LOCAL_C_INCLUDES中添加如下一行: framework/arithmetic/ \,记得最后还要加上‘\’反斜杠;在LOCAL_SHARED_LIBYARIES中添加如下一行:libarithmeticservice \ 当然也要记得最后的‘\’反斜杠。
然后我们模仿 MediaPlayerService 那样,在 main_mediaserver.cpp 文件中添加 ArithmeticService 的启动代码,当然你也可以自己编写一个 c 程序来启动这个 service
……………
#include "ArithmeticService.h"
………………
    MediaPlayerService::instantiate();
    ArithmeticService::instantiate();
    ResourceManagerService::instantiate();
4.4.2 selinux
- 首先需要服务起来的时候,服务需要有一个定义的 type,所以我们在 service.te 文件中为我们的 service 定一个 type:
type arithmetic_service, service_manager_type; - 为service定义了一个type后,那么就需要将这个type赋予我们的service了,我们在service_contexts中添加如下代码,这样service起来后,它的type就是arithmetic_service了:
arithmetic u:object_r:arithmetic_service:s0 - 最后就是添加allow规则,因为闲杂我们的service是在MediaServer中加载起来的,而所以我们在mediaserver.te文件中添加如下allow规则:
allow mediaserver arithmetic_service:service_manager {add find};
4.4.3 编译运行
Android.mk
LOCAL_PATH:= $(call my-dir)
include $(CLEAR_VARS)

LOCAL_SRC_FILES := \
        ArithmeticService.cpp \
        IArithmeticService.cpp

LOCAL_SHARED_LIBRARIES := \
        libbinder           \
        libcutils           \
        liblog          \
        libutils            \

LOCAL_C_INCLUDES :=             \
        $(TOP)/frameworks/arithmetic/include    \
        $(TOP)/frameworks/native/include

LOCAL_CLANG := true

LOCAL_MODULE := libarithmeticservice

LOCAL_32_BIT_ONLY := true

include $(BUILD_SHARED_LIBRARY)

include $(call all-makefiles-under,$(LOCAL_PATH))
编写完 Android.mk 文件后,直接将整个 arithmetic 文件夹放到 Android 源码根目录下的 framework 文件夹下面编译即可。编译完成后,可以在 out/target/product/{Project}/system/lib 目录下找到一个名为 libarithmeticservice.so 的文件。
然后就是刷机启动了,简单的判断 service 有没有起来的方法就是手机开机以后使用 adb 连接手机,然后通过 service list 指令就可以列出手机当前运行的 service,一切都没有问题的话,我们添加的 arithmetic 服务就运行起来了。
4.5 main_client.cpp
#define LOG_TAG "ArithmeticClient"
#include <utils/Log.h>
#include <cutils/log.h>
#include <binder/IPCThreadState.h>
#include <binder/IServiceManager.h>
#include <utils/Errors.h>
#include <utils/String8.h>
#include <utils/String16.h>
#include <utils/RefBase.h>

#include <IArithmeticService.h>

#include "ArithmeticService.h"

using namespace android;

int main(int artc __unused, char ** argv __unused)
{
    sp<IServiceManager> sm = defaultServiceManager();
    sp<IBinder> binder = sm->getService(String16("arithmetic"));
    sp<IArithmeticService> ArithmeticService;
    ArithmeticService = interface_cast<IArithmeticService>(binder);

    double result_add = ArithmeticService->add(1.0, 2.0);
    ALOGD("Call Add method: 1.0 + 2.0 = %lf", result_add);

    double result_sub = ArithmeticService->sub(1201.2, 32.10);
    ALOGD("Call Sub method: 1201.2 + 32.10 = %lf", result_sub);

    double result_mul = ArithmeticService->mul(32.5, 40.2);
    ALOGD("Call Mul method: 32.5 + 40.2 = %lf", result_mul);

    double result_div = ArithmeticService->div(1000.0, 4);
    ALOGD("Call Div method: 1000.0 + 4 = %lf", result_div);
}
Android.mk
LOCAL_PATH:= $(call my-dir)
include $(CLEAR_VARS)

LOCAL_SRC_FILES := \
        main_client.cpp

LOCAL_SHARED_LIBRARIES := \
        libbinder                           \
        libcutils                           \
        liblog                          \
        libutils                            \
        libarithmeticservice  \

LOCAL_C_INCLUDES :=             \
    $(TOP)/frameworks/arithmetic \
    $(TOP)/frameworks/arithmetic/include  \
        $(TOP)/frameworks/native/include

LOCAL_CLANG := true

LOCAL_MODULE := arithmeticclient

LOCAL_32_BIT_ONLY := true

include $(BUILD_EXECUTABLE)

include $(call all-makefiles-under,$(LOCAL_PATH))
按照原本的目录层次,将更新后的代码放到 framework 文件夹下面,用 mmm 编译,就可以在 out/target/product/{Project}/system/bin 路径下看到一个 arithmeticclient 的可执行程序。如果之前编译的是 user 版本,那么只能执行 make 刷机了,如果是 eng 版本的软件可以通过 usb 插上手机,执行 adb remount,然后将这个文件 push 到手机 /system/bin 路劲下,然后直接执行就可以了。因为使用的是 Android 的 Log 输出,所以要用adb shell logcat ArithmeticClient:D ArithmeticService:D *😒 -v threadtime才能看到最后的输出的内容。
参考文章
https://blog.csdn.net/weixin_39190897/article/details/122204264
Android系统服务(SystemService)简介;
编写android native Service;
通过C++实现Android Native Service;
在Native层使用Binder创建服务;
Service与Android系统设计(6)— Native Service;
基于 Binder 的跨进程通信以及 Service(一):Native 层。


 1万+
1万+


 被折叠的 条评论
为什么被折叠?
被折叠的 条评论
为什么被折叠?
 到【灌水乐园】发言


