


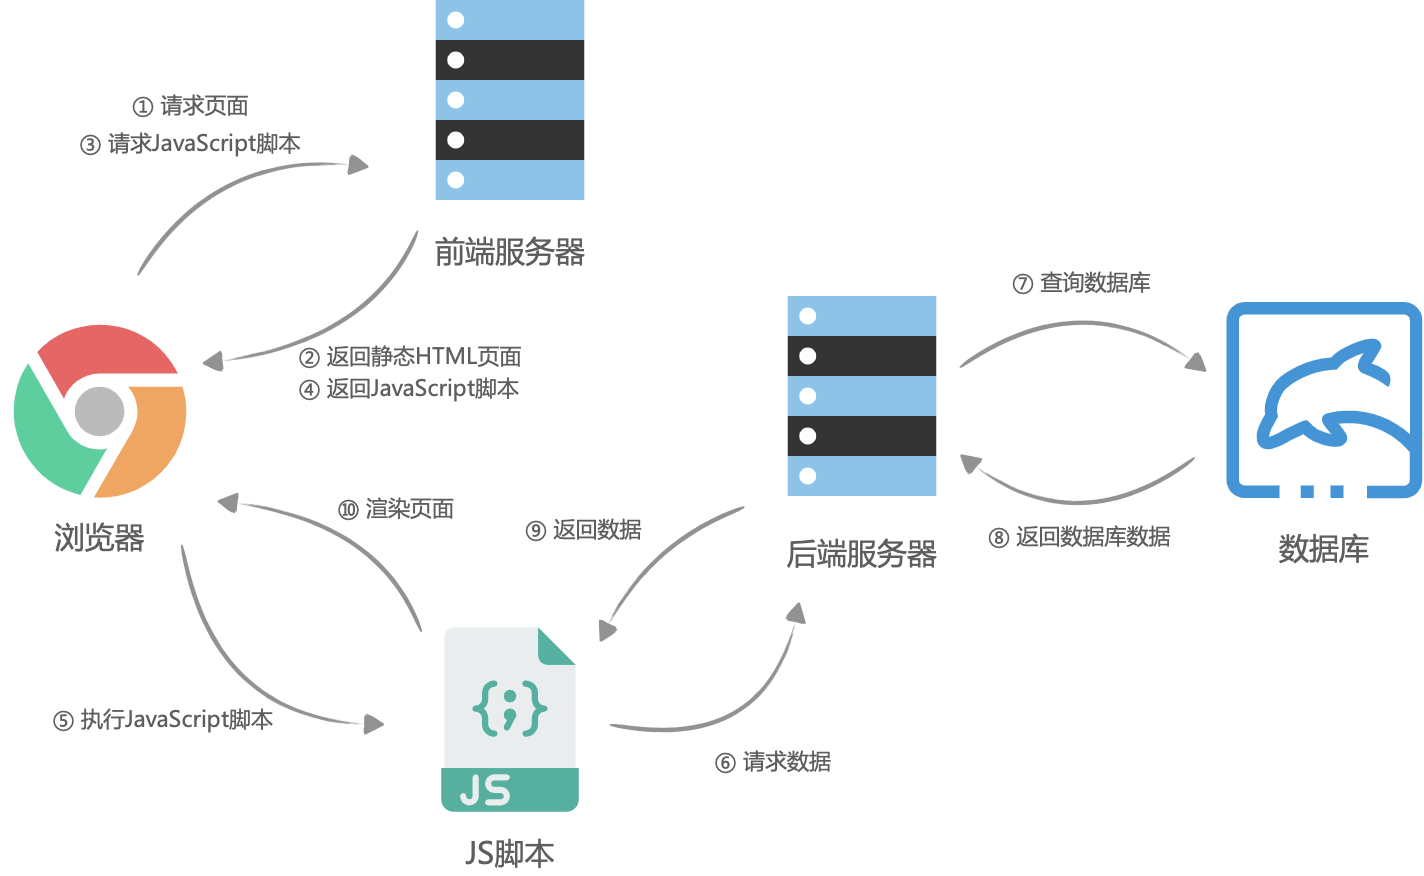
与传统 SPA 相比,服务器端渲染 (SSR) 对SEO更加友好,方便搜索引擎爬虫抓取,可以直接查看完全渲染的页面,除此之外,SSR能够在更短的时间内渲染出页面内容,让用户有更好的用户体验。
前言
本文将从以下三个模块介绍服务端渲染:
- 什么是客户端渲染?
- 什么是服务端渲染?
- 如何实现服务端渲染?希望看完后对你有所帮助!
客户端渲染
1、概念
客户端渲染(CSR),即传统的单页面应用(SPA)模式,Vue构建的应用程序默认情况下是一个HTML模板页面,只有一个id为app的根容器,然后通过webpack打包生成css、js等资源文件,浏览器加载、解析来渲染HTML。
右键查看一个标准的Vue项目网页源代码,可以看出源代码并没有页面中实际渲染的相关内容,只有一个id为app的根元素,所以说网页展示出来的内容是通过 JavaScript 动态渲染出来的。这种通过浏览器端的 JavaScript 为主导来渲染网页的方式就是客户端渲染。

2、优缺点
2.1、优点:
前后端分离;体验更好;
2.2、缺点:
首屏渲染慢;SEO不友好;
服务端渲染
服务端渲染(Server Side Render )就是将一个Vue组件在服务器端渲染为HTML字符串并发送到浏览器,最后将这些静态标记“激活”为可交互应用程序的过程称为服务端渲染。
简言之,在浏览器请求页面URL的时候,服务端将我们需要的HTML文本组装好,并返回给浏览器,这个HTML文本被浏览器解析之后,不需要经过 JavaScript 脚本的执行,即可直接构建出希望的 DOM 树并展示到页面中。这个服务端组装HTML的过程,叫做服务端渲染。
实现
1、小试牛刀
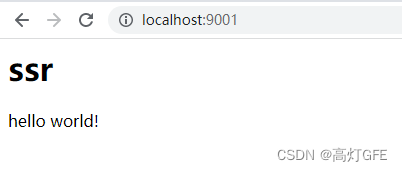
我们先简单实现服务端渲染,通过Vue3自带的 server-renderer 异步生成我们需要的HTML代码。
// nodejs服务器  express koa
const express = require('express');
const { createSSRApp } = require('vue');
const { renderToString } = require('@vue/server-renderer');

// 创建express实例
let app = express();

// 通过渲染器渲染page可以得到html内容
const page = createSSRApp({
    data: () => {
        return {
            title: 'ssr',
            count: 0,
        }
    },
    template: `<div><h1>{{title}}</h1>hello world!</div>`,
});

app.get('/', async function (req, res) {
    try {
        // 异步生成html
        const html = await renderToString(page);
        res.send(html);
    } catch (error) {
        res.status(500).send('系统错误');
    }
});

app.listen(9001, () => {
    console.log('9001 success');
});
然后通过 node 命令启动,也可以通过 nodemon 启动(关于 nodemon 使用大家可以自行百度)。
node .\server\index.js
// or
nodemon .\server\index.js

node启动

然后打开 http://localhost:9001/ 就可以看到:
右击查看网页源代码后:
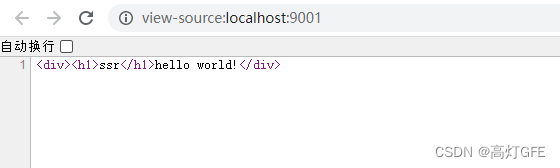
从网页源代码可以看出,当浏览器从服务端直接拿到HTML代码后,不需要执行 JavaScript 代码也可以将 **hello world!** 显示在页面上。这就是简单实现SSR的全部过程了。
大家可以用 vue-cli 新建一个vue项目,在页面显示 hello world ,然后通过查看网页源代码对比区别!
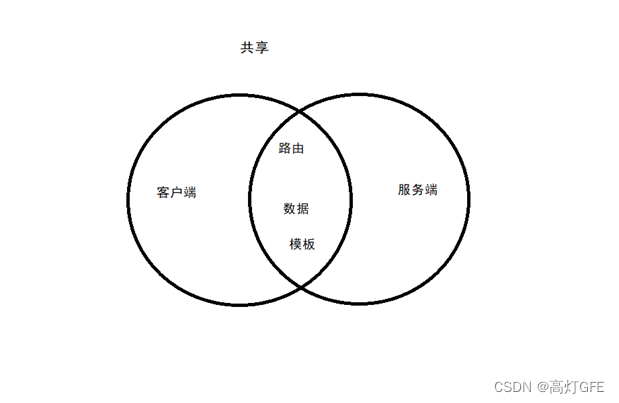
2、同构项目
前面已经通过简单的案例来演示了SSR,那么如何应用在我们的项目中呢?这里需要引入一个概念:同构。所谓同构,就是让一份代码,既可以在服务端中执行,也可以在客户端中执行,并且执行的效果都是一样的,都是完成这个 HTML 的组装,正确的显示页面。也就是说,一份代码,既可以客户端渲染,也可以服务端渲染。
2.1、服务端、客户端配置文件
在根目录新建 webpack 目录,此文件夹主要存放打包配置文件。
新建服务端配置文件:server.config.js
const base = require('./base.config.js');
const path = require('path');
// webpack插件
const { default: merge } = require('webpack-merge');
const nodeExternals = require("webpack-node-externals");
const { WebpackManifestPlugin } = require('webpack-manifest-plugin');

module.exports = merge(base, {
    mode: "production",
    // 将 entry 指向应用程序的 server 文件
    entry: {
        'server': path.resolve(__dirname, '../entry/server.entry.js')
    },
    // 对 bundle renderer 提供 source map 支持
    devtool: 'source-map',
    // 外置化应用程序依赖模块。可以使服务器构建速度更快,并生成较小的 bundle 文件。
    externals: nodeExternals({
        allowlist: [/\.css$/],
    }),
    output: {
        path: path.resolve(__dirname, './../dist/server'),
        filename: '[name].server.bundle.js',
        library: {
            type: 'commonjs2'   // 构建目标加载模式 commonjs
        }
    },
    // 这允许 webpack 以 Node 适用方式处理动态导入
    // 并且还会在编译 Vue 组件时告知 `vue-loader` 输送面向服务器代码(server-oriented code)。
    target: 'node',
    module: {
        rules: [
            {
                test: /\.js$/,
                use: {
                    loader: 'babel-loader',
                    options: {
                        presets: ['@babel/preset-env'],
                        plugins: [["@babel/plugin-transform-runtime", {
                            "corejs": 3
                        }]]
                    },

                },
                exclude: /node_modules/
            }
        ]
    },
    // 这是将服务器的整个输出构建为单个 JSON 文件的插件。
    // 服务端默认文件名为 `ssr-manifest.json`
    plugins: [
        new WebpackManifestPlugin({ fileName: 'ssr-manifest.json' }),
    ],
})
新建客户端配置文件:client.config.js
const base = require('./base.config.js');
const path = require('path');
// webpack插件
const { default: merge } = require('webpack-merge');
const HtmlWebpackPlugin = require('html-webpack-plugin');
const CopyPlugin = require("copy-webpack-plugin");

module.exports = merge(base, {
    mode: "production",
    // 对 bundle renderer 提供 source map 支持
    devtool: 'source-map',
    // 将 entry 指向应用程序的 client 文件
    entry: {
        'client': path.resolve(__dirname, '../entry/client.entry.js')
    },
    output: {
        path: path.resolve(__dirname, './../dist/client'),
        clean: true,
        filename: '[name].client.bundle.js',
    },
    plugins: [
        // 通过 html-webpack-plugin 生成client index.html
        new HtmlWebpackPlugin({
            filename: 'index.html',
            template: path.resolve('public/index.html')
        }),
        // 图标
        new CopyPlugin({
            patterns: [
                { from: path.resolve(__dirname, "../public/favicon.ico"), to: path.resolve(__dirname, './../dist/client') },
            ],
        }),
    ]
})
最后新建 base 配置文件:base.config.js
const path = require('path');
const { VueLoaderPlugin } = require('vue-loader');
module.exports = {
    // 输出
    output: {
        path: path.resolve(__dirname, './../dist'),
        filename: '[name].bundle.js',
    },
    //  loader
    module: {
        rules: [
            { test: /\.vue$/, use: 'vue-loader' },
            {
                test: /\.css$/, use: [
                    'vue-style-loader',
                    'css-loader'
                ]
            },
            {
                test: /\.s[ac]ss$/i,
                use: [
                    "vue-style-loader",
                    "css-loader",
                    "sass-loader",
                ],
            },
            {
                test: /\.js$/,
                use: {
                    loader: 'babel-loader',
                    options: {
                        presets: ['@babel/preset-env']
                    },

                },
                exclude: /node_modules/
            }
        ],
    },
    plugins: [
        new VueLoaderPlugin(),
    ]
}
到此就完成了配置文件,最后贴出打包命令(package.json)
{
  "scripts": {
    "build:client": "webpack --config ./webpack/client.config.js",
    "build:server": "webpack --config ./webpack/server.config.js",
    "build": "npm run build:client && npm run build:server"
  },
}
2.2、入口(entry)文件
在根目录下创建 entry 目录,此文件夹主要存放入口文件。
新建通用入口文件:app.js
// 通用入口
// 创建VUE实例
import { createSSRApp } from 'vue';
import App from './../src/App.vue';


export default function () {
    return createSSRApp(App);
}
新建服务端入口文件:server.entry.js
import createApp from './app';
// 服务器端路由与客户端使用不同的历史记录
import { createMemoryHistory } from 'vue-router'
import createRouter from './router.js'
import createStore from './store';
import { renderToString } from '@vue/server-renderer'
export default context => {
return new Promise(async (resolve, reject) => {
const app = createApp();
const router = createRouter(createMemoryHistory())
const store = createStore();
app.use(router);
app.use(store);
// 设置服务器端 router 的位置
await router.push(context.url);
// isReady 等到 router 将可能的异步组件和钩子函数解析完
await router.isReady();
// 匹配路由是否存在
const matchedComponents = router.currentRoute.value.matched.flatMap(record => Object.values(record.components))
// 不存在路由,返回 404
if (!matchedComponents.length) {
return reject({ code: 404 });
}
// 对所有匹配的路由组件调用 `asyncData()`
Promise.all(matchedComponents.map(component => {
if (component.asyncData) {
return component.asyncData({
store,
route: router.currentRoute.value
});
}
})).then(async (res) => {
let html = await renderToString(app);
html += `<script>window.__INITIAL_STATE__ = ${replaceHtmlTag(JSON.stringify(store.state))}</script>`
resolve(html);
}).catch(() => {
reject(html)
})
})
}
/**
* 替换标签
* @param {*} html
* @returns
*/
function replaceHtmlTag(html) {
return html.replace(/<script(.*?)>/gi, '<script$1>').replace(/<\/script>/g, '</script>')
}
新建客户端入口文件:client.entry.js
// 挂载、激活app
import createApp from './app';
import { createWebHistory } from 'vue-router'
import createRouter from './router.js'
import createStore from './store';
const router = createRouter(createWebHistory())

const app = createApp();
app.use(router);
const store = createStore();

// 判断window.__INITIAL_STATE__是否存在,存在的替换store的值
if (window.__INITIAL_STATE__) {
    // 激活状态数据
    store.replaceState(window.__INITIAL_STATE__);
}
app.use(store)

// 在客户端和服务端我们都需要等待路由器先解析异步路由组件以合理地调用组件内的钩子。因此使用 router.isReady 方法
router.isReady().then(() => {
    app.mount('#app')
})
服务端、客户端入口文件完成后,需要对路由(router)和 store 进行共享。
新建router.js
import { createRouter } from 'vue-router'

const routes = [
    { path: '/', component: () => import('../src/views/index.vue') },
    { path: '/about', component: () => import('../src/views/about.vue') },
]

// 导出路由仓库
export default function (history) {
    // 工厂
    return createRouter({
        history,
        routes
    })
}
还需要两个vue组件,分别是index.vue、about.vue
<script>
    // 声明额外的选项
    export default {
        // 对外暴露方法,执行store
        asyncData: ({ store, route }) => {
            // 触发 action 后,会返回 Promise
            return store.dispatch('asyncSetData', route.query?.id || route.params?.id);
        },
    }
</script>
<script setup>
    import { computed } from 'vue';
    import { useStore } from 'vuex';
    import {generateRandomInteger} from '../utils'

    const clickMe = () => {
        store.dispatch('asyncSetData', generateRandomInteger(1,4));
    }

    const store = useStore();
    // 得到后赋值
    const storeData = computed(() => store.state.data);

</script>
<template>
    <div>
        <div>index</div>
        <button @click="clickMe">点击</button>
        <div style="margin-top:20px">store
            <div>id: {{ storeData?.id }}</div>
            <div>title: {{ storeData?.title }}</div>
        </div>
    </div>
</template>

<style lang='scss' scoped>
</style>
<script setup>
    import { ref } from 'vue'
</script>
<template>
    <div>about</div>
</template>

<style lang='scss' scoped>
</style>
为了方便测试,我们将App.vue修改为router-view
<template>
    <div id="nav">
        <router-link to="/?id=1">Home</router-link> |
        <router-link to="/about">About</router-link>
    </div>
    <router-view />
</template>

<style lang="scss">
#app {
    font-family: Avenir, Helvetica, Arial, sans-serif;
    -webkit-font-smoothing: antialiased;
    -moz-osx-font-smoothing: grayscale;
    text-align: center;
    color: #2c3e50;
}

#nav {
    padding: 30px;

    a {
        font-weight: bold;
        color: #2c3e50;

        &.router-link-exact-active {
            color: #42b983;
        }
    }
}
</style>
新建store.js
// 实例化store
import { createStore as _createStore } from 'vuex';
// 引入数据
import { getData } from './data';

// 对外导出一个仓库
export default function createStore() {
    return _createStore({
        state: {
            // 状态数据
            data: {}
        },
        mutations: {
            // 同步数据
            SET_DATA(state, item) {
                state.data = item;
            }
        },
        actions: {
            // 异步数据
            asyncSetData({ commit }, id) {
                getData(id).then(item => {
                    commit('SET_DATA', item);
                })
            },
        },
        modules: {}
    });
}
为了方便测试,我们新建一个data.js文件
export function getData(id) {
    const bookList = [
        { id: 1, title: '西游记' },
        { id: 2, title: '红楼梦' },
        { id: 3, title: '水浒传' },
        { id: 4, title: '三国演义' },
    ];

    const item = bookList.find(i => i.id == id);
    return Promise.resolve(item);
}
到这里我们就可以构建客户端、服务端了,命令为 npm run build,这里的构建会自动构建两次,分别是 build:client、build:server,当终端出现 successfully 时则表示构建成功。
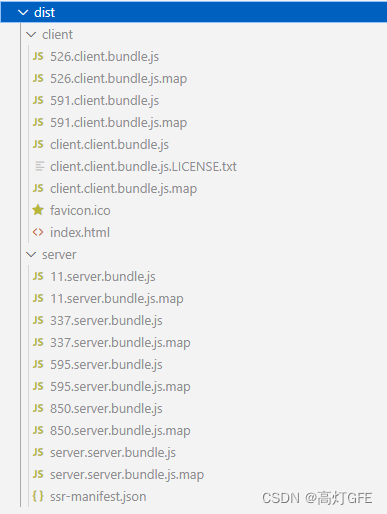
2.3、server.js
最后就是修改server/index.js文件,为了区别在此新建index2.js
const express = require('express')
const { renderToString } = require('@vue/server-renderer')
const app = express();
const path = require('path');
// 构建结果清单
const manifest = require('./../dist/server/ssr-manifest.json')
const appPath = path.join(__dirname, './../dist/server', manifest['server.js'])
const createApp = require(appPath).default;
const fs = require('fs');

// 搭建静态资源目录
// 这里index必须为false,有兴趣的话可以试试前后会有什么区别
app.use('/', express.static(path.join(__dirname, '../dist/client'), { index: false }));

// 获取模板
const indexTemplate = fs.readFileSync(path.join(__dirname, './../dist/client/index.html'), 'utf-8');

// 匹配所有的路径,搭建服务
app.get('*', async (req, res) => {
    try {
        const appContent = await createApp(req);

        const html = indexTemplate
            .toString()
            .replace('<div id="app">', `<div id="app">${appContent}`)

        res.setHeader('Content-Type', 'text/html');
        res.send(html);
    } catch (error) {
        console.log('error', error)
        res.status(500).send('服务器错误');
    }

})

app.listen(9002, () => {
    console.log('success 9002')
});
新建模板文件:index.html
<!DOCTYPE html>
<html lang="en">

    <head>
        <meta charset="UTF-8">
        <meta http-equiv="X-UA-Compatible" content="IE=edge">
        <meta name="viewport" content="width=device-width, initial-scale=1.0">
        <title>vue ssr</title>
    </head>

    <body>
        <div id="app"></div>
    </body>

</html>
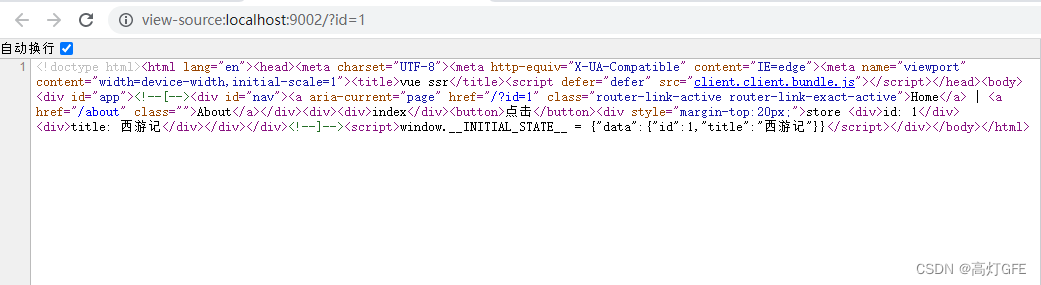
然后执行 nodemon .\server\index2.js,访问http://localhost:9002/?id=1

查看网页源代码
总结
当浏览器访问服务端渲染项目时,服务端将 URL 传给到预选构建好的 VUE 应用渲染器,渲染器匹配到对应的路由的组件之后,执行我们预先在组件内定义的 asyncData 方法获取数据,并将获取完的数据传递给渲染器的上下文,利用 template 组装成HTML,并将 HTML 和状态 state 一并 send 给浏览器,浏览器加载了构建好的 Vue 应用后,将 state 数据同步到前端的 store 中,并根据数据激活后端返回的被浏览器解析为 DOM 元素的HTML文本,完成了数据状态、路由、组件的同步,使得白屏时间更短,有了更好的加载体验,同时更有利于 SEO 。


 340
340


 被折叠的 条评论
为什么被折叠?
被折叠的 条评论
为什么被折叠?
 到【灌水乐园】发言


