


1. 核心原理
- 两端交互:PC端生成唯一二维码,App扫码后完成授权验证。
- 唯一标识:通过UUID绑定PC端请求与App扫码操作,确保一对一通信。
- 实时通知:服务端通过SSE(服务端推送事件)实现PC端与App的状态同步。
- Token传递:App授权时携带用户Token,服务端验证后生成登录凭证(如Cookie)。
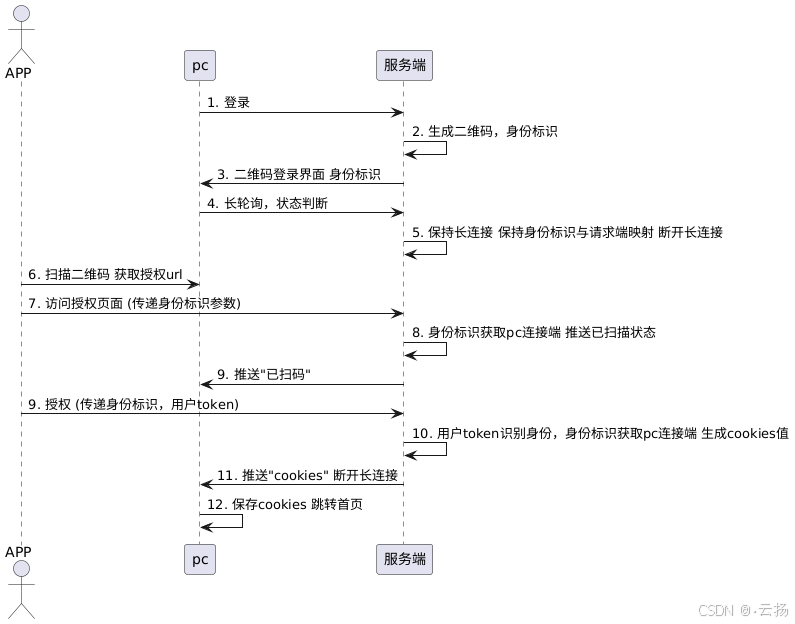
2. 流程步骤
- PC端生成二维码
- 二维码内容为授权URL(含唯一ID)。
- PC端通过SSE订阅服务端事件,等待登录结果。
- App扫码授权
- 扫码后跳转授权页面,用户确认登录。
- App将Token传递给服务端,绑定PC端ID。
- 服务端验证与通知
- 验证Token有效性,生成登录凭证(如Cookie)。
- 通过SSE向PC端推送登录成功事件,携带Cookie信息。
- PC端跳转首页
- 接收事件后自动跳转,展示用户信息。
3. 技术栈
- 后端:SpringBoot(核心框架)、SSE(服务端推送)、qrcode-plugin(二维码生成)。
- 前端:Thymeleaf(模板引擎)、原生JS(事件处理)。
- 依赖:
<?xml version="1.0" encoding="UTF-8"?>
<project xmlns="http://maven.apache.org/POM/4.0.0" xmlns:xsi="http://www.w3.org/2001/XMLSchema-instance"
         xsi:schemaLocation="http://maven.apache.org/POM/4.0.0 https://maven.apache.org/xsd/maven-4.0.0.xsd">
    <modelVersion>4.0.0</modelVersion>
    <groupId>com.javacoder</groupId>
    <artifactId>spring-boot-demo</artifactId>
    <version>0.0.1-SNAPSHOT</version>
    <name>spring-boot-demo</name>
    <description>Demo project for Spring Boot</description>
    <url/>
    <licenses>
        <license/>
    </licenses>
    <developers>
        <developer/>
    </developers>
    <scm>
        <connection/>
        <developerConnection/>
        <tag/>
        <url/>
    </scm>

    <parent>
        <groupId>org.springframework.boot</groupId>
        <artifactId>spring-boot-starter-parent</artifactId>
        <version>2.2.1.RELEASE</version>
        <relativePath/> <!-- lookup parent from repository -->
    </parent>

    <properties>
        <project.build.sourceEncoding>UTF-8</project.build.sourceEncoding>
        <project.reporting.outputEncoding>UTF-8</project.reporting.outputEncoding>
        <java.version>1.8</java.version>
    </properties>

    <dependencies>
        <dependency>
            <groupId>org.springframework.boot</groupId>
            <artifactId>spring-boot-starter-web</artifactId>
        </dependency>

        <!-- https://mvnrepository.com/artifact/com.github.liuyueyi.media/qrcode-plugin -->
        <dependency>
            <groupId>com.github.liuyueyi.media</groupId>
            <artifactId>qrcode-plugin</artifactId>
            <version>3.0.1-beta</version>
        </dependency>

        <dependency>
            <groupId>org.springframework.boot</groupId>
            <artifactId>spring-boot-starter-thymeleaf</artifactId>
        </dependency>
    </dependencies>

    <build>
        <pluginManagement>
            <plugins>
                <plugin>
                    <groupId>org.springframework.boot</groupId>
                    <artifactId>spring-boot-maven-plugin</artifactId>
                </plugin>
            </plugins>
        </pluginManagement>
    </build>
    <repositories>
        <repository>
            <id>spring-releases</id>
            <name>Spring Releases</name>
            <url>https://repo.spring.io/libs-release-local</url>
            <snapshots>
                <enabled>false</enabled>
            </snapshots>
        </repository>
        <repository>
            <id>jitpack.io</id>
            <url>http://jitpack.io</url>
        </repository>

    </repositories>

</project>
4. 示例工程实现
4.1. 项目配置
- application.yml:
server:
  port: 8080

spring:
  thymeleaf:
    mode: HTML
    encoding: UTF-8
    servlet:
      content-type: text/html
    cache: false
- IpUtils工具类:获取本地IP地址,避免硬编码。
import java.net.*;
import java.util.Enumeration;

public class IpUtils {
    public static final String DEFAULT_IP = "127.0.0.1";

    /**
     * 直接根据第一个网卡地址作为其内网ipv4地址,避免返回 127.0.0.1
     *
     * @return
     */
    public static String getLocalIpByNetcard() {
        try {
            for (Enumeration<NetworkInterface> e = NetworkInterface.getNetworkInterfaces(); e.hasMoreElements(); ) {
                NetworkInterface item = e.nextElement();
                for (InterfaceAddress address : item.getInterfaceAddresses()) {
                    if (item.isLoopback() || !item.isUp()) {
                        continue;
                    }
                    if (address.getAddress() instanceof Inet4Address) {
                        Inet4Address inet4Address = (Inet4Address) address.getAddress();
                        return inet4Address.getHostAddress();
                    }
                }
            }
            return InetAddress.getLocalHost().getHostAddress();
        } catch (SocketException | UnknownHostException e) {
            return DEFAULT_IP;
        }
    }

    private static volatile String ip;

    public static String getLocalIP() {
        if (ip == null) {
            synchronized (IpUtils.class) {
                if (ip == null) {
                    ip = getLocalIpByNetcard();
                }
            }
        }
        return ip;
    }
}
4.2. 核心接口
- 登录接口(生成二维码)
@CrossOrigin
@Controller
public class QrLoginRest {
    @Value(("${server.port}"))
    private int port;

    @GetMapping(path = "login")
    public String qr(Map<String, Object> data) throws IOException, WriterException {
        String id = UUID.randomUUID().toString();
        // IpUtils 为获取本机ip的工具类,本机测试时,如果用127.0.0.1, localhost那么app扫码访问会有问题哦
        String ip = IpUtils.getLocalIP();

        String pref = "http://" + ip + ":" + port + "/";
        data.put("redirect", pref + "home");
        data.put("subscribe", pref + "subscribe?id=" + id);


        String qrUrl = pref + "scan?id=" + id;
        // 下面这一行生成一张宽高200,红色,圆点的二维码,并base64编码
        // 一行完成,就这么简单省事,强烈安利
        String qrCode = QrCodeGenWrapper.of(qrUrl).setW(200).setDrawPreColor(Color.RED)
                .setDrawStyle(QrCodeOptions.DrawStyle.CIRCLE).asString();
        data.put("qrcode", DomUtil.toDomSrc(qrCode, MediaType.ImageJpg));
        return "login";
    }
请注意上面的实现,我们返回的是一个视图,并传递了三个数据:
- redirect:跳转url(app授权之后,跳转的页面)
- subscribe: 订阅url(用户会访问这个url,开启长连接,接收服务端推送的扫码、登录事件)
- qrcode: base64格式的二维码图片
- SSE订阅接口
private Map<String, SseEmitter> cache = new ConcurrentHashMap<>();

@GetMapping(path = "subscribe", produces = {org.springframework.http.MediaType.TEXT_EVENT_STREAM_VALUE})
public SseEmitter subscribe(String id) {
    // 设置五分钟的超时时间
    SseEmitter sseEmitter = new SseEmitter(5 * 60 * 1000L);
    cache.put(id, sseEmitter);
    sseEmitter.onTimeout(() -> cache.remove(id));
    sseEmitter.onError((e) -> cache.remove(id));
    return sseEmitter;
}
- 维护SSE长连接,处理超时和错误事件。
- 扫码授权接口
@GetMapping(path = "scan")
public String scan(Model model, HttpServletRequest request) throws IOException {
    String id = request.getParameter("id");
    SseEmitter sseEmitter = cache.get(request.getParameter("id"));
    if (sseEmitter != null) {
        // 告诉pc端,已经扫码了
        sseEmitter.send("scan");
    }

    // 授权同意的url
    String url = "http://" + IpUtils.getLocalIP() + ":" + port + "/accept?id=" + id;
    model.addAttribute("url", url);
    return "scan";
}
- 跳转授权页面,触发PC端状态更新。
- 授权验证接口
@ResponseBody
@GetMapping(path = "accept")
public String accept(String id, String token) throws IOException {
    SseEmitter sseEmitter = cache.get(id);
    if (sseEmitter != null) {
        // 发送登录成功事件,并携带上用户的token,我们这里用cookie来保存token
        sseEmitter.send("login#qrlogin=" + token);
        sseEmitter.complete();
        cache.remove(id);
    }

    return "登录成功: " + token;
}
- 验证Token后推送登录结果,关闭SSE连接。
- 首页接口
@GetMapping(path = {"home", ""})
@ResponseBody
public String home(HttpServletRequest request) {
    Cookie[] cookies = request.getCookies();
    if (cookies == null || cookies.length == 0) {
        return "未登录!";
    }

    Optional<Cookie> cookie = Stream.of(cookies).filter(s -> s.getName().equalsIgnoreCase("qrlogin")).findFirst();
    return cookie.map(cookie1 -> "欢迎进入首页: " + cookie1.getValue()).orElse("未登录!");
}
- 用户授权成功之后,就会自动跳转到首页了,我们在首页就简单一点,搞一个欢迎的文案即可。
4.3. 前端页面
- login.html:在resources/templates文件下,新增文件login.html。展示二维码,通过SSE监听事件。
<!DOCTYPE html>
<html xmlns:th="http://www.thymeleaf.org">
<head>
    <meta charset="UTF-8">
    <meta name="viewport" content="width=device-width, initial-scale=1">
    <meta name="description" content="SpringBoot thymeleaf"/>
    <meta name="author" content="YiHui"/>
    <meta name="viewport" content="width=device-width, initial-scale=1.0"/>
    <title>二维码界面</title>
</head>
<body>

<div>
    <div class="title">请扫码登录</div>
    <img th:src="${qrcode}"/>
    <div id="state" style="display: none"></div>

    <script th:inline="javascript">
        var stateTag = document.getElementById('state');

        var subscribeUrl = [[${subscribe}]];
        var source = new EventSource(subscribeUrl);
        source.onmessage = function (event) {
            text = event.data;
            console.log("receive: " + text);
            if (text == 'scan') {
                stateTag.innerText = '已扫描';
                stateTag.style.display = 'block';
            } else if (text.startsWith('login#')) {
                // 登录格式为 login#cookie
                var cookie = text.substring(6);
                document.cookie = cookie;
                window.location.href = [[${redirect}]];
                source.close();
            }
        };

        source.onopen = function (evt) {
            console.log("开始订阅");
        }
    </script>
</div>
</body>
</html>
- scan.html:模拟App授权页面,生成Token并跳转。
<html xmlns:th="http://www.thymeleaf.org">
<head>
    <meta charset="UTF-8">
    <meta name="viewport" content="width=device-width, initial-scale=1">
    <meta name="description" content="SpringBoot thymeleaf"/>
    <meta name="author" content="YiHui"/>
    <meta name="viewport" content="width=device-width, initial-scale=1.0"/>
    <title>扫码登录界面</title>
</head>
<body>

<div>
    <div class="title">确定登录嘛?</div>

    <div>
        <a id="login">登录</a>
    </div>

    <script th:inline="javascript">

        // 生成uuid,模拟传递用户token
        function guid() {

            return 'xxxxxxxx-xxxx-4xxx-yxxx-xxxxxxxxxxxx'.replace(/[xy]/g, function (c) {
                var r = Math.random() * 16 | 0, v = c == 'x' ? r : (r & 0x3 | 0x8);
                return v.toString(16);

            });
        }

        // 获取实际的token,补齐参数,这里只是一个简单的模拟
        var url = [[${url}]];
        document.getElementById("login").href = url + "&token=" + guid();
    </script>

</div>
</body>
</html>
5. 测试流程
-
启动项目:访问
http://192.168.x.x:8080/login(192.168.x.x为本地IP,可以使用ipconfig命令查看)。

-
扫码模拟:
- 用浏览器打开二维码URL(如
http://192.168.x.x:8080/scan?id=xxx)。 - 点击授权链接,服务端生成Cookie并推送事件。

- 用浏览器打开二维码URL(如
-
验证结果:
- PC端自动跳转首页,显示用户Token。
- 未登录时返回“未登录!”。

6. 总结
- 技术亮点:SSE实现实时通信,qrcode-plugin简化二维码生成。
- 优化方向:
- 增加Token加密和时效性验证。
- 集成真实用户系统,替代模拟Token。
- 支持多端设备管理。
通过此示例,可快速搭建扫码登录功能,适用于Web应用与移动客户端的联合登录场景。
7. 参考链接
- 技术派微信扫码登录实现
- 项目源码:https://github.com/liuyueyi/spring-boot-demo/blob/master/spring-case/202-web-qrcode-login


 被折叠的 条评论
为什么被折叠?
被折叠的 条评论
为什么被折叠?
 到【灌水乐园】发言


