


项目场景:
实验要求:
① 设置合理的STP优先级、边缘端口、Eth-trunk
② 企业内网划分多个vlan ,减少广播域大小,提高网络稳定性
③ 所有设备,在任何位置都可以telnet远程管理
④ 出口配置NAT
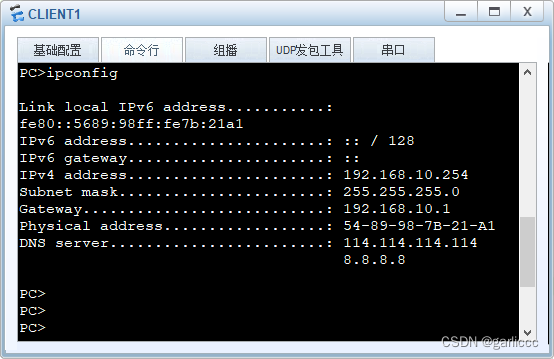
⑤ 所有用户均为自动获取ip地址
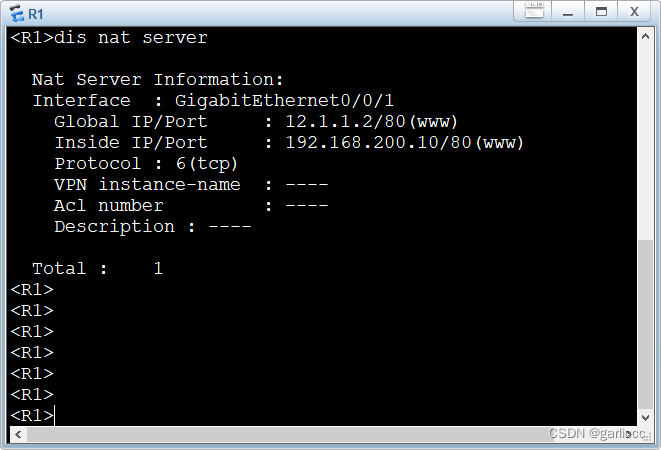
⑥ 在企业出口将内网服务器的80端口映射出去,允许外网用户访问
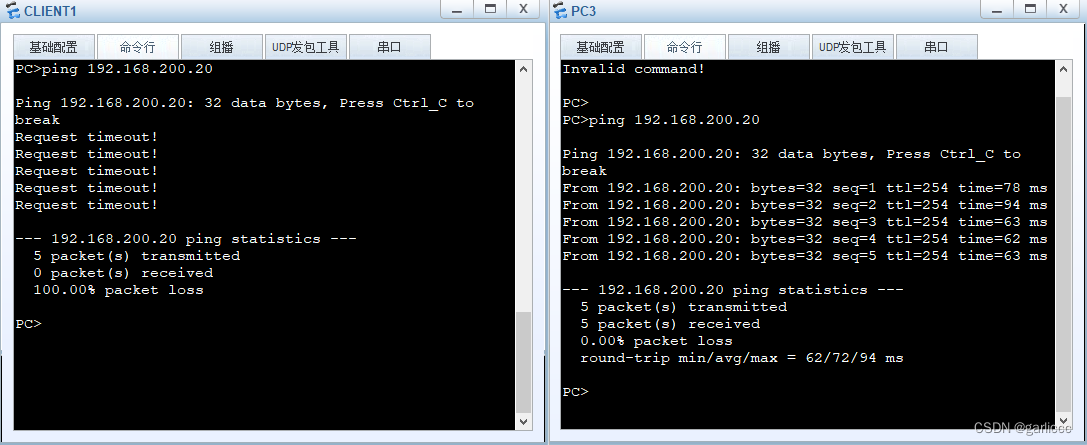
⑦ 企业财务服务器,只允许财务部(vlan 30)的员工访问。
个人配置步骤:
步骤①:二层:STP Eth-trunk
步骤②:vlan、trunk
步骤③:网关、SVI配置
步骤④:DHCP 配置
步骤⑤:出口 NAT配置
步骤⑥:服务器端口映射
步骤⑦:ACL配置
步骤⑧:telnet远程管理配置
步骤⑨:vlan修剪配置
实搭拓扑图:

具体操作:
步骤①:二层:STP Eth-trunk
核心交换机(SW1):
改变优先级使其成为根桥:
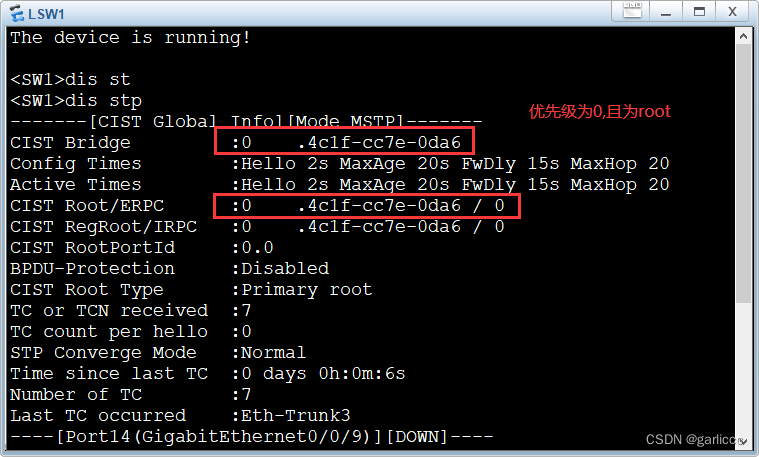
[SW1]stp root primary
配置链路聚合:
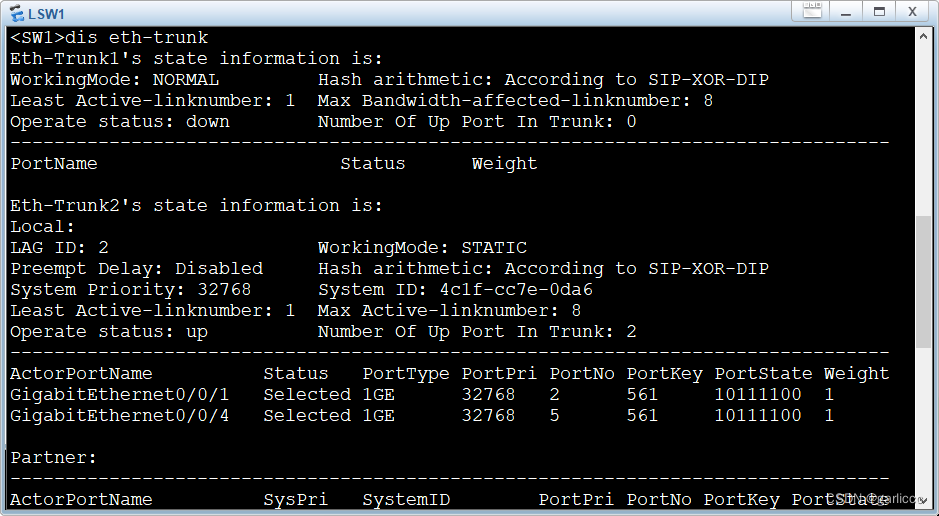
[SW1]int Eth-Trunk 2
[SW1-Eth-Trunk2]mode lacp-static %lacp模式
[SW1-Eth-Trunk2]trunkport GigabitEthernet 0/0/1 0/0/4 %绑定1、4口到eth2
修改链路聚合的stp链路开销:
[SW1-Eth-Trunk2]stp cost 10000
接入交换机(SW2,SW3,SW4,SW5):
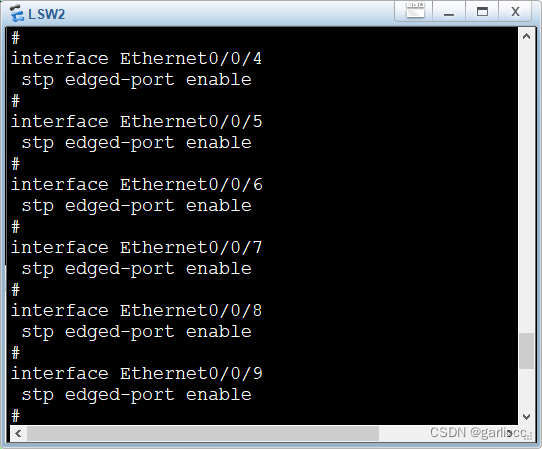
配置边缘端口:
[SW2]port-group  group-member Ethernet 0/0/1 to Ethernet 0/0/22
[SW2-port-group]stp edged-port enable
配置链路聚合:
[sw2]int Eth-Trunk 2 %与核心交换机同号,sw3为eth-trunk 3 以此类推
[sw2-Eth-Trunk2]mode lacp-static  %lacp模式
[sw2-Eth-Trunk2]trunkport GigabitEthernet 0/0/1 to 0/0/2  %绑定1、2口到eth2
修改链路聚合的stp链路开销:
[sw2-Eth-Trunk2]stp cost 10000
步骤②:vlan、trunk
核心交换机(SW1):
[SW1]port-group group-member Eth-Trunk 2 to Eth-Trunk 5
[SW1-port-group]port link-type trunk
[SW1-port-group]port trunk allow-pass vlan all
接入交换机(SW2,SW3,SW4,SW5):
[sw2]vlan batch 10 20
[sw2-Ethernet0/0/2]po li ac
[sw2-Ethernet0/0/2]po de vl 10
[sw2-Ethernet0/0/2]int e0/0/3
[sw2-Ethernet0/0/3]po li ac
[sw2-Ethernet0/0/3]po de vl 20
[sw2]int Eth-Trunk 2
[sw2-Eth-Trunk2]port link-type trunk
[sw2-Eth-Trunk2]port trunk allow-pass vlan all
步骤③:网关、SVI配置
核心交换机(SW1):
[SW1]int vlanif 10
[SW1-Vlanif10]ip address 192.168.10.1 24
[SW1-Vlanif10]int vlanif 20
[SW1-Vlanif20]ip address 192.168.20.1 24
[SW1-Vlanif20]int vlanif 30
[SW1-Vlanif30]ip add 192.168.30.1 24
[SW1-Vlanif30]int vlanif 40
[SW1-Vlanif40]ip add 192.168.40.1 24
[SW1-Vlanif40]int vlanif 200
[SW1-Vlanif200]ip add 192.168.200.1 24

与路由器对接:
[SW1]vlan 800
[SW1-vlan800]int gi0/0/24
[SW1-GigabitEthernet0/0/24]port link-type access
[SW1-GigabitEthernet0/0/24]port default vlan 800
[SW1]int Vlanif 800
[SW1-Vlanif800]ip add 192.168.254.2 24
步骤④:DHCP 配置
核心交换机(SW1):
[SW1]dhcp enable
[SW1]ip pool xiaoshou_1
[SW1-ip-pool-xiaoshou_1]network 192.168.10.0 mask 24
[SW1-ip-pool-xiaoshou_1]gateway-list 192.168.10.1
[SW1-ip-pool-xiaoshou_1]dns-list 114.114.114.114 8.8.8.8
[SW1-ip-pool-xiaoshou_1]ip pool xiaoshou_2
[SW1-ip-pool-xiaoshou_2]network 192.168.20.0 mask 24
[SW1-ip-pool-xiaoshou_2]gateway-list 192.168.20.1
[SW1-ip-pool-xiaoshou_2]dns-list 114.114.114.114 8.8.8.8
[SW1-ip-pool-xiaoshou_2]ip pool caiwu
[SW1-ip-pool-caiwu]network 192.168.30.0 ma
[SW1-ip-pool-caiwu]network 192.168.30.0 mask 24
[SW1-ip-pool-caiwu]gateway-list 192.168.30.1
[SW1-ip-pool-caiwu]dns-list 114.114.114.114 8.8.8.8
[SW1-ip-pool-caiwu]ip pool jishu
[SW1-ip-pool-jishu]network 192.168.40.1 mask 24
[SW1-ip-pool-jishu]gateway-list 192.168.40.1
[SW1-ip-pool-jishu]dns-list 114.114.114.114 8.8.8.8

让以下接口从dhcp获取地址:
[SW1]int Vlanif 10
[SW1-Vlanif10]dhcp select global
[SW1-Vlanif10]int Vlanif 20
[SW1-Vlanif20]dhcp select global
[SW1-Vlanif20]int Vlanif 30
[SW1-Vlanif30]dhcp select global
[SW1-Vlanif30]int Vlanif 40
[SW1-Vlanif40]dhcp select global
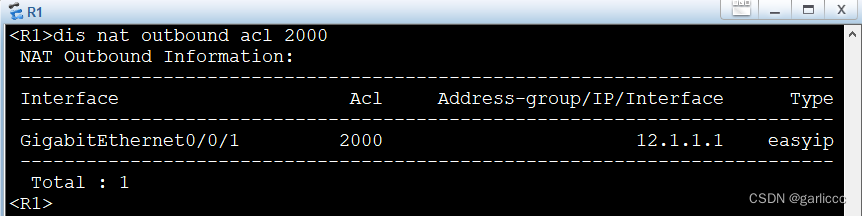
步骤⑤:出口 NAT配置
出口路由器(R1):
[R1]int g0/0/0
[R1-GigabitEthernet0/0/0]ip add 192.168.254.1 24
[R1-GigabitEthernet0/0/0]int g0/0/1
[R1-GigabitEthernet0/0/1]ip add 12.1.1.1 29
[R1]ip route-static 0.0.0.0 0 12.1.1.6 %出包
[R1]ip route-static 192.168.0.0 16 192.168.254.2 %回包

创建acl:
[R1]acl 2000
[R1-acl-basic-2000]rule permit source 192.168.0.0 0.0.255.255

出口nat转换:
[R1]int g0/0/1
[R1-GigabitEthernet0/0/1]nat outbound 2000
核心交换机SW1:
[SW1]ip route-static 0.0.0.0 0 192.168.254.1 %默认出包
运营商R2(模拟配置):
[R2]int e0/0/0
[R2-Ethernet0/0/0]ip add 12.1.11
[R2-Ethernet0/0/0]ip add 12.1.1.6 29
[R2]int LoopBack 0
[R2-LoopBack0]ip add 9.9.9.9 24
步骤⑥:服务器端口映射
出口路由器(R1):
[R1]int g0/0/1
[R1-GigabitEthernet0/0/1]nat server protocol tcp global 12.1.1.2 80 inside 192.168.200.10 80
步骤⑦:ACL配置
核心交换机sw1:
创建acl规则:
[SW1]acl 3000
[SW1-acl-adv-3000]rule permit ip source 192.168.30.0 0.0.0.255 destination 192.168.200.20 0
[SW1-acl-adv-3000]rule deny ip source any destination 192.168.200.20 0
应用acl:
[SW1]int Eth-Trunk 5
[SW1-Eth-Trunk5]traffic-filter outbound acl 3000
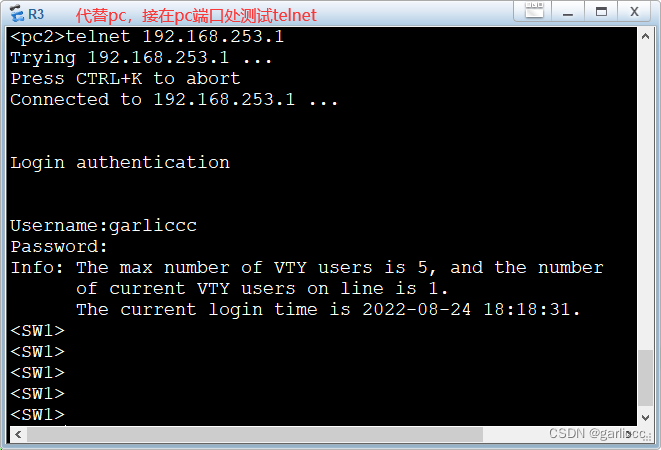
步骤⑧:telnet远程管理配置
出口路由器R1
[R1]telnet server enable
[R1]aaa
[R1-aaa]local-user garliccc privilege level 3 password cipher admin
[R1-aaa]local-user garliccc service-type telnet
[R1]user-interface vty 0 4
[R1-ui-vty0-4]authentication-mode aaa
交换机(SW1,SW2,SW3,SW4,SW5):
[SW1]telnet server enable
[SW1]aaa
[SW1-aaa]local-user garliccc privilege level 3 password cipher admin
[SW1-aaa]local-user garliccc service-type telnet
[SW1]user-interface vty 0 4
[SW1-ui-vty0-4]authentication-mode aaa
添加管理地址:
[SW1]vlan 999 %使用专门管理vlan 999来承载telnet的管理流量
[SW1]int Vlanif 999
[SW1-Vlanif999]ip add 192.168.253.1 24
默认回包:
[SW1]ip route-static 0.0.0.0 0 192.168.253.1 %该缺省路由是为了管理流量回包
步骤⑨:vlan修剪配置
核心交换机(SW1):
[SW1]int Eth-Trunk 2
[SW1-Eth-Trunk2]undo port trunk allow-pass vlan 2 to 4094
[SW1-Eth-Trunk2]port trunk allow-pass vlan 10 20
交换机(SW2,SW3,SW4,SW5):
[sw2]int Eth-Trunk 2
[sw2-Eth-Trunk2]undo port trunk allow-pass vlan 2 to 4094
[sw2-Eth-Trunk2]port trunk allow-pass vlan 10 20 999 %允许相应的vlan即可
完成效果:
依据实验要求进行效果展示:
① 设置合理的STP优先级、边缘端口、Eth-trunk
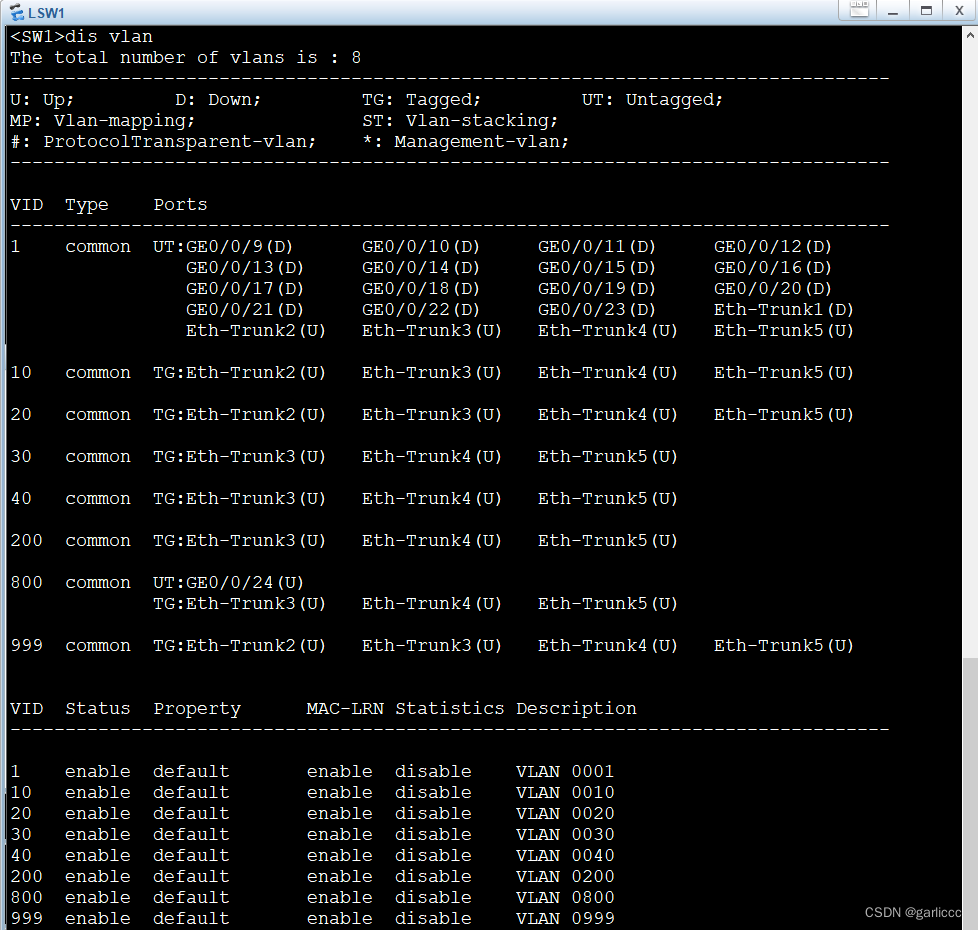
② 企业内网划分多个vlan ,减少广播域大小,提高网络稳定性
③ 所有设备,在任何位置都可以telnet远程管理
④ 出口配置NAT
⑤ 所有用户均为自动获取ip地址
⑥ 在企业出口将内网服务器的80端口映射出去,允许外网用户访问
⑦ 企业财务服务器,只允许财务部(vlan 30)的员工访问。
相关dis命令:
dis eth-trunk %查看聚合状态
dis stp interface Eth-Trunk 2 %查看聚合端口stp状态
dis vlan %查看vlan状态
dis port vlan active %查看接口通过vlan和状态.
PC>ipconfig %查看pc的ip信息
dis ip pool name caiwu used %查看名为caiwu的地址池分配状态


 5752
5752


 被折叠的 条评论
为什么被折叠?
被折叠的 条评论
为什么被折叠?
 到【灌水乐园】发言


