


网格布局由GridLayout代表,它是Android4.0新增的布局管理器,因此需要在Android4.0之后的版本中才能使用该布局管理器。如果希望在更早的Android平台上使用该布局管理器,则需要导入相应的支撑库。
GridLayout的作用类似于HTML中的table标签,它把整个容器划分成rows*columns个网格,每个网格可以放置一个组件。除此
之外,也可以设置一个组件横跨多少列、一个组件纵跨多少行。
GridLayout提供了setRowCount(int)和setColumnCount(int)方法来控制该网格的行数量和列数量:
下面来看一下具体的使用案例:先看效果截图: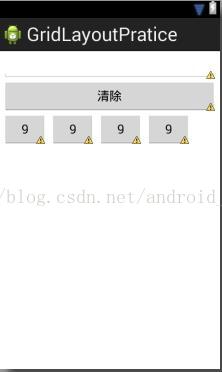
xml的相应代码如下:
<GridLayout

    xmlns:android="http://schemas.android.com/apk/res/android"
    xmlns:tools="http://schemas.android.com/tools"
    android:layout_width="match_parent"
    android:layout_height="match_parent"
    android:rowCount="6"
    android:columnCount="4"

    >
    <EditText
        android:id="@+id/edittext"
        android:layout_width="fill_parent"
        android:layout_height="wrap_content"
        android:layout_columnSpan="4"
        android:layout_row="0"
        android:layout_marginLeft="5dp"
        android:layout_marginRight="5dp"
        android:padding="10dp"
        />
    <Button
        android:id="@+id/clear"
        android:layout_width="fill_parent"
        android:layout_height="wrap_content"
        android:layout_columnSpan="4"
       android:layout_row="0"
        android:text="清除"
         android:layout_marginLeft="5dp"
        android:layout_marginRight="5dp"
        android:padding="10dp"
        />
    <Button
        android:layout_width="wrap_content"
        android:layout_height="wrap_content"
        android:layout_row="3"
        android:layout_column="0"
          android:layout_marginLeft="5dp"
        android:text="9"
        android:padding="10dp"
        />
     <Button
        android:layout_width="wrap_content"
        android:layout_height="wrap_content"
        android:layout_row="3"
        android:layout_column="1"
          android:layout_marginLeft="5dp"
        android:text="9"
        android:padding="10dp"
        />
      <Button
        android:layout_width="wrap_content"
        android:layout_height="wrap_content"
        android:layout_row="3"
        android:layout_column="2"
          android:layout_marginLeft="5dp"
        android:text="9"
        android:padding="10dp"
        />
 <Button
        android:layout_width="wrap_content"
        android:layout_height="wrap_content"
        android:layout_row="3"
        android:layout_column="3"
          android:layout_marginLeft="5dp"
        android:text="9"
        android:padding="10dp"
        />


</GridLayout>


 4747
4747

 被折叠的 条评论
为什么被折叠?
被折叠的 条评论
为什么被折叠?
 到【灌水乐园】发言


