


JSON 与 Ajax
一、JSON
1、JSON 概述
1.1 JSON概念
JSON(JavaScript Object Notation),JavaScript 对象标记,是一种轻量级的数据交换格式,实际就是一个长一点的字符串。在 Java 开发中,可以将 JSON 数据转换为对象,也可以将对象转换为 JSON 数据。
1.2 JSON语法
注意点:key 值需要使用
"", value 值可以为多种数据类型:数字、字符串、逻辑值、数据、对象、null
单条数据:
{
"key1" : value1,
"key1" : value1,
...
}
多条数据:
[
{
"key1" : value1,
"key1" : value1,
...
},
{
"key1" : value1,
"key1" : value1,
...
},
...
]
实例:
student.json
{
"id" : "20201001",
"name" : "张三",
"sex" : "男",
"age" : 18
}
[
{
"id" : "20201001",
"name" : "张三",
"sex" : "男",
"age" : 18
},
{
"id" : "20201002",
"name" : "李四",
"sex" : "女",
"age" : 19
},
{
"id" : "20201003",
"name" : "王五",
"sex" : "男",
"age" : 20
}
]
2 、JSON 与 Java 对象转换
JSON 与 Java 对象转换需要引入如下资源:
![]()
2.1 Java 对象转 JSON
语法:
String str = JSON.toJSONString(对象名);
-
创建动态 Web 项目 json-test ,并引入资源 fastjson

-
创建实体类 Student.java
package com.ynnz.entity; public class Student { private String id; private String name; private String sex; private int age; // get、set方法省略 public Student() { } public Student(String id, String name, String sex, int age) { this.id = id; this.name = name; this.sex = sex; this.age = age; } @Override public String toString() { return "Student [id=" + id + ", name=" + name + ", sex=" + sex + ", age=" + age + "]"; } -
测试
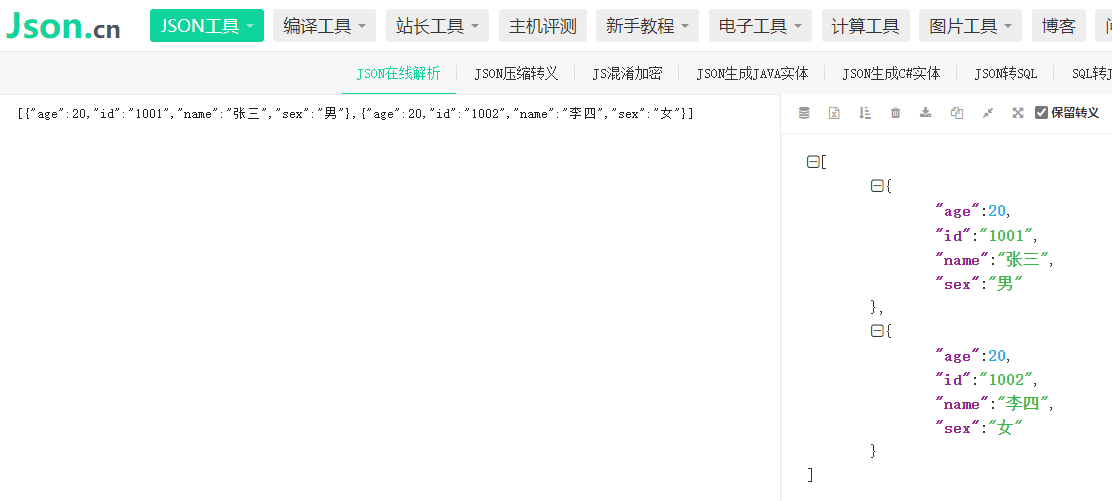
package com.ynnz.test;

import java.util.ArrayList;
import java.util.List;

import com.alibaba.fastjson.JSON;
import com.ynnz.entity.Student;

public class Test {
    public static void main(String[] args) {
        // 准备数据
        List<Student> list = new ArrayList<Student>();
        Student stu1 = new Student("1001", "张三", "男", 20);
        Student stu2 = new Student("1002", "李四", "女", 20);
        list.add(stu1);
        list.add(stu2);
        // 将对象转换为JSON
        String jsonStr = JSON.toJSONString(list);
        System.out.println(jsonStr);
    }
}
输出结果为:
-

以上格式不方便查看,我们可以在网上找一些JSON在线解析工具进行格式整理:
2.2 JSON 字符串转对象
语法:
类名 对象名 = JSON.parseObject(json字符串,类名.class);
-
测试
package com.ynnz.test;

import com.alibaba.fastjson.JSON;
import com.ynnz.entity.Student;

public class Test {
    public static void main(String[] args) {
        // 准备数据
        Student stu1 = new Student("1001", "张三", "男", 20);
        // 将对象转换为JSON
        String jsonStr = JSON.toJSONString(stu1);

        // 将json字符串转为对象
        Student student = JSON.parseObject(jsonStr,Student.class);
        System.out.println(student);
    }
}
输出结果:
二、Ajax
1、Ajax 概念
Ajax(Asynchronous Javascript And XML),异步 JavaScript 和 XML。
Ajax 可以使用 JavaScript 向服务器发送异步请求,在服务器请求少量数据,进行页面的局部刷新,不需要进行整个页面的刷新,可以大大提高页面访问效率。
2、Ajax 使用场景

3、Ajax 语法
Ajax 是 JavaScipt中的一部分,结合 jQuery 使用可以大大提高效率。
$.ajax({
    // 请求方式
    type : "get",
    // 请求地址
    url : "test.json",
    // 是否异步,默认为异步
    async : true,
    // 发送到服务器的数据
    data : {
        id : "1001"
    },
    // 预期服务器返回的类型
    dataType : "json",
    // 请求成功时调用的函数,data为返回的数据
    success : function(data){
        console.log(data);
    },
    // 请求失败时执行的函数
    error : function(){
        alert("请求失败")
    }
})
4、Ajax 案例
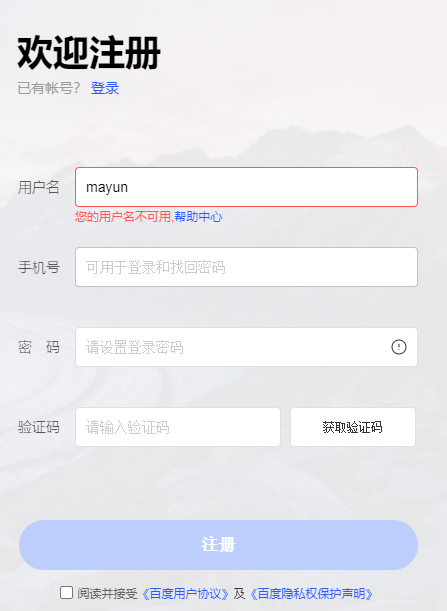
4.1 注册判断用户名是否存在
-
准备基础数据 account.json(真实开发中需要从数据库查询数据,并转换为json数据)
[ { "id":"admin", "password":"123456" }, { "id":"zhangsan", "password":"123456" }, { "id":"lisi", "password":"123456" }, { "id":"wangwu", "password":"123456" }, { "id":"mayun", "password":"123456" } ] -
创建项目,引入 jQuery 文件
-
进行 Ajax 异步请求判断
<!DOCTYPE html>
<html>
    <head>
        <meta charset="utf-8">
        <title>注册页面</title>
    </head>
    <body>
        <form action="">
            账号:
            <input type="text" id="username"/><br />
            <span id="msg"></span>
            <br />
            密码:
            <input type="text" id="password"/><br /><br />
            <input type="submit" id="submit" value="注册"/>
        </form>
        <script src="js/jquery-3.6.0.min.js"></script>
        <script>
            $("#username").blur(function(){
                $.ajax({
                    type : "get",
                    url : "json/account.json",
                    success : function(data){
                        var username = $("#username").val();
                        var count = 0;
                        for(var i=0;i<data.length;i++){
                            if(username == data[i].id){
                                $("#msg").text("账号已经存在,请重新取名");
                                $("#msg").css("color","red");
                            }
                            else{
                                count++;
                            }
                        }
                        if(count == data.length){
                            $("#msg").text("账号合法");
                            $("#msg").css("color","green");
                        }
                    }
                })
            })
        </script>
    </body>
</html>
4.2 登录判断
<!DOCTYPE html>
<html>
    <head>
        <meta charset="utf-8">
        <title>登录界面</title>
    </head>
    <body>
        <form action="">
            账号:
            <input type="text" id="username"/><br />
            <br />
            密码:
            <input type="text" id="password"/><br /><br />
            <input type="button" id="submit" value="登录"/>
        </form>
        <script src="js/jquery-3.6.0.min.js"></script>
        <script>
            $("#submit").click(function(){
                $.ajax({
                    type : "get",
                    url : "json/account.json",
                    success : function(data){
                        var username = $("#username").val();
                        var password = $("#password").val();
                        var count = 0;
                        for(var i=0;i<data.length;i++){
                            if(username == data[i].id){
                                if(password == data[i].password){
                                    alert("账号,密码正确,进入主界面")
                                }
                                else{
                                    alert("密码不正确,请重试")
                                }
                            }
                            else{
                                count++;
                            }
                        }
                        if(count == data.length){
                            alert("账号不存在,请重试")
                        }
                    }
                })
            })
        </script>
    </body>
</html>
三、SSM + Ajax + JSON 实现登录、信息查询功能
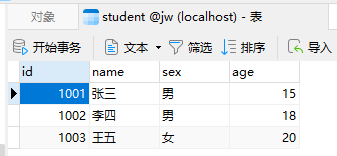
1、数据库设计
数据库:jw
数据表:
account

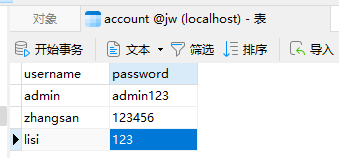
student

2、SSM框架整合
-
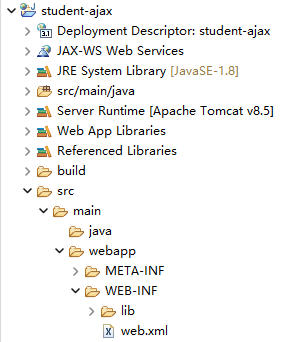
创建动态 Web 项目 student-ajax,导入资源
资源下载:有道云笔记
-
mybatis 配置
mybatis.xml
<?xml version="1.0" encoding="UTF-8" ?> <!DOCTYPE configuration PUBLIC "-//mybatis.org//DTD Config 3.0//EN" "http://mybatis.org/dtd/mybatis-3-config.dtd"> <configuration> <!-- 设置别名 --> <typeAliases> <package name="com.ynnz.entity" /> </typeAliases> </configuration> -
spring 配置
spring.xml
<?xml version="1.0" encoding="UTF-8"?> <beans xmlns="http://www.springframework.org/schema/beans" xmlns:xsi="http://www.w3.org/2001/XMLSchema-instance" xmlns:context="http://www.springframework.org/schema/context" xmlns:aop="http://www.springframework.org/schema/aop" xmlns:tx="http://www.springframework.org/schema/tx" xmlns:mvc="http://www.springframework.org/schema/mvc" xsi:schemaLocation="http://www.springframework.org/schema/beans http://www.springframework.org/schema/beans/spring-beans.xsd http://www.springframework.org/schema/context http://www.springframework.org/schema/context/spring-context.xsd http://www.springframework.org/schema/aop http://www.springframework.org/schema/aop/spring-aop.xsd http://www.springframework.org/schema/tx http://www.springframework.org/schema/tx/spring-tx.xsd http://www.springframework.org/schema/mvc http://www.springframework.org/schema/mvc/spring-mvc.xsd"> <!-- 配置数据源 --> <bean id="dataSource" class="com.alibaba.druid.pool.DruidDataSource"> <property name="driverClassName" value="com.mysql.jdbc.Driver"></property> <property name="url" value="jdbc:mysql://localhost:3306/jw?characterEncoding=utf-8&useSSL=false"></property> <property name="username" value="root"></property> <property name="password" value="123456"></property> </bean> <!-- 配置Mapper扫描 --> <bean class="org.mybatis.spring.mapper.MapperScannerConfigurer"> <!-- 设置映射接口包扫描 --> <property name="basePackage" value="com.ynnz.dao"></property> </bean> <!-- 配置SqlSessionFactory --> <bean class="org.mybatis.spring.SqlSessionFactoryBean"> <!-- 设置mybatis的核心配置文件 --> <property name="configLocation" value="classpath:mybatis.xml"></property> <!-- 设置数据源 --> <property name="dataSource" ref="dataSource"></property> </bean> <!-- 开启注解包扫描(service) --> <context:component-scan base-package="com.ynnz.service" /> <!-- 配置事务管理器 --> <bean id="transactionManager" class="org.springframework.jdbc.datasource.DataSourceTransactionManager"> <property name="dataSource" ref="dataSource"></property> </bean> <!-- 开启注解方式管理AOP事务 --> <tx:annotation-driven transaction-manager="transactionManager" /> </beans> -
springmvc 配置
springmvc.xml
<?xml version="1.0" encoding="UTF-8"?> <beans xmlns="http://www.springframework.org/schema/beans" xmlns:xsi="http://www.w3.org/2001/XMLSchema-instance" xmlns:context="http://www.springframework.org/schema/context" xmlns:mvc="http://www.springframework.org/schema/mvc" xsi:schemaLocation="http://www.springframework.org/schema/beans http://www.springframework.org/schema/beans/spring-beans-4.2.xsd http://www.springframework.org/schema/context http://www.springframework.org/schema/context/spring-context-4.2.xsd http://www.springframework.org/schema/mvc http://www.springframework.org/schema/mvc/spring-mvc-4.2.xsd"> <!-- 开启注解包扫描(controller) --> <context:component-scan base-package="com.ynnz.controller" /> <!-- 配置注解驱动 --> <mvc:annotation-driven></mvc:annotation-driven> <!-- 静态资源处理(放行) --> <mvc:default-servlet-handler/> <!-- 配置视图解析器 --> <bean class="org.springframework.web.servlet.view.InternalResourceViewResolver"> <property name="prefix" value="/jsp/"></property> <property name="suffix" value=".jsp"></property> </bean> </beans> -
web 服务器配置
web.xml
<?xml version="1.0" encoding="UTF-8"?>
<web-app xmlns:xsi="http://www.w3.org/2001/XMLSchema-instance"
    xmlns="http://xmlns.jcp.org/xml/ns/javaee"
    xsi:schemaLocation="http://xmlns.jcp.org/xml/ns/javaee http://xmlns.jcp.org/xml/ns/javaee/web-app_3_1.xsd"
    id="WebApp_ID" version="3.1">

    <!-- 配置Spring容器 -->
    <context-param>
        <param-name>contextConfigLocation</param-name>
        <param-value>classpath:spring.xml</param-value>
    </context-param>
    <!-- 配置监听器加载Spring -->
    <listener>
        <listener-class>org.springframework.web.context.ContextLoaderListener</listener-class>
    </listener>
    <!-- 配置前端控制器 -->
    <servlet>
        <servlet-name>springmvc</servlet-name>
        <servlet-class>org.springframework.web.servlet.DispatcherServlet</servlet-class>
        <init-param>
            <param-name>contextConfigLocation</param-name>
            <param-value>classpath:springmvc.xml</param-value>
        </init-param>
        <load-on-startup>1</load-on-startup>
    </servlet>
    <servlet-mapping>
        <servlet-name>springmvc</servlet-name>
        <url-pattern>/</url-pattern>
    </servlet-mapping>
    <!-- 配置请求数据的字符集编码 -->
    <filter>
        <filter-name>charset</filter-name>
        <filter-class>org.springframework.web.filter.CharacterEncodingFilter</filter-class>
        <init-param>
            <param-name>encoding</param-name>
            <param-value>utf-8</param-value>
        </init-param>
    </filter>
    <filter-mapping>
        <filter-name>charset</filter-name>
        <url-pattern>/*</url-pattern>
    </filter-mapping>
</web-app>
3、登录功能开发
-
entity 层开发
package com.ynnz.entity; public class Account { private String username; private String password; // get、get方法省略 } -
dao 层开发
package com.ynnz.dao;

import java.util.List;
import com.ynnz.entity.Account;

public interface AccountDao {
    // 查询所有账号信息
    public abstract List<Account> queryAccounts();
}
<?xml version="1.0" encoding="UTF-8"?> <!DOCTYPE mapper PUBLIC "-//mybatis.org//DTD Mapper 3.0//EN" "http://mybatis.org/dtd/mybatis-3-mapper.dtd" > <mapper namespace="com.ynnz.dao.AccountDao"> <!-- 自动映射器 --> <resultMap type="Account" id="accMap"> <id column="username" property="username"/> <result column="password" property="password"/> </resultMap> <!-- 查询所有客户信息 --> <select id="queryAccounts" resultMap="accMap"> select * from account </select> </mapper> -
service 层开发
package com.ynnz.service;

import java.util.List;
import com.ynnz.entity.Account;

public interface AccountService {
    // 查询所有账号信息
    public abstract List<Account> queryAccounts();
}
package com.ynnz.service.impl; import java.util.List; import org.springframework.beans.factory.annotation.Autowired; import org.springframework.stereotype.Service; import com.ynnz.dao.AccountDao; import com.ynnz.entity.Account; import com.ynnz.service.AccountService; @Service("accountService") public class AccountServiceImpl implements AccountService { @Autowired private AccountDao accountDao; @Override public List<Account> queryAccounts() { return accountDao.queryAccounts(); } } -
controller 层开发
package com.ynnz.controller; import java.util.List; import org.springframework.beans.factory.annotation.Autowired; import org.springframework.stereotype.Controller; import org.springframework.web.bind.annotation.RequestMapping; import org.springframework.web.bind.annotation.ResponseBody; import com.alibaba.fastjson.JSON; import com.ynnz.entity.Account; import com.ynnz.service.AccountService; @Controller public class AccountController { @Autowired private AccountService accountService; // 查询登录信息(账号信息) @RequestMapping("/login") @ResponseBody public String login() { List<Account> list = accountService.queryAccounts(); // 将list对象转为json String account = JSON.toJSONString(list); return account; } } -
view 层开发
需要引入jQuery
<%@ page language="java" contentType="text/html; charset=UTF-8"
    pageEncoding="UTF-8"%>
<!DOCTYPE html>
<html>
<head>
<meta charset="UTF-8">
<title>登录</title>
<style>
    fieldset{
        width: 270px;
        margin: 0 auto;
    }
</style>
</head>
<body>
    <fieldset>
        <legend>登录</legend>
        <form action="">
            账号:
            <input type="text" id="username"/><br /><br />
            密码:
            <input type="password" id="password"/><br /><br />
            <input type="button" value="登录" id="login"/>
        </form>
    </fieldset>

    <script src="js/jquery-3.6.0.min.js"></script>
    <script>
        $("#login").click(function(){
            $.ajax({
                type : "post",
                url : "http://localhost:8080/student-ajax/login",
                dataType : "json",
                success : function(data){
                    var username = $("#username").val();
                    var password = $("#password").val();
                    var count = 0;
                    for(var i=0;i<data.length;i++){
                        if(username == data[i].username){
                            if(password == data[i].password){
                                window.location.href = "main.jsp";
                            }
                            else{
                                alert("密码不正确,请重试")
                            }
                        }
                        else{
                            count++;
                        }
                    }
                    if(count == data.length){
                        alert("账号不存在,请重试")
                    }
                }
            })
        })
    </script>
</body>
</html>
4、查询信息功能开发
-
entity 层开发
package com.ynnz.entity; public class Student { private String id; private String name; private String sex; private int age; // set、get方法省略 } -
dao 层开发
package com.ynnz.dao;

import java.util.List;
import org.apache.ibatis.annotations.Param;
import com.ynnz.entity.Student;

public interface StudentDao {
    // 查询学生信息
    public abstract List<Student> queryStudent(@Param("id") String id,@Param("name") String name);
}
<?xml version="1.0" encoding="UTF-8"?> <!DOCTYPE mapper PUBLIC "-//mybatis.org//DTD Mapper 3.0//EN" "http://mybatis.org/dtd/mybatis-3-mapper.dtd" > <mapper namespace="com.ynnz.dao.StudentDao"> <!-- 自动映射器 --> <resultMap type="Student" id="stuMap"> <id column="id" property="id"/> <result column="name" property="name"/> <result column="sex" property="sex"/> <result column="age" property="age"/> </resultMap> <!-- 查询所有客户信息 --> <select id="queryStudent" resultMap="stuMap"> select * from student <where> <if test="id!=null and id!=''"> id = #{id} </if> <if test="name!=null and name!=''"> and name like concat('%', #{name} ,'%') </if> </where> </select> </mapper> -
service 层开发
package com.ynnz.service;

import java.util.List;
import com.ynnz.entity.Student;

public interface StudentService {
    // 查询学生信息
    public abstract List<Student> queryStudent(String id,String name);
}
package com.ynnz.service.impl; import java.util.List; import org.springframework.beans.factory.annotation.Autowired; import org.springframework.stereotype.Service; import com.ynnz.dao.StudentDao; import com.ynnz.entity.Student; import com.ynnz.service.StudentService; @Service("studentService") public class StudentServiceImpl implements StudentService { @Autowired private StudentDao studentDao; @Override public List<Student> queryStudent(String id, String name) { return studentDao.queryStudent(id, name); } } -
controller 层开发
package com.ynnz.controller; import java.util.List; import org.springframework.beans.factory.annotation.Autowired; import org.springframework.stereotype.Controller; import org.springframework.web.bind.annotation.RequestMapping; import org.springframework.web.bind.annotation.ResponseBody; import com.alibaba.fastjson.JSON; import com.ynnz.entity.Student; import com.ynnz.service.StudentService; @Controller public class StudentController { @Autowired private StudentService studentService; // 查询学生信息 @RequestMapping("/queryStudent") @ResponseBody public String queryStudent(String id,String name) { List<Student> list = studentService.queryStudent(id, name); return JSON.toJSONString(list); } } -
view 层开发
<%@ page language="java" contentType="text/html; charset=UTF-8" pageEncoding="UTF-8"%> <!DOCTYPE html> <html> <head> <meta charset="UTF-8"> <title>主界面</title> <style> fieldset{ width: 800px; margin: 0 auto; } th,td{ text-align: center; } </style> </head> <body> <fieldset> <legend>系统主界面</legend> <form action=""> 学号: <input type="text" id="id"/> 姓名: <input type="text" id="name"/> <input type="button" value="搜索" id="search"/> </form> <br /> <table border="1" width="800px" cellspacing="0"> <tr> <th>学号</th> <th>姓名</th> <th>性别</th> <th>年龄</th> <th>操作</th> </tr> </table> </fieldset> <script src="js/jquery-3.6.0.min.js"></script> <script> // 访问页面默认查询所有数据 $(function () { showData(); // 展示数据 }); function showData() { $.ajax({ type: "get", url: "http://localhost:8080/student-ajax/queryStudent", data: { }, dataType: "json", success:function (data) { var str = ""; for(var i=0;i<data.length;i++){ str +="<tr>"; str +=" <td>"+data[i].id+"</td>"; str +=" <td>"+data[i].name+"</td>"; str +=" <td>"+data[i].sex+"</td>"; str +=" <td>"+data[i].age+"</td>"; str +=" <td><a href='#'>修改</a> <a href='#'>删除</a></td>"; str +="</tr>"; } $("table").append(str); }, error:function () {} }); } // 搜索数据 $("#search").click(function(){ $.ajax({ type: "get", url: "http://localhost:8080/student-ajax/queryStudent", data: { id : $("#id").val(), name : $("#name").val() }, dataType: "json", success:function (data) { $("tr:not(tr:eq(0))").remove(); var str = ""; for(var i=0;i<data.length;i++){ str +="<tr>"; str +=" <td>"+data[i].id+"</td>"; str +=" <td>"+data[i].name+"</td>"; str +=" <td>"+data[i].sex+"</td>"; str +=" <td>"+data[i].age+"</td>"; str +=" <td><a href='#'>修改</a> <a href='#'>删除</a></td>"; str +="</tr>"; } $("table").append(str); }, error:function () {} }); }) </script> </body> </html>


 3151
3151


 被折叠的 条评论
为什么被折叠?
被折叠的 条评论
为什么被折叠?
 到【灌水乐园】发言


