


分享一下我老师大神的人工智能教程!零基础,通俗易懂!http://blog.csdn.net/jiangjunshow
也欢迎大家转载本篇文章。分享知识,造福人民,实现我们中华民族伟大复兴!
《Spring4实战 第4版》2016年4月新出版的,之前的第三版看起来还是不错的,所以看到新版就直接买下来。
英文版源码地址:Spring in Action, Fourth Edition Covers Spring 4

1.IOC装配Bean
参考【Spring实战4 2.2】,作者提倡无XML配置化。
1.1接口只有一个现实类
可以自动装配
public interface CompactDisc { void play();}import org.springframework.stereotype.Component;@Componentpublic class SgtPeppers implements CompactDisc { private String title = "Sgt. Pepper's Lonely Hearts Club Band"; private String artist = "http://blog.csdn.net/unix21"; public void play() { System.out.println("【非常醒目SgtPeppers 】>>>>>>>>>>>>>>>>>Playing " + title + " by " + artist); }}import org.springframework.context.annotation.ComponentScan;import org.springframework.context.annotation.Configuration;@Configuration@ComponentScanpublic class CDPlayerConfig { }单元测试
import static org.junit.Assert.*;import org.junit.Rule;import org.junit.Test;import org.junit.runner.RunWith;import org.springframework.beans.factory.annotation.Autowired;import org.springframework.beans.factory.annotation.Qualifier;import org.springframework.test.context.ContextConfiguration;import org.springframework.test.context.junit4.SpringJUnit4ClassRunner;@RunWith(SpringJUnit4ClassRunner.class)@ContextConfiguration(classes = CDPlayerConfig.class)public class CDPlayerTest { @Autowired private CompactDisc cd; @Test public void play() { cd.play(); }}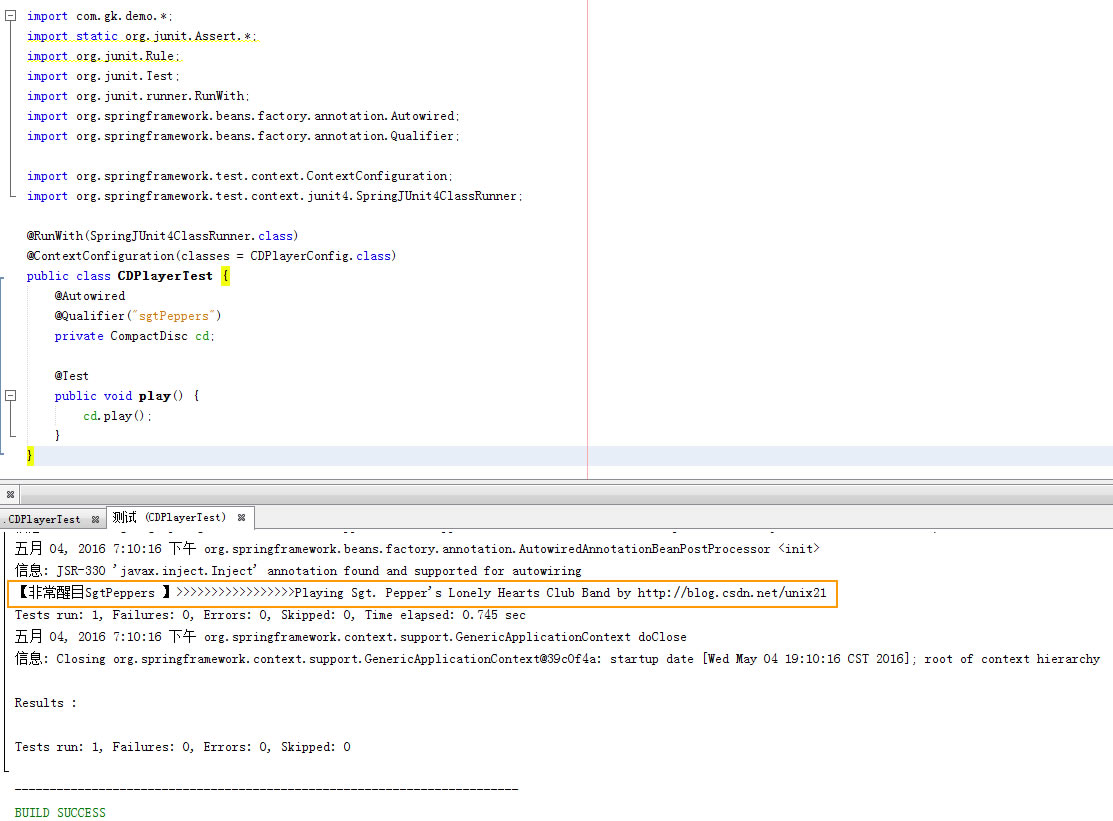
1.2 接口有多个实现类
【参考 Spring实战4 3.3】
故意再写一个实现类
import org.springframework.stereotype.Component;@Componentpublic class SgtPeppersNew implements CompactDisc { private String title = "Sgt. Pepper's Lonely Hearts Club Band"; private String artist = "http://blog.csdn.net/unix21"; public void play() { System.out.println("【非常醒目 SgtPeppersNew】>>>>>>>>>>>>>>>>>Playing " + title + " by " + artist); }}如果这个时候运行肯定会报错NoUniqueBeanDefinitionException: No qualifying bean of type
解决方法有两种
第一种 在实现类上 标识首选的bean,使用@Primary
import org.springframework.context.annotation.Primary;import org.springframework.stereotype.Component;@Component@Primarypublic class SgtPeppers implements CompactDisc { private String title = "Sgt. Pepper's Lonely Hearts Club Band"; private String artist = "http://blog.csdn.net/unix21"; public void play() { System.out.println("【非常醒目SgtPeppers 】>>>>>>>>>>>>>>>>>Playing " + title + " by " + artist); }}
第二种 使用@Qualifier注解
import static org.junit.Assert.*;import org.junit.Rule;import org.junit.Test;import org.junit.runner.RunWith;import org.springframework.beans.factory.annotation.Autowired;import org.springframework.beans.factory.annotation.Qualifier;import org.springframework.test.context.ContextConfiguration;import org.springframework.test.context.junit4.SpringJUnit4ClassRunner;@RunWith(SpringJUnit4ClassRunner.class)@ContextConfiguration(classes = CDPlayerConfig.class)public class CDPlayerTest { @Autowired @Qualifier("sgtPeppersNew") private CompactDisc cd; @Test public void play() { cd.play(); }}
需要注意的是bean id的首字母是类名小写。
1.3 为组件扫描的bean命名
【参考 Spring实战4 2.2.2】
import org.springframework.stereotype.Component;@Component("spn")public class SgtPeppersNew implements CompactDisc {@Autowired @Qualifier("spn") private CompactDisc cd;也可以使用 @Named效果是一样的,这是java依赖注入规范
import javax.inject.Named;@Named("spn")public class SgtPeppersNew implements CompactDisc {1.4 设定组件扫描的指定包
【参考 Spring实战4 2.2.3】
如果@ComponentScan默认不设置只扫描配置类所在的包作为基础包。
@Configuration@ComponentScan("blog.csdn.net.unix21")public class CDPlayerConfigTest {如果想更清晰的表明设置的是基础包
@ComponentScan(basePackages="指定包")
指定多个
@ComponentScan(basePackages={"指定包1","指定包2"})
也可以将其指定为包中所包含的类或者接口
@ComponentScan(basePackages={"XXX.class","XX.class"})
1.5 自动装配
【参考 Spring实战4 2.2.4】
声明自动装配需要@Autowired注解
1.5.1 在构造方法上使用自动装配
@RunWith(SpringJUnit4ClassRunner.class)@ContextConfiguration(classes = CDPlayerConfigTest.class)public class CDPlayerFunTest { private CompactDisc cd; @Autowired @Qualifier("spn") public void CDPlayer(CompactDisc cd) { this.cd = cd; } @Test public void play() { cd.play(); System.out.println("【占位符】CDPlayerFunTest"); }}
另一种写法
@Componentpublic class CDPlayer implements MediaPlayer { private CompactDisc cd; @Autowired public CDPlayer(@Qualifier("spn")CompactDisc cd) { this.cd = cd; } public void play() { cd.play(); }}1.5.2 在属性Setter方法上使用自动装配
@Componentpublic class CDPlayer implements MediaPlayer { private CompactDisc cd; @Autowired @Qualifier("spn") public void setCompactDisc(CompactDisc cd) { this.cd = cd; } public void play() { cd.play(); }}避免异常声明 @Autowired(required = false),如果没有匹配的bean,Spring会让这个bean处于未装配转态,但是需要谨慎对待这个设置,代码需要做null检查。
@Autowired是Spring特有的注解,可以替换为@Inject,@Inject来源自Jave依赖注入规范。
1.6 创建自定义的限定符
【参考 Spring实战4 3.3.2】
@Component@Qualifier("cold")public class IceCream implements CompactDisc { private String title = "Sgt. Pepper's Lonely Hearts Club Band"; private String artist = "The Beatles"; public void play() { System.out.println("【非常醒目 IceCream】>>>>>>>>>>>>>>>>>>>>>>>>>>>>>>>>Playing " + title + " by " + artist); }}@RunWith(SpringJUnit4ClassRunner.class)@ContextConfiguration(classes=CDPlayerConfigTest.class)public class CDPlayerLogTest { @Autowired private MediaPlayer player; @Autowired @Qualifier("sp") private CompactDisc cd; @Autowired @Qualifier("cold") private CompactDisc cd2; @Test public void cdShouldNotBeNull() { assertNotNull(cd); } @Test public void play() { player.play(); cd.play(); cd2.play(); }}
好处:这样做的好处限定符不耦合类名,所以可以随意重构类名。
问题:重复的限定符出现在多个类上这是不允许的,因为Java不允许同一个条目上重复出现相同类型的多个注解。
1.7 使用自定义限定符注解
针对上述问题可以创建自定义的限定符注解。
@Retention(RetentionPolicy.RUNTIME) // 注解会在class字节码文件中存在,在运行时可以通过反射获取到 @Target({ElementType.CONSTRUCTOR,ElementType.FIELD,ElementType.METHOD,ElementType.TYPE})//定义注解的作用目标**作用范围字段、枚举的常量/方法 @Qualifierpublic @interface Cold {}@Retention(RetentionPolicy.RUNTIME) // 注解会在class字节码文件中存在,在运行时可以通过反射获取到 @Target({ElementType.CONSTRUCTOR,ElementType.FIELD,ElementType.METHOD,ElementType.TYPE})//定义注解的作用目标**作用范围字段、枚举的常量/方法 @Qualifierpublic @interface Creamy {}@Retention(RetentionPolicy.RUNTIME) // 注解会在class字节码文件中存在,在运行时可以通过反射获取到 @Target({ElementType.CONSTRUCTOR,ElementType.FIELD,ElementType.METHOD,ElementType.TYPE})//定义注解的作用目标**作用范围字段、枚举的常量/方法 @Qualifierpublic @interface Fruity {}@Component@Cold@Creamypublic class IceCream implements CompactDisc { private String title = "Spring 实现 第4版 读书笔记"; private String artist = "http://blog.csdn.net/unix21"; public void play() { System.out.println("【非常醒目 IceCream】>>>>>>>>>>>>>>>>>>>>>>>>>>>>>>>>Playing " + title + " by " + artist); }}@Component@Cold@Fruitypublic class Popsicle implements CompactDisc { private String title = "Spring 实现 第4版 读书笔记"; private String artist = "http://blog.csdn.net/unix21"; public void play() { System.out.println("【非常醒目 Popsicle】>>>>>>>>>>>>>>>>>>>>>>>>>>>>>>>>Playing " + title + " by " + artist); }}@RunWith(SpringJUnit4ClassRunner.class)@ContextConfiguration(classes = CDPlayerConfigTest.class)public class CDPlayerLogTest { @Autowired private MediaPlayer player; @Autowired @Qualifier("sp") private CompactDisc cd; @Autowired @Cold @Creamy private CompactDisc cd2; @Autowired @Cold @Fruity private CompactDisc cd3; @Test public void cdShouldNotBeNull() { assertNotNull(cd); } @Test public void play() { player.play(); cd.play(); cd2.play(); cd3.play(); }}
1.8 bean的作用域
Spring定义了多重作用域,singleton单例,prototype原型等
singleton单例:整个应用中,只创建bean的一个实例,默认Spring上下文中所有的bean都是单例。
prototype原型:每次注入或者通过Spring应用上下文获取的时候,都会创建一个新的bean实例。
@Componentpublic class Add implements AddI { public int a=0; public void Add() { a++; } public void getA() { System.out.println("【非常醒目 Add】>>>>>>>>>>>>>>>>>>>>>>>>>>>>>>>>a= " +a+""); }}public interface AddI {void Add(); void getA();}@Componentpublic class CDPlayer implements MediaPlayer { @Autowired @Qualifier("sp") private CompactDisc cd; @Autowired private AddI a; public void play() { System.out.println("【非常醒目 CDPlayer】>>>"); cd.play(); a.Add(); a.getA(); a.Add(); a.getA(); System.out.println("【非常醒目 CDPlayer】<<<"); }}@RunWith(SpringJUnit4ClassRunner.class)@ContextConfiguration(classes = CDPlayerConfigTest.class)public class CDPlayerLogTest { @Autowired private MediaPlayer player; @Autowired @Qualifier("sp") private CompactDisc cd; @Autowired @Cold @Creamy private CompactDisc cd2; @Autowired @Cold @Fruity private CompactDisc cd3; @Test public void cdShouldNotBeNull() { assertNotNull(cd); } @Autowired private AddI a; @Test public void play() { player.play(); cd.play(); cd2.play(); cd3.play(); a.getA(); }}
再写一个多线程
public class ClientThread extends Thread { @Autowired private AddI a; @Autowired public ClientThread(AddI a) { this.a = a; } public void run() { a.Add(); a.getA(); }}调用多线程
@RunWith(SpringJUnit4ClassRunner.class)@ContextConfiguration(classes = CDPlayerConfigTest.class)public class SpringScopeTest { @Autowired private AddI a; @Test public void Scope() { for (int i = 0; i < 10; i++) { ClientThread t = new ClientThread(a); t.start(); } }}
改为SCOPE_PROTOTYPE
@Component@Scope(ConfigurableBeanFactory.SCOPE_PROTOTYPE)//@Scope(ConfigurableBeanFactory.SCOPE_SINGLETON)public class Add implements AddI { public int a=0; public void Add() { a++; } public void getA() { System.out.println("【非常醒目 Add】>>>>>>>>>>>>>>>>>>>>>>>>>>>>>>>>a= " +a+""); }}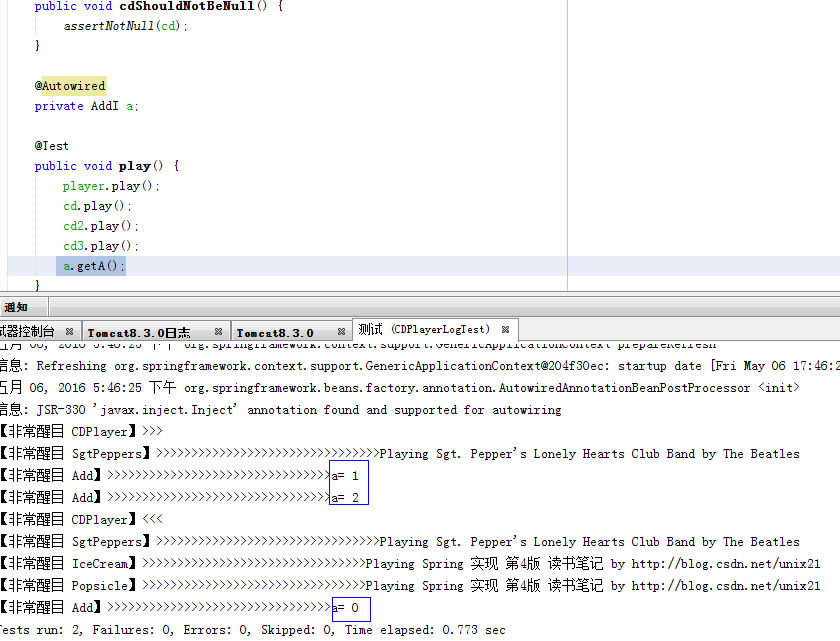

看到差异了吧。
补充说明:@Repository、@Service、@Controller 和 @Component将类标识为Bean,都是一样的,用在不同的地方而已。
2.AOP切面编程
定义接口
public interface PerformanceI { public void perform();}实现类
import org.springframework.stereotype.Component;@Componentpublic class Performance implements PerformanceI{ public void perform(){ System.out.println("【非常醒目 Performance perform 调用中】 By http://blog.csdn.net/unix21"); }}定义切面
import org.aspectj.lang.annotation.After;import org.aspectj.lang.annotation.AfterThrowing;import org.aspectj.lang.annotation.Aspect;import org.aspectj.lang.annotation.Before;@Aspectpublic class MyAspect { @Before("execution(* com.demo.PerformanceI.perform(..))") public void before(){ System.out.println("【非常醒目 [方法调用前] 】"); } @After("execution(* com.demo.PerformanceI.perform(..))") public void after(){ System.out.println("【非常醒目 [方法调用后] 】"); } @AfterThrowing("execution(* com.demo.PerformanceI.perform(..))") public void afterThrowing(){ System.out.println("【非常醒目 [方法异常后] 】"); }}配置文件
import com.demo.*;import org.springframework.context.annotation.Bean;import org.springframework.context.annotation.ComponentScan;import org.springframework.context.annotation.Configuration;import org.springframework.context.annotation.EnableAspectJAutoProxy;@Configuration@EnableAspectJAutoProxy@ComponentScan("com.demo")public class AppConfig { @Bean public MyAspect myAspect() { return new MyAspect(); } }import org.junit.Test;import org.junit.runner.RunWith;import org.springframework.beans.factory.annotation.Autowired;import org.springframework.test.context.ContextConfiguration;import org.springframework.test.context.junit4.SpringJUnit4ClassRunner;@RunWith(SpringJUnit4ClassRunner.class)@ContextConfiguration(classes = AppConfig.class)public class MyTest { @Autowired private PerformanceI p1; @Test public void play() { p1.perform(); }}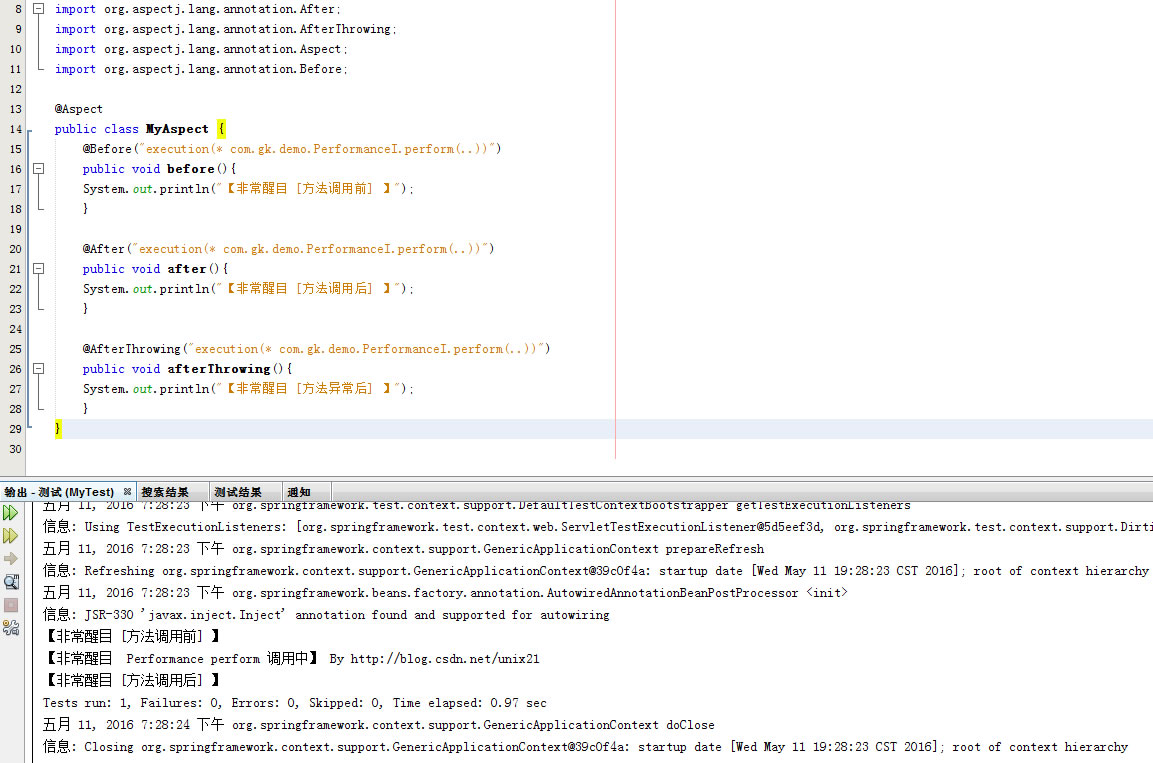
实现了方法调用前后的AOP效果。
这个Spring官方参考做的不错:http://docs.spring.io/spring/docs/4.2.5.RELEASE/javadoc-api/
这里选不同的版本:http://docs.spring.io/spring/docs/

3.Spring MVC
DispatcherServlet是Spring MVC的核心,每当应用接受一个HTTP请求,由DispatcherServlet负责将请求分发给应用的其他组件。
在旧版本中,DispatcherServlet之类的servlet一般在web.xml文件中配置;但是Spring 3.1引入了注解就无需再使用web.xml文件。
import org.springframework.web.servlet.support.AbstractAnnotationConfigDispatcherServletInitializer;public class SpitterWebInitializer extends AbstractAnnotationConfigDispatcherServletInitializer { @Override protected Class<?>[] getRootConfigClasses() { return new Class<?>[]{RootConfig.class}; } @Override protected Class<?>[] getServletConfigClasses() { return new Class<?>[]{WebConfig.class}; } @Override protected String[] getServletMappings() { return new String[]{"/"}; }}AbstractAnnotationConfigDispatcherServletInitializer这个类负责配置DispatcherServlet、初始化Spring MVC容器和Spring容器。
正如可以通过多种方式配置DispatcherServlet一样,也可以通过多种方式启动Spring MVC特性。原来我们一般在xml文件中使用<mvc:annotation-driven>元素启动注解驱动的Spring MVC特性。这里我们使用JavaConfig配置,最简单的Spring MVC配置类代码如下:
import org.springframework.context.annotation.Bean;import org.springframework.context.annotation.ComponentScan;import org.springframework.context.annotation.Configuration;import org.springframework.web.servlet.ViewResolver;import org.springframework.web.servlet.config.annotation.DefaultServletHandlerConfigurer;import org.springframework.web.servlet.config.annotation.EnableWebMvc;import org.springframework.web.servlet.config.annotation.WebMvcConfigurerAdapter;import org.springframework.web.servlet.view.InternalResourceViewResolver;@Configuration@EnableWebMvc@ComponentScan("com.xxx.controller")public class WebConfig extends WebMvcConfigurerAdapter{ @Bean public ViewResolver viewResolver() { //配置JSP视图解析器 InternalResourceViewResolver resolver = new InternalResourceViewResolver(); resolver.setPrefix("/WEB-INF/views/"); resolver.setSuffix(".jsp"); //可以在JSP页面中通过${}访问beans resolver.setExposeContextBeansAsAttributes(true); return resolver; } @Override public void configureDefaultServletHandling(DefaultServletHandlerConfigurer configurer) { configurer.enable(); //配置静态文件处理 }}通过@ComponentScan注解指定bean的自动发现机制作用的范围,被@Controller等注解修饰的web的bean将被发现并加载到spring mvc应用容器,这样就不需要在配置类中显式定义任何控制器bean了。
通过@Bean注解添加一个ViewResolverbean,具体来说是InternalResourceViewResolver。
RootConfig的配置就非常简单了,唯一需要注意的是,它在设置扫描机制的时候,将之前WebConfig设置过的那个包排除了;也就是说,这两个扫描机制作用的范围正交。RootConfig的代码如下:
import org.springframework.context.annotation.ComponentScan;import org.springframework.context.annotation.Configuration;import org.springframework.context.annotation.FilterType;import org.springframework.web.servlet.config.annotation.EnableWebMvc;@Configuration@ComponentScan(basePackages = {"com.xxx.*"}, excludeFilters = {@ComponentScan.Filter(type = FilterType.ANNOTATION, value = EnableWebMvc.class)})public class RootConfig {}@Controllerpublic class HomeController { @Autowired private PerformanceI p1; @RequestMapping(value = "/home", method = RequestMethod.GET) public String home() { p1.perform(); return "home"; }}<%@page contentType="text/html" pageEncoding="UTF-8"%><!DOCTYPE html><html> <head> <meta http-equiv="Content-Type" content="text/html; charset=UTF-8"> <title>JSP Page</title> </head> <body> <h1>Spring4 & Sping MVC4 </h1><p>demo by http://blog.csdn.net/unix21</p> </body></html>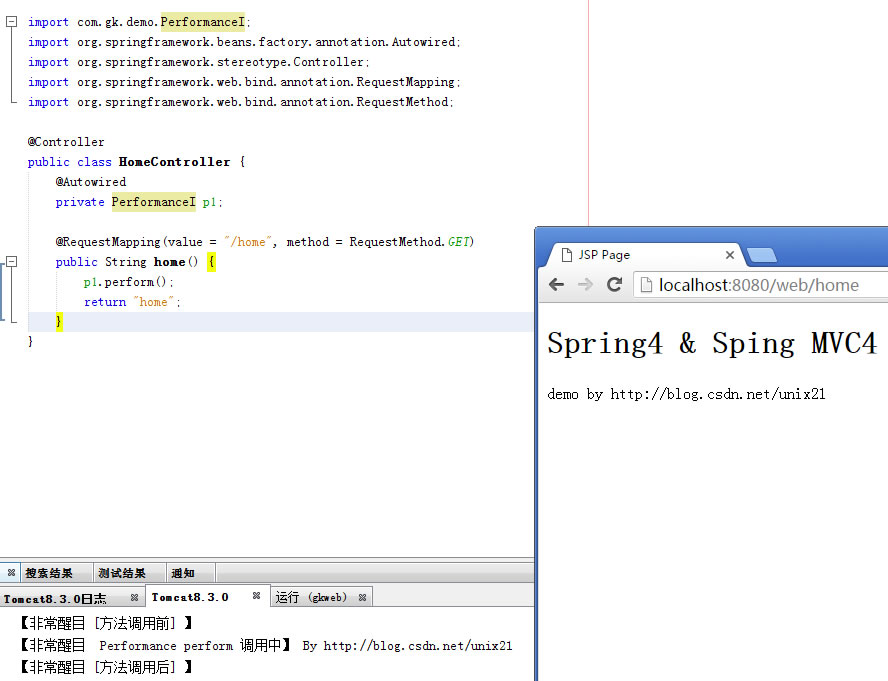
下面这个是【第5章】的翻译 https://segmentfault.com/a/1190000004343063?_ea=575820
4.Spring4整合MyBatis3
说明:《Spring实战(第4版)》并没有提到MyBatis的整合,这个是我自己写的,写一起只为查看方便。
新建MybatisConfig文件
import javax.sql.DataSource;import org.mybatis.spring.SqlSessionFactoryBean;import org.mybatis.spring.mapper.MapperScannerConfigurer;import org.springframework.context.annotation.Bean;import org.springframework.context.annotation.Configuration;import org.springframework.jdbc.datasource.DataSourceTransactionManager;import org.springframework.jdbc.datasource.DriverManagerDataSource;import org.springframework.transaction.PlatformTransactionManager;import org.springframework.transaction.annotation.EnableTransactionManagement;@Configuration@EnableTransactionManagementpublic class MybatisConfig { @Bean public DataSource dataSource() { DriverManagerDataSource dataSource = new DriverManagerDataSource(); dataSource.setUsername("admin"); dataSource.setPassword("admin"); dataSource.setDriverClassName("com.microsoft.sqlserver.jdbc.SQLServerDriver");//如果其他数据库换对应的驱动即可 dataSource.setUrl("jdbc:sqlserver://blog.csdn.net.unix21:3499;DatabaseName=testdb"); return dataSource; } @Bean MapperScannerConfigurer mpperScannnerConfigurer() { MapperScannerConfigurer msc = new MapperScannerConfigurer(); msc.setSqlSessionFactoryBeanName("sqlSessionFactory"); msc.setBasePackage("com.unix.mapper");//自动扫描mapper包 return msc; } @Bean(name = "sqlSessionFactory") SqlSessionFactoryBean sqlSessionFactory(DataSource dataSource) { SqlSessionFactoryBean ssfb = new SqlSessionFactoryBean(); ssfb.setDataSource(dataSource); ssfb.setTypeAliasesPackage("com.unix.bean");//自动扫描bean包 return ssfb; } @Bean PlatformTransactionManager transactionManager(DataSource dataSource) { DataSourceTransactionManager transactionManager = new DataSourceTransactionManager(); transactionManager.setDataSource(dataSource); return transactionManager; }}新增一个mapper接口
public interface SchoolMapper { @Select("select * from School where id =#{id}") School findById(@Param("id") int id); @Select("select * from School where Name like '${name}%'") List<School> findByName(@Param("name") String name);}测试用例
@RunWith(SpringJUnit4ClassRunner.class)@ContextConfiguration(classes = MybatisConfig.class)//@TransactionConfiguration(defaultRollback=true)public class SchoolTest { @Autowired private SchoolMapper shoolDao; @Test public void findById(){ School shool = shoolDao.findById(1); Assert.assertNotNull(shool); System.out.println(shool.getName()); } @Test public void findByName(){ List<School> result = shoolDao.findByName("苏州中学"); Assert.assertNotNull(result); for (School s : result) { System.out.println(s.getName()); } }}5.Spring4使用Redis
redis在日常开发中已经成为了标配了,在spring4中使用redis非常简单,无需自己去写一个jedis的工厂方法连接池之类的代码,因为Spring已经写好了,你只需要引用spring-data-redis包即可
<dependency> <groupId>org.springframework.data</groupId> <artifactId>spring-data-redis</artifactId> <version>1.7.1.RELEASE</version> </dependency>Redis配置
@Configurationpublic class RedisConfig { @Bean public RedisConnectionFactory redisCF() { JedisConnectionFactory cf = new JedisConnectionFactory(); cf.setHostName("127.0.0.1");//服务器IP cf.setPort(6379);//端口 cf.setPassword("密码"); return cf; } @Bean public RedisTemplate<String, String> redisTemplate(RedisConnectionFactory cf) { RedisTemplate<String, String> redis = new RedisTemplate<String, String>(); redis.setConnectionFactory(cf); return redis; } @Bean public StringRedisTemplate stringRedisTemplate(RedisConnectionFactory cf) { StringRedisTemplate redis = new StringRedisTemplate(); redis.setConnectionFactory(cf); return redis; }}测试用例
@RunWith(SpringJUnit4ClassRunner.class)@ContextConfiguration(classes = RedisConfig.class)public class RedisTest { @Autowired private StringRedisTemplate r1; @Test public void get() { String foo=DateUtil.getNowTimeString(); r1.opsForValue().set("foo", foo); foo=r1.opsForValue().get("foo"); System.out.println("【Redis 测试>>>get set】"+foo+"By http://blog.csdn.net/unix21"); }}
6.Spring Security
import org.springframework.security.web.context.AbstractSecurityWebApplicationInitializer;public class SecurityWebInitializer extends AbstractSecurityWebApplicationInitializer {}@Configuration@EnableWebMvcSecuritypublic class SecuredConfig extends WebSecurityConfigurerAdapter { @Override protected void configure(HttpSecurity http) throws Exception { http .authorizeRequests() .anyRequest().authenticated() .and() .formLogin() .and() .httpBasic(); }}
基于内存的用户存储:
//基于内存的用户 @Override protected void configure(AuthenticationManagerBuilder auth) throws Exception { auth .inMemoryAuthentication() .withUser("user1").password("pass1").roles("USER").and() .withUser("user2").password("pass2").roles("USER","ADMIN"); }故意输错用户名密码就进不去

验证 指定页面+指定权限
@Override protected void configure(HttpSecurity http) throws Exception { http .authorizeRequests() .antMatchers("/news").hasRole("USER") .and() .formLogin() .and() .httpBasic(); }
我们用user2登陆,由于没权限返回403

只有用user1登陆才可以看到页面内容。
自定义登陆页
现实开发中不肯能用Spring提供的简易登陆页,除非是一个很小的内部系统。
@Configuration@EnableWebMvcSecuritypublic class SecuredConfig extends WebSecurityConfigurerAdapter { @Override protected void configure(HttpSecurity http) throws Exception { http .authorizeRequests() .antMatchers("/news/*").hasRole("USER") .and() .formLogin() .loginPage("/login") .defaultSuccessUrl("/") .failureUrl("/login?error") .permitAll() .and() .httpBasic(); }.antMatchers("/news/*").hasRole("USER") :匹配 /news/以及/news/ 开头的所有页面 需要USER权限
.loginPage("/login") :自定义登陆页
.defaultSuccessUrl("/") :默认成功页,如果没有权限则跳转到该页面
.failureUrl("/login?error") :默认失败页面
// 1. /login 登录页面的常规显示 // 2. /login?error 登录验证失败的展示 // 3. /login?logout 注销登录的处理 @RequestMapping(value = "/login", method = RequestMethod.GET) public ModelAndView login( @RequestParam(value = "error", required = false) String error, @RequestParam(value = "logout", required = false) String logout) { ModelAndView model = new ModelAndView(); if (error != null) { model.addObject("error", "用户名密码不对!"); } if (logout != null) { model.addObject("msg", "You've been logged out successfully."); } model.setViewName("login"); return model; }login.jsp
<%@page contentType="text/html" pageEncoding="UTF-8"%><html> <head> <title>登陆</title> </head> <body onload='document.f.username.focus();'> <h3>登陆页</h3> <c:if test="${not empty error}"> <div style="color: red">${error}</div> </c:if> <c:if test="${not empty msg}"> <div>${msg}</div> </c:if> <form name='f' action='/gkweb/login' method='POST'> <table> <tr><td>用户名:</td><td><input type='text' name='username' value=''></td></tr> <tr><td>密码:</td><td><input type='password' name='password'/></td></tr> <tr><td colspan='2'><input name="submit" type="submit" value="登陆"/></td></tr> </table> <input type="hidden" name="${_csrf.parameterName}" value="${_csrf.token}" /> </form> </body></html>

配置多个页面权限控制
.antMatchers("/news/*","/user/*").hasRole("USER")写法二
.antMatchers("/news/*").hasRole("USER").antMatchers("/user/*").hasRole("USER") @Override protected void configure(HttpSecurity http) throws Exception { http .authorizeRequests() .antMatchers("/", "/home").permitAll() .anyRequest().authenticated() .and() .formLogin() .loginPage("/login") .defaultSuccessUrl("/helloadmin") .permitAll() .and() .logout() .permitAll(); }对URL进行权限配置,使得"/", "/home"不需要登录就可以访问,其他需要登录。登录的地址是'/login',当登录成功后将跳转到/helloadmin页面,并且登录、登出页面都是不需要登录就可以访问的。
.httpBasic()
支持弹窗就是windows自带的认证框进行认证。由于不好扩展这个基本没什么用,可以不用。
.rememberMe()
记住我的状态
.rememberMe().key("web") .tokenValiditySeconds(1209600);
.logout()
注销功能
@Override protected void configure(HttpSecurity http) throws Exception { http .authorizeRequests() .antMatchers("/news/*").hasRole("USER") .and() .formLogin() .loginPage("/login") .defaultSuccessUrl("/") .failureUrl("/login?error") .usernameParameter("username") .passwordParameter("password") .and() .logout() .logoutSuccessUrl("/login?logout") .and() .rememberMe().key("gkweb") .tokenValiditySeconds(1209600); }注销就是页面给用户一个链接或者按钮
1.使用jstl声明退出路径
引用jar包
<dependency> <groupId>jstl</groupId> <artifactId>jstl</artifactId> <version>1.2</version> </dependency><%@ taglib uri="http://java.sun.com/jsp/jstl/core" prefix="c" %><c:url var="logoutUrl" value="/logout"/><form action="${logoutUrl}" method="post"><input type="submit" value="Log out" /><input type="hidden" name="${_csrf.parameterName}" value="${_csrf.token}"/></form>2.硬编码退出路径
<form action="${pageContext.request.contextPath}/logout" method="post"> <input type="submit" value="Logout" /> <input type="hidden" name="${_csrf.parameterName}" value="${_csrf.token}"/></form>3.链接退出
<script> function formSubmit() { document.getElementById("logoutForm").submit(); } </script><form action="${pageContext.request.contextPath}/logout" method="post" id="logoutForm"> <c:if test="${pageContext.request.userPrincipal.name != null}"> <h2> Welcome : ${pageContext.request.userPrincipal.name} | <a href="javascript:formSubmit()"> 退出1-链接</a> </h2> </c:if> <input type="submit" value="退出1-按钮" /> <input type="hidden" name="${_csrf.parameterName}" value="${_csrf.token}"/> </form> <c:url var="logoutUrl" value="/logout"/> <form action="${logoutUrl}" method="post"> <c:if test="${pageContext.request.userPrincipal.name != null}"> <h2> Welcome : ${pageContext.request.userPrincipal.name} | <a href="javascript:formSubmit()"> 退出2-链接</a> </h2> </c:if> <input type="submit" value="退出2-按钮" /> <input type="hidden" name="${_csrf.parameterName}" value="${_csrf.token}"/> </form>自定义的用户服务
实际开发肯定是需要去数据库或者其他地方查询用户账号密码等
@Override protected void configure(AuthenticationManagerBuilder auth) throws Exception { auth.userDetailsService(new CustomUserDetailsService(userDao));}而不能直接在CustomUserDetailsService使用@Autowired注解出来。
CustomUserDetailsService集成的接口UserDetailsService无需自己重新定义,参考 泛型推断类型不符合上限
public class CustomUserDetailsService implements UserDetailsService { private final UserMapper userDao; public CustomUserDetailsService(UserMapper u) { this.userDao = u; } @Override public UserDetails loadUserByUsername(String username) throws UsernameNotFoundException { UserBean user = userDao.findByName(username); if (user == null) { throw new UsernameNotFoundException("没有找到对应用户"); } List<SimpleGrantedAuthority> authorities = new ArrayList<>(); authorities.add(new SimpleGrantedAuthority(user.getUtype().toString())); return new org.springframework.security.core.userdetails.User(user.getUserName(), user.getPassword(), authorities); }}
给我老师的人工智能教程打call!http://blog.csdn.net/jiangjunshow


 967
967

 被折叠的 条评论
为什么被折叠?
被折叠的 条评论
为什么被折叠?
 到【灌水乐园】发言


