


需求:Android客户端连接服务器端mysql数据库中的内容
环境部署
服务器:apache-tomcat-8.5.9
语言版本:Java 1.8.0_101
编译环境:Eclipse
Android Studio
调用jar包:httpclient-4.2.5,httpcore-4.2.4 //HttpClient父类
mysql-connector-java-5.1.40-bin //用于连接mysql数据库
思路:涉及到服务器端mysql数据库安装、web应用部分开发和Android客户端开发三个部分
步骤:
1、mysql数据库安装
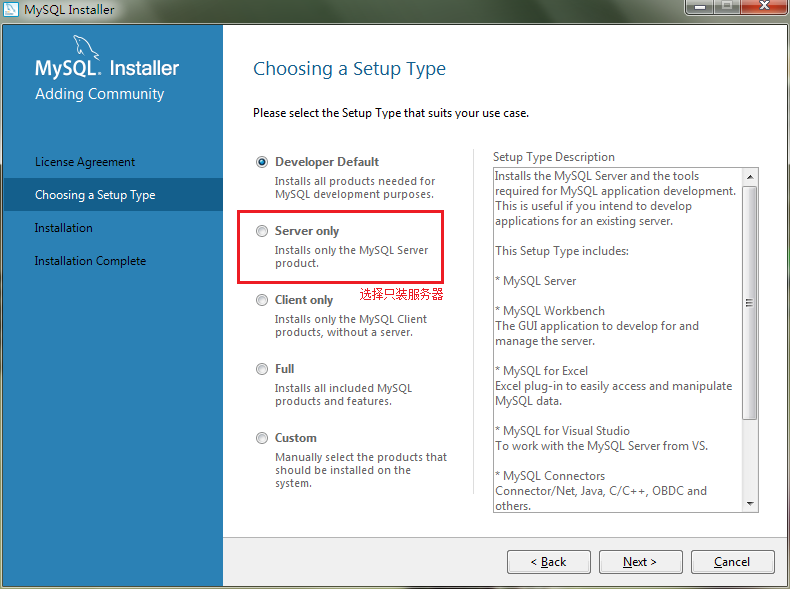
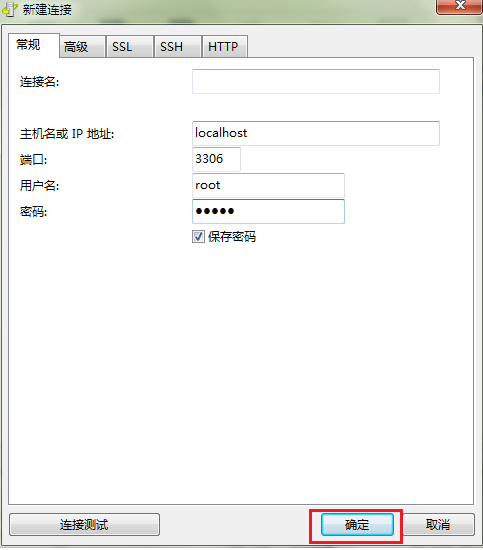
a、先安装mysql-installer-community-5.7.17.0,其中在Setup Type上选择“Server only”,然后记住数据库端口号和账号(例如:root)密码(例如:123456),如下图:
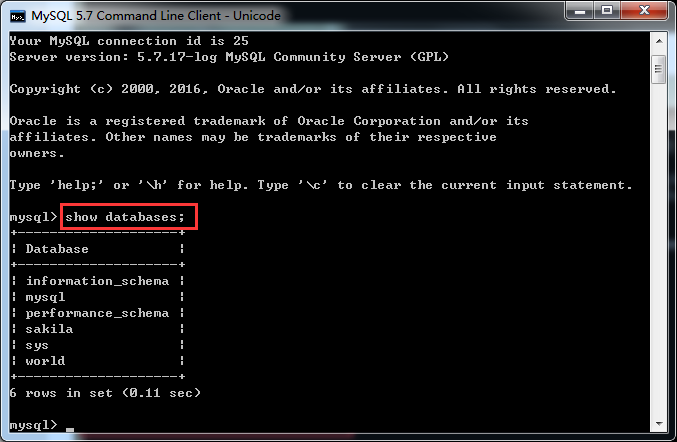
b、安装成功验证。命令行窗口输入密码,然后输入显示所有数据库命令:show databases; 一定要有分号,并按回车。

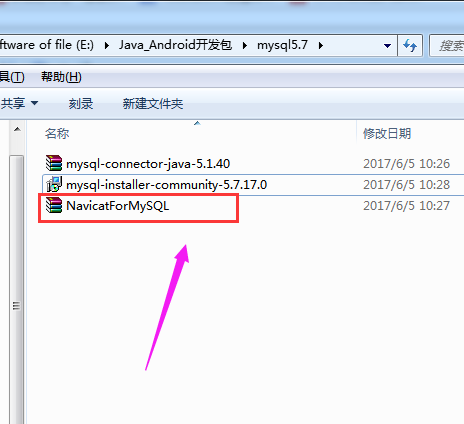
c、NavicatforMySQL下载及使用。注册,然后连接数据库,输入密码后,能够看到已存在的数据库,可以在其中进行相关数据库和数据表的创建操作。
(具体以参考资料中的内容为主)
2、web应用部分开发
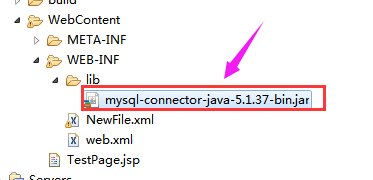
a、新建servlet,并且配置好web.xml中的相应信息(在WebContent下的WEB-INF文件夹下加入web.xml文件来连接servlet与jsp前端),此外还需在libs中添加mysql-connector-java-5.1.37-bin.jar文件,代码如下:

 1 package com.Servlet;
 2
 3 import java.io.IOException;
 4 import javax.servlet.ServletException;
 5 import javax.servlet.annotation.WebServlet;
 6 import javax.servlet.http.HttpServlet;
 7 import javax.servlet.http.HttpServletRequest;
 8 import javax.servlet.http.HttpServletResponse;
 9
10 import java.io.PrintWriter;
11 import java.sql.Connection;
12 import java.sql.ResultSet;
13 import java.sql.Statement;
14 import com.DBTool.DBUtil;
15
16 @WebServlet("/Servlet")
17 public class Login extends HttpServlet {
18     private static final long serialVersionUID = 1L;
19
20     /**
21      * @see HttpServlet#HttpServlet()
22      */
23     public Login() {
24         super();
25         // TODO Auto-generated constructor stub
26     }
27     /**
28      * @see HttpServlet#doGet(HttpServletRequest request, HttpServletResponse response)
29      */
30     protected void doGet(HttpServletRequest request, HttpServletResponse response) throws ServletException, IOException {
31         // TODO Auto-generated method stub
32         response.getWriter().append("Served at: ").append(request.getContextPath());
33     }
34
35     /**
36      * @see HttpServlet#doPost(HttpServletRequest request, HttpServletResponse response)
37      */
38     protected void doPost(HttpServletRequest request, HttpServletResponse response) throws ServletException, IOException {
39         String ID = request.getParameter("ID");
40         String PW= request.getParameter("PW");
41         boolean type=false;
42         response.setContentType("text/html; charset=UTF-8");
43         PrintWriter out = response.getWriter();
44         try
45         {
46             Connection con=DBUtil.getConnection();
47             Statement stmt=con.createStatement();
48             //mysql数据库中的数据表,表名叫:demotable ,需要自己预先在数据库中进行创建,包含相应的字段和记录。
49             String sql="select * from mysql.demotable where uid="+ID+" and pwd="+PW;
50             ResultSet rs=stmt.executeQuery(sql);
51             while(rs.next())
52             {
53                 type=true;
54             }
55         }
56         catch(Exception ex)
57         {
58             ex.printStackTrace();
59         }
60         finally
61         {
62             DBUtil.Close();
63             out.print(type);
64             out.flush();
65             out.close();
66         }
67     }
68
69 }
web.xml内容如下:
 1 <?xml version="1.0" encoding="UTF-8"?>
 2 <web-app id="WebApp_ID" version="2.4" xmlns="http://java.sun.com/xml/ns/j2ee" xmlns:xsi="http://www.w3.org/2001/XMLSchema-instance" xsi:schemaLocation="http://java.sun.com/xml/ns/j2ee http://java.sun.com/xml/ns/j2ee/web-app_2_4.xsd">
 3     <display-name>web</display-name>
 4     <servlet>
 5         <display-name>Login</display-name>
 6         <servlet-name>Login</servlet-name>
 7         <servlet-class>com.Servlet.Login</servlet-class>
 8     </servlet>
 9     <servlet-mapping>
10         <servlet-name>Login</servlet-name>
11         <url-pattern>/Login</url-pattern>
12     </servlet-mapping>
13     <welcome-file-list>
14         <welcome-file>index.html</welcome-file>
15         <welcome-file>index.jsp</welcome-file>
16     </welcome-file-list>
17 </web-app>
b、前端界面设计(TestPage.jsp)如下:
 1 <%@ page language="java" contentType="text/html; charset=UTF-8" pageEncoding="UTF-8"%>
 2 <!DOCTYPE html PUBLIC "-//W3C//DTD HTML 4.01 Transitional//EN" "http://www.w3.org/TR/html4/loose.dtd">
 3 <html>
 4 <head>
 5 <meta http-equiv="Content-Type" content="text/html; charset=UTF-8">
 6 <title>Insert title here</title>
 7 </head>
 8 <body>
 9 <form id="from1" action="Login" method="post">
10 <table>
11 <tr><td>用户名</td><td><input type="text"  name="ID"></td></tr>
12 <tr><td>密码</td><td><input type="password"  name="PW"></td></tr>
13 <tr><td colspan="2" align="center"><input type="submit"  value="登陆"/></td></tr>
14 </table>
15 </form>
16 </body>
17 </html>
c、在java Resources下的src文件夹中新建com.DBTool包,用作数据池来连接数据库,在包中建立DBUtil类实现功能,代码如下:
 1 package com.DBTool;
 2
 3
 4 import java.sql.*;
 5
 6 public class DBUtil {
 7     //其中mysql是数据库名称,在mysql57版本的数据库中已经预先新建完成;3306是mysql数据库的端口号。
 8     private static String url="jdbc:mysql://localhost:3306/mysql";
 9     //com.mysql.jdbc.Driver是mysql-connector-java-5.1.40中的驱动包路径
10     private static String driverClass="com.mysql.jdbc.Driver";
11     //mysql的账号和密码是在安装mysql中进行设置的,这里拿来用即可。
12     private static String username="root";
13     private static String password="123456";
14     private static Connection conn;
15     //装载驱动
16     static{
17         try{
18             Class.forName(driverClass);
19         }
20         catch(ClassNotFoundException e){
21             e.printStackTrace();
22         }
23     }
24     //获取数据库连接
25     public static Connection getConnection(){
26         try{
27             conn=DriverManager.getConnection(url,username,password);
28         }
29         catch(SQLException e){
30             e.printStackTrace();
31         }
32         return conn;
33     }
34     //建立数据库连接
35     public static void main(String[] args){
36         Connection conn=DBUtil.getConnection();
37         if(conn!=null){
38             System.out.println("数据库连接成功");
39         }
40         else{
41             System.out.println("数据库连接失败");
42         }
43     }
44     //关闭数据库连接
45     public static void Close(){
46         if(conn!=null){
47             try{
48                 conn.close();
49             }
50             catch(SQLException e){
51                 e.printStackTrace();
52             }
53         }
54     }
55 }
d、运行服务器,测试是否成功搭建。


3、Android部分开发
仅附上核心部分代码,如下:
 1 public void SendByHttpClient(final String id, final String pw){
 2         new Thread(new Runnable() {
 3             @Override
 4             public void run() {
 5                 try {
 6                     HttpClient httpclient=new DefaultHttpClient();
 7                     HttpPost httpPost=new HttpPost("http://web应用部署服务器上的IP地址:8080/HttpClientDemo/Login");//服务器地址,指向Servlet
 8                     List<NameValuePair> params=new ArrayList<NameValuePair>();//将id和pw装入list
 9                     params.add(new BasicNameValuePair("ID",id));
10                     params.add(new BasicNameValuePair("PW",pw));
11                     final UrlEncodedFormEntity entity=new UrlEncodedFormEntity(params,"utf-8");//以UTF-8格式发送
12                     httpPost.setEntity(entity);
13                     HttpResponse httpResponse= httpclient.execute(httpPost);
14                     if(httpResponse.getStatusLine().getStatusCode()==200)//在200毫秒之内接收到返回值
15                     {
16                         HttpEntity entity1=httpResponse.getEntity();
17                         String response=EntityUtils.toString(entity1, "utf-8");//以UTF-8格式解析
18                         Message message=new Message();
19                         message.what=USER_LOGIN;
20                         message.obj=response;
21                         handler.sendMessage(message);使用Message传递消息给线程
22                     }
23                 }
24                 catch (Exception e) {
25                     e.printStackTrace();
26                 }
27             }
28         }).start();
29     }
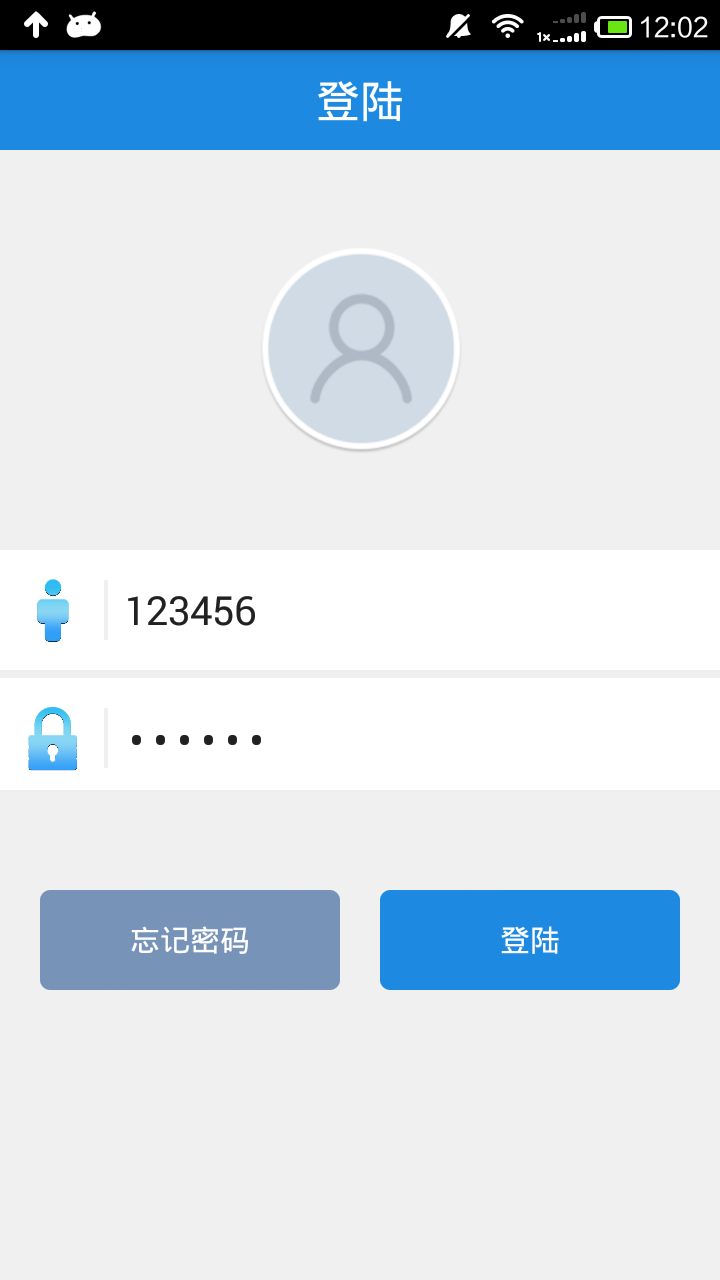
最终,测试结果图,如下:
-------------------------------------------------------------------------------------------
参考资料:
http://transcoder.tradaquan.com/from=1017649e/bd_page_type=1/ssid=0/uid=0/pu=usm%401%2Csz%401320_2001%2Cta%40iphone_1_9.2_3_601/baiduid=3B77D44CFFB44688FD602EAD8A663022/w=0_10_/t=iphone/l=3/tc?ref=www_iphone&lid=9684581900815139314&order=2&fm=alhm&h5ad=1&srd=1&dict=32&tj=h5_mobile_2_0_10_title&w_qd=IlPT2AEptyoA_ykzv39b7vOxASxPcYSfDwWEKKelwb6TYslhS_&sec=22021&di=4d89010ccd0ca0f7&bdenc=1&tch=124.133.103.675.1.561&nsrc=IlPT2AEptyoA_yixCFOxXnANedT62v3IEQGG_ytK1DK6mlrte4viZQRAUSD8L7qYZpPPtCPQpxkCwnWh_7YskNYWgK&eqid=86668bed7c43800010000003594fbeac&wd=&clk_info=%7B%22srcid%22%3A%221599%22%2C%22tplname%22%3A%22h5_mobile%22%2C%22t%22%3A1498398423079%2C%22sig%22%3A%2242687%22%2C%22xpath%22%3A%22div-a-h3%22%7D
http://blog.csdn.net/qq_14923661/article/details/50461696 // Android平台实现与Apache Tomcat服务器数据交互(MySql数据库)


 1940
1940


 被折叠的 条评论
为什么被折叠?
被折叠的 条评论
为什么被折叠?
 到【灌水乐园】发言


