


点击上方“芋道源码”,选择“设为星标”
管她前浪,还是后浪?
能浪的浪,才是好浪!
每天 10:33 更新文章,每天掉亿点点头发...
源码精品专栏

Retrofit是适用于Android和Java且类型安全的 HTTP 客户端,其最大的特性的是支持通过接口的方式发起 HTTP 请求 。而spring-boot是使用最广泛的 Java 开发框架,但是Retrofit官方没有支持与spring-boot框架快速整合,因此我们开发了retrofit-spring-boot-starter。
retrofit-spring-boot-starter实现了Retrofit与spring-boot框架快速整合,并且支持了诸多功能增强,极大简化开发 。
Github 项目地址:https://github.com/LianjiaTech/retrofit-spring-boot-starter
Gitee 项目地址:https://gitee.com/lianjiatech/retrofit-spring-boot-starter
示例 demo:https://github.com/ismart-yuxi/retrofit-spring-boot-demo
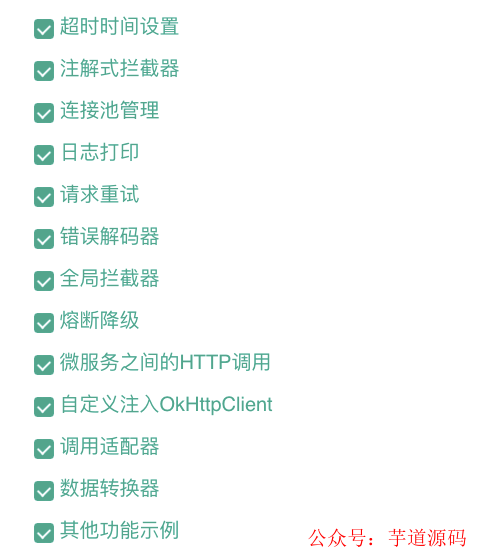
功能特性
推荐下自己做的 Spring Boot 的实战项目:
https://github.com/YunaiV/ruoyi-vue-pro
快速使用
引入依赖
<dependency>
    <groupId>com.github.lianjiatech</groupId>
   <artifactId>retrofit-spring-boot-starter</artifactId>
   <version>2.2.17</version>
</dependency>
强烈建议使用最新版本,稳定无 bug!
2.2.13和2.2.14对配置中心有兼容性 bug,请勿使用!!!
本项目依赖 Retrofit-2.9.0,okhttp-3.14.9,okio-1.17.5 版本,如果冲突,烦请手动引入相关 jar 包 。完整依赖如下:
<dependency>
    <groupId>com.github.lianjiatech</groupId>
   <artifactId>retrofit-spring-boot-starter</artifactId>
   <version>2.2.17</version>
</dependency>
 <dependency>
    <groupId>com.squareup.okhttp3</groupId>
    <artifactId>logging-interceptor</artifactId>
    <version>3.14.9</version>
</dependency>
<dependency>
    <groupId>com.squareup.okhttp3</groupId>
    <artifactId>okhttp</artifactId>
    <version>3.14.9</version>
</dependency>
<dependency>
    <groupId>com.squareup.okio</groupId>
    <artifactId>okio</artifactId>
    <version>1.17.5</version>
</dependency>
<dependency>
    <groupId>com.squareup.retrofit2</groupId>
    <artifactId>retrofit</artifactId>
    <version>2.9.0</version>
</dependency>
<dependency>
    <groupId>com.squareup.retrofit2</groupId>
    <artifactId>converter-jackson</artifactId>
    <version>2.9.0</version>
</dependency>
定义 http 接口
接口必须使用@RetrofitClient注解标记 !http 相关注解可参考官方文档:retrofit 官方文档。
@RetrofitClient(baseUrl = "${test.baseUrl}")
public interface HttpApi {

    @GET("person")
    Result<Person> getPerson(@Query("id") Long id);
}友情提示:方法请求路径慎用
/开头 。对于Retrofit而言,如果baseUrl=http://localhost:8080/api/test/,方法请求路径如果是person,则该方法完整的请求路径是:http://localhost:8080/api/test/person。而方法请求路径如果是/person,则该方法完整的请求路径是:http://localhost:8080/person。
注入使用
将接口注入到其它 Service 中即可使用!
@Service
public class TestService {

    @Autowired
    private HttpApi httpApi;

    public void test() {
        // 通过httpApi发起http请求
    }
}默认情况下,自动使用SpringBoot扫描路径进行retrofitClient注册 。你也可以在配置类加上@RetrofitScan手工指定扫描路径。
推荐下自己做的 Spring Cloud 的实战项目:
https://github.com/YunaiV/onemall
HTTP 请求相关注解
HTTP请求相关注解,全部使用了retrofit原生注解。详细信息可参考官方文档:retrofit 官方文档 ,以下是一个简单说明。
| 注解分类 | 支持的注解 |
|---|---|
| 请求方式 | @GET @HEAD @POST @PUT @DELETE @OPTIONS @HTTP |
| 请求头 | @Header @HeaderMap @Headers |
| Query 参数 | @Query @QueryMap @QueryName |
| path 参数 | @Path |
| form-encoded 参数 | @Field @FieldMap @FormUrlEncoded |
| 请求体 | @Body |
| 文件上传 | @Multipart @Part @PartMap |
| url 参数 | @Url |
配置项说明
retrofit-spring-boot-starter支持了多个可配置的属性,用来应对不同的业务场景。**
retrofit:
   # 连接池配置
   pool:
      # test1连接池配置
      test1:
         # 最大空闲连接数
         max-idle-connections: 3
         # 连接保活时间(秒)
         keep-alive-second: 100

   # 是否禁用void返回值类型
   disable-void-return-type: false


   # 全局转换器工厂
   global-converter-factories:
      - com.github.lianjiatech.retrofit.spring.boot.core.BasicTypeConverterFactory
      - retrofit2.converter.jackson.JacksonConverterFactory
   # 全局调用适配器工厂
   global-call-adapter-factories:
      - com.github.lianjiatech.retrofit.spring.boot.core.BodyCallAdapterFactory
      - com.github.lianjiatech.retrofit.spring.boot.core.ResponseCallAdapterFactory

   # 日志打印配置
   log:
      # 启用日志打印
      enable: true
      # 日志打印拦截器
      logging-interceptor: com.github.lianjiatech.retrofit.spring.boot.interceptor.DefaultLoggingInterceptor
      # 全局日志打印级别
      global-log-level: info
      # 全局日志打印策略
      global-log-strategy: body


   # 重试配置
   retry:
      # 是否启用全局重试
      enable-global-retry: true
      # 全局重试间隔时间
      global-interval-ms: 1
      # 全局最大重试次数
      global-max-retries: 1
      # 全局重试规则
      global-retry-rules:
         - response_status_not_2xx
         - occur_io_exception
      # 重试拦截器
      retry-interceptor: com.github.lianjiatech.retrofit.spring.boot.retry.DefaultRetryInterceptor

   # 熔断降级配置
   degrade:
      # 是否启用熔断降级
      enable: true
      # 熔断降级实现方式
      degrade-type: sentinel
      # 熔断资源名称解析器
      resource-name-parser: com.github.lianjiatech.retrofit.spring.boot.degrade.DefaultResourceNameParser
   # 全局连接超时时间
   global-connect-timeout-ms: 5000
   # 全局读取超时时间
   global-read-timeout-ms: 5000
   # 全局写入超时时间
   global-write-timeout-ms: 5000
   # 全局完整调用超时时间
   global-call-timeout-ms: 0
高级功能
超时时间设置
retrofit-spring-boot-starter支持两种方式设置超时时间,一种是全局超时时间设置,另一种是注解超时时间设置。
全局超时时间设置
在 yaml 文件中可配置全局超时时间,对所有接口生效 。
retrofit:
   # 全局连接超时时间
   global-connect-timeout-ms: 5000
   # 全局读取超时时间
   global-read-timeout-ms: 5000
   # 全局写入超时时间
   global-write-timeout-ms: 5000
   # 全局完整调用超时时间
   global-call-timeout-ms: 0
注解式超时时间设置
在@RetrofitClient注解上可以设置超时时间,针对当前接口生效,优先级更高。具体字段有connectTimeoutMs、readTimeoutMs、writeTimeoutMs、callTimeoutMs等。
注解式拦截器
很多时候,我们希望某个接口下的某些 http 请求执行统一的拦截处理逻辑。为了支持这个功能,retrofit-spring-boot-starter提供了注解式拦截器 ,做到了基于 url 路径的匹配拦截 。使用的步骤主要分为 2 步:
继承
BasePathMatchInterceptor编写拦截处理器;接口上使用
@Intercept进行标注。如需配置多个拦截器,在接口上标注多个@Intercept注解即可!
下面以给指定请求的 url 后面拼接 timestamp 时间戳为例,介绍下如何使用注解式拦截器。
继承BasePathMatchInterceptor编写拦截处理器
@Component
public class TimeStampInterceptor extends BasePathMatchInterceptor {

    @Override
    public Response doIntercept(Chain chain) throws IOException {
        Request request = chain.request();
        HttpUrl url = request.url();
        long timestamp = System.currentTimeMillis();
        HttpUrl newUrl = url.newBuilder()
                .addQueryParameter("timestamp", String.valueOf(timestamp))
                .build();
        Request newRequest = request.newBuilder()
                .url(newUrl)
                .build();
        return chain.proceed(newRequest);
    }
}接口上使用@Intercept进行标注
@RetrofitClient(baseUrl = "${test.baseUrl}")
@Intercept(handler = TimeStampInterceptor.class, include = {"/api/**"}, exclude = "/api/test/savePerson")
public interface HttpApi {

    @GET("person")
    Result<Person> getPerson(@Query("id") Long id);

    @POST("savePerson")
    Result<Person> savePerson(@Body Person person);
}上面的@Intercept配置表示:拦截HttpApi接口下/api/**路径下(排除/api/test/savePerson)的请求,拦截处理器使用TimeStampInterceptor。
扩展注解式拦截器
有的时候,我们需要在拦截注解 动态传入一些参数,然后再执行拦截的时候需要使用这个参数。这种时候,我们可以扩展实现自定义拦截注解 。自定义拦截注解必须使用@InterceptMark标记,并且注解中必须包括include()、exclude()、handler()属性信息 。使用的步骤主要分为 3 步:
自定义拦截注解
继承
BasePathMatchInterceptor编写拦截处理器接口上使用自定义拦截注解;
例如我们需要在请求头里面动态加入accessKeyId、accessKeySecret签名信息才能正常发起 http 请求 ,这个时候可以自定义一个加签拦截器注解@Sign来实现 。下面以自定义@Sign拦截注解为例进行说明。
自定义@Sign注解
@Retention(RetentionPolicy.RUNTIME)
@Target(ElementType.TYPE)
@Documented
@InterceptMark
public @interface Sign {
    /**
     * 密钥key
     * 支持占位符形式配置。
     *
     * @return
     */
    String accessKeyId();

    /**
     * 密钥
     * 支持占位符形式配置。
     *
     * @return
     */
    String accessKeySecret();

    /**
     * 拦截器匹配路径
     *
     * @return
     */
    String[] include() default {"/**"};

    /**
     * 拦截器排除匹配,排除指定路径拦截
     *
     * @return
     */
    String[] exclude() default {};

    /**
     * 处理该注解的拦截器类
     * 优先从spring容器获取对应的Bean,如果获取不到,则使用反射创建一个!
     *
     * @return
     */
    Class<? extends BasePathMatchInterceptor> handler() default SignInterceptor.class;
}扩展自定义拦截注解有以下 2 点需要注意:
自定义拦截注解必须使用@InterceptMark标记。注解中必须包括
include()、exclude()、handler()属性信息。
实现SignInterceptor
@Component
public class SignInterceptor extends BasePathMatchInterceptor {

    private String accessKeyId;

    private String accessKeySecret;

    public void setAccessKeyId(String accessKeyId) {
        this.accessKeyId = accessKeyId;
    }

    public void setAccessKeySecret(String accessKeySecret) {
        this.accessKeySecret = accessKeySecret;
    }

    @Override
    public Response doIntercept(Chain chain) throws IOException {
        Request request = chain.request();
        Request newReq = request.newBuilder()
                .addHeader("accessKeyId", accessKeyId)
                .addHeader("accessKeySecret", accessKeySecret)
                .build();
        return chain.proceed(newReq);
    }
}上述accessKeyId和accessKeySecret字段值会依据@Sign注解的accessKeyId()和accessKeySecret()值自动注入,如果@Sign指定的是占位符形式的字符串,则会取配置属性值进行注入 。另外,accessKeyId和accessKeySecret字段必须提供setter方法 。
接口上使用@Sign
@RetrofitClient(baseUrl = "${test.baseUrl}")
@Sign(accessKeyId = "${test.accessKeyId}", accessKeySecret = "${test.accessKeySecret}", exclude = {"/api/test/person"})
public interface HttpApi {

    @GET("person")
    Result<Person> getPerson(@Query("id") Long id);

    @POST("savePerson")
    Result<Person> savePerson(@Body Person person);
}
这样就能在指定 url 的请求上,自动加上签名信息了。
连接池管理
默认情况下,所有通过Retrofit发送的 http 请求都会使用max-idle-connections=5 keep-alive-second=300的默认连接池。当然,我们也可以在配置文件中配置多个自定义的连接池,然后通过@RetrofitClient的poolName属性来指定使用。比如我们要让某个接口下的请求全部使用poolName=test1的连接池,代码实现如下:
配置连接池。
retrofit:
  # 连接池配置
  pool:
    # test1连接池配置
    test1:
      # 最大空闲连接数
      max-idle-connections: 3
      # 连接保活时间(秒)
      keep-alive-second: 100
通过
@RetrofitClient的poolName属性来指定使用的连接池。@RetrofitClient(baseUrl = "${test.baseUrl}", poolName="test1") public interface HttpApi { @GET("person") Result<Person> getPerson(@Query("id") Long id); }
日志打印
很多情况下,我们希望将 http 请求日志记录下来。本框架支持以下全局日志打印配置:
retrofit:
  # 日志打印配置
  log:
    # 启用日志打印
    enable: true
    # 日志打印拦截器
    logging-interceptor: com.github.lianjiatech.retrofit.spring.boot.interceptor.DefaultLoggingInterceptor
    # 全局日志打印级别
    global-log-level: info
    # 全局日志打印策略
    global-log-strategy: body
4 种日志打印策略含义如下 :
NONE:No logs.BASIC:Logs request and response lines.HEADERS:Logs request and response lines and their respective headers.BODY:Logs request and response lines and their respective headers and bodies (if present).
针对每个接口,如果需要单独定制的话,可以设置@RetrofitClient的enableLog、logLevel和logStrategy。
请求重试
retrofit-spring-boot-starter支持支持全局重试和声明式重试。
全局重试
全局重试默认关闭,可以通过配置retrofit.retry.enable-global-retry=ture开启。开启之后,所有HTTP请求都会按照配置参数自动重试,详细配置项如下:
retrofit:
  # 重试配置
  retry:
    # 是否启用全局重试
    enable-global-retry: true
    # 全局重试间隔时间
    global-interval-ms: 20
    # 全局最大重试次数
    global-max-retries: 10
    # 全局重试规则
    global-retry-rules:
      - response_status_not_2xx
    # 重试拦截器
    retry-interceptor: com.github.lianjiatech.retrofit.spring.boot.retry.DefaultRetryInterceptor
重试规则支持三种配置 :
RESPONSE_STATUS_NOT_2XX:响应状态码不是2xx时执行重试;OCCUR_IO_EXCEPTION:发生 IO 异常时执行重试;OCCUR_EXCEPTION:发生任意异常时执行重试;
声明式重试
如果只需要在指定某些请求才执行重试,可以使用声明式重试!具体就是在接口或者方法上声明@Retry注解。
错误解码器
在HTTP发生请求错误(包括发生异常或者响应数据不符合预期)的时候,错误解码器可将HTTP相关信息解码到自定义异常中。你可以在@RetrofitClient注解的errorDecoder()指定当前接口的错误解码器,自定义错误解码器需要实现ErrorDecoder接口:
/**
 * 错误解码器。ErrorDecoder.
 * 当请求发生异常或者收到无效响应结果的时候,将HTTP相关信息解码到异常中,无效响应由业务自己判断
 *
 * When an exception occurs in the request or an invalid response result is received, the HTTP related information is decoded into the exception,
 * and the invalid response is determined by the business itself.
 *
 * @author 陈添明
 */
public interface ErrorDecoder {

    /**
     * 当无效响应的时候,将HTTP信息解码到异常中,无效响应由业务自行判断。
     * When the response is invalid, decode the HTTP information into the exception, invalid response is determined by business.
     *
     * @param request  request
     * @param response response
     * @return If it returns null, the processing is ignored and the processing continues with the original response.
     */
    default RuntimeException invalidRespDecode(Request request, Response response) {
        if (!response.isSuccessful()) {
            throw RetrofitException.errorStatus(request, response);
        }
        return null;
    }


    /**
     * 当请求发生IO异常时,将HTTP信息解码到异常中。
     * When an IO exception occurs in the request, the HTTP information is decoded into the exception.
     *
     * @param request request
     * @param cause   IOException
     * @return RuntimeException
     */
    default RuntimeException ioExceptionDecode(Request request, IOException cause) {
        return RetrofitException.errorExecuting(request, cause);
    }

    /**
     * 当请求发生除IO异常之外的其它异常时,将HTTP信息解码到异常中。
     * When the request has an exception other than the IO exception, the HTTP information is decoded into the exception.
     *
     * @param request request
     * @param cause   Exception
     * @return RuntimeException
     */
    default RuntimeException exceptionDecode(Request request, Exception cause) {
        return RetrofitException.errorUnknown(request, cause);
    }

}
全局拦截器
全局应用拦截器
如果我们需要对整个系统的的 http 请求执行统一的拦截处理,可以自定义实现全局拦截器BaseGlobalInterceptor, 并配置成spring容器中的bean!例如我们需要在整个系统发起的 http 请求,都带上来源信息。
@Component
public class SourceInterceptor extends BaseGlobalInterceptor {
    @Override
    public Response doIntercept(Chain chain) throws IOException {
        Request request = chain.request();
        Request newReq = request.newBuilder()
                .addHeader("source", "test")
                .build();
        return chain.proceed(newReq);
    }
}
全局网络拦截器
只需要实现NetworkInterceptor接口 并配置成spring容器中的bean就支持自动织入全局网络拦截器。
熔断降级
retrofit-spring-boot-starter支持熔断降级功能,底层基于Sentinel实现。具体来说,支持了熔断资源自发现 和注解式降级规则配置 。如需使用熔断降级,只需要进行以下操作即可:
1. 开启熔断降级功能
默认情况下,熔断降级功能是关闭的,需要设置相应的配置项来开启熔断降级功能 :
retrofit:
  # 熔断降级配置
  degrade:
    # 是否启用熔断降级
    enable: true
    # 熔断降级实现方式
    degrade-type: sentinel
    # 熔断资源名称解析器
resource-name-parser: com.github.lianjiatech.retrofit.spring.boot.degrade.DefaultResourceNameParser资源名称解析器用于实现用户自定义资源名称,默认配置是DefaultResourceNameParser,对应的资源名称格式为HTTP_OUT:GET:http://localhost:8080/api/degrade/test。用户可以继承BaseResourceNameParser类实现自己的资源名称解析器。
另外,由于熔断降级功能是可选的,因此启用熔断降级需要用户自行引入 Sentinel 依赖 :
<dependency>
    <groupId>com.alibaba.csp</groupId>
    <artifactId>sentinel-core</artifactId>
    <version>1.6.3</version>
</dependency>
2. 配置降级规则(可选)
retrofit-spring-boot-starter支持注解式配置降级规则,通过@Degrade注解来配置降级规则 。@Degrade注解可以配置在接口或者方法上,配置在方法上的优先级更高。
@Retention(RetentionPolicy.RUNTIME)
@Target({ElementType.METHOD, ElementType.TYPE})
@Documented
public @interface Degrade {

    /**
     * RT threshold or exception ratio threshold count.
     */
    double count();

    /**
     * Degrade recover timeout (in seconds) when degradation occurs.
     */
    int timeWindow() default 5;

    /**
     * Degrade strategy (0: average RT, 1: exception ratio).
     */
    DegradeStrategy degradeStrategy() default DegradeStrategy.AVERAGE_RT;
}
如果应用项目已支持通过配置中心配置降级规则,可忽略注解式配置方式 。
3. @RetrofitClient 设置 fallback 或者 fallbackFactory (可选)
如果@RetrofitClient不设置fallback或者fallbackFactory,当触发熔断时,会直接抛出RetrofitBlockException异常。用户可以通过设置fallback或者fallbackFactory来定制熔断时的方法返回值 。fallback类必须是当前接口的实现类,fallbackFactory必须是FallbackFactory<T>实现类,泛型参数类型为当前接口类型。另外,fallback和fallbackFactory实例必须配置成Spring容器的Bean。
fallbackFactory相对于fallback,主要差别在于能够感知每次熔断的异常原因(cause) 。参考示例如下:
@Slf4j
@Service
public class HttpDegradeFallback implements HttpDegradeApi {

    @Override
    public Result<Integer> test() {
        Result<Integer> fallback = new Result<>();
        fallback.setCode(100)
                .setMsg("fallback")
                .setBody(1000000);
        return fallback;
    }
}
@Slf4j
@Service
public class HttpDegradeFallbackFactory implements FallbackFactory<HttpDegradeApi> {

    /**
     * Returns an instance of the fallback appropriate for the given cause
     *
     * @param cause fallback cause
     * @return 实现了retrofit接口的实例。an instance that implements the retrofit interface.
     */
    @Override
    public HttpDegradeApi create(Throwable cause) {
        log.error("触发熔断了! ", cause.getMessage(), cause);
        return new HttpDegradeApi() {
            @Override
            public Result<Integer> test() {
                Result<Integer> fallback = new Result<>();
                fallback.setCode(100)
                        .setMsg("fallback")
                        .setBody(1000000);
                return fallback;
            }
    }
}
微服务之间的 HTTP 调用
为了能够使用微服务调用,需要进行如下配置:
配置ServiceInstanceChooser为Spring容器Bean
用户可以自行实现ServiceInstanceChooser接口,完成服务实例的选取逻辑,并将其配置成Spring容器的Bean。对于Spring Cloud应用,retrofit-spring-boot-starter提供了SpringCloudServiceInstanceChooser实现,用户只需将其配置成Spring的Bean即可。
@Bean
@Autowired
public ServiceInstanceChooser serviceInstanceChooser(LoadBalancerClient loadBalancerClient) {
    return new SpringCloudServiceInstanceChooser(loadBalancerClient);
}使用@Retrofit的serviceId和path属性,可以实现微服务之间的 HTTP 调用
@RetrofitClient(serviceId = "${jy-helicarrier-api.serviceId}", path = "/m/count", errorDecoder = HelicarrierErrorDecoder.class)
@Retry
public interface ApiCountService {

}
自定义注入 OkHttpClient
通常情况下,通过@RetrofitClient注解属性动态创建OkHttpClient对象能够满足大部分使用场景。但是在某些情况下,用户可能需要自定义OkHttpClient,这个时候,可以在接口上定义返回类型是OkHttpClient.Builder的静态方法来实现。代码示例如下:
@RetrofitClient(baseUrl = "http://ke.com")
public interface HttpApi3 {

   @OkHttpClientBuilder
   static OkHttpClient.Builder okhttpClientBuilder() {
      return new OkHttpClient.Builder()
              .connectTimeout(1, TimeUnit.SECONDS)
              .readTimeout(1, TimeUnit.SECONDS)
              .writeTimeout(1, TimeUnit.SECONDS);

   }

   @GET
   Result<Person> getPerson(@Url String url, @Query("id") Long id);
}
方法必须使用
@OkHttpClientBuilder注解标记!
调用适配器和数据转码器
调用适配器
Retrofit可以通过调用适配器CallAdapterFactory将Call<T>对象适配成接口方法的返回值类型。retrofit-spring-boot-starter扩展 2 种CallAdapterFactory实现:
BodyCallAdapterFactory
默认启用,可通过配置
retrofit.enable-body-call-adapter=false关闭
同步执行 http 请求,将响应体内容适配成接口方法的返回值类型实例。
除了
Retrofit.Call<T>、Retrofit.Response<T>、java.util.concurrent.CompletableFuture<T>之外,其它返回类型都可以使用该适配器。
ResponseCallAdapterFactory
默认启用,可通过配置
retrofit.enable-response-call-adapter=false关闭
同步执行 http 请求,将响应体内容适配成
Retrofit.Response<T>返回。如果方法的返回值类型为
Retrofit.Response<T>,则可以使用该适配器。
Retrofit 自动根据方法返回值类型选用对应的CallAdapterFactory执行适配处理!加上 Retrofit 默认的CallAdapterFactory,可支持多种形式的方法返回值类型:
基础类型(
String/Long/Integer/Boolean/Float/Double):直接将响应内容转换为上述基础类型。其它任意 POJO 类型:将响应体内容适配成一个对应的 POJO 类型对象返回,如果 http 状态码不是 2xx,直接抛错!(推荐)
CompletableFuture<T>: 将响应体内容适配成CompletableFuture<T>对象返回!(异步调用推荐)Void: 不关注返回类型可以使用Void。如果 http 状态码不是 2xx,直接抛错!(不关注返回值)Response<T>: 将响应内容适配成Response<T>对象返回!(不推荐)Call<T>: 不执行适配处理,直接返回Call<T>对象!(不推荐)
/**
     * 其他任意Java类型
     * 将响应体内容适配成一个对应的Java类型对象返回,如果http状态码不是2xx,直接抛错!
     * @param id
     * @return
     */
    @GET("person")
    Result<Person> getPerson(@Query("id") Long id);

    /**
     *  CompletableFuture<T>
     *  将响应体内容适配成CompletableFuture<T>对象返回
     * @param id
     * @return
     */
    @GET("person")
    CompletableFuture<Result<Person>> getPersonCompletableFuture(@Query("id") Long id);

    /**
     * Void
     * 不关注返回类型可以使用Void。如果http状态码不是2xx,直接抛错!
     * @param id
     * @return
     */
    @GET("person")
    Void getPersonVoid(@Query("id") Long id);

    /**
     *  Response<T>
     *  将响应内容适配成Response<T>对象返回
     * @param id
     * @return
     */
    @GET("person")
    Response<Result<Person>> getPersonResponse(@Query("id") Long id);

    /**
     * Call<T>
     * 不执行适配处理,直接返回Call<T>对象
     * @param id
     * @return
     */
    @GET("person")
Call<Result<Person>> getPersonCall(@Query("id") Long id);我们也可以通过继承CallAdapter.Factory扩展实现自己的CallAdapter !
retrofit-spring-boot-starter支持通过retrofit.global-call-adapter-factories配置全局调用适配器工厂,工厂实例优先从 Spring 容器获取,如果没有获取到,则反射创建。默认的全局调用适配器工厂是[BodyCallAdapterFactory, ResponseCallAdapterFactory]!
retrofit:
  # 全局调用适配器工厂
  global-call-adapter-factories:
    - com.github.lianjiatech.retrofit.spring.boot.core.BodyCallAdapterFactory
    - com.github.lianjiatech.retrofit.spring.boot.core.ResponseCallAdapterFactory
针对每个 Java 接口,还可以通过@RetrofitClient注解的callAdapterFactories()指定当前接口采用的CallAdapter.Factory,指定的工厂实例依然优先从 Spring 容器获取。
注意:如果CallAdapter.Factory没有public的无参构造器,请手动将其配置成Spring容器的Bean对象 !
数据转码器
Retrofit使用Converter将@Body注解标注的对象转换成请求体,将响应体数据转换成一个Java对象,可以选用以下几种Converter:
Gson: com.squareup.Retrofit:converter-gson
Jackson: com.squareup.Retrofit:converter-jackson
Moshi: com.squareup.Retrofit:converter-moshi
Protobuf: com.squareup.Retrofit:converter-protobuf
Wire: com.squareup.Retrofit:converter-wire
Simple XML: com.squareup.Retrofit:converter-simplexml
JAXB: com.squareup.retrofit2:converter-jaxb
fastJson:com.alibaba.fastjson.support.retrofit.Retrofit2ConverterFactory
retrofit-spring-boot-starter支持通过retrofit.global-converter-factories配置全局数据转换器工厂,转换器工厂实例优先从 Spring 容器获取,如果没有获取到,则反射创建。默认的全局数据转换器工厂是retrofit2.converter.jackson.JacksonConverterFactory,你可以直接通过spring.jackson.*配置jackson序列化规则,配置可参考Customize the Jackson ObjectMapper!
retrofit:
  # 全局转换器工厂
   global-converter-factories:
      - retrofit2.converter.jackson.JacksonConverterFactory
针对每个 Java 接口,还可以通过@RetrofitClient注解的converterFactories()指定当前接口采用的Converter.Factory,指定的转换器工厂实例依然优先从 Spring 容器获取。
注意:如果Converter.Factory没有public的无参构造器,请手动将其配置成Spring容器的Bean对象 !
其他功能示例
form 参数接口调用
@FormUrlEncoded
@POST("token/verify")
 Object tokenVerify(@Field("source") String source,@Field("signature") String signature,@Field("token") String token);


@FormUrlEncoded
@POST("message")
CompletableFuture<Object> sendMessage(@FieldMap Map<String, Object> param);
上传文件
构建 MultipartBody.Part
// 对文件名使用URLEncoder进行编码
public ResponseEntity importTerminology(MultipartFile file){
        String fileName=URLEncoder.encode(Objects.requireNonNull(file.getOriginalFilename()),"utf-8");
        okhttp3.RequestBody requestBody=okhttp3.RequestBody.create(MediaType.parse("multipart/form-data"),file.getBytes());
        MultipartBody.Part part=MultipartBody.Part.createFormData("file",fileName,requestBody);
        apiService.upload(part);
        return ok().build();
        }
http 上传接口
@POST("upload")
@Multipart
Void upload(@Part MultipartBody.Part file);
下载文件
http 下载接口
@RetrofitClient(baseUrl = "https://img.ljcdn.com/hc-picture/")
public interface DownloadApi {

    @GET("{fileKey}")
    Response<ResponseBody> download(@Path("fileKey") String fileKey);
}
http 下载使用
@SpringBootTest(classes = RetrofitTestApplication.class)
@RunWith(SpringRunner.class)
public class DownloadTest {
    @Autowired
    DownloadApi downLoadApi;

    @Test
    public void download() throws Exception {
        String fileKey = "6302d742-ebc8-4649-95cf-62ccf57a1add";
        Response<ResponseBody> response = downLoadApi.download(fileKey);
        ResponseBody responseBody = response.body();
        // 二进制流
        InputStream is = responseBody.byteStream();

        // 具体如何处理二进制流,由业务自行控制。这里以写入文件为例
        File tempDirectory = new File("temp");
        if (!tempDirectory.exists()) {
            tempDirectory.mkdir();
        }
        File file = new File(tempDirectory, UUID.randomUUID().toString());
        if (!file.exists()) {
            file.createNewFile();
        }
        FileOutputStream fos = new FileOutputStream(file);
        byte[] b = new byte[1024];
        int length;
        while ((length = is.read(b)) > 0) {
            fos.write(b, 0, length);
        }
        is.close();
        fos.close();
    }
}
动态 URL
使用@url注解可实现动态 URL。
注意:@url必须放在方法参数的第一个位置。原有定义@GET、@POST等注解上,不需要定义端点路径 !
@GET
 Map<String, Object> test3(@Url String url,@Query("name") String name);
DELETE 请求传请求体
@HTTP(method = "DELETE", path = "/user/delete", hasBody = true)GET 请求传请求体
okhttp3 自身不支持GET请求带请求体 。源码如下:
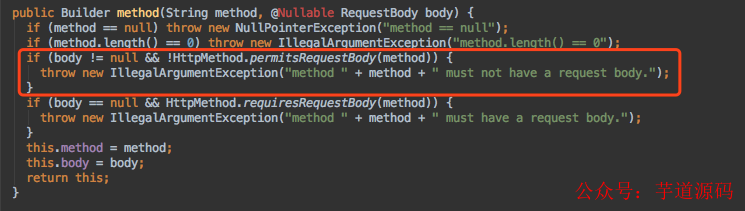

作者给出了具体原因,可以参考这个 issue:https://github.com/square/okhttp/issues/3154
- END -欢迎加入我的知识星球,一起探讨架构,交流源码。加入方式,长按下方二维码噢:

已在知识星球更新源码解析如下:

最近更新《芋道 SpringBoot 2.X 入门》系列,已经 101 余篇,覆盖了 MyBatis、Redis、MongoDB、ES、分库分表、读写分离、SpringMVC、Webflux、权限、WebSocket、Dubbo、RabbitMQ、RocketMQ、Kafka、性能测试等等内容。
提供近 3W 行代码的 SpringBoot 示例,以及超 4W 行代码的电商微服务项目。
获取方式:点“在看”,关注公众号并回复 666 领取,更多内容陆续奉上。
文章有帮助的话,在看,转发吧。
谢谢支持哟 (*^__^*)


 345
345


 被折叠的 条评论
为什么被折叠?
被折叠的 条评论
为什么被折叠?
 到【灌水乐园】发言


