


点击上方“芋道源码”,选择“设为星标”
管她前浪,还是后浪?
能浪的浪,才是好浪!
每天 10:33 更新文章,每天掉亿点点头发...
源码精品专栏

我们在日常开发中,经常会需要远程调用其他服务提供的接口,比较常用的 HTTP 远程代理框架有OpenFeign、Retrofit以及一些第三方封装工具类,例如Hutool提供的HttpUtil。
11月24日,Spring Boot 3正式发布,Spring官方已经自身支持使用声明式服务调用的方式来调用远程接口。

虽然类似的远程调用框架如OpenFeign和Retrofit仍然可以使用,但HttpServiceProxyFactory增加了对 Spring 框架的原生支持。如果Spring本身可以做到远程调用的话,这些大量的第三方库应该很快会被原生方法取代,我们今天来了解一下这个新特征。
声明式 Http 接口
声明性 HTTP 接口可以让你像定义Java接口那样定义HTTP服务,用法和你平时写Controller中方法完全一致。
引入
声明性 HTTP 接口功能是spring-web依赖项的一部分,使用前必须引入如下依赖包:
<dependency>
  <groupId>org.springframework.boot</groupId>
  <artifactId>spring-boot-starter-web</artifactId>
</dependency>
<!-- For reactive support -->
<dependency>
  <groupId>org.springframework.boot</groupId>
  <artifactId>spring-boot-starter-webflux</artifactId>
</dependency>
创建 HTTP 服务接口
在 Spring 中,HTTP 服务接口是一个带有@HttpExchange方法的 Java 接口。注释方法被视为 HTTP 端点,细节通过注释属性和输入方法参数类型静态定义。
支持的注解类型
@HttpExchange :是用于指定
HTTP端点的通用注释。在接口级别使用时,它适用于所有方法。@GetExchange :为
HTTP GET请求指定@HttpExchange。@PostExchange :为
HTTP POST请求指定@HttpExchange。@PutExchange :为
HTTP PUT请求指定@HttpExchange。@DeleteExchange :为
HTTP DELETE请求指定@HttpExchange。@PatchExchange :为
HTTP PATCH请求指定@HttpExchange。
方法参数
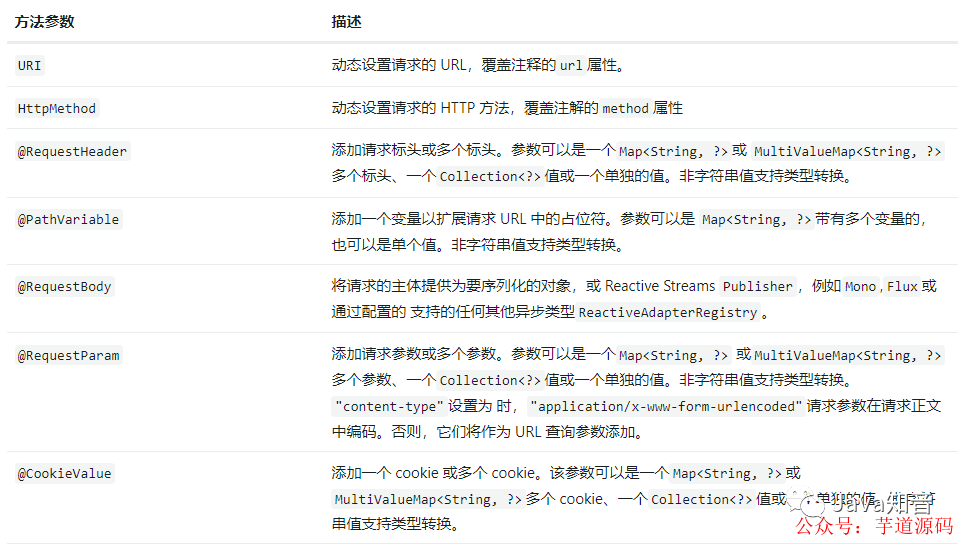
返回值
声明性 HTTP 接口支持以下返回值:

使用示例
@PutExchange
void update(@PathVariable Long id, @RequestBody User user);
完整使用案例
我们以一个简单的用户信息请求为例
0、构建HttpServiceProxyFactory:
HttpServiceProxyFactory是一个从 HTTP 服务接口创建客户端代理的工厂类。使用HttpServiceProxyFactory.builder(client).build()方法来获取代理 bean 的实例。
import com.fasterxml.jackson.databind.ObjectMapper;
import com.howtodoinjava.app.web.UserClient;
import lombok.SneakyThrows;
import org.springframework.context.annotation.Bean;
import org.springframework.context.annotation.Configuration;
import org.springframework.web.reactive.function.client.WebClient;
import org.springframework.web.reactive.function.client.support.WebClientAdapter;
import org.springframework.web.service.invoker.HttpServiceProxyFactory;
@Configuration
public class WebConfig {
  @Bean
  WebClient webClient(ObjectMapper objectMapper) {
    return WebClient.builder()
        .baseUrl("https://jsonplaceholder.typicode.com/")
        .build();
  }
  @SneakyThrows
  @Bean
  UserClient postClient(WebClient webClient) {
    HttpServiceProxyFactory httpServiceProxyFactory =
        HttpServiceProxyFactory.builder(WebClientAdapter.forClient(webClient))
            .build();
    return httpServiceProxyFactory.createClient(UserClient.class);
  }
}
1、定义一个简单的用户信息实体类:
public class User {

    private int id;

    private String username;

    private String password;

   // 省略

}
2、请求接口:
import com.howtodoinjava.app.model.User;
import org.springframework.http.ResponseEntity;
import org.springframework.web.bind.annotation.PathVariable;
import org.springframework.web.bind.annotation.RequestBody;
import org.springframework.web.service.annotation.DeleteExchange;
import org.springframework.web.service.annotation.GetExchange;
import org.springframework.web.service.annotation.HttpExchange;
import org.springframework.web.service.annotation.PostExchange;
import org.springframework.web.service.annotation.PutExchange;
import reactor.core.publisher.Flux;
import reactor.core.publisher.Mono;
@HttpExchange(url = "/users", accept = "application/json", contentType = "application/json")
public interface UserClient {
  @GetExchange("/")
  Flux<User> getAll();
  @GetExchange("/{id}")
  Mono<User> getById(@PathVariable("id") Long id);
  @PostExchange("/")
  Mono<ResponseEntity<Void>> save(@RequestBody User user);
  @PutExchange("/{id}")
  Mono<ResponseEntity<Void>> update(@PathVariable Long id, @RequestBody User user);
  @DeleteExchange("/{id}")
  Mono<ResponseEntity<Void>> delete(@PathVariable Long id);
}3、将UserClient bean 注入应用程序类并调用方法来获取 API 响应:
@Autowired
UserClient userClient;
//Get All Users
userClient.getAll().subscribe(
    data -> log.info("User: {}", data)
);
//Get User By Id
userClient.getById(1L).subscribe(
    data -> log.info("User: {}", data)
);
//Create a New User
userClient.save(new User(null, "Lokesh", "lokesh", "admin@email.com"))
    .subscribe(
        data -> log.info("User: {}", data)
    );
//Delete User By Id
userClient.delete(1L).subscribe(
    data -> log.info("User: {}", data)
);
完工,不需要定义方法实现就能进行远程HTTP调用,非常方便!
欢迎加入我的知识星球,一起探讨架构,交流源码。加入方式,长按下方二维码噢:

已在知识星球更新源码解析如下:


最近更新《芋道 SpringBoot 2.X 入门》系列,已经 101 余篇,覆盖了 MyBatis、Redis、MongoDB、ES、分库分表、读写分离、SpringMVC、Webflux、权限、WebSocket、Dubbo、RabbitMQ、RocketMQ、Kafka、性能测试等等内容。
提供近 3W 行代码的 SpringBoot 示例,以及超 4W 行代码的电商微服务项目。
获取方式:点“在看”,关注公众号并回复 666 领取,更多内容陆续奉上。
文章有帮助的话,在看,转发吧。
谢谢支持哟 (*^__^*)


 1127
1127


 被折叠的 条评论
为什么被折叠?
被折叠的 条评论
为什么被折叠?
 到【灌水乐园】发言


