


 本文详细介绍了LNMP(Linux、Nginx、MySQL、PHP)环境的搭建过程,包括Nginx和PHP的配置,以及数据库的安装和权限设置。此外,还展示了如何在Linux环境下创建和启动Web服务,以及如何解决405和413错误。最后,文章提到了数据库的拆分和扩展Web服务器以提高系统性能和用户体验。
什么是LNMP?
LNMP是一套技术的组合,L=Linux、N=Nginx、M=MySQL、P=PHP、(ES、redis、kafka、zookeeper…)
为何要用LNMP?
具有成本低廉、部署灵活、快速开发、安全稳定等特点,是 Web 网络应用和环境的优秀组合。若是服务器配置比较低的个人网站,当然首选 LNMP 架构。
如何用LNMP?
LNMP的工作方式
首先Nginx服务是不能处理动态请求,那么当用户发起动态请求时, Nginx又是如何进行处理的。
1.静态请求:请求静态文件或者html页面,服务器上存在的html文件
1)静态文件:文件上传到服务器,永远不会改变的文件就是静态文件
2)html就是一个标准的静态文件
2.动态请求:请求的是动态内容,带参数的请求
1)动态页面不存在于服务器上,可能是取数据库或者redis等地方取值拼凑成的页面
当用户发起http请求,请求会被Nginx处理,如果是静态资源请求Nginx则直接返回,如果是动态请求Nginx则通过fastcgi协议转交给后端的PHP程序处理,具体如下图所示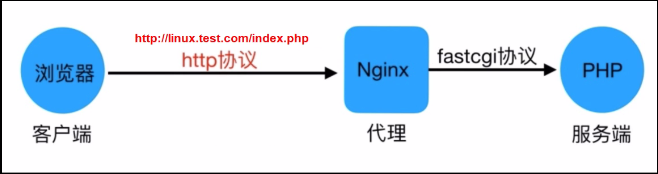
访问流程
1.浏览器输入域名,浏览器会拿着域名取DNS服务器解析
2.DNS服务器会将域名解析成ip
3.浏览器会去与IP对应的服务器建立tcp/ip连接
4.连接建立完成后,后向服务器发请求,请求nginx
5.nginx会判断请求是动态的还是静态的
#静态请求
location .jpg$ {
root /code
}
#动态请求
location .php$ {
fastcgi_pass 127.0.0.1:9000;
}
6.如果是静态请求,nginx去code目录获取,直接返回
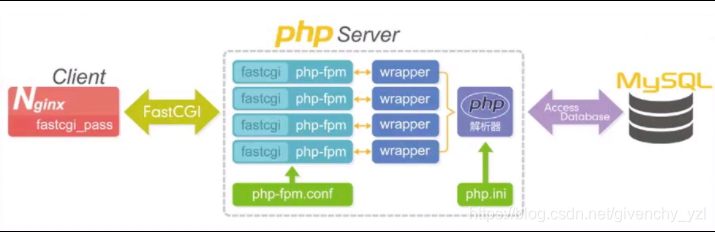
7.如果是动态请求,nginx通过fastcgi协议连接PHP服务的PHP-fpm管理进程
8.PHP-FPM管理进程会下发工作给wrapper工作进程
9.wrapper工作进程判断php内容是否可以直接返回内容;
10.如果只是php内容,wrapper工作进程直接解析,并返回结果;
11.如果还需要访问数据库,则wrapper会去请求数据库获取数据,再返回数据。
12.数据流转过程
1)请求:浏览器 ->负载均衡 ->nginx ->php-fpm ->wrapper ->mysql
2) 响应:mysql -> wrapper -> php-fpm -> nginx -> 负载均衡 ->浏览器。
LNP搭建交作业页面
1.安装nginx
1)配置官方源
[root@web01 ~]# vim /etc/yum.repos.d/nginx.repo
[nginx]
name=nginx repo
baseurl=http://nginx.org/packages/centos/7/$basearch/
gpgcheck=0
enabled=1
module_hotfixes=true
2)安装nginx
[root@web01 ~]# yum install -y nginx
3)配置nginx
[root@web01 ~]# vim /etc/nginx/nginx.conf
user www;
4)创建用户
[root@web01 ~]# groupadd www -g 666
[root@web01 ~]# useradd www -u 666 -g 666 -s /sbin/nologin -M
5)启动nginx,并加入开机自启
[root@web01 ~]# systemctl start nginx
[root@web01 ~]# systemctl enable nginx
Created symlink from /etc/systemd/system/multi-user.target.wants/nginx.service to /usr/lib/systemd/system/nginx.service.
6)验证启动
[root@web01 ~]# ps -ef | grep nginx
root 23769 1 0 11:26 ? 00:00:00 nginx: master process /usr/sbin/nginx -c /etc/nginx/nginx.conf
www 23770 23769 0 11:26 ? 00:00:00 nginx: worker process
root 23816 8453 0 11:27 pts/1 00:00:00 grep --color=auto nginx
安装PHP
1.上传压缩包(yum缓存)
[root@web01 ~]# cd /opt/
[root@web01 tmp]# rz php.tar.gz
2.解压代码包
[root@web01 tmp]# tar xf php.tar.gz
3.安装本地rpm包
[root@web01 tmp]# yum localinstall -y *.rpm
4.配置php
[root@web01 ~]# vim /etc/php-fpm.d/www.conf
user = www
group = www
5.启动php
[root@web01 ~]# systemctl start php-fpm
[root@web01 ~]# systemctl enable php-fpm
Created symlink from /etc/systemd/system/multi-user.target.wants/php-fpm.service to /usr/lib/systemd/system/php-fpm.service.
安装mariadb(测试阶段也可不安)
1)安装
[root@web01 ~]# yum install -y mariadb-server
2)启动
[root@web01 ~]# systemctl start mariadb
[root@web01 ~]# systemctl enable mariadb
Created symlink from /etc/systemd/system/multi-user.target.wants/mariadb.service to /usr/lib/systemd/system/mariadb.service.
3)验证
[root@web01 ~]# mysql
Welcome to the MariaDB monitor. Commands end with ; or \g.
Your MariaDB connection id is 2
Server version: 5.5.64-MariaDB MariaDB Server
Copyright © 2000, 2018, Oracle, MariaDB Corporation Ab and others.
Type ‘help;’ or ‘\h’ for help. Type ‘\c’ to clear the current input statement.
MariaDB [(none)]> show databases;
±-------------------+
| Database |
±-------------------+
| information_schema |
| mysql |
| performance_schema |
| test |
±-------------------+
4 rows in set (0.00 sec)
MariaDB [(none)]>
搭建交作业页面
1.安装nginx
1)配置官方源
[root@web01 ~]# vim /etc/yum.repos.d/nginx.repo
[nginx]
name=nginx repo
baseurl=http://nginx.org/packages/centos/7/$basearch/
gpgcheck=0
enabled=1
module_hotfixes=true

2)安装nginx
[root@web01 ~]# yum install -y nginx

3)配置nginx
[root@web01 ~]# vim /etc/nginx/nginx.conf
user www;

4)创建用户
[root@web01 ~]# groupadd www -g 666
[root@web01 ~]# useradd www -u 666 -g 666 -s /sbin/nologin -M

5)启动nginx,并加入开机自启
[root@web01 ~]# systemctl start nginx
[root@web01 ~]# systemctl enable nginx
Created symlink from /etc/systemd/system/multi-user.target.wants/nginx.service to /usr/lib/systemd/system/nginx.service.

6)创建目录
[root@web01 ~]# mkdir -p /code/zuoye
[root@web01 ~]# cd /code/zuoye

7)上传作业代码
[root@web01 code]# rz kaoshi.zip
[root@web01 code]# unzip kaoshi.zip
[root@web01 code]# vim /code/zuoye/upload_file.php
$wen="/code/zuoye/upload";
[root@web01 ~]# chown -R www.www /code
2.安装php
1)上传压缩包(yum缓存)
[root@web01 ~]# cd /tmp/
[root@web01 tmp]# rz php.tar.gz

2)解压代码包
[root@web01 tmp]# tar xf php.tar.gz

3)安装本地rpm包
[root@web01 tmp]# yum localinstall -y *.rpm

4)配置php
[root@web01 ~]# vim /etc/php-fpm.d/www.conf
user = www
group = www

5)启动php
[root@web01 ~]# systemctl start php-fpm
[root@web01 ~]# systemctl enable php-fpm
Created symlink from /etc/systemd/system/multi-user.target.wants/php-fpm.service to /usr/lib/systemd/system/php-fpm.service.
3.安装mariadb
1)安装
[root@web01 ~]# yum install -y mariadb-server

2)启动
[root@web01 ~]# systemctl start mariadb
[root@web01 ~]# systemctl enable mariadb
Created symlink from /etc/systemd/system/multi-user.target.wants/mariadb.service to /usr/lib/systemd/system/mariadb.service.

3)验证
#连接数据库
[root@web01 ~]# mysql
Welcome to the MariaDB monitor.  Commands end with ; or \g.
Your MariaDB connection id is 2
Server version: 5.5.64-MariaDB MariaDB Server

Copyright (c) 2000, 2018, Oracle, MariaDB Corporation Ab and others.

Type 'help;' or '\h' for help. Type '\c' to clear the current input statement.

MariaDB [(none)]> show databases;
+--------------------+
| Database           |
+--------------------+
| information_schema |
| mysql              |
| performance_schema |
| test               |
+--------------------+
4 rows in set (0.00 sec)

MariaDB [(none)]>
4.关联NP
不关联会报错为405,因为nginx服务没有办法解析动态请求,没有跟php做关联
4.1)nginx关联php语法
#fastcgi_pass(nginx连接PHP的代理协议)
Syntax:	fastcgi_pass address;
Default:	—
Context:	location, if in location

#fastcgi_param (指定请求的问题)
Syntax:	fastcgi_param parameter value [if_not_empty];
Default:	—
Context:	http, server, location

#fastcgi_index(指定默认的index页面)
Syntax:	fastcgi_index name;
Default:	—
Context:	http, server, location
4.2)配置nginx关联php
[root@web01 ~]# vim /etc/nginx/conf.d/php.conf
server {
    #端口号
    listen 80;
    #域名
    server_name www.zuoye.com;
    #站点目录
    location / {
        root /code/zuoye;
        index index.html;
    }
    #关联php
    location ~* \.php$ {
        fastcgi_pass localhost:9000;
        #fastcgi_index index.php;
        fastcgi_param SCRIPT_FILENAME /code/zuoye/$fastcgi_script_name;
        include fastcgi_params;
    }
}
4.3)解决报错为413,因为上传文件过大,nginx默认上传文件大小为1m,超过1m就报413(413 Request Entity Too Large)
#nginx文件
vim /etc/nginx/nginx.conf

http {
    client_max_body_size 200m;
}

#PHP文件
vim /etc/php.ini
#找upload_max_filesize
upload_max_filesize = 200M
#找到post请求post_max_size
post_max_size = 200M
4.4)重启服务
systemctl restart php-fpm

nginx -t

systemctl restart nginx
5)上传测试
若出现403,查看selinux与防火墙是否关闭
成功
数据库的搭建:
#设置数据库密码
[root@localhost ~]# mysqladmin -uroot password ‘123’
#使用账号和密码连接数据库
[root@localhost ~]# mysql -uroot -p123
#测试PHP和Mariadb关联
1)编写PHP测试连接数据库的代码
[root@nginx ~]# cat /code/zuoye/test.php
<?php
    $servername = "localhost";
    $username = "root";
    $password = "123";

    // 创建连接
    $conn = mysqli_connect($servername, $username, $password);

    // 检测连接
    if (!$conn) {
        die("Connection failed: " . mysqli_connect_error());
    }
    echo "小哥哥,php可以连接MySQL...";
?>

<img style='width:100%;height:100%;' src=https://blog.driverzeng.com/zenglaoshi/php_mysql.png>
2)访问测试
http://www.zuoye.com/test.php
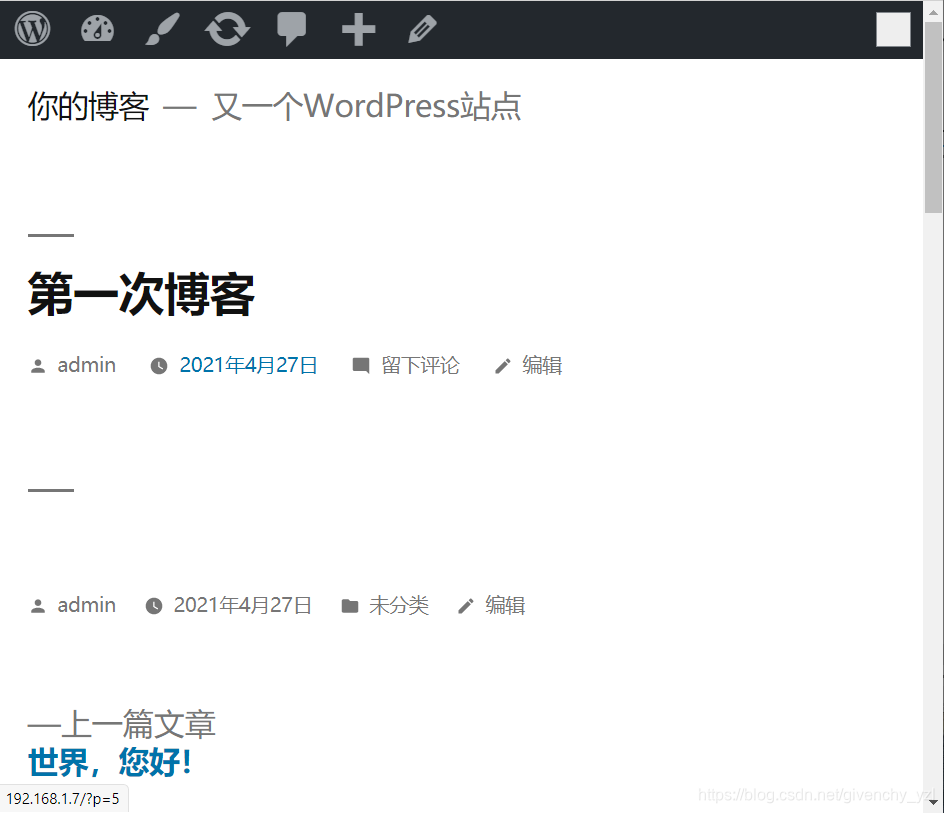
项目一、搭建Wordpress博客
1.上传代码压缩包
[root@localhost ~]# cd /code
[root@localhost code]# rz -E
rz waiting to receive.
2.解压压缩包
[root@localhost code]# tar -xf wordpress.tar.gz
3.授权(解压完一定要授权)
[root@localhost code]# chown -R www.www wordpress
4.配置nginx文件内容
[root@localhost code]# vim /etc/nginx/conf.d/wordpress.conf
server{
listen 80;
server_name localhost;
location / {
root /code/wordpress;
index index.php;
}
location ~* .php$ {
fastcgi_pass localhost:9000;
#fastcgi_index index.php;
fastcgi_param SCRIPT_FILENAME /code/wordpress/$fastcgi_script_name;
include fastcgi_params;
}
}
5.重启访问
#检查配置
[root@localhost code]# nginx -t
nginx: the configuration file /etc/nginx/nginx.conf syntax is ok
nginx: configuration file /etc/nginx/nginx.conf test is successful
#重启
[root@localhost code]# systemctl restart nginx
6.将域名添加进Windows的hosts文件、测试访问
192.168.1.7 linux.wp.com
在浏览器输入linux.wp.com
7.登录数据库,建库
[root@localhost conf.d]# mysql -uroot -p123
MariaDB [(none)]> create database wordpress;
Query OK, 1 row affected (0.00 sec)
8.创建数据库用户并授权
MariaDB [(none)]> grant all on wordpress.* to wp@‘172.16.1.%’ identified
by ‘123’;
Query OK, 0 rows affected (0.22 sec)
8.注册登录,发表博客
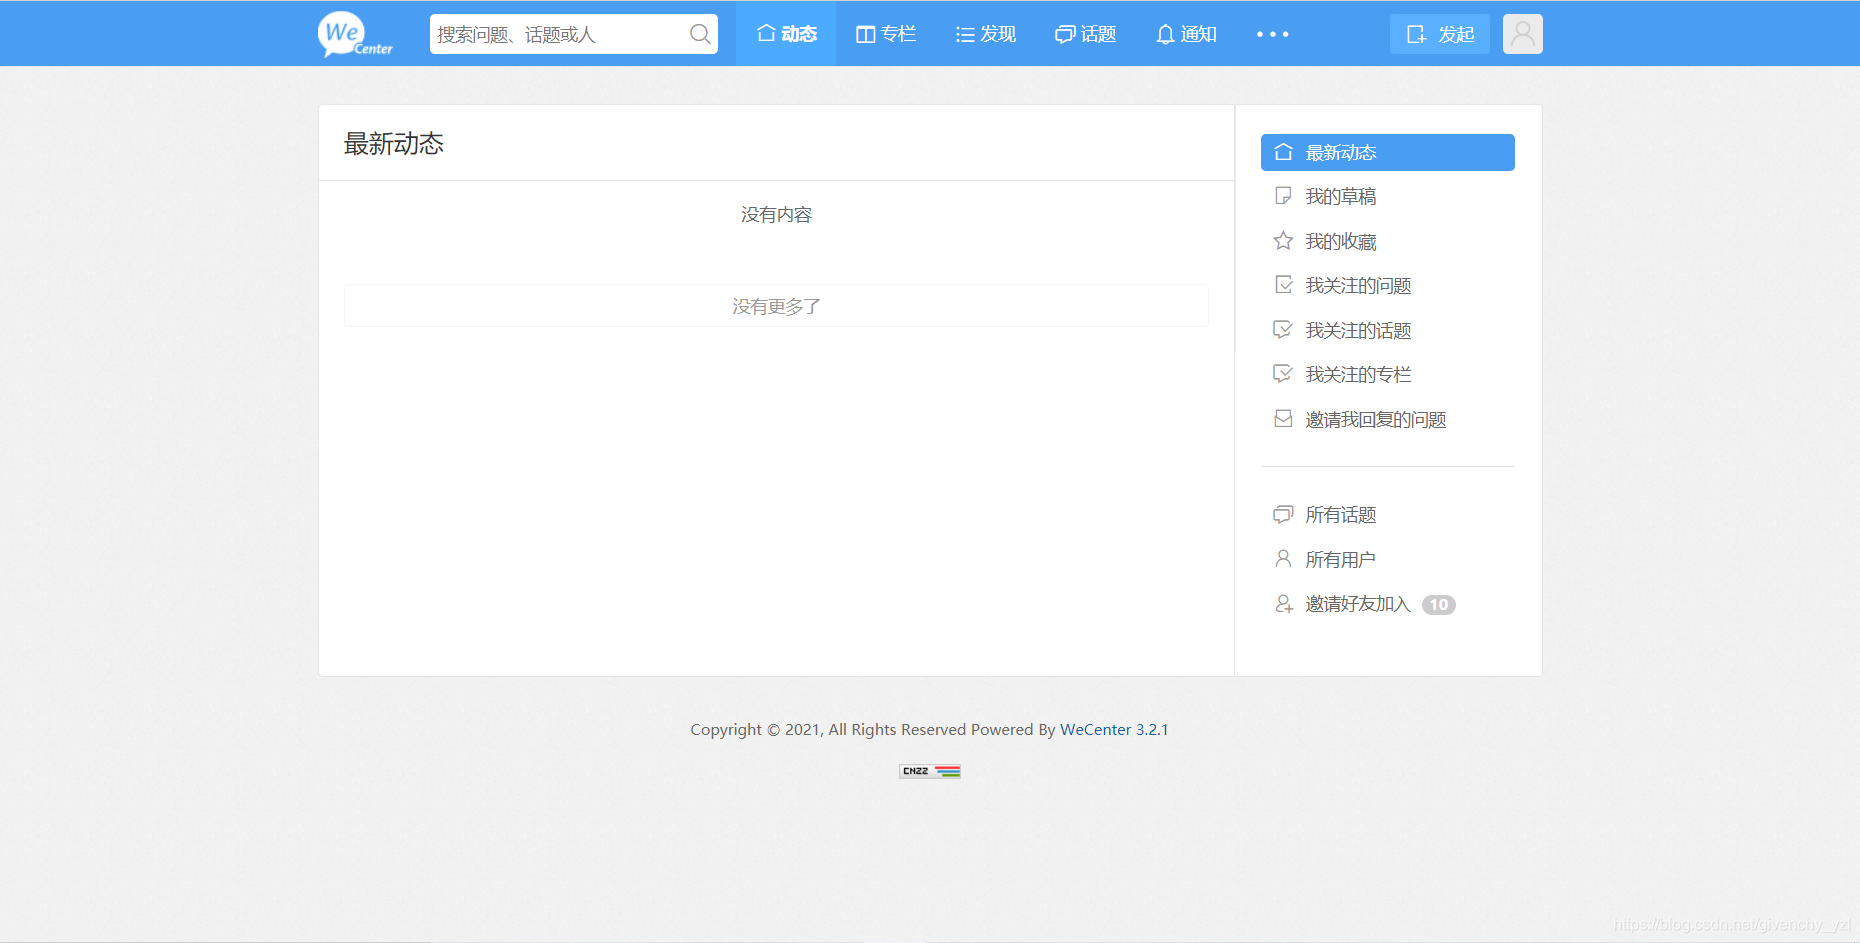
项目二、搭建知乎网站
#上传代码包并解压
[root@web01 code]# rz -E
[root@web01 code]# unzip zhihu.zip
#授权代码
[root@web01 code]# chown -R www.www /code
#创建知乎页面配置文件
[root@web01 code]# cat /etc/nginx/conf.d/zhihu.conf
server{
listen 80;
server_name linux.zh.com;
root /code/zhihu;
location / {
index index.php;
}
location ~* .php$ {
fastcgi_pass localhost:9000;
#fastcgi_index index.php;
fastcgi_param SCRIPT_FILENAME
d
o
c
u
m
e
n
t
r
o
o
t
document_root
documentrootfastcgi_script_name;
include fastcgi_params;
}
}
#配置本地hosts文件
在C:\Windows\System32\drivers\etc\hosts文件中做好域名解析
#浏览器访问
#数据库建库
[root@web01 zhihu]# mysql -uroot -p
Enter password: 123
MariaDB [(none)]> create database zhihu;
#创建数据库用户并授权
MariaDB [(none)]> grant all on zhihu.* to zh@‘172.16.1.%’ identified by
‘123’;
Query OK, 0 rows affected (0.00 sec)
grant: 授权
all: 所有
on: 在…之上
zhihu: 库名
to: 给…用户
zh@172.16.1.%: 用户
%: 所有
#显示用户
MariaDB [(none)]> select user,host from mysql.user;
±-----±----------------------+
| user | host |
±-----±----------------------+
| root | 127.0.0.1 |
| wp | 172.16.1.% |
| zh | 172.16.1.% |
| root | ::1 |
| | localhost |
| root | localhost |
| | localhost.localdomain |
| root | localhost.localdomain |
±-----±----------------------+
8 rows in set (0.10 sec)
#根据页面提示操作
登录成功后,出现如下图
项目三、搭建edu网站
#上传代码包并解压
[root@web01 code]# rz -E
[root@web01 code]# tar -xf edusoho-8.3.36.tar.gz
四、拆分数据库(数据库迁移)
为什么要拆分数据库?
由于单台服务器运行LNMP架构会导致网站访问缓慢,当内存被占满时,很容易导致系统出现oom(out of memory )从而kill掉MySQL数据库,所以要将web和数据库进行独立部署。
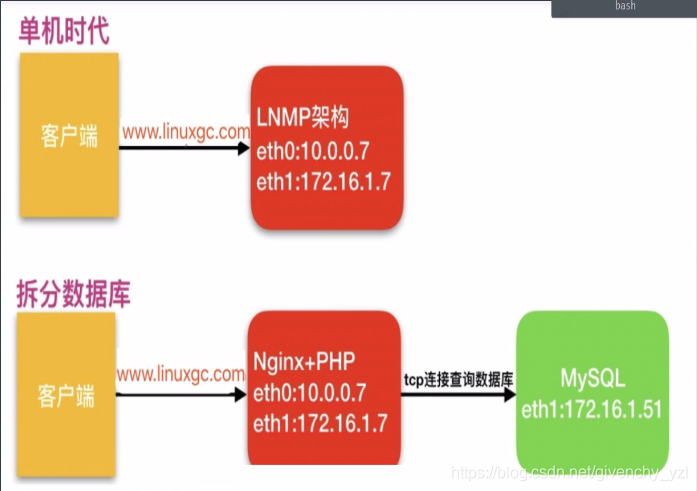
拆分后解决了什么问题
1、缓解web网站压力
2、增强数据库的读写性能
3、提高用户访问速度
环境准备:
主机 ip 部署的服务
web01 192.168.1.7,172…16.1.7 nginx+PHP
db01 172.16.1.51 mariadb
#在新的服务器上搭建数据库
[root@db01 ~]# yum install -y mariadb
#配置数据库密码
[root@db01 ~]# systemctl start mariadb
[root@db01 ~]# mysqladmin -uroot password
New password: 123
Confirm new password: 123
#测试连接远程数据库
[root@web01 ~]# mysql -uroot -p123 -h 172.16.1.51
ERROR 1130 (HY000): Host ‘172.16.1.7’ is not allowed to connect to this MariaDB server
mysql # 数据库的命令
-u # 指定用户
root # root用户
-p #密码
123 # 设置的密码
-h # 指定数据库的主机
172.16.1.51 # 主机的ip
#授权用户远程连接
[root@db01 ~]# mysql -uroot -p123
MariaDB [(none)]> create database wordpress;
MariaDB [(none)]> grant all on wordpress.* to wps@‘172.16.1.%’ identified by ‘123’;
Query OK, 0 rows affected (0.00 sec)
#再次测试连接
[root@web01 ~]# mysql -uwp -p -h 172.16.1.51
Enter password:
MariaDB [(none)]> show databases;
±-------------------+
| Database |
±-------------------+
| information_schema |
| test |
| wordpress |
±-------------------+
#旧数据库导出数据
[root@web01 ~]# mysqldump -uroot -p -B wordpress > /tmp/wp.sql
Enter password:
#将数据推送到新服务器
[root@web01 ~]# scp /tmp/wp.sql 172.16.1.51:/tmp
#将数据导入新数据库
1)库外导入
[root@db01 ~]# mysql -uroot -p < /tmp/wp.sql
Enter password:
2)库内读取
MariaDB [wordpress]> source /tmp/wp.sql;
3)任意门方式导入数据
[root@web01 ~]# mysql -uroot -p < /tmp/wp.sql
#修改项目中数据库地址(wps)
[root@web01 ~]# vim /code/wordpress/wp-config.php
// ** MySQL 设置 - 具体信息来自您正在使用的主机 ** //
/** WordPress数据库的名称 */
define(‘DB_NAME’, ‘wordpress’);
/** MySQL数据库密码 */
define(‘DB_PASSWORD’, ‘123’);
// ** MySQL 设置 - 具体信息来自您正在使用的主机 ** //
/** WordPress数据库的名称 */
define(‘DB_NAME’, ‘wordpress’);
/** MySQL数据库用户名 */
define(‘DB_USER’, ‘wp’);
/** MySQL数据库密码 */
define(‘DB_PASSWORD’, ‘123’);
/** MySQL主机 */
define(‘DB_HOST’, ‘172.16.1.51’);
#停掉旧数据库
[root@web01 ~]# systemctl stop mariadb
#访问测试
浏览器访问
五、扩展web服务器
#环境准备
主机 ip 部署服务
web01 192.168.1.7/172.16.1.7 nginx+php
web02 192.168.1.8/172.168.1.8 nginx+php
db01 172.16.1.51 mariadb
#搭建nginx
1)配置官方源
[root@web02 ~]# vim /etc/yum.repos.d/nginx.repo
[nginx]
name=nginx repo
baseurl=http://nginx.org/packages/centos/7/$basearch/
gpgcheck=0
enabled=1
module_hotfixes=true
2)安装nginx
[root@web02 ~]# yum install -y nginx
3)配置nginx
[root@web02 ~]# vim /etc/nginx/nginx.conf
user www;
4)创建用户
[root@web02 ~]# groupadd www -g 666
[root@web02 ~]# useradd www -u 666 -g 666 -s /sbin/nologin -M
5)启动nginx,并加入开机自启
[root@web01 ~]# systemctl start nginx
[root@web01 ~]# systemctl enable nginx
Created symlink from /etc/systemd/system/multi-user.target.wants/nginx.service to /usr/lib/systemd/system/nginx.service.
6)上传压缩包(yum缓存)
[root@web01 ~]# cd /opt/
[root@web01 tmp]# rz php.tar.gz
7)解压代码包
[root@web01 tmp]# tar xf php.tar.gz
8)安装本地rpm包
[root@web01 tmp]# yum localinstall -y *.rpm
9)配置php
[root@web01 ~]# vim /etc/php-fpm.d/www.conf
user = www
group = www
10)授权
11)修改Windows的hosts文件
若登录时出现:ERROR 1045 (28000): Access denied for user ‘root’@‘localhost’ (using password: YES)。
可以参考下面两篇文章
https://cloud.tencent.com/developer/article/1188636
https://blog.csdn.net/lhl1124281072/article/details/80277163


 6619
6619

 被折叠的 条评论
为什么被折叠?
被折叠的 条评论
为什么被折叠?
 到【灌水乐园】发言


