


本文引用,原文地址:http://blog.sina.com.cn/s/blog_6b3ac3900100knoh.html
CKEditor功能强大,但在JSP中不支持图片的上传,解决方案如下:
实现方式: ckeditor_3.3 + struts2 ,用struts2的fileUploadStack实现
1. 下载ckeditor_3.3 ,目前最新版本是3.3,可以到官方网站上下载: http://ckeditor.com/download
2. 下载下来我们进行安装, 解压压缩文件,.解压缩后得到ckeditor的程序文件夹,里面一些无用的文件可以删除,比如例子_samples,未压缩的源代码_source等.只保留以下文件即可:
skins文件夹是皮肤文件夹,三种皮肤可任选其一。把这些整理好的文件放到项目WebRoot下。
3. 配置ckeditor:
在config.js中配置如下:
CKEDITOR.editorConfig = function( config ) {
config.language = 'zh-cn'; // 配置语言
config.uiColor = '#FFF'; // 背景颜色
config.width = '500px'; // 宽度
config.height = '180px'; // 高度
config.skin = 'office2003'; //界面v2,kama,office2003 为提高速度,只保留了office2003
config.toolbar =
[
['Source','Bold','Italic','Underline','Strike','-','Subscript','Superscript'],
['NumberedList','BulletedList','-','Outdent','Indent','TextColor'],
['JustifyLeft','JustifyCenter','JustifyRight','JustifyBlock','Maximize', 'ShowBlocks','-','Undo','Redo'],
['Image','Flash','Table','HorizontalRule','Smiley','SpecialChar','PageBreak'],
['Styles','Format','Font','FontSize','Preview']
]; //配置操作界面上的工具按钮
config.font_names = '宋体/宋体;黑体/黑体;仿宋/仿宋 _GB2312;楷体/楷体_GB2312;隶书/隶书;幼圆/幼圆;'+ config.font_names ;
}; //增加中文字体
4. 在页面中引用,如下:
<script type="text/javascript" src="ckeditor/ckeditor.js"></script> //当前JSP页面引入CKEditor

<textarea cols="80" id="content" rows="10">
</textarea>
<script type="text/javascript">
CKEDITOR.replace('content'); //content为textarea的id
</script>
效果如下:
点击图片按钮,效果图为

<!--EndFragment-->
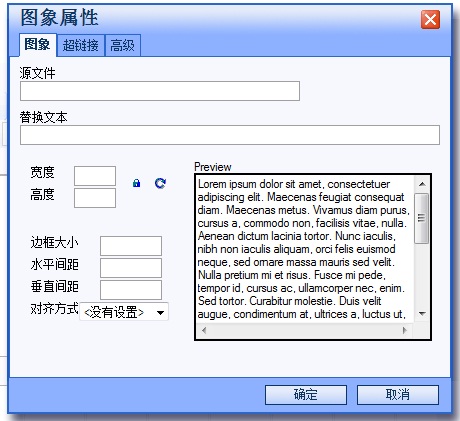
该界面无法完成上传。
5. 在插入image对话框的URL文本框的旁边放一个我自己的Upload按钮,点击后页面转入我自己定义的文件/图片上传页面,接下来我自己处理upload的整个过程。最后返回一个url,通过这个url可以看到图片。
借助CKEditor强大的扩展能力,我们完全可以以javascript实现这一目标。
修改代码如下:
<textarea name="editor1" ></textarea>
<script type="text/javascript">
CKEDITOR.replace('editor1', addUploadButton(this));
function addUploadButton(editor){
CKEDITOR.on('dialogDefinition', function( ev ){
var dialogName = ev.data.name;
var dialogDefinition = ev.data.definition;
if ( dialogName == 'image' ){
var infoTab = dialogDefinition.getContents( 'info' );
infoTab.add({
type : 'button',
id : 'upload_image',
align : 'center',
label : '上传',
onClick : function( evt ){
var thisDialog = this.getDialog();
var txtUrlObj = thisDialog.getContentElement('info', 'txtUrl');
var txtUrlId = txtUrlObj.getInputElement().$.id;
addUploadImage(txtUrlId);
}
}, 'browse'); //place front of the browser button
}
});
}
function addUploadImage(theURLElementId){
var uploadUrl = "uploadsFiles.jsp"; //这是我自己的处理文件/图片上传的页面URL
var imgUrl = window.showModalDialog(uploadUrl);
//在upload结束后通过js代码window.returnValue=...可以将图片url返回给imgUrl变量。
//更多window.showModalDialog的使用方法参考
var urlObj = document.getElementByIdx_x(theURLElementId);
urlObj.value = imgUrl;
urlObj.fireEvent("onchange"); //触发url文本框的onchange事件,以便预览图片
}
</script>
说明:CKEditor的扩展基本上都是通过on方法实现的。on方法有2个参数,第一个是 CKEditor内部的各种事件名称,类似一个钩子。第二个参数是要扩展的代码,通常是一个js函数。因为我们要改动的是image对话框,所以对应的事件名称是dialogDefinition,对话框的名字是image。image url文本框在info选项卡内,通过getContents('info')定位到该选项卡,然后通过infoTab.add()方法就可以在选项卡内添加新的元素了。元素定义是JSON格式。我们这里定义了一个button,其中包括标签(label)和点击(onClick)以后要执行的动作(通常也是个js函数)。infoTab.add()第二个参数是用来指定新元素的位置-在该元素之前。如果不提供这个参数则新元素放在选项卡最后。我们在这里将这个新的Upload按钮放在CKEditor默认的browser按钮前面。
upload按钮点击后就是进行upload动作。这个是通过 addUploadImage()完成的。该函数接受一个id参数,用来指定upload完成后图片的url返回给哪个表单元素。通过查看源代码可知图片 URL文本框的id是txtUrl,但该id是CKEditor自己内部的id,不是页面上最终生成的HTML的id。不过CKEditor也提供了方法 getContentElement()和getInputElement()进行2者的转换。
addUploadImage函数内容也很简单,先指定我自己的文件上传页面的URL,然后在一个模态窗口中打开这个页面,处理文件上传的所有细节。最终的结果是将图片上传后在服务器上的URL地址返回给一个变量imgUrl。最后把这个变量赋值给传进来的图片URL文本框里。最后手工触发一下onchange事件,这样在image对话框里就能看到图片的预览效果了。
效果如下:
点击“上传”按钮:如图:


这是弹出的网页对话框:
其中代码如下:
<body>
<s:form action="fileUploadsss" method="post" name="pos"
enctype="multipart/form-data" target="smz">
<iframe name="smz" width="0" height="0" frameborder="0"
style="display: none" > </iframe>
<table width="80%" border="1" cellspacing="0" cellpadding="0">
<tr>
<td width="20%" align="right">
<font color="red">*</font>上传图片文件
</td>
<td width="20%">
<s:file name="myFile"></s:file>
<s:submit value="上传"></s:submit>
</tr>
</table>
</s:form>
<s:hidden name="pagePath" id="_page_path"></s:hidden>
</body>
<script type="text/javascript">
var _page_path = document.getElementByIdx_x("_page_path").value;
if(null!=_page_path && ""!=_page_path){
window.returnValue=_page_path;
window.close();
}
</script>
说明:《1》iframe name="smz" 是防止提交后页面跳转的,其中name与s:form的target字段相同
《2》s:hidden name="pagePath" 是后台向前台传递的图片在服务器的位置路径
《3》js: window.returnValue=_page_path; 是网页对话框向父页面传值
6:struts2上传配置(即点击上传按钮时要执行的程序)
web.xml中配置如下:
<filter>
<filter-name> struts-cleanup </filter-name >
<filter-class> org.apache.struts2.dispatcher.ActionContextCleanUp</filter-class>
</filter>
<filter-mapping >
<filter-name > struts-cleanup </filter-name >
<url-pattern > /* </url-pattern >
</filter-mapping >
<filter>
<filter-name>struts2</filter-name>
<filter-class>org.apache.struts2.dispatcher.FilterDispatcher</filter-class>
</filter>
<filter-mapping>
<filter-name>struts2</filter-name>
<url-pattern>/*</url-pattern>
</filter-mapping>
在struts.xml中配置如下:
<action name ="fileUploadsss" class="com.ccit.FileUploadAction" >
<interceptor-ref name ="fileUploadStack" />
<result name ="success">/uploadsFiles.jsp</result >
</action>
处理上传action代码:
public class FileUploadAction extends ActionSupport {
private static final long serialVersionUID = 572146812454l ;
private static final int BUFFER_SIZE = 300 * 1024;
private File myFile; //网页中file字段的name
private String contentType; //struts2中必须字段,主要是set方法
private String fileName; // struts2中必须字段,主要是set方法
private String imageFileName; //要上传的图片在服务器中的名称
private String imagePath; //保存服务器中的路径
private String pagePath; //页面中要引用的url
public String getPagePath() {
return pagePath;
}
public void setPagePath(String pagePath) {
this.pagePath = pagePath;
}
public String getImagePath() {
return imagePath;
}
public void setImagePath(String imagePath) {
this.imagePath = imagePath;
}
public void setMyFileContentType(String contentType) {
this.contentType = contentType;
}
public void setMyFileFileName(String fileName) {
this.fileName = fileName;
}
public void setMyFile(File myFile) {
this .myFile = myFile;
}
public String getImageFileName() {
return imageFileName;
}
private static void copy(File src, File dst) {
try {
InputStream in = null ;
OutputStream out = null ;
try {
in = new BufferedInputStream( new FileInputStream(src), BUFFER_SIZE);
out = new BufferedOutputStream( new FileOutputStream(dst), BUFFER_SIZE);
byte [] buffer = new byte [BUFFER_SIZE];
while (in.read(buffer) > 0 ) {
out.write(buffer);
}
} finally {
if ( null != in) {
}
if ( null != out) {
out.close();
}
}
} catch (Exception e) {
e.printStackTrace();
}
}
@Override
public String execute() {
imageFileName = new Date().getTime() + fileName; //此名称用当前时间与上传图片名组成
imagePath = ServletActionContext.getServletContext().getRealPath( "/ckeditor/images/Image" ) + "/" + imageFileName;
System.out.println(imagePath);
pagePath = getWebPath() + "ckeditor/images/Image" + "/" + imageFileName; //页面引用位置
System.out.println(pagePath);
File imageFile = new File(imagePath);
copy(myFile, imageFile);
return SUCCESS;
}
private String getWebPath(){
HttpServletRequest request = ServletActionContext.getRequest ();
String path = request.getContextPath();
String basePath = request.getScheme() + "://"
+ request.getServerName() + ":" + request.getServerPort()
+ path + "/";
return basePath;
}
}
7. 上传完成页面如图:


 4392
4392

 被折叠的 条评论
为什么被折叠?
被折叠的 条评论
为什么被折叠?
 到【灌水乐园】发言


