


In any web application, you often have to deal with forms. Application first displays a form and after user filled this form, he submits it to server. At server, application needs to capture input and process this input (e.g. store input information) and return a success view. In this spring mvc example, we will learn to display forms and then we will learn to process submitted form fields.
In this example, we are creating an employee management module with add employee feature. It will have following capabilities:
- Display empty form on initial page load
- Display error messages if form is submitted with empty field
- After successful form submit, redirect to another screen with success message

Spring MVC Form Example – Blank Form
Let’s start adding application components one by one and noting down things which matter.
Adding model data
For this example application, EmployeeVO class is used as model. It will hold the data which view will use to render and post back to controller.
package com.howtodoinjava.demo.model;

import java.io.Serializable;

public class EmployeeVO implements Serializable
{
    private static final long serialVersionUID = 1L;

    private Integer id;
    private String firstName;
    private String lastName;
    private String email;

    //Getters and Setters

    @Override
    public String toString() {
        return "EmployeeVO [id=" + id + ", firstName=" + firstName
                + ", lastName=" + lastName + ", email=" + email + "]";
    }
}
Creating form views
This application uses two views i.e. one for displaying form and another for displaying success message.
1) addEmployee.jsp
<%@ page contentType="text/html;charset=UTF-8"%>
<%@ taglib prefix="form" uri="http://www.springframework.org/tags/form"%>
<%@ taglib prefix="spring" uri="http://www.springframework.org/tags" %>

<html>
<head>
    <title>Add Employee Form</title>
</head>

<body>
    <h2><spring:message code="lbl.page" text="Add New Employee" /></h2>
    <br/>
    <form:form method="post" modelAttribute="employee">
        <table>
            <tr>
                <td><spring:message code="lbl.firstName" text="First Name" /></td>
                <td><form:input path="firstName" /></td>
            </tr>
            <tr>
                <td><spring:message code="lbl.lastName" text="Last Name" /></td>
                <td><form:input path="lastName" /></td>
            </tr>
            <tr>
                <td><spring:message code="lbl.email" text="Email Id" /></td>
                <td><form:input path="email" /></td>
            </tr>
            <tr>
                <td colspan="2"><input type="submit" value="Add Employee"/></td>
            </tr>
        </table>
    </form:form>
</body>
</html>
Important Points:
- The Spring
<form:form>tag declares two attributes. Themethod="post"attribute used to indicate a form performs an HTTP POST request upon submission. And themodelAttribute="employee”attribute used to indicate the form data is bound to a model namedemployee. - Form’s various
<form:input>tags make use of the attributepathto indicate the form’s fields to which they are bind. They show the user the original value of the field, which will either be the bound property value or the value rejected due to a binding error. They must be used inside the<form:form>tag, which defines a form that binds to themodelAttributeby its name. - Finally, you can find the standard HTML tag
<input type="submit" />that generates a ‘Submit’ button and trigger the sending of data to the server, followed by the tag that closes out the form.
Please note that <spring:message> tags are used for displaying field labels for message resource file present in classpath. In our case, content of message resource is as follow:
messages.properties
lbl.page=Add New Employee
lbl.firstName=First Name
lbl.lastName=Last Name
lbl.email=Email Id
2) addSuccess.jsp
<html>
    <head>
        <title>Add Employee Success</title>
    </head>
    <body>
        Employee has been added successfully.
    </body>
</html>
This file is pretty straight forward and just displays the success message.
Creating form’s controller
EmployeeController.java
@Controller
@RequestMapping("/employee-module/addNew")
@SessionAttributes("employee")
public class EmployeeController
{
    @Autowired
    EmployeeManager manager;

    @RequestMapping(method = RequestMethod.GET)
    public String setupForm(Model model)
    {
         EmployeeVO employeeVO = new EmployeeVO();
         model.addAttribute("employee", employeeVO);
         return "addEmployee";
    }

    @RequestMapping(method = RequestMethod.POST)
    public String submitForm(@ModelAttribute("employee") EmployeeVO employeeVO,
                            BindingResult result, SessionStatus status)
    {
        //Store the employee information in database
        //manager.createNewRecord(employeeVO);

        //Mark Session Complete
        status.setComplete();
        return "redirect:addNew/success";
    }

    @RequestMapping(value = "/success", method = RequestMethod.GET)
    public String success(Model model)
    {
         return "addSuccess";
    }
}
Important Points:
- The controller starts by using the standard
@Controllerannotation, as well as the@RequestMappingannotation that allows access to the controller through the URLhttp://localhost:8080/springmvcexample/employee-module/addNew - When you enter this URL in your browser, it will send an HTTP GET request to your web application. This in turn triggers the execution of the
setupFormmethod, which is designated to attend this type of request based on its@RequestMappingannotation. - Since it’s possible for a form to contain errors, it can be an inconvenience to lose whatever valid data was already provided by a user on every subsequent submission. To solve this problem, the
@SessionAttributesis used to save aemployeefield to a user’s session, so that any future reference to the employee field is in fact made on the same reference, whether a form is submitted twice or more times. - The
setupFormmethod defines a Model object as an input parameter, which serves to send model data to the view (i.e., the form). Inside the handler method, an emptyEmployeeVOobject is created that is added as an attribute to the controller’s Model object. Then the controller returns the execution flow to theaddEmployeeview, which in this case is resolved toaddEmployee.jspwhich we saw above. - After you have filled in the form fields, submitting the form triggers an HTTP POST request, that in turn invokes the
submitFormmethod. The@ModelAttribute("employee") EmployeeVO employeeVOused to reference theemployeeobject. TheBindingResultobject that contains newly submitted data by the user. And theSessionStatusobject used in case it’s necessary to access a user’s session. - Right before a user is redirected to a success page, we should flush out the session data because now it’s of no use. This is done by calling the
setComplete()method on theSessionStatusobject. - After creating an employee in database, submitForm method returns a view named
redirect:addNew/success. Theredirect:prefix in the view name is used to avoid a problem known as duplicate form submission.
When you refresh the web page in the form success view, the form you just submitted is resubmitted again. To avoid this problem, you can apply the post/redirect/get design pattern, which recommends redirecting to another URL after a form submission is handled successfully, instead of returning an HTML page directly.
Adding validation to form
Till now our example application is able to display form, and receiving submitted form with filled values. In real life application, user’s will make lots of mistake in filling forms. Validation should always be on client side, but to protect data integrity you should also validate data on server side as well.
Validation can be added into application into two steps i.e. first at view layer and then at controller code.
Modified addEmployee.jsp
<%@ page contentType="text/html;charset=UTF-8"%>
<%@ taglib prefix="form" uri="http://www.springframework.org/tags/form"%>
<%@ taglib prefix="spring" uri="http://www.springframework.org/tags" %>

<html>
<head>
    <title>Add Employee Form</title>
    <style>
    .error
    {
        color: #ff0000;
        font-weight: bold;
    }
    </style>
</head>

<body>
    <h2><spring:message code="lbl.page" text="Add New Employee" /></h2>
    <br/>
    <form:form method="post" modelAttribute="employee">
        <%-- <form:errors path="*" cssClass="error" /> --%>
        <table>
            <tr>
                <td><spring:message code="lbl.firstName" text="First Name" /></td>
                <td><form:input path="firstName" /></td>
                <td><form:errors path="firstName" cssClass="error" /></td>
            </tr>
            <tr>
                <td><spring:message code="lbl.lastName" text="Last Name" /></td>
                <td><form:input path="lastName" /></td>
                <td><form:errors path="lastName" cssClass="error" /></td>
            </tr>
            <tr>
                <td><spring:message code="lbl.email" text="Email Id" /></td>
                <td><form:input path="email" /></td>
                <td><form:errors path="email" cssClass="error" /></td>
            </tr>
            <tr>
                <td colspan="3"><input type="submit" value="Add Employee"/></td>
            </tr>
        </table>
    </form:form>
</body>
</html>
You will also need to update message resource file.
lbl.page=Add New Employee
lbl.firstName=First Name
lbl.lastName=Last Name
lbl.email=Email Id

//Error messages
error.firstName=First Name can not be blank
error.lastName=Last Name can not be blank
error.email=Email Id can not be blank
Modified submitForm() method
@RequestMapping(method = RequestMethod.POST)
public String submitForm(@ModelAttribute("employee") EmployeeVO employeeVO,
                        BindingResult result, SessionStatus status)
{
    //Validation code start
    boolean error = false;

    System.out.println(employeeVO); //Verifying if information is same as input by user

    if(employeeVO.getFirstName().isEmpty()){
        result.rejectValue("firstName", "error.firstName");
        error = true;
    }

    if(employeeVO.getLastName().isEmpty()){
        result.rejectValue("lastName", "error.lastName");
        error = true;
    }

    if(employeeVO.getEmail().isEmpty()){
        result.rejectValue("email", "error.email");
        error = true;
    }

    if(error) {
        return "addEmployee";
    }
    //validation code ends

    //Store the employee information in database
    //manager.createNewRecord(employeeVO);

    //Mark Session Complete
    status.setComplete();
    return "redirect:addNew/success";
}
Testing the application
Before testing let’s add other essential files.
spring-servlet.xml
<beans xmlns="http://www.springframework.org/schema/beans"
    xmlns:xsi="http://www.w3.org/2001/XMLSchema-instance" xmlns:context="http://www.springframework.org/schema/context"
    xsi:schemaLocation="http://www.springframework.org/schema/beans
        http://www.springframework.org/schema/beans/spring-beans-3.0.xsd
        http://www.springframework.org/schema/context
        http://www.springframework.org/schema/context/spring-context-3.0.xsd">

    <context:component-scan base-package="com.howtodoinjava.demo" />

    <bean class="org.springframework.web.servlet.mvc.annotation.AnnotationMethodHandlerAdapter" />
    <bean class="org.springframework.web.servlet.mvc.annotation.DefaultAnnotationHandlerMapping" />

    <bean class="org.springframework.web.servlet.view.InternalResourceViewResolver">
        <property name="prefix" value="/WEB-INF/views/" />
        <property name="suffix" value=".jsp" />
    </bean>

    <bean id="messageSource" class="org.springframework.context.support.ResourceBundleMessageSource">
        <property name="basename" value="messages" />
    </bean>

</beans>
web.xml
<web-app id="WebApp_ID" version="2.4"
    xmlns="http://java.sun.com/xml/ns/j2ee"
    xmlns:xsi="http://www.w3.org/2001/XMLSchema-instance"
    xsi:schemaLocation="http://java.sun.com/xml/ns/j2ee
    http://java.sun.com/xml/ns/j2ee/web-app_2_4.xsd">

    <display-name>Spring Web MVC Hello World Application</display-name>

    <servlet>
        <servlet-name>spring</servlet-name>
            <servlet-class>
                org.springframework.web.servlet.DispatcherServlet
            </servlet-class>
        <load-on-startup>1</load-on-startup>
    </servlet>

    <servlet-mapping>
        <servlet-name>spring</servlet-name>
        <url-pattern>/</url-pattern>
    </servlet-mapping>

</web-app>
pom.xml
<project xmlns="http://maven.apache.org/POM/4.0.0" xmlns:xsi="http://www.w3.org/2001/XMLSchema-instance"
    xsi:schemaLocation="http://maven.apache.org/POM/4.0.0 http://maven.apache.org/maven-v4_0_0.xsd">
    <modelVersion>4.0.0</modelVersion>
    <groupId>com.howtodoinjava.demo</groupId>
    <artifactId>springmvcexample</artifactId>
    <packaging>war</packaging>
    <version>1.0-SNAPSHOT</version>
    <name>springmvcexample Maven Webapp</name>
    <url>http://maven.apache.org</url>
    <dependencies>

        <dependency>
            <groupId>junit</groupId>
            <artifactId>junit</artifactId>
            <version>4.12</version>
            <scope>test</scope>
        </dependency>

        <!-- Spring MVC support -->

        <dependency>
            <groupId>org.springframework</groupId>
            <artifactId>spring-webmvc</artifactId>
            <version>4.1.4.RELEASE</version>
        </dependency>

        <dependency>
            <groupId>org.springframework</groupId>
            <artifactId>spring-web</artifactId>
            <version>4.1.4.RELEASE</version>
        </dependency>

        <!-- Tag libs support for view layer -->
        <dependency>
            <groupId>javax.servlet</groupId>
            <artifactId>jstl</artifactId>
            <version>1.2</version>
            <scope>runtime</scope>
        </dependency>

        <dependency>
            <groupId>taglibs</groupId>
            <artifactId>standard</artifactId>
            <version>1.1.2</version>
            <scope>runtime</scope>
        </dependency>

    </dependencies>

    <build>
        <finalName>springmvcexample</finalName>
    </build>
</project>
Now test the application.
1) Enter URL : http://localhost:8080/springmvcexample/employee-module/addNew : It will display blank form.
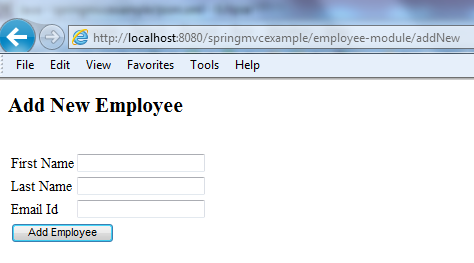
Spring MVC Form Example – Blank Form
2) Fill first name field and hit “Add Employee” button. This will list down the validation messages that last name and email fields can not be submitted blank.
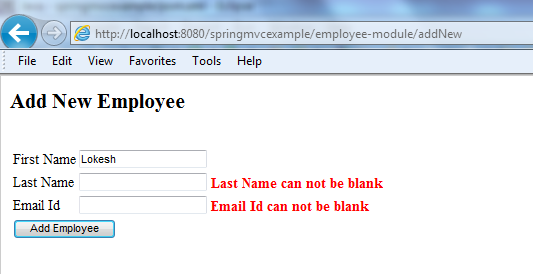
Spring MVC Form Example – Validation Messages
3) Now fill all three values correctly, and submit the form. Now you will be able to see the success message.
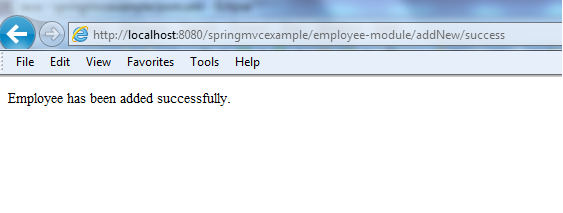
Spring MVC Form Example – Success Message
That’s all for this basic but important tutorial about form submission in spring MVC. Keep me posting about your queries and suggestions.


 1006
1006

 被折叠的 条评论
为什么被折叠?
被折叠的 条评论
为什么被折叠?
 到【灌水乐园】发言


