


This is the Eclipse version of the Quick Start with JPA tutorial. It demonstrates how to create
and run a simple JPA application in Eclipse. The demonstrated application uses JPA to store and retrieve simple Point entity objects, where each Point has two persistent fields - x and y.
For this tutorial, besides the Java JDK (5 or above) and the Eclipse IDE (either Eclipse IDE for Java EE Developers or Eclipse IDE for Java Developers), you only need to download and extract the ObjectDB distribution zip file. The distribution zip contains everything necessary (no external dependencies).
The tutorial was written for Eclipse 3.6.1 but it should work with other Eclipse versions as well (dialog boxes and menus might look slightly different but the code would be the same).
Step 1: Create a Java Project
We start by creating a new Eclipse Project, using:
File > New > Project…
If you are using Eclipse IDE for Java EE Developers, you can see in the [New] menu a command for creating a [JPA Project]. We are not using that type of project in this tutorial but rather an ordinary Java Project.
In the [New Project] dialog box:
- Select Java Project and click Next.
- Choose a Project Name (e.g. Tutorial) and click Next.
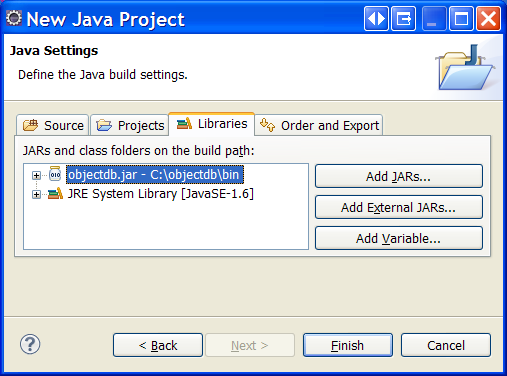
In theLibrariestab, clickAdd External JARs...and select theobjectdb.jarfile from thebinsubdirectory of the ObjectDB installation directory:
Click Finish to create the project, andYesin the Open Associated Perspective dialog (if shown).
Now you should have a new Eclipse project with ObjectDB/JPA support.

ObjectDB/JPA can also be added to existing projects, by adding the objectdb.jar file, using:
Right Clicking on the Project > Properties > Libraries > Add External JARs…
The next step is creating a JPA Entity class.
Step 2: Define a JPA Entity Class
To store objects in an ObjectDB database using JPA we need to define an entity class:
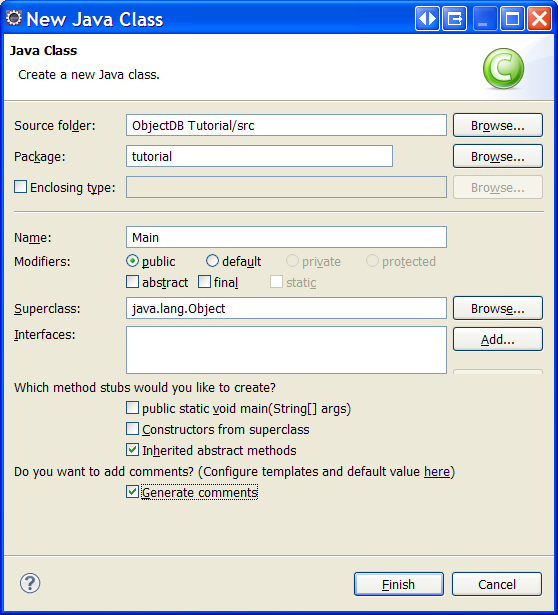
- Open the [New Java Class] dialog box, e.g. by right clicking the project node (in the [Package Explorer] window) and selecting New > Class.
- Enter tutorial as the package name - use exactly that case sensitive package name.
- Enter Point as the class name - use exactly that case sensitive class name.
- Click Finish to create the new class.
Use copy and paste to fill the new source file with the following content:
package tutorial;

import java.io.Serializable;
import javax.persistence.*;

@Entity
public class Point implements Serializable {
    private static final long serialVersionUID = 1L;

    @Id @GeneratedValue
    private long id;

    private int x;
    private int y;

    public Point() {
    }

    Point(int x, int y) {
        this.x = x;
        this.y = y;
    }

    public Long getId() {
        return id;
    }

    public int getX() {
         return x;
    }

    public int getY() {
         return y;
    }

    @Override
    public String toString() {
        return String.format("(%d, %d)", this.x, this.y);
    }
}
The new class should represent Point objects in the database. Besides the @Entity annotation and the id field (and its annotations) - the Point class is an ordinary Java class.
The next step is adding a Main class that stores and retrieves instances of the Point entity class.
Step 3: Add a Main Class
In this step we will add a main class to the project with code that will store Point objects in the database and then retrieve them from the database:
- Open the [New Java Class] dialog box by right clicking the tutorial package node (in the [Package Explorer] window) and selecting New > Class.
- The package name should be
tutorial. - Enter
Mainas the class name - use exactly that case sensitive class name. - Click Finish to create the new class.
Use copy and paste to fill the new source file with the following content:
package tutorial;

import javax.persistence.*;
import java.util.*;

public class Main {
    public static void main(String[] args) {
        // Open a database connection
        // (create a new database if it doesn't exist yet):
        EntityManagerFactory emf =
            Persistence.createEntityManagerFactory("$objectdb/db/points.odb");
        EntityManager em = emf.createEntityManager();

        // Store 1000 Point objects in the database:
        em.getTransaction().begin();
        for (int i = 0; i < 1000; i++) {
            Point p = new Point(i, i);
            em.persist(p);
        }
        em.getTransaction().commit();

        // Find the number of Point objects in the database:
        Query q1 = em.createQuery("SELECT COUNT(p) FROM Point p");
        System.out.println("Total Points: " + q1.getSingleResult());

        // Find the average X value:
        Query q2 = em.createQuery("SELECT AVG(p.x) FROM Point p");
        System.out.println("Average X: " + q2.getSingleResult());

        // Retrieve all the Point objects from the database:
        TypedQuery<Point> query =
            em.createQuery("SELECT p FROM Point p", Point.class);
        List<Point> results = query.getResultList();
        for (Point p : results) {
            System.out.println(p);
        }

        // Close the database connection:
        em.close();
        emf.close();
    }
}
The main method creates an ObjectDB database file, stores 1000 Point objects in the database, and then run a few queries, including a query that retrieves all the 1000 Point objects from the database. Finally it closes the database.
The next step (and the last in this tutorial) is running the project.
Step 4: Run the Application
You can run the application now by right clicking the Main.java node (in the [Package Explorer] window) and selecting Run As > Java Application.
The expected output in the Eclipse [Console] window, is:
Total Points: 1000
Average X: 499.5
(0,0)
(1,1)
(2,2)
(3,3)
 :
 :
(998,998)
(999,999)
When you run the application for the first time, a new ObjectDB database file is generated in the db subdirectory under the ObjectDB installation directory. Running the application again will use the existing database file to store additional 1,000 objects.
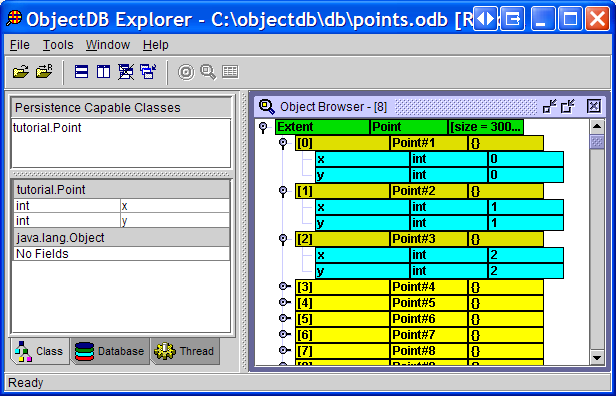
You can view the content of the database file by opening it in the ObjectDB Explorer:
This is the end of the tutorial.


 1万+
1万+

 被折叠的 条评论
为什么被折叠?
被折叠的 条评论
为什么被折叠?
 到【灌水乐园】发言


