


 本文深入解析Struts2中的拦截器概念及其应用,包括拦截器的基本原理、内置拦截器的功能介绍,以及如何配置和使用自定义拦截器。
Interceptor(以下译为拦截器)是Struts 2的一个强有力的工具,有许多功能(feature)都是构建于它之上,如国际化、转换器,校验等。
什么是拦截器
拦截器,在AOP(Aspect-Oriented Programming)中用于在某个方法或字段被访问之前,进行拦截然后在之前或之后加入某些操作。拦截是AOP的一种实现策略。
拦截器是动态拦截Action调用的对象。它提供了一种机制可以让开发者定义在一个action执行前后执行的代码,也可以在一个action执行前阻止其执行。同时也提供了一种提取action中可重用部分的方法。
拦截器链(Interceptor Chain,在Struts 2中称为拦截器栈Interceptor Stack)。拦截器链就是将拦截器按一定的顺序联结成一条链。在访问被拦截的方法或字段时,拦截器链中的拦截器就会按其之前定义的顺序被调用。
实现原理
Struts 2的拦截器实现相对简单。当请求到达Struts 2的ServletDispatcher时,Struts 2会查找配置文件,并根据其配置实例化相对的拦截器对象,然后串成一个列表(list),最后一个一个地调用列表中的拦截器,如图1所示。
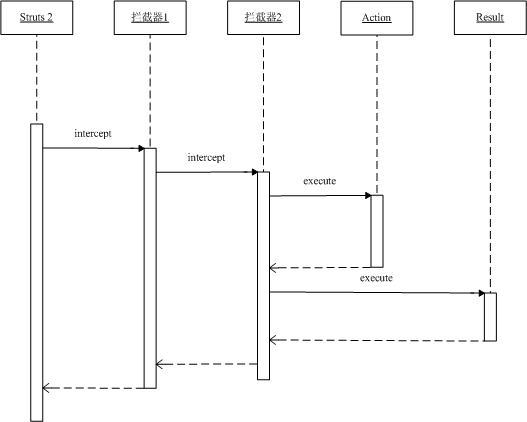
图1 拦截器调用序列图
已有的拦截器
Struts 2已经为您提供丰富多样的,功能齐全的拦截器实现。大家可以到struts2-all-2.0.1.jar或struts2-core-2.0.1.jar包的struts-default.xml查看关于默认的拦截器与拦截器链的配置。
在本文使用是Struts 2的最新发布版本2.0.1。
以下部分就是从struts-default.xml文件摘取的内容:
< interceptor name ="alias" class ="com.opensymphony.xwork2.interceptor.AliasInterceptor" />
< interceptor name ="autowiring" class ="com.opensymphony.xwork2.spring.interceptor.ActionAutowiringInterceptor" />
< interceptor name ="chain" class ="com.opensymphony.xwork2.interceptor.ChainingInterceptor" />
< interceptor name ="conversionError" class ="org.apache.struts2.interceptor.StrutsConversionErrorInterceptor" />
< interceptor name ="createSession" class ="org.apache.struts2.interceptor.CreateSessionInterceptor" />
< interceptor name ="debugging" class ="org.apache.struts2.interceptor.debugging.DebuggingInterceptor" />
< interceptor name ="external-ref" class ="com.opensymphony.xwork2.interceptor.ExternalReferencesInterceptor" />
< interceptor name ="execAndWait" class ="org.apache.struts2.interceptor.ExecuteAndWaitInterceptor" />
< interceptor name ="exception" class ="com.opensymphony.xwork2.interceptor.ExceptionMappingInterceptor" />
< interceptor name ="fileUpload" class ="org.apache.struts2.interceptor.FileUploadInterceptor" />
< interceptor name ="i18n" class ="com.opensymphony.xwork2.interceptor.I18nInterceptor" />
< interceptor name ="logger" class ="com.opensymphony.xwork2.interceptor.LoggingInterceptor" />
< interceptor name ="model-driven" class ="com.opensymphony.xwork2.interceptor.ModelDrivenInterceptor" />
< interceptor name ="scoped-model-driven" class ="com.opensymphony.xwork2.interceptor.ScopedModelDrivenInterceptor" />
< interceptor name ="params" class ="com.opensymphony.xwork2.interceptor.ParametersInterceptor" />
< interceptor name ="prepare" class ="com.opensymphony.xwork2.interceptor.PrepareInterceptor" />
< interceptor name ="static-params" class ="com.opensymphony.xwork2.interceptor.StaticParametersInterceptor" />
< interceptor name ="scope" class ="org.apache.struts2.interceptor.ScopeInterceptor" />
< interceptor name ="servlet-config" class ="org.apache.struts2.interceptor.ServletConfigInterceptor" />
< interceptor name ="sessionAutowiring" class ="org.apache.struts2.spring.interceptor.SessionContextAutowiringInterceptor" />
< interceptor name ="timer" class ="com.opensymphony.xwork2.interceptor.TimerInterceptor" />
< interceptor name ="token" class ="org.apache.struts2.interceptor.TokenInterceptor" />
< interceptor name ="token-session" class ="org.apache.struts2.interceptor.TokenSessionStoreInterceptor" />
< interceptor name ="validation" class ="com.opensymphony.xwork2.validator.ValidationInterceptor" />
< interceptor name ="workflow" class ="com.opensymphony.xwork2.interceptor.DefaultWorkflowInterceptor" />
< interceptor name ="store" class ="org.apache.struts2.interceptor.MessageStoreInterceptor" />
< interceptor name ="checkbox" class ="org.apache.struts2.interceptor.CheckboxInterceptor" />
< interceptor name ="profiling" class ="org.apache.struts2.interceptor.ProfilingActivationInterceptor" />
配置和使用拦截器
在struts-default.xml中已经配置了以上的拦截器。如果您想要使用上述拦截器,只需要在struts.xml文件中通过“<include file="struts-default.xml" />”将struts-default.xml文件包含进来,并继承其中的struts-default包(package),最后在定义Action时,使用“<interceptor-ref name="xx" />”引用拦截器或拦截器栈(interceptor stack)。一旦您继承了struts-default包(package),所有Action都会调用拦截器栈 ——defaultStack。当然,在Action配置中加入“<interceptor-ref name="xx" />”可以覆盖defaultStack。
下面是使用拦截器timer的例子。首先,新建Action类tuotrial/TimerInterceptorAction.java,内容如下:
package tutorial;

import com.opensymphony.xwork2.ActionSupport;

public class TimerInterceptorAction extends ActionSupport {
   @Override
    public String execute() {
        try {
            // 模拟耗时的操作
           Thread.sleep( 500 );
       } catch (Exception e) {
           e.printStackTrace();
       }
        return SUCCESS;
   }
}配置Action,名为Timer,配置文件如下:
<! DOCTYPE struts PUBLIC
        "-//Apache Software Foundation//DTD Struts Configuration 2.0//EN"
        "http://struts.apache.org/dtds/struts-2.0.dtd" >
< struts >
    < include file ="struts-default.xml" />
    < package name ="InterceptorDemo" extends ="struts-default" >
        < action name ="Timer" class ="tutorial.TimerInterceptorAction" >
            <interceptor-ref name ="timer" />
            <result > /Timer.jsp </ result >
        </ action >
    </ package >
</ struts >发布运行应用程序,在浏览器的地址栏键入http://localhost:8080/Struts2_Interceptor/Timer.action,显示Timer.jsp页面后,查看服务器的后台输出。
2006 - 12 - 6 14 : 27 : 32 com.opensymphony.xwork2.interceptor.TimerInterceptor doLog
信息: Executed action [ //Timer!execute ] took 2859 ms.在您的环境中执行Timer!execute的耗时,可能上述的时间有些不同,这取决于您PC的性能。但是无论如何,2859 ms与500 ms还是相差太远了。这是什么原因呢?其实是第一次加载Timer时,需要进行一定的初始工作。当你重新请求Timer.action时,以上输出会变为:
2006 - 12 - 6 14 : 29 : 18 com.opensymphony.xwork2.interceptor.TimerInterceptor doLog
信息: Executed action [ //Timer!execute ] took 500 ms.OK,这正是我们期待的结果。上述例子演示了拦截器timer的用途——用于显示执行某个action方法的耗时,在我们做一个粗略的性能调试时,这相当有用。
自定义拦截器
在开始着手创建自定义拦截器前,切记以下原则:
拦截器必须是无状态的,不要使用API提供的ActionInvocation之外的任何东西。
要求拦截器是无状态的原因是Struts 2不能保证为每一个请求或者action创建一个实例,所以如果拦截器带有状态,会引发并发问题。
所有的Struts 2的拦截器都直接或间接实现接口com.opensymphony.xwork2.interceptor.Interceptor。除此之外,大家可能更喜欢继承类com.opensymphony.xwork2.interceptor.AbstractInterceptor。
以下例子演示通过继承AbstractInterceptor,实现授权拦截器。
首先,创建授权拦截器类tutorial.AuthorizationInterceptor,代码如下:
package tutorial;

import java.util.Map;

import com.opensymphony.xwork2.Action;
import com.opensymphony.xwork2.ActionInvocation;
import com.opensymphony.xwork2.interceptor.AbstractInterceptor;

public class AuthorizationInterceptor extends AbstractInterceptor {

   @Override
    public String intercept(ActionInvocation ai) throws Exception {
       Map session = ai.getInvocationContext().getSession();
       String role = (String) session.get( " ROLE " );
        if ( null != role) {
           Object o = ai.getAction();
            if (o instanceof RoleAware) {
               RoleAware action = (RoleAware) o;
               action.setRole(role);
           }
            return ai.invoke();
       } else {
            return Action.LOGIN;
       }
   }

}以上代码相当简单,我们通过检查session是否存在键为“ROLE”的字符串,判断用户是否登陆。如果用户已经登陆,将角色放到Action中,调用Action;否则,拦截直接返回Action.LOGIN字段。为了方便将角色放入Action,我定义了接口tutorial.RoleAware,代码如下:
package tutorial;

public interface RoleAware {
    void setRole(String role);
}接着,创建Action类tutorial.AuthorizatedAccess模拟访问受限资源,它作用就是通过实现RoleAware获取角色,并将其显示到ShowUser.jsp中,代码如下:
package tutorial;

import com.opensymphony.xwork2.ActionSupport;

public class AuthorizatedAccess extends ActionSupport implements RoleAware {
    private String role;

    public void setRole(String role) {
        this .role = role;
   }

    public String getRole() {
        return role;
   }

   @Override
    public String execute() {
        return SUCCESS;
   }
}
以下是ShowUser.jsp的代码:
<% @ page  contentType = " text/html; charset=UTF-8 " %>
<% @taglib prefix = " s " uri = " /struts-tags " %>
< html >
< head >
    < title > Authorizated User </ title >
</ head >
< body >
    < h1 > Your role is: < s:property value ="role" /></ h1 >
</ body >
</ html >
然后,创建tutorial.Roles初始化角色列表,代码如下:
package tutorial;

import java.util.Hashtable;
import java.util.Map;


public class Roles {
    public Map < String, String > getRoles() {
       Map < String, String > roles = new Hashtable < String, String > ( 2 );
       roles.put( " EMPLOYEE " , " Employee " );
       roles.put( " MANAGER " , " Manager " );
        return roles;
   }
}接下来,新建Login.jsp实例化tutorial.Roles,并将其roles属性赋予<s:radio>标志,代码如下:
<% @ page  contentType = " text/html; charset=UTF-8 " %>
<% @taglib prefix = " s " uri = " /struts-tags " %>
< html >
< head >
    < title > Login </ title >
</ head >
< body >
    < h1 > Login </ h1 >
    Please select a role below:
    < s:bean id ="roles" name ="tutorial.Roles" />
    < s:form action ="Login" >
        < s:radio list ="#roles.roles" value ="'EMPLOYEE'" name ="role" label ="Role" />
        < s:submit />
    </ s:form >
</ body >
</ html >创建Action类tutorial.Login将role放到session中,并转到Action类tutorial.AuthorizatedAccess,代码如下:
package tutorial;

import java.util.Map;

import org.apache.struts2.interceptor.SessionAware;

import com.opensymphony.xwork2.ActionSupport;

public class Login extends ActionSupport implements SessionAware {
    private String role;
    private Map session;

    public String getRole() {
        return role;
   }

    public void setRole(String role) {
        this .role = role;
   }

    public void setSession(Map session) {
        this .session = session;
   }

   @Override
    public String execute() {
       session.put( " ROLE " , role);
        return SUCCESS;
   }
}
最后,配置struts.xml文件,内容如下:
<! DOCTYPE struts PUBLIC
        "-//Apache Software Foundation//DTD Struts Configuration 2.0//EN"
        "http://struts.apache.org/dtds/struts-2.0.dtd" >
< struts >
    < include file ="struts-default.xml" />
    < package name ="InterceptorDemo" extends ="struts-default" >
        < interceptors >
            < interceptor name ="auth" class ="tutorial.AuthorizationInterceptor" />
        </ interceptors >
        < action name ="Timer" class ="tutorial.TimerInterceptorAction" >
            < interceptor-ref name ="timer" />
            < result > /Timer.jsp </ result >
        </ action >
        < action name ="Login" class ="tutorial.Login" >
            < result type ="chain" > AuthorizatedAccess </ result >
        </ action >
        < action name ="AuthorizatedAccess" class ="tutorial.AuthorizatedAccess" >
            < interceptor-ref name ="auth" />
            < result name ="login" > /Login.jsp </ result >
            < result name ="success" > /ShowRole.jsp </ result >
        </ action >
    </ package >
</ struts >发布运行应用程序,在浏览器地址栏中输入:http://localhost:8080/Struts2_Interceptor/AuthorizatedAccess.action。由于此时,session还没有键为“ROLE”的值,所以返回Login.jsp页面,如图2所示:
图2 Login.jsp
选中Employee,点击Submit,出现图3所示页面:
图3 ShowRole.jsp
总结
拦截器是Struts 2比较重要的一个功能。通过正确地使用拦截器,我们可以编写高可复用的代码。


 101
101

 被折叠的 条评论
为什么被折叠?
被折叠的 条评论
为什么被折叠?
 到【灌水乐园】发言


