


项目地址:Docs
Notebook地址(推荐使用google colab打开):https://github.com/huggingface/diffusion-models-class/tree/main/unit3
推荐阅读材料:《扩散模型-从原理到实战》第六章
本文深入解读Stable Diffusion中的各个模块
首先,如果想要快速体验Stable Diffuision,可以从HuggingFace直接下载预训练好的Pipeline,然后直接调用pipe()函数进行图片生成
from diffusers import StableDiffusionPipeline
pipe = StableDiffusionPipeline.from_pretrained("CompVis/stable-diffusion-v1-4", revision="fp16", torch_dtype=torch.float16, use_auth_token=True).to("cuda")
image = pipe("An astronaught scuba diving").images[0]
如果想要深入了解Pipeline中的各个组成模块,则需先把他们下载下来
# Load the autoencoder model which will be used to decode the latents into image space.
vae = AutoencoderKL.from_pretrained("CompVis/stable-diffusion-v1-4", subfolder="vae")

# Load the tokenizer and text encoder to tokenize and encode the text.
tokenizer = CLIPTokenizer.from_pretrained("openai/clip-vit-large-patch14")
text_encoder = CLIPTextModel.from_pretrained("openai/clip-vit-large-patch14")

# The UNet model for generating the latents.
unet = UNet2DConditionModel.from_pretrained("CompVis/stable-diffusion-v1-4", subfolder="unet")

# The noise scheduler
scheduler = LMSDiscreteScheduler(beta_start=0.00085, beta_end=0.012, beta_schedule="scaled_linear", num_train_timesteps=1000)

# To the GPU we go!
vae = vae.to(torch_device)
text_encoder = text_encoder.to(torch_device)
unet = unet.to(torch_device);
A Diffusion Loop
图片生成的过程(也就是文章开始调用pipe()的过程)拆解步骤如下:
1. text_embedding 的过程大致为text string -> tokenization(input_ids) -> token embedding
2. Scheduler, 需要我们指定一个时间步数(num_inference_steps)
3. latents, 初始化的随机噪音
4. Loop,多时间步骤的循环迭代,每一步都从当前的latents中去噪一点点,逐步向着原始图片迈进
# Some settings
prompt = ["A watercolor painting of an otter"]
height = 512                        # default height of Stable Diffusion
width = 512                         # default width of Stable Diffusion
num_inference_steps = 30            # Number of denoising steps
guidance_scale = 7.5                # Scale for classifier-free guidance
generator = torch.manual_seed(32)   # Seed generator to create the inital latent noise
batch_size = 1

# Prep text
text_input = tokenizer(prompt, padding="max_length", max_length=tokenizer.model_max_length, truncation=True, return_tensors="pt")
with torch.no_grad():
    text_embeddings = text_encoder(text_input.input_ids.to(torch_device))[0]
max_length = text_input.input_ids.shape[-1]
uncond_input = tokenizer(
    [""] * batch_size, padding="max_length", max_length=max_length, return_tensors="pt"
)
with torch.no_grad():
    uncond_embeddings = text_encoder(uncond_input.input_ids.to(torch_device))[0]
text_embeddings = torch.cat([uncond_embeddings, text_embeddings])

# Prep Scheduler
def set_timesteps(scheduler, num_inference_steps):
    scheduler.set_timesteps(num_inference_steps)
    scheduler.timesteps = scheduler.timesteps.to(torch.float32) # minor fix to ensure MPS compatibility, fixed in diffusers PR 3925

set_timesteps(scheduler,num_inference_steps)

# Prep latents
latents = torch.randn(
  (batch_size, unet.in_channels, height // 8, width // 8),
  generator=generator,
)
latents = latents.to(torch_device)
latents = latents * scheduler.init_noise_sigma # Scaling (previous versions did latents = latents * self.scheduler.sigmas[0]

# Loop
with autocast("cuda"):  # will fallback to CPU if no CUDA; no autocast for MPS
    for i, t in tqdm(enumerate(scheduler.timesteps), total=len(scheduler.timesteps)):
        # expand the latents if we are doing classifier-free guidance to avoid doing two forward passes.
        latent_model_input = torch.cat([latents] * 2)
        sigma = scheduler.sigmas[i]
        # Scale the latents (preconditioning):
        # latent_model_input = latent_model_input / ((sigma**2 + 1) ** 0.5) # Diffusers 0.3 and below
        latent_model_input = scheduler.scale_model_input(latent_model_input, t)

        # predict the noise residual
        with torch.no_grad():
            noise_pred = unet(latent_model_input, t, encoder_hidden_states=text_embeddings).sample

        # perform guidance
        noise_pred_uncond, noise_pred_text = noise_pred.chunk(2)
        noise_pred = noise_pred_uncond + guidance_scale * (noise_pred_text - noise_pred_uncond)

        # compute the previous noisy sample x_t -> x_t-1
        # latents = scheduler.step(noise_pred, i, latents)["prev_sample"] # Diffusers 0.3 and below
        latents = scheduler.step(noise_pred, t, latents).prev_sample

# scale and decode the image latents with vae
latents = 1 / 0.18215 * latents
with torch.no_grad():
    image = vae.decode(latents).sample

# Display
image = (image / 2 + 0.5).clamp(0, 1)
image = image.detach().cpu().permute(0, 2, 3, 1).numpy()
images = (image * 255).round().astype("uint8")
pil_images = [Image.fromarray(image) for image in images]
pil_images[0]
Variational Autoencoder(VAE)
把图片映射到维度更低的latent space,例如把3*512*512的图片映射到4*64*64。然后在latent space里生成一个随机噪声,进行denoise,最后再将denoise后的向量decode回原始图片的维度,结果即为生成的图片。
这样做的好处是,用latent space的低维向量(而不是原始图片的高维向量)进行diffusion计算,节省计算空间,提高计算效率。
def pil_to_latent(input_im):
    # Single image -> single latent in a batch (so size 1, 4, 64, 64)
    with torch.no_grad():
        latent = vae.encode(tfms.ToTensor()(input_im).unsqueeze(0).to(torch_device)*2-1) # Note scaling
    return 0.18215 * latent.latent_dist.sample()

def latents_to_pil(latents):
    # bath of latents -> list of images
    latents = (1 / 0.18215) * latents
    with torch.no_grad():
        image = vae.decode(latents).sample
    image = (image / 2 + 0.5).clamp(0, 1)
    image = image.detach().cpu().permute(0, 2, 3, 1).numpy()
    images = (image * 255).round().astype("uint8")
    pil_images = [Image.fromarray(image) for image in images]
    return pil_images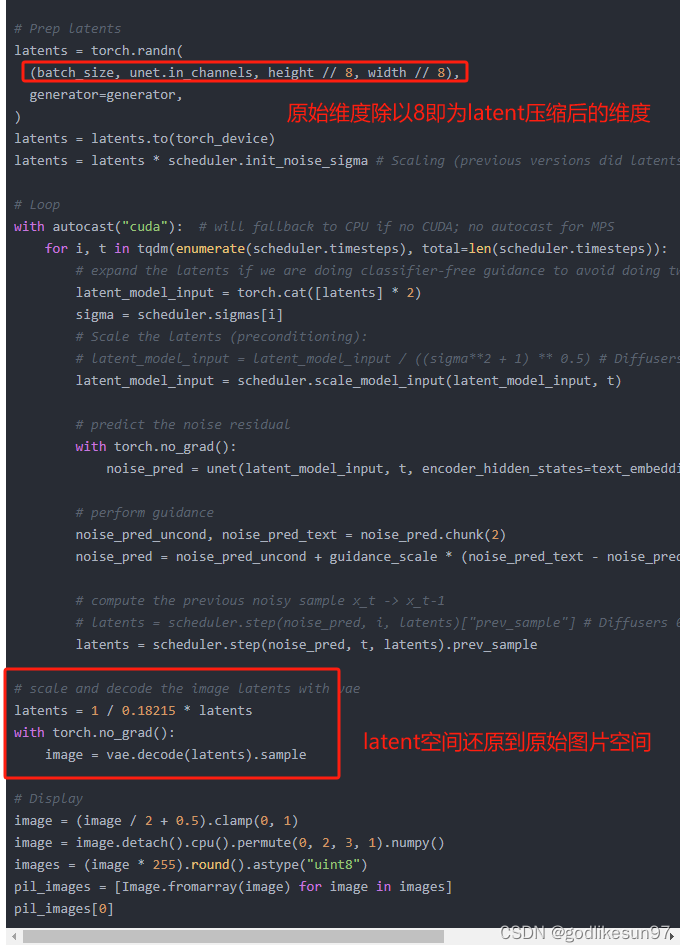
Scheduler
Scheduler可以根据我们指定的num_time_step来为我们制定一份根据时间步为图片增加噪音的计划,同时Scheduler也帮我们处理了根据时间步对图片进行逐步去噪的工作。
创建scheduler对象,支持指定时间步(num_train_timesteps)以及一些增beta参数(该参数控制每次原始图片和噪声的权重比例)
scheduler = LMSDiscreteScheduler(beta_start=0.00085, beta_end=0.012, beta_schedule="scaled_linear", num_train_timesteps=1000)手动设置Scheduler的timestep
# Setting the number of sampling steps:
def set_timesteps(scheduler, num_inference_steps):
    scheduler.set_timesteps(num_inference_steps)
    scheduler.timesteps = scheduler.timesteps.to(torch.float32) # minor fix to ensure MPS compatibility, fixed in diffusers PR 3925

set_timesteps(scheduler, 20)
查看设置后的timestep, 共有1000个时间点,如果设置timestep=20,即返回20个部分,每个部分间隔50。
返回值从1000开始从大到小排列,这是因为我们生成的步骤为,从最后一个时间步的随机噪声X_20开始,逐步像原始原片X_0进行去噪还原。
# See these in terms of the original 1000 steps used for training:
print(scheduler.timesteps)

# output
tensor([999.0000, 946.4211, 893.8421, 841.2632, 788.6842, 736.1053, 683.5263,
        630.9474, 578.3684, 525.7895, 473.2105, 420.6316, 368.0526, 315.4737,
        262.8947, 210.3158, 157.7368, 105.1579,  52.5789,   0.0000
在我们对原始图片X_0逐步添加noise的过程中,每次添加的noise也是随时间步逐渐递减的
# Plotting this noise schedule:
plt.plot(scheduler.sigmas)
plt.title('Noise Schedule')
plt.xlabel('Sampling step')
plt.ylabel('sigma')
plt.show()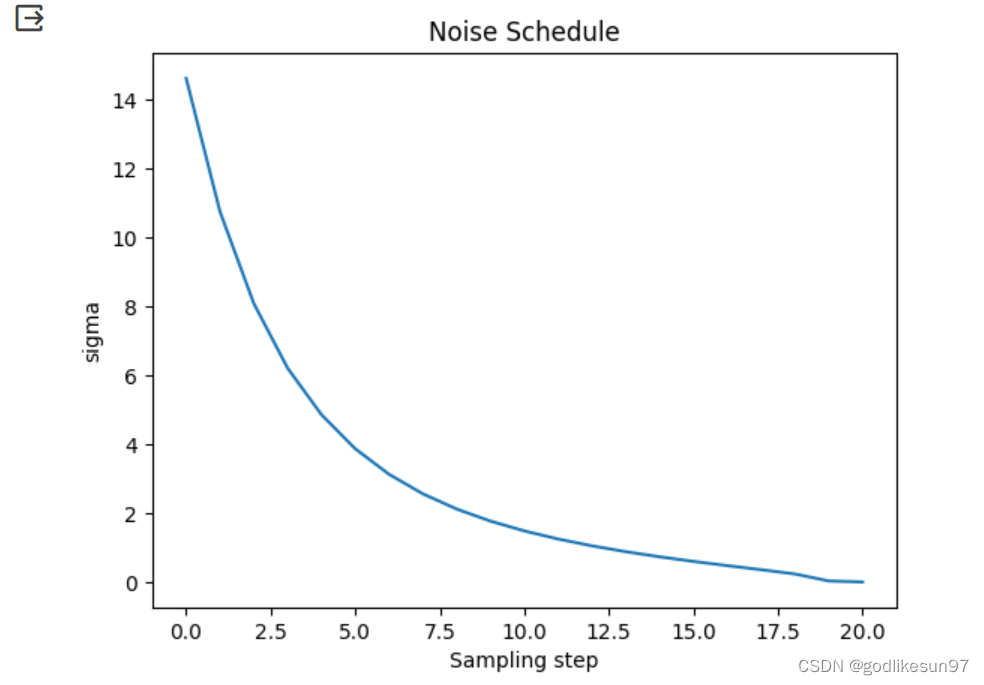
Text Embedding
两个步骤:
1. tokenize
# Our text prompt
prompt = 'A picture of a puppy'

# Turn the text into a sequnce of tokens:
text_input = tokenizer(prompt, padding="max_length", max_length=tokenizer.model_max_length, truncation=True, return_tensors="pt")
text_input['input_ids'][0] # View the tokens

# output
tensor([49406,   320,  1674,   539,   320,  6829, 49407, 49407, 49407, 49407,
        49407, 49407, 49407, 49407, 49407, 49407, 49407, 49407, 49407, 49407,
        49407, 49407, 49407, 49407, 49407, 49407, 49407, 49407, 49407, 49407,
        49407, 49407, 49407, 49407, 49407, 49407, 49407, 49407, 49407, 49407,
        49407, 49407, 49407, 49407, 49407, 49407, 49407, 49407, 49407, 49407,
        49407, 49407, 49407, 49407, 49407, 49407, 49407, 49407, 49407, 49407,
        49407, 49407, 49407, 49407, 49407, 49407, 49407, 49407, 49407, 49407,
        49407, 49407, 49407, 49407, 49407, 49407, 49407]
2. embedding(token_embedding + position_embedding)
# Grab the output embeddings
output_embeddings = text_encoder(text_input.input_ids.to(torch_device))[0]
print('Shape:', output_embeddings.shape)
output_embeddings

#output
Shape: torch.Size([1, 77, 768])
tensor([[[-0.3884,  0.0229, -0.0522,  ..., -0.4899, -0.3066,  0.0675],
         [ 0.0290, -1.3258,  0.3085,  ..., -0.5257,  0.9768,  0.6652],
         [ 0.6942,  0.3538,  1.0991,  ..., -1.5716, -1.2643, -0.0121],
         ...,
         [-0.0221, -0.0053, -0.0089,  ..., -0.7303, -1.3830, -0.3011],
         [-0.0062, -0.0246,  0.0065,  ..., -0.7326, -1.3745, -0.2953],
         [-0.0536,  0.0269,  0.0444,  ..., -0.7159, -1.3634, -0.3075]]],
       device='cuda:0', grad_fn=<NativeLayerNormBackward0>)
UNET
UNET使我们在扩散过程中使用的模型,模型的输入为(latent, timestep, text_embedding),输出为当前timestep预测的noise。UNET调用方式为:
# Run this through the unet to predict the noise residual
with torch.no_grad():
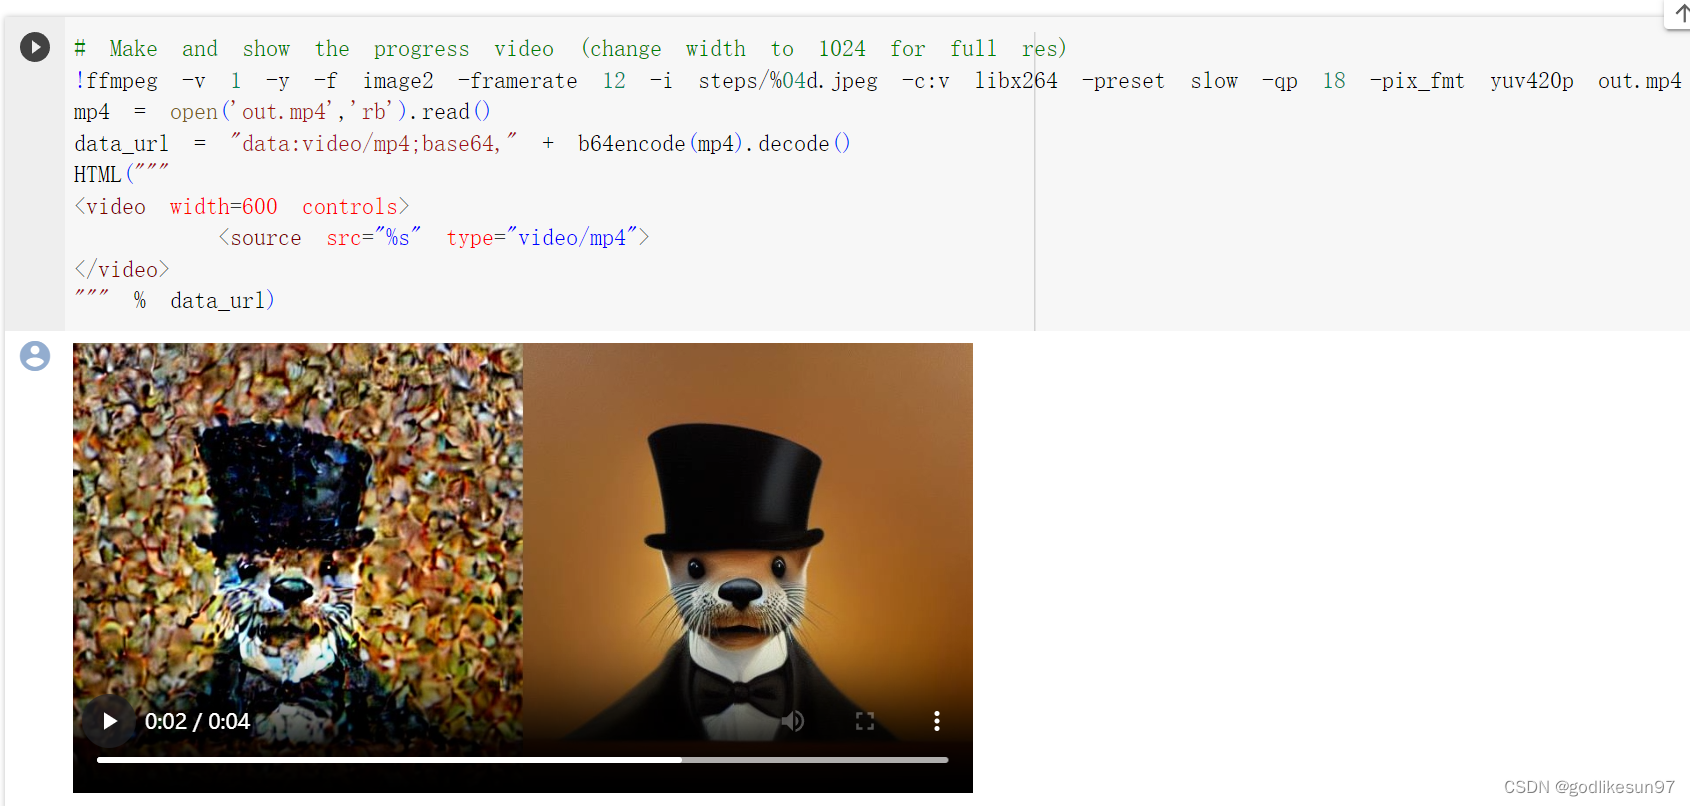
noise_pred = unet(latents, t, encoder_hidden_states=text_embeddings)["sample"]在得到模型预测的noise之后,给图片进行去噪的过程由scheduler.step(noise_pred, t, latents)执行,其返回值包含两个变量,分别是:
(1)pred_original_sample: 当前时间步预测的原始图片X_0
(2) prev_sample: 当前时间步X_t预测的上个时间步的图片X_t-1, 即下一次去噪的输入图片。
通过展示每个时间步生成的X_t-1(下图左)和X_0(下图右),我们发现在对图片进行迭代去噪的过程中,每个时间步骤预测的X_0为较为接近原始图片的高质量图片,但是X_t-1为噪声较多的低质量图片,这是因为我们每次只是在X_t中减少了一点点的噪音生成X_t-1(并没有直接变成X_0)


 被折叠的 条评论
为什么被折叠?
被折叠的 条评论
为什么被折叠?
 到【灌水乐园】发言


