来源 http://blog.csdn.net/bathinbreeze/article/details/8994825
6. 用eclipse实现PMService
PMservice是一个通过Service服务,来实现任务管理的程序。分为客户端PMClient和服务端PMService。
PMService提供一些操作方法:
-
服务开始的提示方法:getVal();
-
任务管理器的查询方法:getProcessID() 获取进程号,和getProcessName()获取进程名;
-
以及终止进程的方法:killProc(String ID),来提供服务给客户端。
PMClient使用PMService所提供的服务,来调用这些方法实现业务逻辑,并提供显示界面。
对于PMService的实现
-
通过ActivityManager activityManager = (ActivityManager) getSystemService("activity"); 获得activityService
-
编写aidl文件,eclipse会自动生成相应的Stub和Proxy的接口实现
对于PMClient的实现
-
复制PMService的aidl文件,eclipse会为PMClient生成相应的接口实现
-
通 过在ServiceConnection:: onServiceConnected()中,PMService = IPMService.Stub.asInterface(service); 获得PMService创建的 PMServiceProxy(new BinderProxy()); 并把这个proxy对象保存在PMService中
-
在onCreate()方法中,调用bindService(new Intent(IPMService.class.getName()),serConn, Context.BIND_AUTO_CREATE);
其中, serConn 是ServiceConnection类的实例化,传递的是PMService对象,这里是把当前类的PMService与PMService那边的PMService绑定在一起,这样就实现了两个进程的通信了
实现流程分析
-
调用的时候,客户端首先调用bindService(new Intent (IPMService.class.getName(), serConn,Context.BIND_AUTO_CREATE);激活serviceConnection的onServiceConnected 方法,在此方法中获取到一个binder,这个binder是系统给我们的一个与远程进行通信的binder,此binder能够查找系统中注册的 service,如果没有查找到该Service,那么可认定该service是从其他apk获得的,就创建一个此service的静态代理类 Proxy,否则,就把这个service返回,供客户端调用。
-
服务端收到这个Intent后,激活PMServiceImpl extends IPMService.Stub的onBind方法,创建一个Binder返回 (return new PMServiceImpl())。之后,这个Binder负责与客户端的Proxy通信。
源码流程:
PMService的源码
在eclipse新建PMServer工程,我用的是android 4.2.2
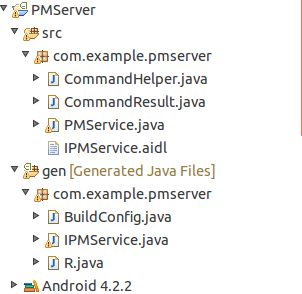
先列出PMServer工程的文件清单,其中IPMService.java是通过IPMService.aidl自动创建的
下面是各个文件的源码:
IPMService.aidle
- package com.example.pmserver;
- interface IPMService
- {
- double getVal(String val);
- List<String> getProcessName();
- List<String> getProcessID();
- String killProc(String PID);
- }
把这个文件放入到我们工程的com.example.pmserver包中,系统会自动生成IPMService.java
为了实现进程信息的查询,我们需要CommandHelper.java这个类,通过API执行shell语言的方式来收集我们需要的进程信息。
CommandHelper.java
- package com.example.pmserver;
- import com.example.pmserver.CommandResult;
- import java.io.BufferedReader;
- import java.io.IOException;
- import java.io.InputStreamReader;
- /**
- *
- *
- */
- public class CommandHelper {
- //default time out, in millseconds
- public static int DEFAULT_TIMEOUT;
- public static final int DEFAULT_INTERVAL = 1000;
- public static long START;
- public static CommandResult exec(String command) throws IOException, InterruptedException {
- Process process = Runtime.getRuntime().exec(command);
- CommandResult commandResult = wait(process);
- if (process != null) {
- process.destroy();
- }
- return commandResult;
- }
- private static boolean isOverTime() {
- return System.currentTimeMillis() - START >= DEFAULT_TIMEOUT;
- }
- private static CommandResult wait(Process process) throws InterruptedException, IOException {
- BufferedReader errorStreamReader = null;
- BufferedReader inputStreamReader = null;
- try {
- errorStreamReader = new BufferedReader(new InputStreamReader(process.getErrorStream()));
- inputStreamReader = new BufferedReader(new InputStreamReader(process.getInputStream()));
- //timeout control
- START = System.currentTimeMillis();
- boolean isFinished = false;
- for (;;) {
- if (isOverTime()) {
- CommandResult result = new CommandResult();
- result.setExitValue(CommandResult.EXIT_VALUE_TIMEOUT);
- result.setOutput("Command process timeout");
- return result;
- }
- if (isFinished) {
- CommandResult result = new CommandResult();
- result.setExitValue(process.waitFor());
- //parse error info
- if (errorStreamReader.ready()) {
- StringBuilder buffer = new StringBuilder();
- String line;
- while ((line = errorStreamReader.readLine()) != null) {
- buffer.append(line);
- }
- result.setError(buffer.toString());
- }
- //parse info
- if (inputStreamReader.ready()) {
- StringBuilder buffer = new StringBuilder();
- String line;
- while ((line = inputStreamReader.readLine()) != null) {
- buffer.append(line);
- }
- result.setOutput(buffer.toString());
- }
- return result;
- }
- try {
- isFinished = true;
- process.exitValue();
- } catch (IllegalThreadStateException e) {
- // process hasn't finished yet
- isFinished = false;
- Thread.sleep(DEFAULT_INTERVAL);
- }
- }
- } finally {
- if (errorStreamReader != null) {
- try {
- errorStreamReader.close();
- } catch (IOException e) {
- }
- }
- if (inputStreamReader != null) {
- try {
- inputStreamReader.close();
- } catch (IOException e) {
- }
- }
- }
- }
- }
下面,需要提供一些操作的接口,以便调用 CommandResult.java
- package com.example.pmserver;
- public class CommandResult {
- public static final int EXIT_VALUE_TIMEOUT=-1;
- private String output;
- void setOutput(String error) {
- output=error;
- }
- String getOutput(){
- return output;
- }
- int exitValue;
- void setExitValue(int value) {
- exitValue=value;
- }
- int getExitValue(){
- return exitValue;
- }
- private String error;
- /**
- * @return the error
- */
- public String getError() {
- return error;
- }
- /**
- * @param error the error to set
- */
- public void setError(String error) {
- this.error = error;
- }
- }
接下来,就是我们Service的核心文件了,实现了业务逻辑。
PMService.java
- package com.example.pmserver;
- import java.io.IOException;
- import java.util.ArrayList;
- import java.util.Iterator;
- import java.util.List;
- import com.example.pmserver.CommandHelper;
- import com.example.pmserver.CommandResult;
- import android.os.IBinder;
- import android.os.RemoteException;
- import android.app.ActivityManager;
- import android.app.ActivityManager.RunningAppProcessInfo;
- import android.app.Service;
- import android.content.Intent;
- import android.util.Log;
- public class PMService extends Service {
- private static final String TAG = "PMService";
- List<String> ProcName = new ArrayList<String>();
- List<String> ProcID = new ArrayList<String>();
- public class PMServiceImpl extends IPMService.Stub {
- @Override
- public double getVal(String val) throws RemoteException {
- Log.v(TAG, "getVal() called for " + val);
- return 1.0; //test the binder transaction is ok between c/s
- }
- public List<String> getProcessName() {
- List<RunningAppProcessInfo> procList = this.getProcessInfo(); //get process info
- int j = 0;
- Iterator<RunningAppProcessInfo> iterator = procList.iterator();
- if(iterator.hasNext()) {
- do {
- RunningAppProcessInfo procInfo = iterator.next();
- Log.v("ProcInfo", "ProcName = " + procInfo.processName);
- ProcName.add(procInfo.processName);
- //ProcID.add(Integer.toString(procInfo.pid));
- Log.v("ProcName", "ProcName = " + ProcName.get(j++));
- }while(iterator.hasNext());
- }
- return ProcName;
- }
- public List<String> getProcessID() {
- List<RunningAppProcessInfo> procList = this.getProcessInfo();
- int i = 0;
- Iterator<RunningAppProcessInfo> iterator = procList.iterator();
- if(iterator.hasNext()) {
- do {
- RunningAppProcessInfo procInfo = iterator.next();
- Log.v("ProcInfo","ProcID = " + procInfo.pid);
- ProcID.add(String.valueOf(procInfo.pid));
- //ProcID.add(Integer.toString(procInfo.pid));
- Log.v("ProcName", "ProcID = " + ProcID.get(i++));
- }while(iterator.hasNext());
- }
- return ProcID;
- }
- @Override
- public String killProc(String PID) throws RemoteException {
- // TODO Auto-generated method stub
- String cmd = "kill -9 "+PID;
- String reply = "";
- Log.v("cmd",cmd);
- try {
- CommandHelper.DEFAULT_TIMEOUT = 5000;
- CommandResult result = CommandHelper.exec(cmd);
- if (result != null) {
- if(result.getError()!=null)
- {
- Log.v("Output","Error:" + result.getError());
- reply = result.getError();
- }
- if(result.getOutput()!=null)
- {
- Log.v("Output","Output:" + result.getOutput());
- reply = result.getOutput();
- }
- }
- } catch (IOException ex) {
- Log.v("Output","IOException:" + ex.getLocalizedMessage());
- } catch (InterruptedException ex) {
- Log.v("Output","InterruptedException:" + ex.getLocalizedMessage());
- }
- return reply;
- }
- public void exec(String command) throws IOException, InterruptedException {
- // Process process = Runtime.getRuntime().exec(command);
- Runtime.getRuntime().exec(command);
- return ;
- }
- public List<RunningAppProcessInfo> getProcessInfo() {
- List<RunningAppProcessInfo> procList = new ArrayList<RunningAppProcessInfo>();
- // ActivityManager activityManager = (ActivityManager) getSystemService(ACTIVITY_SERVICE);
- ActivityManager activityManager = (ActivityManager) getSystemService("activity");
- procList = activityManager.getRunningAppProcesses();
- return procList;
- }
- }
- @Override
- public void onCreate() {
- super.onCreate();
- Log.v(TAG, "onCreate called");
- }
- @Override
- public void onDestroy() {
- super.onDestroy();
- Log.v(TAG, "onDestory() called");
- }
- @Override
- public void onStart(Intent intent, int startId) {
- super.onStart(intent, startId);
- Log.v(TAG, "onStart() called");
- }
- @Override
- public IBinder onBind(Intent intent) {
- Log.v(TAG, "onBind() called");
- return new PMServiceImpl();
- }
- }
AndroidManifest.xml配置文件
- <?xml version="1.0" encoding="utf-8"?>
- <manifest xmlns:android="http://schemas.android.com/apk/res/android"
- package="com.example.pmserver"
- android:versionCode="1"
- android:versionName="1.0" >
- <uses-sdk
- android:minSdkVersion="8"
- android:targetSdkVersion="17" />
- <application
- android:allowBackup="true"
- android:icon="@drawable/ic_launcher"
- android:label="@string/app_name"
- android:theme="@style/AppTheme" >
- <service
- android:name="com.example.pmserver.PMService"
- android:label="@string/app_name" >
- <intent-filter>
- <action android:name="com.example.pmserver.IPMService" />
- </intent-filter>
- </service>
- </application>
- </manifest>
Service这边不需要显示操作,界面的配置就不需要了。这样,Service这边就OK了。
PMClient的源码
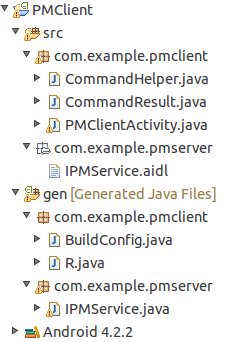
这个是PMClient工程的文件清单,
IPMService.aidl直接从PMService中拷贝过来就好,这里就不列出了。同样,会自动生成IPMService.java
CommandHelper.java和CommandResult.java这里不需要(这里,我只是做测试之用),不需要添加,在com.example.pmclient中,只需添加PMClientActivity.java即可。
PMClientActivity.java
- package com.example.pmclient;
- import com.example.pmserver.IPMService;
- import com.example.pmclient.CommandHelper;
- import com.example.pmclient.CommandResult;
- import java.io.IOException;
- import java.util.ArrayList;
- import java.util.HashMap;
- import java.util.List;
- import java.util.Map;
- import android.os.Bundle;
- import android.os.IBinder;
- import android.app.Activity;
- import android.view.View;
- import android.widget.AdapterView;
- import android.widget.ListView;
- import android.widget.SimpleAdapter;
- import android.content.ComponentName;
- import android.content.Context;
- import android.content.Intent;
- import android.content.ServiceConnection;
- import android.os.RemoteException;
- import android.util.Log;
- import android.widget.Toast;
- import android.widget.AdapterView.OnItemClickListener;
- public class PMClientActivity extends Activity {
- protected static final String TAG = "TestaidlClient";
- private IPMService PMService = null;
- @Override
- public void onCreate(Bundle savedInstanceState) {
- super.onCreate(savedInstanceState);
- setContentView(R.layout.list_main);
- bindService(new Intent(IPMService.class.getName()),serConn, Context.BIND_AUTO_CREATE);
- }
- public void onDestroy(){
- super.onDestroy();
- Log.v(TAG, "onDestory() called");
- unbindService(serConn);
- }
- private void callService() {
- try {
- double val = PMService.getVal("Liang");
- if(val == 1.0) {
- Toast.makeText(this, "Service is ready!",
- Toast.LENGTH_LONG).show();
- }
- setNameID(PMService.getProcessID(), PMService.getProcessName());
- } catch (RemoteException e) {
- Log.e("MainActivity", e.getMessage(), e);
- }
- }
- private ServiceConnection serConn = new ServiceConnection() {
- // 此方法在系统建立服务连接时调用
- @Override
- public void onServiceConnected(ComponentName name, IBinder service) {
- Log.v(TAG, "onServiceConnected() called");
- PMService = IPMService.Stub.asInterface(service);
- callService();
- }
- // 此方法在销毁服务连接时调用
- @Override
- public void onServiceDisconnected(ComponentName name) {
- Log.v(TAG, "onServiceDisconnected()");
- PMService = null;
- }
- };
- public void setNameID(final List<String> ProcID, final List<String> ProcName) {
- //绑定Layout里面的ListView
- ListView list = (ListView) findViewById(R.id.ListView01);
- //每个list里面放的都是MAP,map里面放的是键值对
- ArrayList<Map<String, String>> Items = new ArrayList<Map<String, String>>();
- //把该显示的内容放到list中
- for (int i = 0; i < ProcID.size(); i++)
- {
- Map<String, String> item = new HashMap<String, String>();
- String PIDbuf = "PID: "+ProcID.get(i);
- item.put("ProcID", PIDbuf);
- String PNamebuf = "PName: "+ProcName.get(i);
- item.put("ProcName", PNamebuf);
- Items.add(item);
- }
- //构建适配器Adapter,将数据与显示数据的布局页面绑定
- final SimpleAdapter simpleAdapter = new SimpleAdapter(this, Items,
- R.layout.list_proc_info, new String[]{ "ProcID", "ProcName" },
- new int[]{ R.id.ProcID, R.id.ProcName});
- //通过setAdapter()方法把适配器设置给ListView
- list.setAdapter(simpleAdapter);
- list.setOnItemClickListener(new OnItemClickListener() {
- @Override
- public void onItemClick(AdapterView<?> arg0, View arg1, int arg2,
- long arg3) {
- // TODO Auto-generated method stub
- String result = "";
- Log.v("ClickInfo", "arg0 = " + arg0 + "arg1 = " + arg1 + " arg2 = " + arg2 +" arg3 = " + arg3);
- //arg2 放的是process的name
- try {
- result = PMService.killProc(ProcID.get(arg2));
- } catch (RemoteException e) {
- // TODO Auto-generated catch block
- e.printStackTrace();
- }
- if(result == null)
- {
- result = "success!";
- }
- ToastMSG(result);
- //刷新页面
- simpleAdapter.notifyDataSetChanged();
- }
- });
- }
- public void ToastMSG(String info)
- {
- Toast.makeText(this, "Info: " + info,
- Toast.LENGTH_LONG).show();
- }
- }
再来看布局的设置,一共有2个布局文件,在res/layout/中: list_main.xml
- <?xml version="1.0" encoding="utf-8"?>
- <LinearLayout
- android:id="@+id/LinearLayout01"
- android:layout_width="fill_parent"
- android:layout_height="fill_parent"
- xmlns:android="http://schemas.android.com/apk/res/android">
- <ListView android:layout_width="wrap_content"
- android:layout_height="wrap_content"
- android:id="@+id/ListView01"
- android:background="#A9A9A9"/>
- </LinearLayout>
list_proc_info.xml
- <?xml version="1.0" encoding="utf-8"?>
- <!-- <LinearLayout xmlns:android="http://schemas.android.com/apk/res/android"
- android:orientation="horizontal"
- android:layout_width="fill_parent"
- android:layout_height="wrap_content">
- <TextView android:id="@+id/ProcID"
- android:layout_width="wrap_content"
- android:layout_height="fill_parent"
- android:textSize="16dp"
- android:gravity="center_vertical"
- android:paddingLeft="10dp" />
- <TextView android:id="@+id/ProcName"
- android:layout_width="wrap_content"
- android:layout_height="fill_parent"
- android:textSize="16dp"
- android:gravity="center_vertical"
- android:paddingLeft="10dp" />
- </LinearLayout>
- -->
- <LinearLayout xmlns:android="http://schemas.android.com/apk/res/android"
- android:orientation="horizontal"
- android:layout_width="fill_parent"
- android:layout_height="fill_parent"
- >
- <ImageView android:id="@+id/Procimg"
- android:layout_width="wrap_content"
- android:layout_height="wrap_content"
- android:layout_margin="5px"
- android:src="@drawable/ic_launcher"/>
- <LinearLayout android:orientation="vertical"
- android:layout_width="wrap_content"
- android:layout_height="wrap_content">
- <TextView android:id="@+id/ProcID"
- android:layout_width="wrap_content"
- android:layout_height="wrap_content"
- android:textColor="#FFFFFFFF"
- android:textSize="40px" />
- <TextView android:id="@+id/ProcName"
- android:layout_width="wrap_content"
- android:layout_height="wrap_content"
- android:textColor="#FFFFFFFF"
- android:textSize="30px" />
- </LinearLayout>
- </LinearLayout>
最后,是配置文件:
AndroidManifest.xml
- <?xml version="1.0" encoding="utf-8"?>
- <manifest xmlns:android="http://schemas.android.com/apk/res/android"
- package="com.example.pmclient"
- android:versionCode="1"
- android:versionName="1.0" >
- <uses-sdk
- android:minSdkVersion="8"
- android:targetSdkVersion="17"
- android:sharedUserId="android.uid.system" />
- <application
- android:allowBackup="true"
- android:icon="@drawable/ic_launcher"
- android:label="@string/app_name"
- android:theme="@style/AppTheme" >
- <activity
- android:name="com.example.pmclient.PMClientActivity"
- android:label="@string/app_name" >
- <intent-filter>
- <action android:name="android.intent.action.MAIN" />
- <category android:name="android.intent.category.LAUNCHER" />
- </intent-filter>
- </activity>
- </application>
- </manifest>
关于布局文件的字段名(@XXX),这里没有给出对应的配置文件,因为太简单了!请大家自行设置。
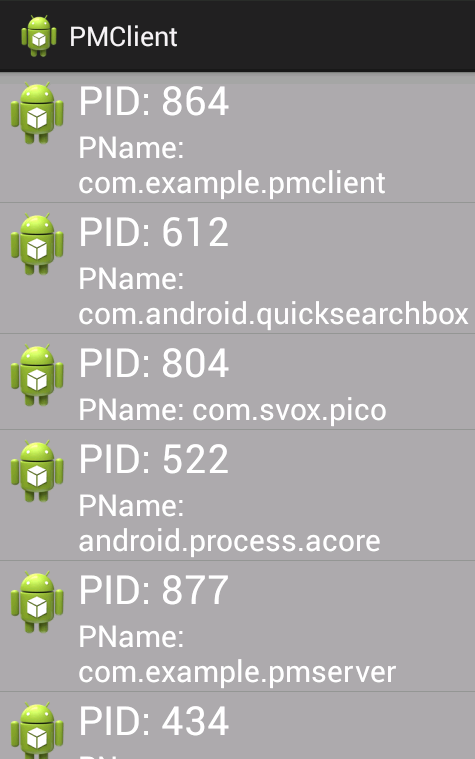
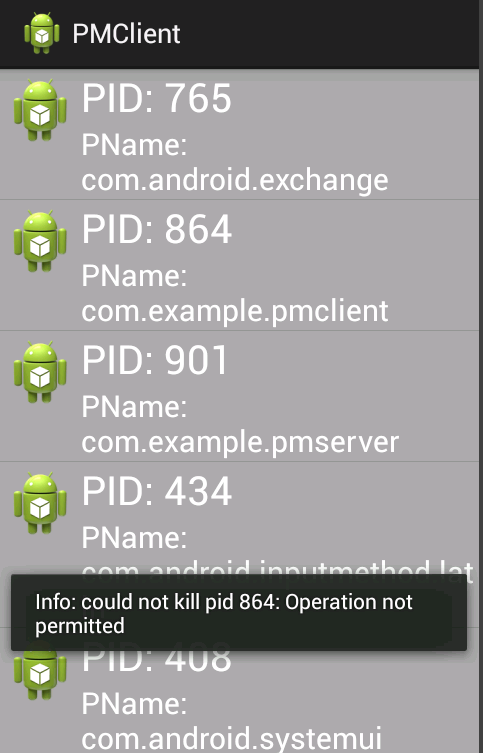
大功告成了!上效果图!
界面比较简单,单击对应的进程即可杀掉进程。这里由于Service的权限不够,导致进程不能结束。另外,杀掉进程后(可以尝试杀掉PMService自己,界面会自刷新)。


 352
352

 被折叠的 条评论
为什么被折叠?


